
User Manual
Page 3
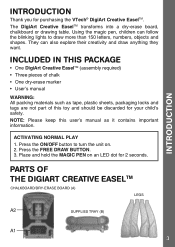
...VTech® DigiArt Creative EaselTM. Press the FREE DRAW BUTTON. 3. The DigiArt Creative EaselTM transforms into a dry-erase board, chalkboard or drawing table. ACTIVATING NORMAL PLAY 1. Parts of chalk • One dry-erase marker • User's manual WARNING: All packing materials such as it contains important information. INCLUDED IN THIS PACKAGE • One DigiArt Creative EaselTM (assembly... required) • Three pieces of the DigiArt Creative Easeltm CHALKBOARD/DRY-ERASE BOARD (A) LEGS SUPPLIES...
...VTech® DigiArt Creative EaselTM. Press the FREE DRAW BUTTON. 3. The DigiArt Creative EaselTM transforms into a dry-erase board, chalkboard or drawing table. ACTIVATING NORMAL PLAY 1. Parts of chalk • One dry-erase marker • User's manual WARNING: All packing materials such as it contains important information. INCLUDED IN THIS PACKAGE • One DigiArt Creative EaselTM (assembly... required) • Three pieces of the DigiArt Creative Easeltm CHALKBOARD/DRY-ERASE BOARD (A) LEGS SUPPLIES...
User Manual
Page 5
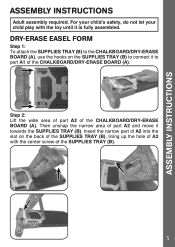
ASSEMBLY INSTRUCTIONS Assembly Instructions Adult assembly required. For your child's safety, do not let your child play with the center screw of the CHALKBOARD/DRY-ERASE BOARD (A). Step...A2 of part A2 and move it towards the SUPPLIES TRAY (B). Then unsnap the narrow area of the CHALKBOARD/DRY-ERASE BOARD (A). DRY-ERASE EASEL FORM Step 1: To attach the SUPPLIES TRAY (B) to the CHALKBOARD/DRY-ERASE BOARD (A), use the hooks on the back of the SUPPLIES TRAY... SUPPLIES TRAY (B). 5 Insert the narrow part of A2 into the slot on the SUPPLIES TRAY (B) to connect it is fully assembled.
ASSEMBLY INSTRUCTIONS Assembly Instructions Adult assembly required. For your child's safety, do not let your child play with the center screw of the CHALKBOARD/DRY-ERASE BOARD (A). Step...A2 of part A2 and move it towards the SUPPLIES TRAY (B). Then unsnap the narrow area of the CHALKBOARD/DRY-ERASE BOARD (A). DRY-ERASE EASEL FORM Step 1: To attach the SUPPLIES TRAY (B) to the CHALKBOARD/DRY-ERASE BOARD (A), use the hooks on the back of the SUPPLIES TRAY... SUPPLIES TRAY (B). 5 Insert the narrow part of A2 into the slot on the SUPPLIES TRAY (B) to connect it is fully assembled.

User Manual
Page 6
ASSEMBLY INSTRUCTIONS Step 3: Tighten the center screw by pushing it in and turning it clockwise to fix it in position. Step 4: Insert two LEGS into part A2 of the SUPPLIES TRAY (B). The LEGS will lock into the bottom of the CHALKBOARD/DRY-ERASE BOARD (A) and two LEGS into place. 6
ASSEMBLY INSTRUCTIONS Step 3: Tighten the center screw by pushing it in and turning it clockwise to fix it in position. Step 4: Insert two LEGS into part A2 of the SUPPLIES TRAY (B). The LEGS will lock into the bottom of the CHALKBOARD/DRY-ERASE BOARD (A) and two LEGS into place. 6


