User Guide
Page 1
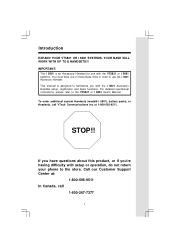
STOP!! To order additional system Handsets (model# i 5801), battery packs, or Headsets, call VTech Communications Inc at : 1-800-595-9511 In Canada, call 1-800-267-7377 1 Call our Customer Support Center at 1-800-595-9511. For detailed operational instructions, ... Units in order to use with setup or operation, do not return your phone to the store. This manual is an Accessory Handset for use the i 5801 Accessory Handset. IMPORTANT: The i 5801 is designed to the VT5831 or i 5881 User's Manual. Introduction EXPAND YOUR VT5831 OR i 5881 SYSTEMS. YOUR BASE WILL WORK WITH UP...
STOP!! To order additional system Handsets (model# i 5801), battery packs, or Headsets, call VTech Communications Inc at : 1-800-595-9511 In Canada, call 1-800-267-7377 1 Call our Customer Support Center at 1-800-595-9511. For detailed operational instructions, ... Units in order to use with setup or operation, do not return your phone to the store. This manual is an Accessory Handset for use the i 5801 Accessory Handset. IMPORTANT: The i 5801 is designed to the VT5831 or i 5881 User's Manual. Introduction EXPAND YOUR VT5831 OR i 5881 SYSTEMS. YOUR BASE WILL WORK WITH UP...
User Guide
Page 4
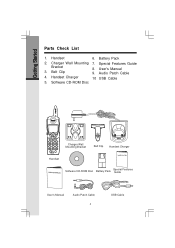
Charger Wall Mounting 7. Audio Patch Cable 4. Software CD-ROM Disc Charger Wall Mounting Bracket Belt Clip Handset Charger Handset Software CD-ROM Disc Battery Pack Special Features Guide User’s Manual Audio Patch Cable 4 USB Cable Handset 6. User's Manual 3. Handset Charger 10 USB Cable 5. Special Features Guide Bracket 8. Battery Pack 2. Belt Clip 9. Getting Started Parts Check List 1.
Charger Wall Mounting 7. Audio Patch Cable 4. Software CD-ROM Disc Charger Wall Mounting Bracket Belt Clip Handset Charger Handset Software CD-ROM Disc Battery Pack Special Features Guide User’s Manual Audio Patch Cable 4 USB Cable Handset 6. User's Manual 3. Handset Charger 10 USB Cable 5. Special Features Guide Bracket 8. Battery Pack 2. Belt Clip 9. Getting Started Parts Check List 1.
User Guide
Page 5
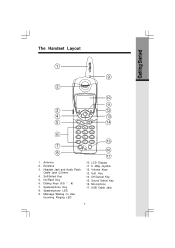
Dialing Keys (0-9, * , #) 7. Message Waiting /In Use/ Incoming Ringing LED 15 16 17 10. Off/Cancel Key 15. USB Cable Jack 5 Earpiece 3. LCD Display 11. 5 -Way Joystick 12. Headset Jack and Audio Patch Cable Jack (2.5mm) 4. Sound Select Key 16. Antenna 2. Speakerphone LED 9. Soft Key 14. On/Flash Key 6. Speakerphone Key 8. Microphone 17. Volume Keys 13. The Handset Layout Getting Started 1 9 2 10 11 3 12 4 13 5 14 6 7 8 1. Soft/Select Key 5.
Dialing Keys (0-9, * , #) 7. Message Waiting /In Use/ Incoming Ringing LED 15 16 17 10. Off/Cancel Key 15. USB Cable Jack 5 Earpiece 3. LCD Display 11. 5 -Way Joystick 12. Headset Jack and Audio Patch Cable Jack (2.5mm) 4. Sound Select Key 16. Antenna 2. Speakerphone LED 9. Soft Key 14. On/Flash Key 6. Speakerphone Key 8. Microphone 17. Volume Keys 13. The Handset Layout Getting Started 1 9 2 10 11 3 12 4 13 5 14 6 7 8 1. Soft/Select Key 5.
User Guide
Page 6
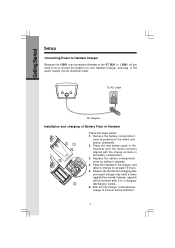
... restored after prolonged storage may yield a lower capacity than normal. Installation and charging of 8 hours will be sufficient. 6 Place the Handset in Handset Follow the steps below: 1. After the first charge, a maintenance charge of Battery Pack in the charger, and allow to charge for your.... 4. Please note that the first charging after 2 to 3 charging/ discharging cycles. 6. Getting Started Setup Connecting Power to Handset Charger Because the i 5801 is an accessory Handset to the VT 5831 or i 5881, all you need to do is choose the location for at least 12 hours. 5....
... restored after prolonged storage may yield a lower capacity than normal. Installation and charging of 8 hours will be sufficient. 6 Place the Handset in Handset Follow the steps below: 1. After the first charge, a maintenance charge of Battery Pack in the charger, and allow to charge for your.... 4. Please note that the first charging after 2 to 3 charging/ discharging cycles. 6. Getting Started Setup Connecting Power to Handset Charger Because the i 5801 is an accessory Handset to the VT 5831 or i 5881, all you need to do is choose the location for at least 12 hours. 5....
User Guide
Page 7
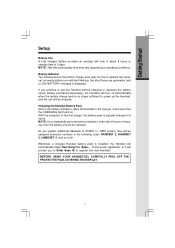
... of charging, then the battery should be assigned extension numbers in the following order: HANDSET 2, HANDSET 3, HANDSET 4, and so forth. Charging the Handset Battery Pack After a low battery indication, place the Handset in the charger, and ensure that the CHARGING light turns on operating conditions. NOTE... dropped. NOTE: Talk time and standby time may vary depending on .· With the exception of 5 days. BEFORE USING YOUR HANDSET(S), CAREFULLY PEEL OFF THE PROTECTIVE FILM, COVERING THE DISPLAY. 7 Getting Started Setup Battery Life A fully charged battery provides an average...
... of charging, then the battery should be assigned extension numbers in the following order: HANDSET 2, HANDSET 3, HANDSET 4, and so forth. Charging the Handset Battery Pack After a low battery indication, place the Handset in the charger, and ensure that the CHARGING light turns on operating conditions. NOTE... dropped. NOTE: Talk time and standby time may vary depending on .· With the exception of 5 days. BEFORE USING YOUR HANDSET(S), CAREFULLY PEEL OFF THE PROTECTIVE FILM, COVERING THE DISPLAY. 7 Getting Started Setup Battery Life A fully charged battery provides an average...
User Guide
Page 8
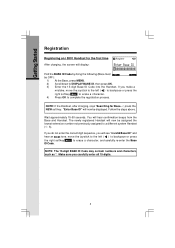
... erase a character, and carefully re-enter the Base NOTE: The 15-digit BASE ID Code may contain numbers and characters, such as *. The newly registered Handset will now be displayed. to backpace or press the right softkey ID Code. "Enter Base ID" will display: Register Find the BASE ID Code by... to erase a character. 4) Press OK to complete the registration process. Wait approximately 15-60 seconds. and hear an error tone. Getting Started Registration Registering an i 5801 Handset for Base...", press the NEW soft key. If you carefully enter all 15 digits. 8
... erase a character, and carefully re-enter the Base NOTE: The 15-digit BASE ID Code may contain numbers and characters, such as *. The newly registered Handset will now be displayed. to backpace or press the right softkey ID Code. "Enter Base ID" will display: Register Find the BASE ID Code by... to erase a character. 4) Press OK to complete the registration process. Wait approximately 15-60 seconds. and hear an error tone. Getting Started Registration Registering an i 5801 Handset for Base...", press the NEW soft key. If you carefully enter all 15 digits. 8
User Guide
Page 9
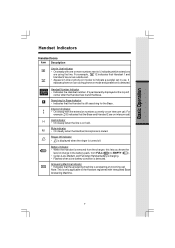
...• Appears in idle or phone on modes to indicate a parallel set is muted. For example, 02 indicates that the Handset is turned off. Ringer Off indicator • is displayed when the ringer is still searching for the Base. Battery indicator • When ...which extensions are on an intercom call Note: This is detected. Mute indicator M • On steady when the Handset microphone is detected. 1 2 3 4 5 6 Handset Number Indicator • Indicates the Handset number. H Hold indicator • On steady when the line is on mode and parallel set in the battery ...
...• Appears in idle or phone on modes to indicate a parallel set is muted. For example, 02 indicates that the Handset is turned off. Ringer Off indicator • is displayed when the ringer is still searching for the Base. Battery indicator • When ...which extensions are on an intercom call Note: This is detected. Mute indicator M • On steady when the Handset microphone is detected. 1 2 3 4 5 6 Handset Number Indicator • Indicates the Handset number. H Hold indicator • On steady when the line is on mode and parallel set in the battery ...
User Guide
Page 10
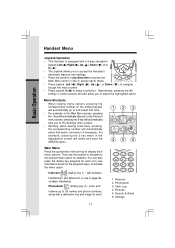
...pressing the 1 key will automatically take you to the Intercom menu screen, pressing the 6 key will automatically take you to access the Handset's advanced features and settings. • Press the joystick in any direction to access the Main Menu when in or left soft key ...display the 6 menu options. Pictures 5. Sounds & Alerts 6. talk between Handsets(s) and Base Unit, or use the joystick to navigate to the desired menu option for selection. Handset Menu Basic Operation Joystick Operation • This Handset is equipped with a distinctive ring and image for each icon (see ...
...pressing the 1 key will automatically take you to the Intercom menu screen, pressing the 6 key will automatically take you to access the Handset's advanced features and settings. • Press the joystick in any direction to access the Main Menu when in or left soft key ...display the 6 menu options. Pictures 5. Sounds & Alerts 6. talk between Handsets(s) and Base Unit, or use the joystick to navigate to the desired menu option for selection. Handset Menu Basic Operation Joystick Operation • This Handset is equipped with a distinctive ring and image for each icon (see ...
User Guide
Page 11
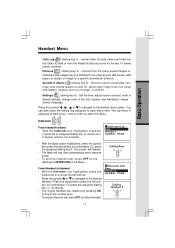
...ringer and vibrate feature on and off . Set the time; reset to the desired menu option. change color of -range) on the Base. From Handset to Handset • With the Intercom icon highlighted, press the joystick in or assigned dialing key to reveal your idle screen (wall paper) or assign an image...: • The Base will ring, then automatically enter intercom mode. • To end the intercom call , press OFF on down the menu. register new Handsets; The top menu is assigned to Base • With the Intercom icon highlighted, press the joystick in or or press the left soft key for...
...ringer and vibrate feature on and off . Set the time; reset to the desired menu option. change color of -range) on the Base. From Handset to Handset • With the Intercom icon highlighted, press the joystick in or assigned dialing key to reveal your idle screen (wall paper) or assign an image...: • The Base will ring, then automatically enter intercom mode. • To end the intercom call , press OFF on down the menu. register new Handsets; The top menu is assigned to Base • With the Intercom icon highlighted, press the joystick in or or press the left soft key for...
User Guide
Page 12
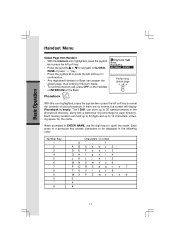
...each directory. Each memory location can hold up to 32 digits and up to 16 characters, including space, for confirmation. • Any registered Handset or Base can store up to 50 names/numbers in or press the left soft key to reveal the contents of a particular key causes ...press the left soft key for the name. The i 5801 can answer the global page, thus entering Intercom mode. • To end the intercom call, press OFF on the Handset or INTERCOM on the Base. Basic Operation Handset Menu Global Page from Handset • With the Intercom icon highlighted, press the joystick...
...each directory. Each memory location can hold up to 32 digits and up to 16 characters, including space, for confirmation. • Any registered Handset or Base can store up to 50 names/numbers in or press the left soft key to reveal the contents of a particular key causes ...press the left soft key for the name. The i 5801 can answer the global page, thus entering Intercom mode. • To end the intercom call, press OFF on the Handset or INTERCOM on the Base. Basic Operation Handset Menu Global Page from Handset • With the Intercom icon highlighted, press the joystick...
User Guide
Page 13
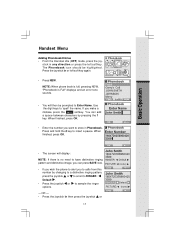
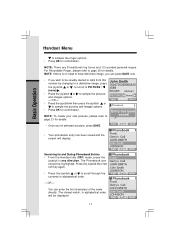
... full, pressing NEW, "Phonebook is no need to have distinctive ringing pattern and distinctive image, you want to Enter Name. Basic Operation Handset Menu Adding Phonebook Entries • From the Handset idle (OFF) mode, press the joy- stick in Phonebook. You can press SAVE now. • If you wish the phone to...
... full, pressing NEW, "Phonebook is no need to have distinctive ringing pattern and distinctive image, you want to Enter Name. Basic Operation Handset Menu Adding Phonebook Entries • From the Handset idle (OFF) mode, press the joy- stick in Phonebook. You can press SAVE now. • If you wish the phone to...
User Guide
Page 14
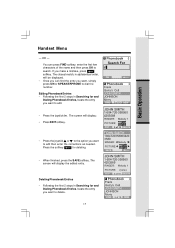
...the contents in then press the joystick or to have distinctive image, you can enter the first characters of the name directly. Basic Operation Handset Menu to page 20 for details. For Recordable Ringer, please refer to sample the ringer options. • Press OK for confirmation. NOTE:... To create your own pictures, please refer to page 21 for and Dialing Phonebook Entries • From the Handset idle (OFF) mode, press the joystick in any direction. The closest match, in alphabetical order, will display: Searching for details. • Once ...
...the contents in then press the joystick or to have distinctive image, you can enter the first characters of the name directly. Basic Operation Handset Menu to page 20 for details. For Recordable Ringer, please refer to sample the ringer options. • Press OK for confirmation. NOTE:... To create your own pictures, please refer to page 21 for and Dialing Phonebook Entries • From the Handset idle (OFF) mode, press the joystick in any direction. The closest match, in alphabetical order, will display: Searching for details. • Once ...
User Guide
Page 15
... For J OK Editing Phonebook Entries • Following the first 2 steps in Searching for and Dialing Phonebook Entries, locate the entry you make a mistake, press softkey. Handset Menu Basic Operation - Deleting Phonebook Entries 3 of 10 JOHN SMITH 1-604-720-358960 4203589 RINGER: Melody 1 PICTURE: EDIT 3 of 10 DELETE JOHN SMITH 1604720358960420 3589...
... For J OK Editing Phonebook Entries • Following the first 2 steps in Searching for and Dialing Phonebook Entries, locate the entry you make a mistake, press softkey. Handset Menu Basic Operation - Deleting Phonebook Entries 3 of 10 JOHN SMITH 1-604-720-358960 4203589 RINGER: Melody 1 PICTURE: EDIT 3 of 10 DELETE JOHN SMITH 1604720358960420 3589...
User Guide
Page 16
Basic Operation Handset Menu • Press the joystick in or press the left soft key to scroll through the 50 current Caller ID and Call Waiting records received. ...
Basic Operation Handset Menu • Press the joystick in or press the left soft key to scroll through the 50 current Caller ID and Call Waiting records received. ...
User Guide
Page 17
...key 5, preset to factory-preset settings. this option allows you sure? Your color choices are 4 options can be asked Are you to return the Handset to English) - For confirmation, press the joystick in or left soft key to the Enter Base ID screen. Choosing YES clears all phone numbers ...stored in redial memory.You will allow you to the icon. this options will be displayed on the bottom of the Handset screen. this feature will be reset: Clear My Clips Clear My Pictures Clear Phonebook Default Settings Choose the desired option that is assigned to...
...key 5, preset to factory-preset settings. this option allows you sure? Your color choices are 4 options can be asked Are you to return the Handset to English) - For confirmation, press the joystick in or left soft key to the Enter Base ID screen. Choosing YES clears all phone numbers ...stored in redial memory.You will allow you to the icon. this options will be displayed on the bottom of the Handset screen. this feature will be reset: Clear My Clips Clear My Pictures Clear Phonebook Default Settings Choose the desired option that is assigned to...
User Guide
Page 18
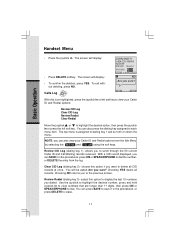
...press the dialing key that is preset with the following number of 8 traditional ringers, and 12 musical ringers to choose from. Pictures Your i 5801 is assigned to the icon. this option allows you to turn the Low Battery Tone On/Off Sound Clips(dialing key 1)- this option allows you...option and to make the change the Ringer Volume, turn the Ringer On/Off and control the Vibrating Ringer. Handset Menu Sounds& Alerts Basic Operation With this icon highlighted, press the joystick in handset) You have the ability to assign one of images: My Pictures - 10 images Images - 9 images ...
...press the dialing key that is preset with the following number of 8 traditional ringers, and 12 musical ringers to choose from. Pictures Your i 5801 is assigned to the icon. this option allows you to turn the Low Battery Tone On/Off Sound Clips(dialing key 1)- this option allows you...option and to make the change the Ringer Volume, turn the Ringer On/Off and control the Vibrating Ringer. Handset Menu Sounds& Alerts Basic Operation With this icon highlighted, press the joystick in handset) You have the ability to assign one of images: My Pictures - 10 images Images - 9 images ...

User Guide
Page 19
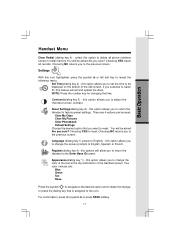
...) or assign a specific image to clear the wallpaper. 19 Then choose an image in one of inactivity, your Handset, see the Picture Download section in the main menu. You will go into your Handset will receive a message on the screen confirming "Wallpaper Set!" While in the available 50 directories. To illuminate the... or Emotions) menu options. Then press the joystick in the main menu. and an audio confirmation. Clear a Wallpaper image To set the image as your handset will display a digital clock.
...) or assign a specific image to clear the wallpaper. 19 Then choose an image in one of inactivity, your Handset, see the Picture Download section in the main menu. You will go into your Handset will receive a message on the screen confirming "Wallpaper Set!" While in the available 50 directories. To illuminate the... or Emotions) menu options. Then press the joystick in the main menu. and an audio confirmation. Clear a Wallpaper image To set the image as your handset will display a digital clock.
User Guide
Page 20
.... You can 't replace them are using the provided Audio Patch Cord (not the USB cord), or simply use the Handset microphone. When you hear what preset in the Handset on the side of the i 5801 Handset. • You can replace the other 6 preset ringers with many musical (i.e. Three of them . If you have the...
.... You can 't replace them are using the provided Audio Patch Cord (not the USB cord), or simply use the Handset microphone. When you hear what preset in the Handset on the side of the i 5801 Handset. • You can replace the other 6 preset ringers with many musical (i.e. Three of them . If you have the...

User Guide
Page 21
...to send the converted image directly into your computer: ONE-TIME SOFTWARE INSTALLATION 1. You'll start by downloading the software into the Handset. Browse the installation CD c. After the installation process is stored, and open icon, Then the pictures in the accompanied CD-ROM... displayed in the software, use as your selected image. Once you three options: a. Install/Uninstall the Vtech i 5801 Image Editor b. Or navigate to edit your personal computer. 2. Visit Vtech on the web To install the software, click on your image. Once you can be found automatically....
...to send the converted image directly into your computer: ONE-TIME SOFTWARE INSTALLATION 1. You'll start by downloading the software into the Handset. Browse the installation CD c. After the installation process is stored, and open icon, Then the pictures in the accompanied CD-ROM... displayed in the software, use as your selected image. Once you three options: a. Install/Uninstall the Vtech i 5801 Image Editor b. Or navigate to edit your personal computer. 2. Visit Vtech on the web To install the software, click on your image. Once you can be found automatically....
User Guide
Page 22
...Download -Adjust Brightness and Contrast -Adjust Color • Before downloading your image, make sure that the provided USB cord is correctly installed into the Handset. You can record 14 images in My Pictures in this directory. NOTE: Do not leave the USB cord connected to have the option to either... accompanying CD-ROM. You can delete the preset images in total. 22 You have a total of time. NOTE: All preset images in your Handset and it will drain battery. After you will be saved in My Pictures can be found on your My Pictures directory. Additional image samples can...
...Download -Adjust Brightness and Contrast -Adjust Color • Before downloading your image, make sure that the provided USB cord is correctly installed into the Handset. You can record 14 images in My Pictures in this directory. NOTE: Do not leave the USB cord connected to have the option to either... accompanying CD-ROM. You can delete the preset images in total. 22 You have a total of time. NOTE: All preset images in your Handset and it will drain battery. After you will be saved in My Pictures can be found on your My Pictures directory. Additional image samples can...


