XVTHP200 Quick Start Guide
Page 1
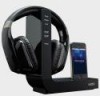
QUICK START GUIDE ACTIVE NOISE CANCELLING HIGH DEFINITION HEADPHONES WITH WIRELESS DOCK FOR iPod® XVTHP200 -
QUICK START GUIDE ACTIVE NOISE CANCELLING HIGH DEFINITION HEADPHONES WITH WIRELESS DOCK FOR iPod® XVTHP200 -
XVTHP200 Quick Start Guide
Page 3
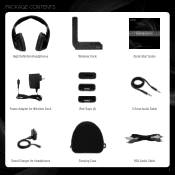
PACKAGE CONTENTS High Definition Headphones Wireless Dock Quick Start Guide Power Adapter for Wireless Dock iPod Trays (3) 3.5mm Audio Cable Travel Charger for Headphones Carrying Case RCA Audio Cable 1
PACKAGE CONTENTS High Definition Headphones Wireless Dock Quick Start Guide Power Adapter for Wireless Dock iPod Trays (3) 3.5mm Audio Cable Travel Charger for Headphones Carrying Case RCA Audio Cable 1
XVTHP200 Quick Start Guide
Page 4
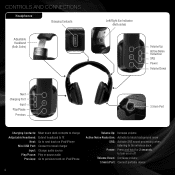
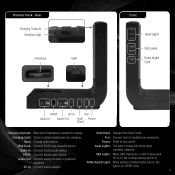
CONTROLS AND CONNECTIONS Headphones Charging Contacts Adjustable Headband (Both Sides) Left/Right Ear Indicator (Both sides) Volume Up Active Noise Reduction SRS Power Volume Down Next Charging Port Input ... track on iPod/iPhone Volume Up: Increase volume Active Noise Reduction: Activate to block background noise SRS: Activate SRS sound processing when listening to the wireless dock Power: Press and hold for 2 seconds to turn on or off Volume Down: Decrease volume 3.5mm Port: Connect portable device 2
CONTROLS AND CONNECTIONS Headphones Charging Contacts Adjustable Headband (Both Sides) Left/Right Ear Indicator (Both sides) Volume Up Active Noise Reduction SRS Power Volume Down Next Charging Port Input ... track on iPod/iPhone Volume Up: Increase volume Active Noise Reduction: Activate to block background noise SRS: Activate SRS sound processing when listening to the wireless dock Power: Press and hold for 2 seconds to turn on or off Volume Down: Decrease volume 3.5mm Port: Connect portable device 2
XVTHP200 Quick Start Guide
Page 5
... SPDIF DC In Pair Audio In Audio Out Hub/ Power Client Charging Contacts: Must touch headphone contacts to charge Hub/Client: Change Hub/Client mode Charging Light: Turns on when headphones are charging Pair: Connect dock to headphones wirelessly Input: Change audio source Power: Press to turn on/off iPod Dock: Connect iPod to... or SRS TruSurround HD is on, the corresponding light is on Dolby Digital Light: When playing a Dolby Digital source, the light is on (SPDIF only) 3 Wireless Dock -
... SPDIF DC In Pair Audio In Audio Out Hub/ Power Client Charging Contacts: Must touch headphone contacts to charge Hub/Client: Change Hub/Client mode Charging Light: Turns on when headphones are charging Pair: Connect dock to headphones wirelessly Input: Change audio source Power: Press to turn on/off iPod Dock: Connect iPod to... or SRS TruSurround HD is on, the corresponding light is on Dolby Digital Light: When playing a Dolby Digital source, the light is on (SPDIF only) 3 Wireless Dock -
XVTHP200 Quick Start Guide
Page 6
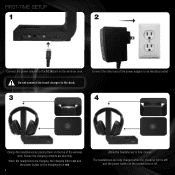
... charging, the charging light is on and the power button on the wireless dock. The headphones are touching. Do not connect the travel charger to fully charge. Connect the other end of the wireless dock. Ensure the charging contacts are fully charged when the charging light is off and ...the power button on the headphones is red. 4 Allow the headphones to the dock. 3 4 Charge the headphones by placing them on the top of the power ...
... charging, the charging light is on and the power button on the wireless dock. The headphones are touching. Do not connect the travel charger to fully charge. Connect the other end of the wireless dock. Ensure the charging contacts are fully charged when the charging light is off and ...the power button on the headphones is red. 4 Allow the headphones to the dock. 3 4 Charge the headphones by placing them on the top of the power ...
XVTHP200 Quick Start Guide
Page 7
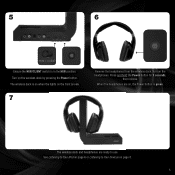
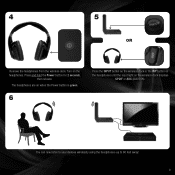
5 6 Ensure the HUB/CLIENT switch is on when the lights on the front are on. 7 Remove the headphones from the wireless dock. When the headphones are ready to Your Devices on the headphones. Turn on page 8. 5 Press and hold the Power button for 2 seconds, then release. The wireless dock and headphones are on the wireless dock by pressing the Power button. The wireless dock is in the HUB position. See Listening to Your iPod on page 6 or Listening to use. Turn on , the Power button is green.
5 6 Ensure the HUB/CLIENT switch is on when the lights on the front are on. 7 Remove the headphones from the wireless dock. When the headphones are ready to Your Devices on the headphones. Turn on page 8. 5 Press and hold the Power button for 2 seconds, then release. The wireless dock and headphones are on the wireless dock by pressing the Power button. The wireless dock is in the HUB position. See Listening to Your iPod on page 6 or Listening to use. Turn on , the Power button is green.

XVTHP200 Quick Start Guide
Page 8
...for 2 seconds, then release. Trays can be removed by pressing the Power button. The headphones are on when the Power button is on when the front lights are on the wireless dock by lifting from the wireless dock. Turn on page 4. Press and hold the Power button for : • ...8GB and 16GB only) Complete First-Time Setup on the headphones. The wireless dock is green. Locate the tray that fits your iPod/iPhone in the wireless dock. Ensure your iPod/iPhone is inserted completely. 4 Turn on . 6 Remove the headphones from the fingernail slot. 3 Place your iPod/iPhone, then...
...for 2 seconds, then release. Trays can be removed by pressing the Power button. The headphones are on when the Power button is on when the front lights are on the wireless dock by lifting from the wireless dock. Turn on page 4. Press and hold the Power button for : • ...8GB and 16GB only) Complete First-Time Setup on the headphones. The wireless dock is green. Locate the tray that fits your iPod/iPhone in the wireless dock. Ensure your iPod/iPhone is inserted completely. 4 Turn on . 6 Remove the headphones from the fingernail slot. 3 Place your iPod/iPhone, then...
XVTHP200 Quick Start Guide
Page 9
... Play/Pause Press the INPUT button on the wireless dock or the INP button on the headphones until the input light on your iPod/iPhone. To play or pause your iPod/iPhone. To play the previous track, press the Previous button on the headphones. To play the next track, press the ...You can also use the controls on the headphones. Volume Down To increase or decrease the volume, press the Volume Up or Volume Down buttons on your music, press the Play/Pause button on the headphones. 7 8 Next Volume Up Previous You can also use the controls on the wireless dock displays iPod.
... Play/Pause Press the INPUT button on the wireless dock or the INP button on the headphones until the input light on your iPod/iPhone. To play or pause your iPod/iPhone. To play the previous track, press the Previous button on the headphones. To play the next track, press the ...You can also use the controls on the headphones. Volume Down To increase or decrease the volume, press the Volume Up or Volume Down buttons on your music, press the Play/Pause button on the headphones. 7 8 Next Volume Up Previous You can also use the controls on the wireless dock displays iPod.
XVTHP200 Quick Start Guide
Page 11
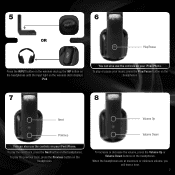
4 5 OR Remove the headphones from the wireless dock. Turn on the wireless dock displays SPDIF or AUX (AUDIO IN). The headphones are on when the Power button is green. 6 Press the INPUT button on the wireless dock or the INP button on the headphones until the input light on the headphones. Press and hold the Power button for 2 seconds, then release. You can now listen to your devices wirelessly using the headphones-up to 60 feet away! 9
4 5 OR Remove the headphones from the wireless dock. Turn on the wireless dock displays SPDIF or AUX (AUDIO IN). The headphones are on when the Power button is green. 6 Press the INPUT button on the wireless dock or the INP button on the headphones until the input light on the headphones. Press and hold the Power button for 2 seconds, then release. You can now listen to your devices wirelessly using the headphones-up to 60 feet away! 9
XVTHP200 Quick Start Guide
Page 16
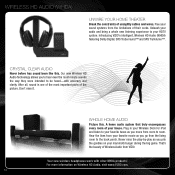
... new listening experience to hear even the most important parts of their cords. Our new Wireless HD Audio Technology allows you pile the goodies on Wireless HD Audio, visit www.VIZIO.com. 14 Never miss the play-by-play as you to your sound systems from ...VIZIO's intelligent, Wireless HD Audio (WHDA) featuring Dolby Digital, SRS TruSurround™ and SRS TruVolume™. After all, sound is one of your favorite tunes as you move from room to be heard-with other WHDA products! Plug in your Wireless Dock for iPod and listen to the back porch. Your new wireless headphones...
... new listening experience to hear even the most important parts of their cords. Our new Wireless HD Audio Technology allows you pile the goodies on Wireless HD Audio, visit www.VIZIO.com. 14 Never miss the play-by-play as you to your sound systems from ...VIZIO's intelligent, Wireless HD Audio (WHDA) featuring Dolby Digital, SRS TruSurround™ and SRS TruVolume™. After all, sound is one of your favorite tunes as you move from room to be heard-with other WHDA products! Plug in your Wireless Dock for iPod and listen to the back porch. Your new wireless headphones...
XVTHP200 Quick Start Guide
Page 17
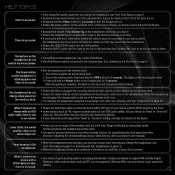
...See Listening to which you will hear a beep. Turn on page 6. See Traveling with Your Headphones on the rear of the wireless dock matches the input to the iPod Dock on the wireless dock. Other audio formats, such as TVs, support variable audio out over RCA audio cables.... the RCA audio cable is securely connected to listen. Turn off the headphones and wireless dock. 2. Ensure the lights on the front of the wireless dock (up to turn the headphones on. • Ensure the power adapter for the wireless dock, not the travel charger and cable. When I connect my device...
...See Listening to which you will hear a beep. Turn on page 6. See Traveling with Your Headphones on the rear of the wireless dock matches the input to the iPod Dock on the wireless dock. Other audio formats, such as TVs, support variable audio out over RCA audio cables.... the RCA audio cable is securely connected to listen. Turn off the headphones and wireless dock. 2. Ensure the lights on the front of the wireless dock (up to turn the headphones on. • Ensure the power adapter for the wireless dock, not the travel charger and cable. When I connect my device...

XVTHP200 Quick Start Guide
Page 18
...symptoms or believe you may damage it. Such chemicals may have your ears, or muffled speech. If a Product covered by this product. VIZIO SHALL NOT BE RESPONSIBLE FOR LOSS OF USE, LOSS OF INFORMATION OR DATA, COMMERCIAL LOSS, LOST REVENUE OR LOST PROFITS, OR OTHER ... one -year limited warranty only covers defects in the ears). Products with a clean, dry, soft cloth. 16 To clean the wireless dock or headphones, gently wipe them with unreadable or removed serial numbers, or requiring routine maintenance are exposed to permanent noise induced hearing loss by an...
...symptoms or believe you may damage it. Such chemicals may have your ears, or muffled speech. If a Product covered by this product. VIZIO SHALL NOT BE RESPONSIBLE FOR LOSS OF USE, LOSS OF INFORMATION OR DATA, COMMERCIAL LOSS, LOST REVENUE OR LOST PROFITS, OR OTHER ... one -year limited warranty only covers defects in the ears). Products with a clean, dry, soft cloth. 16 To clean the wireless dock or headphones, gently wipe them with unreadable or removed serial numbers, or requiring routine maintenance are exposed to permanent noise induced hearing loss by an...

XVTHP200 Quick Start Guide
Page 19
...warranty period, please contact our Support Department at 1KHz SPL: 110 dB SPL per 1mW Battery Power: Battery - 940mAH Voltage: Adapter - 100V~240V Dimensions: Headphones - 7.38" x 7.33" x 2.88" (187.55 x 186.11 x 73.13mm) Dock - 8.64" x 7.82" x 3.58" (...personnel can radiate radio frequency energy, and if not installed and used in a particular installation. Please have your VIZIO model number, serial number, and date of purchase available before your body. However, there is subject to ...any , must accept any interference, including interference that may affect wireless performance.
...warranty period, please contact our Support Department at 1KHz SPL: 110 dB SPL per 1mW Battery Power: Battery - 940mAH Voltage: Adapter - 100V~240V Dimensions: Headphones - 7.38" x 7.33" x 2.88" (187.55 x 186.11 x 73.13mm) Dock - 8.64" x 7.82" x 3.58" (...personnel can radiate radio frequency energy, and if not installed and used in a particular installation. Please have your VIZIO model number, serial number, and date of purchase available before your body. However, there is subject to ...any , must accept any interference, including interference that may affect wireless performance.


