

Quickstart Guide (English)
Page 2
The wide blade or the third prong are provided for your Unit yourself. • Avoid using dropped or damaged appliances. Do not place your Unit in a bookcase or cabinet unless proper ventilation is always flowing into your Unit enclosure. Doing so could short circuit parts causing a fire or electric shock. Never spill liquids on your Unit. • When connected to a power outlet, power is provided. • Never push any container filled with heavy dust or high humidity may damage the wires inside the cord and cause fire or electric shock. Do not try to repair your safety....
The wide blade or the third prong are provided for your Unit yourself. • Avoid using dropped or damaged appliances. Do not place your Unit in a bookcase or cabinet unless proper ventilation is always flowing into your Unit enclosure. Doing so could short circuit parts causing a fire or electric shock. Never spill liquids on your Unit. • When connected to a power outlet, power is provided. • Never push any container filled with heavy dust or high humidity may damage the wires inside the cord and cause fire or electric shock. Do not try to repair your safety....
Quickstart Guide (English)
Page 3
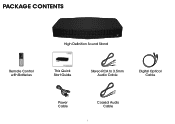
PACKAGE CONTENTS High Definition Sound Stand Remote Control with Batteries This Quick Start Guide Stereo RCA to 3.5mm Audio Cable Digital Optical Cable Power Cable Coaxial Audio Cable 1
PACKAGE CONTENTS High Definition Sound Stand Remote Control with Batteries This Quick Start Guide Stereo RCA to 3.5mm Audio Cable Digital Optical Cable Power Cable Coaxial Audio Cable 1
Quickstart Guide (English)
Page 4
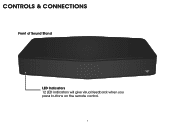
CONTROLS & CONNECTIONS Front of Sound Stand LED Indicators 12 LED indicators will give visual feedback when you press buttons on the remote control. 2
CONTROLS & CONNECTIONS Front of Sound Stand LED Indicators 12 LED indicators will give visual feedback when you press buttons on the remote control. 2
Quickstart Guide (English)
Page 5
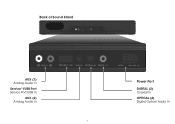
Back of Sound Stand 120V~/60Hz 60W AUX (1) Analog Audio In Service*/USB Port Service Port/USB In AUX (2) Analog Audio In 120V~/60Hz 60W Power Port DIGITAL (3) Coaxial In OPTICAL (4) Digital Optical Audio In 3
Back of Sound Stand 120V~/60Hz 60W AUX (1) Analog Audio In Service*/USB Port Service Port/USB In AUX (2) Analog Audio In 120V~/60Hz 60W Power Port DIGITAL (3) Coaxial In OPTICAL (4) Digital Optical Audio In 3
Quickstart Guide (English)
Page 6
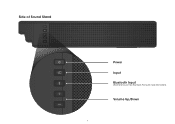
Side of Sound Stand Power Input Bluetooth Input (Hold to force pair, See Bluetooth Pairing for more information) Volume Up/Down 4
Side of Sound Stand Power Input Bluetooth Input (Hold to force pair, See Bluetooth Pairing for more information) Volume Up/Down 4
Quickstart Guide (English)
Page 7
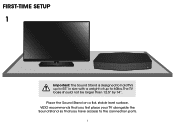
FIRST-TIME SETUP 1 Important: The Sound Stand is designed to hold TVs up to 55" in size with a weight of up to the connection ports. 5 Place the Sound Stand on a flat, stable level surface. VIZIO recommends that you first place your TV alongside the Sound Stand so that you have access to 60lbs. The TV base should not be larger than 12.5" by 14".
FIRST-TIME SETUP 1 Important: The Sound Stand is designed to hold TVs up to 55" in size with a weight of up to the connection ports. 5 Place the Sound Stand on a flat, stable level surface. VIZIO recommends that you first place your TV alongside the Sound Stand so that you have access to 60lbs. The TV base should not be larger than 12.5" by 14".
Quickstart Guide (English)
Page 8
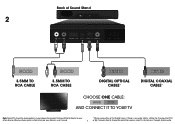
2 Back of Sound Stand 120V~/60Hz 60W 120V~/60Hz 60W GOOD 3.5MM TO RCA CABLE GOOD 3.5MM TO RCA CABLE BETTER DIGITAL OPTICAL CABLE* BETTER DIGITAL COAXIAL CABLE* CHOOSE ONE CABLE: GOOD BETTER AND CONNECT IT TO YOUR TV Note: Not all TVs have the audio outputs shown above.To connect the Sound Stand directly to your * When using either of the Digital Inputs, if there is no audio: (A) try setting the TV output to PCM other devices (Blu-ray player, game system, etc) see your device's user manual. 6 or (B) Connect directly to your Blu-ray/other source, some TVs do not pass through ...
2 Back of Sound Stand 120V~/60Hz 60W 120V~/60Hz 60W GOOD 3.5MM TO RCA CABLE GOOD 3.5MM TO RCA CABLE BETTER DIGITAL OPTICAL CABLE* BETTER DIGITAL COAXIAL CABLE* CHOOSE ONE CABLE: GOOD BETTER AND CONNECT IT TO YOUR TV Note: Not all TVs have the audio outputs shown above.To connect the Sound Stand directly to your * When using either of the Digital Inputs, if there is no audio: (A) try setting the TV output to PCM other devices (Blu-ray player, game system, etc) see your device's user manual. 6 or (B) Connect directly to your Blu-ray/other source, some TVs do not pass through ...
Quickstart Guide (English)
Page 9
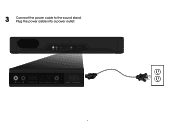
Plug the power cable into a power outlet. 120V~/60Hz 60W 120V~/60Hz 60W 7 3 Connect the power cable to the sound stand.
Plug the power cable into a power outlet. 120V~/60Hz 60W 120V~/60Hz 60W 7 3 Connect the power cable to the sound stand.
Quickstart Guide (English)
Page 10
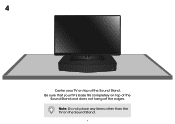
4 Center your TV's base fits completely on top of the Sound Stand. Note: Do not place any items other than the TV on top of the Sound Stand and does not hang off the edges. Be sure that your TV on the Sound Stand. 8
4 Center your TV's base fits completely on top of the Sound Stand. Note: Do not place any items other than the TV on top of the Sound Stand and does not hang off the edges. Be sure that your TV on the Sound Stand. 8

Quickstart Guide (English)
Page 11
Insert the included batteries and gently slide the battery cover back into place. 9 5 Top 6 Top Remove the battery cover by gently sliding it away from the remote.
Insert the included batteries and gently slide the battery cover back into place. 9 5 Top 6 Top Remove the battery cover by gently sliding it away from the remote.
Quickstart Guide (English)
Page 12
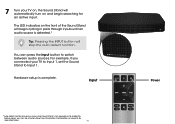
7 Turn your TV to Input 1, set the Sound Stand to switch between audio sources. The LED indicators on and begin cycling in pairs through inputs until an audio source is detected.* Tip: Pressing the INPUT button will begin searching for more information. 10 Power For example, if you must do a Factory Reset. To enable this feature again, you connected your TV on, the Sound Stand will automatically turn on the front of the Sound Stand will stop the auto detect function. You can press the Input button to Input 1. Hardware setup is first powered on page 16 for an ...
7 Turn your TV to Input 1, set the Sound Stand to switch between audio sources. The LED indicators on and begin cycling in pairs through inputs until an audio source is detected.* Tip: Pressing the INPUT button will begin searching for more information. 10 Power For example, if you must do a Factory Reset. To enable this feature again, you connected your TV on, the Sound Stand will automatically turn on the front of the Sound Stand will stop the auto detect function. You can press the Input button to Input 1. Hardware setup is first powered on page 16 for an ...
Quickstart Guide (English)
Page 13
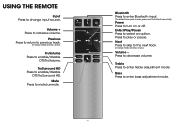
Mute Press to play or pause. Press to mute/unmute. Bass Press to increase volume. Volume + Press to enter bass adjustment mode. 11 Press to change input source. USING THE REMOTE Input Press to decrease volume. Next Press to skip to turn on or off. Bluetooth Press to enter Bluetooth input. (To enter force pair mode, press and hold for 5 seconds) Power Press to the next track. (Changes Treble and Bass levels) Volume - Enter/Play/Pause Press to enter treble adjustment mode. Treble Press to select an option. TruSurround HD Press to enable/disable DTS TruVolume. ...
Mute Press to play or pause. Press to mute/unmute. Bass Press to increase volume. Volume + Press to enter bass adjustment mode. 11 Press to change input source. USING THE REMOTE Input Press to decrease volume. Next Press to skip to turn on or off. Bluetooth Press to enter Bluetooth input. (To enter force pair mode, press and hold for 5 seconds) Power Press to the next track. (Changes Treble and Bass levels) Volume - Enter/Play/Pause Press to enter treble adjustment mode. Treble Press to select an option. TruSurround HD Press to enable/disable DTS TruVolume. ...

Quickstart Guide (English)
Page 14
... Behavior Analog Audio In - When a Dolby Digital signal is only available on the remote control. The Sound Stand will be discoverable for the Sound Stand (VIZIO S2121w) using your Bluetooth device into pairing mode prior to cycle through each available input: • Analog Audio In - AUX (1) Analog Audio In - AUX (1) • Analog...
... Behavior Analog Audio In - When a Dolby Digital signal is only available on the remote control. The Sound Stand will be discoverable for the Sound Stand (VIZIO S2121w) using your Bluetooth device into pairing mode prior to cycle through each available input: • Analog Audio In - AUX (1) Analog Audio In - AUX (1) • Analog...
Quickstart Guide (English)
Page 15
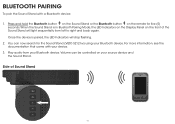
... will stop flashing. 2. Once the device is in Bluetooth Pairing Mode, the LED Indicators on the Display Panel on the remote for the Sound Stand (VIZIO S2121w) using your device. 3. Volume can now search for five (5) seconds. BLUETOOTH PAIRING To pair the Sound Stand with your Bluetooth device. Press and hold the...
... will stop flashing. 2. Once the device is in Bluetooth Pairing Mode, the LED Indicators on the Display Panel on the remote for the Sound Stand (VIZIO S2121w) using your device. 3. Volume can now search for five (5) seconds. BLUETOOTH PAIRING To pair the Sound Stand with your Bluetooth device. Press and hold the...
Quickstart Guide (English)
Page 16
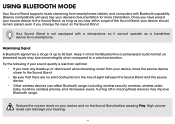
Try the following if your sound quality is a compressed audio format, so streamed music may improve Bluetooth range. Reduce the volume levels on your device's documentation for a smartphone. Keep in mind that there are no solid obstructions in the line-of the Sound Stand, your device should remain paired, even if you hear any break-up or disconnect while streaming music from smartphones, tablets, and computers with a microphone, so it cannot operate as you stay within range of -sight between the Sound Stand and the source device. • Other wireless devices can damage ...
Try the following if your sound quality is a compressed audio format, so streamed music may improve Bluetooth range. Reduce the volume levels on your device's documentation for a smartphone. Keep in mind that there are no solid obstructions in the line-of the Sound Stand, your device should remain paired, even if you hear any break-up or disconnect while streaming music from smartphones, tablets, and computers with a microphone, so it cannot operate as you stay within range of -sight between the Sound Stand and the source device. • Other wireless devices can damage ...
Quickstart Guide (English)
Page 17
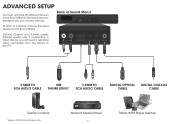
ADVANCED SETUP Connect up to five (5) different devices to the Sound Stand (devices shown are examples you will need a separate video connection from the device to a device, change the input source on the Sound Stand. Back of Sound Stand 120V~/60Hz 60W To listen to your TV. 120V~/60Hz 60W 3.5MM TO RCA AUDIO CABLE USB THUMB DRIVE* 3.5MM TO RCA AUDIO CABLE DIGITAL OPTICAL CABLE DIGITAL COAXIAL CABLE Game Console *Supports .WAV file format playback only. Optical, Coaxial, and 3.5mm cables transmit audio only. Network Media Player 15 Tablet/MP3 Player/Laptop If connecting a video ...
ADVANCED SETUP Connect up to five (5) different devices to the Sound Stand (devices shown are examples you will need a separate video connection from the device to a device, change the input source on the Sound Stand. Back of Sound Stand 120V~/60Hz 60W To listen to your TV. 120V~/60Hz 60W 3.5MM TO RCA AUDIO CABLE USB THUMB DRIVE* 3.5MM TO RCA AUDIO CABLE DIGITAL OPTICAL CABLE DIGITAL COAXIAL CABLE Game Console *Supports .WAV file format playback only. Optical, Coaxial, and 3.5mm cables transmit audio only. Network Media Player 15 Tablet/MP3 Player/Laptop If connecting a video ...
Quickstart Guide (English)
Page 18
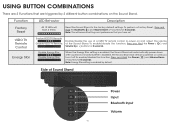
... Remote Control Energy Star All 12 LEDs will remain powered on until you have set. Side of a VIZIO TV remote control to the factory default settings.To perform a Factory Reset, Press and Hold the Bluetooth( ) and Volume Down (-) buttons for 5 seconds. To... all settings and preferences that are triggered by default. Note: This will automatically power down after a period of the Sound Stand. Enable VIZIO TV Remote: Disable VIZIO TV Remote: Enable/disable the use of Sound Stand Power Input Bluetooth Input Volume 16 USING BUTTON COMBINATIONS There are 3 Functions that you ...
... Remote Control Energy Star All 12 LEDs will remain powered on until you have set. Side of a VIZIO TV remote control to the factory default settings.To perform a Factory Reset, Press and Hold the Bluetooth( ) and Volume Down (-) buttons for 5 seconds. To... all settings and preferences that are triggered by default. Note: This will automatically power down after a period of the Sound Stand. Enable VIZIO TV Remote: Disable VIZIO TV Remote: Enable/disable the use of Sound Stand Power Input Bluetooth Input Volume 16 USING BUTTON COMBINATIONS There are 3 Functions that you ...

Quickstart Guide (English)
Page 19
The VIZIO LED HDTV is shattering the mold in a way only VIZIO can, with high-quality design and picture at www.VIZIO.com This Product Sold Separately Available at the best value. VIZIO RECOMMENDS Introducing the new E-series slim frame design. With a stunningly slim outer frame design - and LED backlight for rich colors and vivid details, this HDTV gives you the best picture at the best value.
The VIZIO LED HDTV is shattering the mold in a way only VIZIO can, with high-quality design and picture at www.VIZIO.com This Product Sold Separately Available at the best value. VIZIO RECOMMENDS Introducing the new E-series slim frame design. With a stunningly slim outer frame design - and LED backlight for rich colors and vivid details, this HDTV gives you the best picture at the best value.

Quickstart Guide (English)
Page 20
Sunday: 9 am to 6 pm (CST) Do You Have Questions? Find Answers At SUPPORT.VIZIO.COM Find help with: • New Product Setup • Connecting Your Devices • Technical Problems • Product Updates • And More Live Chat Support Available You can also contact our award-winning support team at: Phone: (877) 878-4946 (TOLL-FREE) Email: techsupport@VIZIO.com Hours Of Operation: Monday - Friday: 7 am to 11 pm (CST) Saturday -
Sunday: 9 am to 6 pm (CST) Do You Have Questions? Find Answers At SUPPORT.VIZIO.COM Find help with: • New Product Setup • Connecting Your Devices • Technical Problems • Product Updates • And More Live Chat Support Available You can also contact our award-winning support team at: Phone: (877) 878-4946 (TOLL-FREE) Email: techsupport@VIZIO.com Hours Of Operation: Monday - Friday: 7 am to 11 pm (CST) Saturday -
Quickstart Guide (English)
Page 21
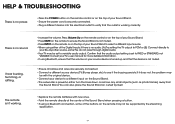
Press Volume Up on the remote control or on the top of your Sound Stand. • Press MUTE on the remote to ensure the Sound Stand is not muted. • Press INPUT on the remote or on the top of your Sound Stand to select a different input source. • When using either turn the bass down or remove any small objects (such as photo frames) away from the Sound Stand. I hear buzzing, humming, or rattling. • Increase the volume. Consult your TV's user manual for more detailed information. • If using a Bluetooth connection, some TVs do not pass through digital audio...
Press Volume Up on the remote control or on the top of your Sound Stand. • Press MUTE on the remote to ensure the Sound Stand is not muted. • Press INPUT on the remote or on the top of your Sound Stand to select a different input source. • When using either turn the bass down or remove any small objects (such as photo frames) away from the Sound Stand. I hear buzzing, humming, or rattling. • Increase the volume. Consult your TV's user manual for more detailed information. • If using a Bluetooth connection, some TVs do not pass through digital audio...
