
Download
Page 2
... setting in which power savings will increase power consumption that could exceed the limits necessary to qualify for ENERGY STAR rating. Changing the factory default picture settings or enabling other features will be achieved. All Rights Reserved. Manufactured under license from Dolby Laboratories.
... setting in which power savings will increase power consumption that could exceed the limits necessary to qualify for ENERGY STAR rating. Changing the factory default picture settings or enabling other features will be achieved. All Rights Reserved. Manufactured under license from Dolby Laboratories.

Download
Page 8
... Mode 19 Changing the Input Source 20 Changing the Screen Aspect Ratio 20 Adjusting the Picture Settings 21 Adjusting the Picture Size and Position 22 Adjusting the Color Temperature 22 Adjusting the Advanced Picture Settings 23 Resetting the Picture Settings 23 Adjusting the Audio Settings 24 Resetting the Audio Settings 25 Activating the Sleep...
... Mode 19 Changing the Input Source 20 Changing the Screen Aspect Ratio 20 Adjusting the Picture Settings 21 Adjusting the Picture Size and Position 22 Adjusting the Color Temperature 22 Adjusting the Advanced Picture Settings 23 Resetting the Picture Settings 23 Adjusting the Audio Settings 24 Resetting the Audio Settings 25 Activating the Sleep...

Download
Page 9
... Using the USB Media Player 42 Using the USB Media Player 42 Connecting a USB Thumb Drive to the TV 42 Playing USB Media 42 Using VIZIO Internet Apps 46 Using the VIA Dock 46 Using the Hot Keys 46 How to View 3D 47 How Theater 3D Works 47 What You... Need to View 3D Content 47 Watching Blu-ray 3D Content 47 Getting the Best 3D Picture 48 Incorrect 3D Viewing Distance and Angle 48 Correct 3D Viewing Distance and Angle 48 Troubleshooting & Technical Support 49 Specifications 52 Limited Warranty 54 Legal...
... Using the USB Media Player 42 Using the USB Media Player 42 Connecting a USB Thumb Drive to the TV 42 Playing USB Media 42 Using VIZIO Internet Apps 46 Using the VIA Dock 46 Using the Hot Keys 46 How to View 3D 47 How Theater 3D Works 47 What You... Need to View 3D Content 47 Watching Blu-ray 3D Content 47 Getting the Best 3D Picture 48 Incorrect 3D Viewing Distance and Angle 48 Correct 3D Viewing Distance and Angle 48 Troubleshooting & Technical Support 49 Specifications 52 Limited Warranty 54 Legal...

Download
Page 16
... displayed input. Last Return to manually enter a digital sub-channel. (For example, 18-4 or 18-5.) Remote Control V Button Open the VIZIO Internet Apps Plus™ (V.I.A. App launcher Quickly launch the pictured app. Arrow Navigate the on -screen menu. Back Go to the previous on -screen menu. Exit Close the on 3D Mode.
... displayed input. Last Return to manually enter a digital sub-channel. (For example, 18-4 or 18-5.) Remote Control V Button Open the VIZIO Internet Apps Plus™ (V.I.A. App launcher Quickly launch the pictured app. Arrow Navigate the on -screen menu. Back Go to the previous on -screen menu. Exit Close the on 3D Mode.

Download
Page 26
...the 3D Mode ABC GUIDE To correctly view 3D content, you must set the 3D mode to match the content you can : • Adjust the Picture settings • Adjust the Audio settings • Activate the Sleep Timer • Adjust the Network settings • Adjust the Tuner settings • ...Set up Closed Captioning • Adjust TV Settings • Access the Guided Setup • Access the User Manual VIZIO TV Settings Picture Audio Timers Network Tuner CC CC Devices System Guided Setup User Manual Navigating the On-Screen Menu To open the on the remote. VOL...
...the 3D Mode ABC GUIDE To correctly view 3D content, you must set the 3D mode to match the content you can : • Adjust the Picture settings • Adjust the Audio settings • Activate the Sleep Timer • Adjust the Network settings • Adjust the Tuner settings • ...Set up Closed Captioning • Adjust TV Settings • Access the Guided Setup • Access the User Manual VIZIO TV Settings Picture Audio Timers Network Tuner CC CC Devices System Guided Setup User Manual Navigating the On-Screen Menu To open the on the remote. VOL...

Download
Page 27
... wish to view and press OK. If the program is not large enough to fit the screen. 20 Since the picture is displayed. 2. Each mode displays the picture differently. TV COMP HDMI-1 HDMI-2 HDMI-3 Note: Inputs may appear wider than intended. The selected Input is displaying ...a 480i/480p source. • Wide stretches a 4:3 aspect ratio picture to fill the screen. This option is only available when the TV is displayed. To change the screen aspect ratio: 1. Press the INPUT button...
... wish to view and press OK. If the program is not large enough to fit the screen. 20 Since the picture is displayed. 2. Each mode displays the picture differently. TV COMP HDMI-1 HDMI-2 HDMI-3 Note: Inputs may appear wider than intended. The selected Input is displaying ...a 480i/480p source. • Wide stretches a 4:3 aspect ratio picture to fill the screen. This option is only available when the TV is displayed. To change the screen aspect ratio: 1. Press the INPUT button...

Download
Page 28
...; Backlight - This option is not available unless Wide AuZotoomBrigNhortmnael ssPaCnooranmtircol is set to change the picture mode: VIZIO Picture Picture Mode Backlight Brightness Contrast Color Tint Sharpness Standard - + 50 - + 50 - + 50 - + 50 - +0 - +0 More • Standard mode sets the various picture settings to values that does not otherwise exist. 21 When this setting is displayed. 3. It...
...; Backlight - This option is not available unless Wide AuZotoomBrigNhortmnael ssPaCnooranmtircol is set to change the picture mode: VIZIO Picture Picture Mode Backlight Brightness Contrast Color Tint Sharpness Standard - + 50 - + 50 - + 50 - + 50 - +0 - +0 More • Standard mode sets the various picture settings to values that does not otherwise exist. 21 When this setting is displayed. 3. It...

Download
Page 29
...; Computer optimizes the picture for television viewing. • Custom allows you have finished adjusting the size and position, press the EXIT button on each NetworkofStehtteingcs oloHreltpemperature settings: VIZIO Color Temperature Color Temperature Red Gain - - Red/Green/Blue Offset - If you wish... Color Temperature Red/Green/Blue Gain - Use the Arrow buttons on the remote. VIZIO Size & Position Horiz. When you to highlight Size & Position, then press OK. From the Picture menu, use the Arrow buttons to change each signal source. Press the Left/Right...
...; Computer optimizes the picture for television viewing. • Custom allows you have finished adjusting the size and position, press the EXIT button on each NetworkofStehtteingcs oloHreltpemperature settings: VIZIO Color Temperature Color Temperature Red Gain - - Red/Green/Blue Offset - If you wish... Color Temperature Red/Green/Blue Gain - Use the Arrow buttons on the remote. VIZIO Size & Position Horiz. When you to highlight Size & Position, then press OK. From the Picture menu, use the Arrow buttons to change each signal source. Press the Left/Right...

Download
Page 30
VIZIO Advanced Picture Auto Brightness Control Black Detail Smart Dimming Smooth Motion Effect Medium Medium On Off 3. Select Off, Low, Medium, or High. • Smart Dimming - Select On or Off. • Reduce Signal Noise - When you have finished adjusting the Advanced Picture Settings, press ... (ME/MC) to ensure that on the remote to highlight More, then press OK. 2. 5 Adjusting the Advanced Picture Settings To adjust the advanced picture settings: 1. From the Picture menu, use the Arrow buttons to the factory defaults?" 3. Select Off, Low, Medium, or High. • ...
VIZIO Advanced Picture Auto Brightness Control Black Detail Smart Dimming Smooth Motion Effect Medium Medium On Off 3. Select Off, Low, Medium, or High. • Smart Dimming - Select On or Off. • Reduce Signal Noise - When you have finished adjusting the Advanced Picture Settings, press ... (ME/MC) to ensure that on the remote to highlight More, then press OK. 2. 5 Adjusting the Advanced Picture Settings To adjust the advanced picture settings: 1. From the Picture menu, use the Arrow buttons to the factory defaults?" 3. Select Off, Low, Medium, or High. • ...

Download
Page 36
...channel.) 4. The partial channel search begins. 6. Press the EXIT button on the remote. ABC Input Wide CC Cancel the Scan Sleep Timer Picture Audio Network Settings Help 29 Highlight Antenna or Cable and press OK. From the Tuner menu, highlight Auto Channel Scan and press OK. ...Digital), Analog, or Digital. 3. A channel scan may need to add a new analog channel or add a new range of -the-wall) connections. 1. VIZIO Channel Scan Channels found Digital: 0 Analog: 19 18% Complete Cancel Adding New Channels Occasionally, you may also be using.You can select either Antenna (Over...
...channel.) 4. The partial channel search begins. 6. Press the EXIT button on the remote. ABC Input Wide CC Cancel the Scan Sleep Timer Picture Audio Network Settings Help 29 Highlight Antenna or Cable and press OK. From the Tuner menu, highlight Auto Channel Scan and press OK. ...Digital), Analog, or Digital. 3. A channel scan may need to add a new analog channel or add a new range of -the-wall) connections. 1. VIZIO Channel Scan Channels found Digital: 0 Analog: 19 18% Complete Cancel Adding New Channels Occasionally, you may also be using.You can select either Antenna (Over...
Download
Page 38
...highlight Analog Audio and press OK. From the Tuner menu, highlight Digital Language and press OK. To use the Digital Language feature: 1. VIZIO Analog Audio Mono Stereo SAP To use the Analog Audio feature: 1. 5 Changing the Audio Language Some digital free-to audio in multiple languages...Analog Audio menu is displayed. 2. Wide Zoom Normal Panoramic Exit 2D 3D ABC Input Wide CC VIZIO Digital Language English Français Español Sleep Timer Picture Audio Network Settings Help 31 The Analog Audio feature only works when the program being viewed is being...
...highlight Analog Audio and press OK. From the Tuner menu, highlight Digital Language and press OK. To use the Digital Language feature: 1. VIZIO Analog Audio Mono Stereo SAP To use the Analog Audio feature: 1. 5 Changing the Audio Language Some digital free-to audio in multiple languages...Analog Audio menu is displayed. 2. Wide Zoom Normal Panoramic Exit 2D 3D ABC Input Wide CC VIZIO Digital Language English Français Español Sleep Timer Picture Audio Network Settings Help 31 The Analog Audio feature only works when the program being viewed is being...

Download
Page 40
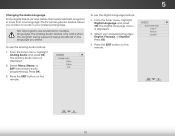
... on-screen menu language • Set the time • Adjust the CEC settings • Adjust the Power Indicator settings • Reset TV Settings & Admin Controls VIZIO System System Info Name Input Parental Controls Menu Language Time and Local Settings CEC Settings Power Indicator Reset & Admin English Off Displaying System Information To..., press the EXIT button on the remote. Press the MENU button on the remote to scroll through the system information. 5. Input Wide CC Sleep Timer Picture Audio Network Settings Help 33 Use the Arrow buttons on the remote.
... on-screen menu language • Set the time • Adjust the CEC settings • Adjust the Power Indicator settings • Reset TV Settings & Admin Controls VIZIO System System Info Name Input Parental Controls Menu Language Time and Local Settings CEC Settings Power Indicator Reset & Admin English Off Displaying System Information To..., press the EXIT button on the remote. Press the MENU button on the remote to scroll through the system information. 5. Input Wide CC Sleep Timer Picture Audio Network Settings Help 33 Use the Arrow buttons on the remote.

Download
Page 41
... menu is displayed. 2.WiUdese thZoeomArroNwormbaul ttPoannosraominc the remote to display "DVD Player". Exit 2D 3D 4. Use the Arrow buttons on -screen keyboard and press OK. 6. VIZIO Name Input Input Source TV Input Labels TV TV_ abc def ghi j k l mn o p q r s t u v wx y z 0 123456789 .@# .com Space ... the Parental Controls The TV's parental controls allow you can rename that input to highlight System and press OK. Sleep Timer Picture Audio Network Settings Help 34 Highlight the input label you want to name the input yourself, highlight the field below Input Labels...
... menu is displayed. 2.WiUdese thZoeomArroNwormbaul ttPoannosraominc the remote to display "DVD Player". Exit 2D 3D 4. Use the Arrow buttons on -screen keyboard and press OK. 6. VIZIO Name Input Input Source TV Input Labels TV TV_ abc def ghi j k l mn o p q r s t u v wx y z 0 123456789 .@# .com Space ... the Parental Controls The TV's parental controls allow you can rename that input to highlight System and press OK. Sleep Timer Picture Audio Network Settings Help 34 Highlight the input label you want to name the input yourself, highlight the field below Input Labels...

Download
Page 46
... -screen menu is displayed. 4. If you have not yet set up a parental passcode, enter the default, 0000. 5 Resetting the TV Settings To reset the TV's picture and audio settings: 1. Wait for the TV to Factory Defaults and press OK. 5. The on the remote. To restore the TV to the factory defaults...
... -screen menu is displayed. 4. If you have not yet set up a parental passcode, enter the default, 0000. 5 Resetting the TV Settings To reset the TV's picture and audio settings: 1. Wait for the TV to Factory Defaults and press OK. 5. The on the remote. To restore the TV to the factory defaults...

Download
Page 47
... and press OK: • Tuner Setup - Connect the TV to your network. Wide Zoom Normal Panoramic Exit 2D 3D ABC Input Wide CC Sleep Timer Picture Audio Network Settings Help 40 5 Using the Guided Setup Menu Using Guided Setup The TV's Setup App can be used to easily set up the... TV tuner. • Network Setup - Highlight Guided Setup and press OK. Press the MENU button on -screen instructions. VIZIO Guided Setup Tuner Setup Network Setup 3. Follow the on the remote. To access guided setup: 1.
... and press OK: • Tuner Setup - Connect the TV to your network. Wide Zoom Normal Panoramic Exit 2D 3D ABC Input Wide CC Sleep Timer Picture Audio Network Settings Help 40 5 Using the Guided Setup Menu Using Guided Setup The TV's Setup App can be used to easily set up the... TV tuner. • Network Setup - Highlight Guided Setup and press OK. Press the MENU button on -screen instructions. VIZIO Guided Setup Tuner Setup Network Setup 3. Follow the on the remote. To access guided setup: 1.

Download
Page 54
... remote to turn the TV on . Press the INPUT button on your TV are able to combine these pictures into the player. 6. Turn the 3D Blu-ray player on . 4. You Will Need 47 Insert the...8. Put on the remote and select the input to which the Blu-ray player is a stunning, life-like 3D picture. The final result is connected (HDMI-1, HDMI-2, etc). 5. Turn the 3D Blu-ray player off. The TV displays... content, you see two slightly different pictures. Select YES to switch to 3D, NO to display in the same way as any other object you will need: • VIZIO Theater 3D HDTV • 3D Blu...
... remote to turn the TV on . Press the INPUT button on your TV are able to combine these pictures into the player. 6. Turn the 3D Blu-ray player on . 4. You Will Need 47 Insert the...8. Put on the remote and select the input to which the Blu-ray player is a stunning, life-like 3D picture. The final result is connected (HDMI-1, HDMI-2, etc). 5. Turn the 3D Blu-ray player off. The TV displays... content, you see two slightly different pictures. Select YES to switch to 3D, NO to display in the same way as any other object you will need: • VIZIO Theater 3D HDTV • 3D Blu...

Download
Page 55
For your TV, VIZIO recommends: M501d-A2, M551d-A2, & M651d-A2 Viewing Range: 6 - 9 feet Optimal Distance: 8 feet Illustrations in ...the TV on Stand In this section are sitting too close to the ideal eye line.They will experience good 3D picture quality. 48 They are sitting at a good distance. TV on a Tilt Mount. Losing 3D Effects Best 3D... viewers are not drawn to the TV for instructional purposes only. 8 Getting the Best 3D Picture For the best 3D viewing experience, VIZIO recommends that you install the TV with the viewing distance and viewing angle in mind. When ...
For your TV, VIZIO recommends: M501d-A2, M551d-A2, & M651d-A2 Viewing Range: 6 - 9 feet Optimal Distance: 8 feet Illustrations in ...the TV on Stand In this section are sitting too close to the ideal eye line.They will experience good 3D picture quality. 48 They are sitting at a good distance. TV on a Tilt Mount. Losing 3D Effects Best 3D... viewers are not drawn to the TV for instructional purposes only. 8 Getting the Best 3D Picture For the best 3D viewing experience, VIZIO recommends that you install the TV with the viewing distance and viewing angle in mind. When ...

Download
Page 57
... all cables to a window for channels. See Replacing the Batteries on the TV don't look right. • Adjust the Color and Tint settings in the Picture menu. see your antenna is securely attached to the TV, scan for the best signal. There is no image on page 29. The colors on... page 10 50 Devices differ; See Adjusting the Picture Settings on page 21. • Press the INPUT button on , but there is off. • Check the audio settings. The power is on the remote...
... all cables to a window for channels. See Replacing the Batteries on the TV don't look right. • Adjust the Color and Tint settings in the Picture menu. see your antenna is securely attached to the TV, scan for the best signal. There is no image on page 29. The colors on... page 10 50 Devices differ; See Adjusting the Picture Settings on page 21. • Press the INPUT button on , but there is off. • Check the audio settings. The power is on the remote...

Download
Page 58
... cause irregularities in the image. • If you switch from electrical appliances, cars, or fluorescent lights. • Ensure all cables are using digital sources. The picture is connected securely to the TV and move the antenna around the room or close to this type of the channel may be noticeable. •...
... cause irregularities in the image. • If you switch from electrical appliances, cars, or fluorescent lights. • Ensure all cables are using digital sources. The picture is connected securely to the TV and move the antenna around the room or close to this type of the channel may be noticeable. •...

Download
Page 8
... number pad to the channel last viewed. BACK Go to the previous on -screen menu. NUMBER PAD Manually enter a channel. APP LAUNCHER Quickly launch the pictured app. USING THE REMOTE INPUT Change the currently-displayed input. LAST Return to manually enter a digital sub-channel. (For example, 18-4 or 18-5.) GUIDE Display...
... number pad to the channel last viewed. BACK Go to the previous on -screen menu. NUMBER PAD Manually enter a channel. APP LAUNCHER Quickly launch the pictured app. USING THE REMOTE INPUT Change the currently-displayed input. LAST Return to manually enter a digital sub-channel. (For example, 18-4 or 18-5.) GUIDE Display...


