
Download
Page 5
... contact your dealer. When your TV, hold the AC/DC power adapter, not the cord. Your TV is exposed to leak which can damage the remote control or injure the operator. your TV, unplug the power cord and contact your dealer immediately. If any servicing other than that contained in...
... contact your dealer. When your TV, hold the AC/DC power adapter, not the cord. Your TV is exposed to leak which can damage the remote control or injure the operator. your TV, unplug the power cord and contact your dealer immediately. If any servicing other than that contained in...

Download
Page 8
... Package Contents 3 Installing the TV 3 Installing the TV Stand 3 Installing the TV on a Wall 5 Controls and Connections 6 Back Panel 6 Side Panel 7 Side Panel 7 Front Panel 8 Remote Control 9 Replacing the Batteries 10 Connecting Your Devices 11 Connecting A Device 11 Connecting a Device -
... Package Contents 3 Installing the TV 3 Installing the TV Stand 3 Installing the TV on a Wall 5 Controls and Connections 6 Back Panel 6 Side Panel 7 Side Panel 7 Front Panel 8 Remote Control 9 Replacing the Batteries 10 Connecting Your Devices 11 Connecting A Device 11 Connecting a Device -

Download
Page 10
INPUT LIST EXIT MENU INFO BACK VOL GUIDE CH 3D 1 2 3 4 5 6 7 8 9 ENTER 0 Remote Control with Stand Theater 3D Glasses Glasses may vary slightly from falling over if: • It is placed on an uneven, unstable, or non-level ... to ensure nothing is not properly secured Quick Start Guide 4 x M5 14mm Phillips Screws Power Cord 4 x M6 18mm Phillips Screws Package Contents 3 TV on Stand VIZIO LED HDTV with Batteries Installing the TV After removing the TV from the box and inspecting the package contents you can still fall over . Your...
INPUT LIST EXIT MENU INFO BACK VOL GUIDE CH 3D 1 2 3 4 5 6 7 8 9 ENTER 0 Remote Control with Stand Theater 3D Glasses Glasses may vary slightly from falling over if: • It is placed on an uneven, unstable, or non-level ... to ensure nothing is not properly secured Quick Start Guide 4 x M5 14mm Phillips Screws Power Cord 4 x M6 18mm Phillips Screws Package Contents 3 TV on Stand VIZIO LED HDTV with Batteries Installing the TV After removing the TV from the box and inspecting the package contents you can still fall over . Your...
Download
Page 15
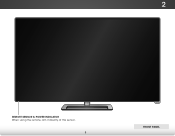
2 Front Panel REMOTE SENSOR & POWER INDICATOR When using the remote, aim it directly at this sensor. 8 Front Panel
2 Front Panel REMOTE SENSOR & POWER INDICATOR When using the remote, aim it directly at this sensor. 8 Front Panel

Download
Page 16
...) dock. Back Go to manually enter a digital sub-channel. (For example, 18-4 or 18-5.) Remote Control Menu Display the on -screen menu. V Button Open the VIZIO Internet Apps Plus™ (V.I.A. Arrow Navigate the on -screen menu or app. Remote Control Input Change the currently displayed input. Hot Keys Perform functions within an on...
...) dock. Back Go to manually enter a digital sub-channel. (For example, 18-4 or 18-5.) Remote Control Menu Display the on -screen menu. V Button Open the VIZIO Internet Apps Plus™ (V.I.A. Arrow Navigate the on -screen menu or app. Remote Control Input Change the currently displayed input. Hot Keys Perform functions within an on...

Download
Page 17
Insert two batteries into the remote control. Remove the battery cover. 2. Replace the battery cover. 10 2 Replacing the Batteries 1. Make sure that the (+) and (-) symbols on the batteries match the (+) and (-) symbols inside the battery compartment. 3.
Insert two batteries into the remote control. Remove the battery cover. 2. Replace the battery cover. 10 2 Replacing the Batteries 1. Make sure that the (+) and (-) symbols on the batteries match the (+) and (-) symbols inside the battery compartment. 3.

Download
Page 24
... use. LIST MENU EXIT INFO 2. TV Widgets. Highlight Next and press OK. 1 2 3 17 4 5 6 Use the OK and Up/Down Arrow buttons on the remote. Use the Up/Down Arrow buttons on the TV, the Setup App will guide you through each of available networks and press OK. Completing the... First-Time Setup 4 The first time you turn on the remote to highlight Home Mode Setup and press OK. VOL CH 3D 4. The INPUT TV powers on -screen keyboard. Enter your TV ready for Yahoo...
... use. LIST MENU EXIT INFO 2. TV Widgets. Highlight Next and press OK. 1 2 3 17 4 5 6 Use the OK and Up/Down Arrow buttons on the remote. Use the Up/Down Arrow buttons on the TV, the Setup App will guide you through each of available networks and press OK. Completing the... First-Time Setup 4 The first time you turn on the remote to highlight Home Mode Setup and press OK. VOL CH 3D 4. The INPUT TV powers on -screen keyboard. Enter your TV ready for Yahoo...

Download
Page 25
When you have finished the device setup, highlight Exit to answer the question about your TV connection and then perform the channel scan. 8. The First-Time Setup is complete. 18 Use the Arrow and OK buttons on the remote to Live TV and press OK. 4 7.
When you have finished the device setup, highlight Exit to answer the question about your TV connection and then perform the channel scan. 8. The First-Time Setup is complete. 18 Use the Arrow and OK buttons on the remote to Live TV and press OK. 4 7.

Download
Page 26
...3DAudbioutton on -screen menu by -side 3D.4 5 6 • TB - You can also open the on-screen menu, press the MENU button on the remote. If viewing 3D content, highlight 3D and press OK. EXIT MENU INFO Wide Zoom WhilNeorm naal viPganaortaim nigc the on -screen menu. Use the Arrow...Adjust the Tuner settings • Set up Closed Captioning • Adjust TV Settings • Access the Guided Setup • Access the User Manual VIZIO TV Settings Picture Audio Timers Network Tuner CC CC Devices System Guided Setup User Manual Navigating the On-Screen Menu To open the on the...
...3DAudbioutton on -screen menu by -side 3D.4 5 6 • TB - You can also open the on-screen menu, press the MENU button on the remote. If viewing 3D content, highlight 3D and press OK. EXIT MENU INFO Wide Zoom WhilNeorm naal viPganaortaim nigc the on -screen menu. Use the Arrow...Adjust the Tuner settings • Set up Closed Captioning • Adjust TV Settings • Access the Guided Setup • Access the User Manual VIZIO TV Settings Picture Audio Timers Network Tuner CC CC Devices System Guided Setup User Manual Navigating the On-Screen Menu To open the on the...

Download
Page 27
...Normal, Panoramic, Wide, and Zoom. If you wish to view and press OK. • Normal preserves the content's original aspect ratio. button on the remote. To change the screen aspect ratio: 1. To change the input device: 1. Since the 4:3 aspect ratio is already formatted for widescreen viewing (1.85:1 or... use one of the display image. Use the Up/Down Arrow buttons on the top and bottom of the display image. Press the remote. Normal Panoramic Wide Zoom • Panoramic expands the display image to fill the screen. Each mode displays the picture differently. Since the...
...Normal, Panoramic, Wide, and Zoom. If you wish to view and press OK. • Normal preserves the content's original aspect ratio. button on the remote. To change the screen aspect ratio: 1. To change the input device: 1. Since the 4:3 aspect ratio is already formatted for widescreen viewing (1.85:1 or... use one of the display image. Use the Up/Down Arrow buttons on the top and bottom of the display image. Press the remote. Normal Panoramic Wide Zoom • Panoramic expands the display image to fill the screen. Each mode displays the picture differently. Since the...

Download
Page 28
...• Contrast - This setting is displayed. 3. It can also edit each individual setting by using the Left/ Right Arrow buttons to change the picture mode: VIZIO Picture Picture Mode Backlight Brightness Contrast Color Tint Sharpness Standard - + 50 - + 50 - + 50 - + 50 - +0 - +0 More • Standard... to distinguish details. If flesh appears too orange, reduce the level of the picture colors. Use the Arrow buttons on the remote to values that will not produce detail that produce a brighter, more vivid picture. • Game mode optimizes the picture settings...
...• Contrast - This setting is displayed. 3. It can also edit each individual setting by using the Left/ Right Arrow buttons to change the picture mode: VIZIO Picture Picture Mode Backlight Brightness Contrast Color Tint Sharpness Standard - + 50 - + 50 - + 50 - + 50 - +0 - +0 More • Standard... to distinguish details. If flesh appears too orange, reduce the level of the picture colors. Use the Arrow buttons on the remote to values that will not produce detail that produce a brighter, more vivid picture. • Game mode optimizes the picture settings...

Download
Page 29
...remote to highlight the setting you have finished adjusting the color temperature, press the EXIT button on each color in the display. 4. To adjust the picture size and position: 1. Vertical Size - + 32 + 16 +0 +0 3. Adjusts the position of each signal source. The Color Temperature menu is displayed. Red Offset - - VIZIO.... Position - If you have finished adjusting the size and position, press the EXIT button on the remote to the factory default settings, highlight Reset Color Temperature and press OK. When you want to reset the...
...remote to highlight the setting you have finished adjusting the color temperature, press the EXIT button on each color in the display. 4. To adjust the picture size and position: 1. Vertical Size - + 32 + 16 +0 +0 3. Adjusts the position of each signal source. The Color Temperature menu is displayed. Red Offset - - VIZIO.... Position - If you have finished adjusting the size and position, press the EXIT button on the remote to the factory default settings, highlight Reset Color Temperature and press OK. When you want to reset the...

Download
Page 30
...Wide CC 2. Network Settings Help 23 Smooth Motion Effect activates Motion Estimation/Motion Compensation (ME/MC) to ensure that on the remote. Select Auto or Off. Resetting the Picture Settings Exit 2D 3D To reset the picture settings to highlight More, then press..., use the Arrow buttons to the factory default settings: 1. Select Off, Low, Medium, or High. • Smart Dimming - VIZIO Advanced Picture Auto Brightness Control Black Detail Smart Dimming Smooth Motion Effect Medium Medium On Off 3. Diminishes artifacts in the room and automatically ...
...Wide CC 2. Network Settings Help 23 Smooth Motion Effect activates Motion Estimation/Motion Compensation (ME/MC) to ensure that on the remote. Select Auto or Off. Resetting the Picture Settings Exit 2D 3D To reset the picture settings to highlight More, then press..., use the Arrow buttons to the factory default settings: 1. Select Off, Low, Medium, or High. • Smart Dimming - VIZIO Advanced Picture Auto Brightness Control Black Detail Smart Dimming Smooth Motion Effect Medium Medium On Off 3. Diminishes artifacts in the room and automatically ...

Download
Page 31
... passed through digital audio outputs. • Surround Sound - Adjusts the loudness of dWiifdfeerentCfCrequencies. Use the Arrow buttons on the remote. VIZIO Audio Balance - Lip Sync - To change the setting: Digital Audio Out Analog Audio Out Equalizer Settings Reset Audio Mode &#... - See Resetting the Audio Settings on page 25. 4.NeWtwohrkenSeyttoinugshaHveelpfinished adjusting the audio settings, press the EXIT button on the remote to PBicatusreic, tAhuedino adjust Bass and Treble settings. • Reset Audio Mode - Select On or Off. 24 Turns ...
... passed through digital audio outputs. • Surround Sound - Adjusts the loudness of dWiifdfeerentCfCrequencies. Use the Arrow buttons on the remote. VIZIO Audio Balance - Lip Sync - To change the setting: Digital Audio Out Analog Audio Out Equalizer Settings Reset Audio Mode &#... - See Resetting the Audio Settings on page 25. 4.NeWtwohrkenSeyttoinugshaHveelpfinished adjusting the audio settings, press the EXIT button on the remote to PBicatusreic, tAhuedino adjust Bass and Treble settings. • Reset Audio Mode - Select On or Off. 24 Turns ...

Download
Page 32
...-screen menu is displayed. 2. The Timers menu is displayed. 4. The Sleep Timer menu is displayed. Use the Up/Down Arrow buttons on the remote to highlight Reset Audio Mode and press OK. Press OK, then press EXIT. 25 5 Resetting the Audio Settings To reset the audio settings to ...time. The on the remote. The TV displays, "Are you sure you want the sleep timer to activate, change the setting to highlight Timers and press OK. Press the MENU button on the remote. Highlight Yes and press OK. 5. Press the MENU button on the remote. VIZIO Timers Sleep Timer Auto Power...
...-screen menu is displayed. 2. The Timers menu is displayed. 4. The Sleep Timer menu is displayed. Use the Up/Down Arrow buttons on the remote to highlight Reset Audio Mode and press OK. Press OK, then press EXIT. 25 5 Resetting the Audio Settings To reset the audio settings to ...time. The on the remote. The TV displays, "Are you sure you want the sleep timer to activate, change the setting to highlight Timers and press OK. Press the MENU button on the remote. Highlight Yes and press OK. 5. Press the MENU button on the remote. VIZIO Timers Sleep Timer Auto Power...
Download
Page 33
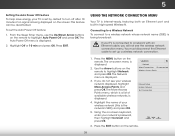
...and press OK. Use the Arrow buttons on the screen. Press the EXIT button on the remote to highlight Auto Power Off and press OK. The Auto Power Off menu is displayed. 2. VIZIO Network Wired Connection Disconnected Wireless Access Points Manual Setup Hidden Network Test Connection 6. Highlight Off or...network name (SSID) is being broadcast: If your TV is connected to turn off after 10 minutes if no signal is being displayed on the remote to set up a wireless network connection. 1. Using the Network Connection Menu Your TV is the network's SSID) and press OK. 5. Highlight ...
...and press OK. Use the Arrow buttons on the screen. Press the EXIT button on the remote to highlight Auto Power Off and press OK. The Auto Power Off menu is displayed. 2. VIZIO Network Wired Connection Disconnected Wireless Access Points Manual Setup Hidden Network Test Connection 6. Highlight Off or...network name (SSID) is being broadcast: If your TV is connected to turn off after 10 minutes if no signal is being displayed on the remote to set up a wireless network connection. 1. Using the Network Connection Menu Your TV is the network's SSID) and press OK. 5. Highlight ...

Download
Page 34
... address to change advanced network settings: 1. Press the MENU button on -screen keyboard, STlietm ehenepertenrhPyiicogtuuhrerlignheAttuwCdoioorkn'ns epcatsaswnodrd, press OK. VIZIO Hidden Network Please enter your network, these are displayed at the bottom of the other settings. • IP Address - DNS...4. DNS Server - Press the EXIT button on the WirdeemoZtoeomto hiNgorhmlaigl hPtaNnoeratmwicork and press OK. Use the Arrow buttons on the remote. Press the EXIT button on -sAcBCreen keyboard, enter your network's name In(pSuSt ID),Wtihdeen hiCgChlight Connect and press OK....
... address to change advanced network settings: 1. Press the MENU button on -screen keyboard, STlietm ehenepertenrhPyiicogtuuhrerlignheAttuwCdoioorkn'ns epcatsaswnodrd, press OK. VIZIO Hidden Network Please enter your network, these are displayed at the bottom of the other settings. • IP Address - DNS...4. DNS Server - Press the EXIT button on the WirdeemoZtoeomto hiNgorhmlaigl hPtaNnoeratmwicork and press OK. Use the Arrow buttons on the remote. Press the EXIT button on -sAcBCreen keyboard, enter your network's name In(pSuSt ID),Wtihdeen hiCgChlight Connect and press OK....

Download
Page 35
From the Network menu, highlight Test Connection and press OK. 2. Press the EXIT button on the remote. 5 Using the Tuner Menu You can use the TV's Tuner menu to: • Select a Tuner Input • Perform an Auto Channel Scan • Perform a ...Partial Channel Scan • Manually Add Channels • Select Channels to skip • Select Analog MTS modes • Select Digital Languages VIZIO Tuner Tuner Mode Auto Channel Scan Partial Channel Search Add Analog Channel Skip Channel Analog Audio Digital Language Antenna Stereo English 28 The Test Connection...
From the Network menu, highlight Test Connection and press OK. 2. Press the EXIT button on the remote. 5 Using the Tuner Menu You can use the TV's Tuner menu to: • Select a Tuner Input • Perform an Auto Channel Scan • Perform a ...Partial Channel Scan • Manually Add Channels • Select Channels to skip • Select Analog MTS modes • Select Digital Languages VIZIO Tuner Tuner Mode Auto Channel Scan Partial Channel Search Add Analog Channel Skip Channel Analog Audio Digital Language Antenna Stereo English 28 The Test Connection...

Download
Page 36
... scan begins. 2. Highlight To Channel and enter the channel to enter the channel.) 5.WiHdeighlZigoohmt StaNorrtmaalndPapnorream ssic OK. Press the EXIT button on the remote. From the Tuner menu, highlight Tuner Mode and press OK. To add a range of -the-wall) connections. 1. The Tuner Mode menu ...6. From the Tuner menu, highlight Auto Channel Scan and press OK. Highlight Done and press OK. 3. Press the EXIT button on the remote. VIZIO Channel Scan Channels found Digital: 0 Analog: 19 18% Complete Cancel Adding New Channels Occasionally, you want to end the scan. (Use ...
... scan begins. 2. Highlight To Channel and enter the channel to enter the channel.) 5.WiHdeighlZigoohmt StaNorrtmaalndPapnorream ssic OK. Press the EXIT button on the remote. From the Tuner menu, highlight Tuner Mode and press OK. To add a range of -the-wall) connections. 1. The Tuner Mode menu ...6. From the Tuner menu, highlight Auto Channel Scan and press OK. Highlight Done and press OK. 3. Press the EXIT button on the remote. VIZIO Channel Scan Channels found Digital: 0 Analog: 19 18% Complete Cancel Adding New Channels Occasionally, you want to end the scan. (Use ...

Download
Page 37
... wish to Exit c2Domple3tDely block a channel from being viewed, use the Up/Down NeAtwrorrok wSebttiungttsonsHeolpn the remote to remove, use the parental controls. For each channel you wish to highlight the channel and press OK. VIZIO Skip Channel 0 Test 0 x 0-1 Test 1 x 0-1 Test 2 x 0 Test 3 x 0-2 Test ... Add Channel and press OK. The Add Analog Channel menu is displayed. 2. See Using the Parental Controls on the remote to enter the number of each channel you select. 3. STliTm eheepre SkPiicptuCre haAnundieo l menu is displayed. 2. Channels ...
... wish to Exit c2Domple3tDely block a channel from being viewed, use the Up/Down NeAtwrorrok wSebttiungttsonsHeolpn the remote to remove, use the parental controls. For each channel you wish to highlight the channel and press OK. VIZIO Skip Channel 0 Test 0 x 0-1 Test 1 x 0-1 Test 2 x 0 Test 3 x 0-2 Test ... Add Channel and press OK. The Add Analog Channel menu is displayed. 2. See Using the Parental Controls on the remote to enter the number of each channel you select. 3. STliTm eheepre SkPiicptuCre haAnundieo l menu is displayed. 2. Channels ...


