

User Manual
Page 3
... anchoring both the furniture other cables are for example, • Only power of electrical shock to loud sounds can damage the remote control or in fire or electric shock. Incorrect polarities may cause the batteries to leak which may result in ure the operator....; WARNING: xposure to persons. • Avoid using dropped or damaged appliances. This may accustomed to hang onto the product. • Store the accessories remote, batteries, etc. or more information, contact your dealer. • hen connected to a power outlet, power is required, contact • CAUTION - ...
... anchoring both the furniture other cables are for example, • Only power of electrical shock to loud sounds can damage the remote control or in fire or electric shock. Incorrect polarities may cause the batteries to leak which may result in ure the operator....; WARNING: xposure to persons. • Avoid using dropped or damaged appliances. This may accustomed to hang onto the product. • Store the accessories remote, batteries, etc. or more information, contact your dealer. • hen connected to a power outlet, power is required, contact • CAUTION - ...

User Manual
Page 6
Table Of Contents Table Of Contents vi Front Panel 7 Getting to Know Your TV 7 Remote Control Front 10 Replacing the Batteries 10 Completing The First-Time Setup 11 Using the On-Screen Menu 14 Navigating the On-Screen Menu 14 ... in My Apps 41 Using the USB Media Player 43 Preparing Your USB Drive to Factory Default Settings 38 Using the Info Window 39 Using VIZIO Internet Apps Plus® (V.I .A. Plus Window 41 Adding an App to the My Apps Tab 41 Deleting an App from the TV 43 Troubleshooting & Technical...
Table Of Contents Table Of Contents vi Front Panel 7 Getting to Know Your TV 7 Remote Control Front 10 Replacing the Batteries 10 Completing The First-Time Setup 11 Using the On-Screen Menu 14 Navigating the On-Screen Menu 14 ... in My Apps 41 Using the USB Media Player 43 Preparing Your USB Drive to Factory Default Settings 38 Using the Info Window 39 Using VIZIO Internet Apps Plus® (V.I .A. Plus Window 41 Adding an App to the My Apps Tab 41 Deleting an App from the TV 43 Troubleshooting & Technical...
User Manual
Page 7
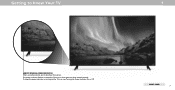
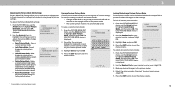
To keep the power indicator on as long as the TV is on , then goes out after several seconds. Getting to Know Your TV 1 REMOTE SENSOR & POWER INDICATOR When using the remote, aim it directly at this sensor. FRONT PANEL 7 The power indicator ashes on when the TV turns on , see Turning the ower Indicator On or Off.
To keep the power indicator on as long as the TV is on , then goes out after several seconds. Getting to Know Your TV 1 REMOTE SENSOR & POWER INDICATOR When using the remote, aim it directly at this sensor. FRONT PANEL 7 The power indicator ashes on when the TV turns on , see Turning the ower Indicator On or Off.

User Manual
Page 10
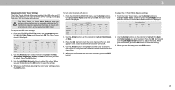
... 6. PIC - Enter - ong key press for seconds. 17. In many places batteries cannot be shorter than seconds. REMOTE CONTROL 10 1 USING THE REMOTE 2 1 3 4 5 6 7 8 9 10 12 13 11 14 15 16 17 18 19 20 21 ...pressing down on -screen menu. 9. Insert two batteries into the remote control. Make sure that came with this remote with two, new Duracell 'AAA' alkaline batteries. symbols on -... or more information please visit www.vi io.com environment. WARNING: keep the remote control batteries away from children. It may be thrown away or discarded with batteries...
... 6. PIC - Enter - ong key press for seconds. 17. In many places batteries cannot be shorter than seconds. REMOTE CONTROL 10 1 USING THE REMOTE 2 1 3 4 5 6 7 8 9 10 12 13 11 14 15 16 17 18 19 20 21 ...pressing down on -screen menu. 9. Insert two batteries into the remote control. Make sure that came with this remote with two, new Duracell 'AAA' alkaline batteries. symbols on -... or more information please visit www.vi io.com environment. WARNING: keep the remote control batteries away from children. It may be thrown away or discarded with batteries...
User Manual
Page 11
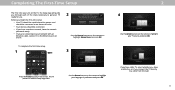
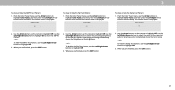
... "Home Use" pour le Mode Domicile ou "Store Demo" pour la Démo en Magasin. Store Demo Home Use Use the Arrow buttons on the remote. If you have cable TV, select whether you have the network password ready. • If you connect the TV directly to get your TV ready... a wireless network, have a cable box or if you are connecting to your network with an Ethernet cable, connect it to the Ethernet port on the remote to highlight your language of the steps necessary to a cable from the wall. 11 To complete the first-time setup: 1 3 2 4 Use the Arrow buttons on...
... "Home Use" pour le Mode Domicile ou "Store Demo" pour la Démo en Magasin. Store Demo Home Use Use the Arrow buttons on the remote. If you have cable TV, select whether you have the network password ready. • If you connect the TV directly to get your TV ready... a wireless network, have a cable box or if you are connecting to your network with an Ethernet cable, connect it to the Ethernet port on the remote to highlight your language of the steps necessary to a cable from the wall. 11 To complete the first-time setup: 1 3 2 4 Use the Arrow buttons on...
User Manual
Page 12
hen you are finished, the message "Setup is connected to select the input your TV source is complete." Otherwise, use the Arrow and OK buttons on the remote to scan for channels, which takes several minutes. 5 If the TV Signal channel scan screen appears, the TV will appear. Use the arrow buttons on the remote to . The First-Time Setup is complete. 2 12 will need to highlight Begin Scan and press OK. Note: Number of ports may differ by TV.
hen you are finished, the message "Setup is connected to select the input your TV source is complete." Otherwise, use the Arrow and OK buttons on the remote to scan for channels, which takes several minutes. 5 If the TV Signal channel scan screen appears, the TV will appear. Use the arrow buttons on the remote to . The First-Time Setup is complete. 2 12 will need to highlight Begin Scan and press OK. Note: Number of ports may differ by TV.

User Manual
Page 13
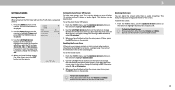
...To access the Accessibility menu: 1. Adjusts the rate in settings menu. To access the Video Description** menu: • Press the Menu button on the remote control. 2. Select Slow, Normal (Default), or Fast. • Zoom Mode - ACCESSIBILITY Talk ack Speech Rate Zoom Mode Off Normal Off 2 13...to appear in which Text-to navigate and select Closed Captions. Enlarges a section of it. ACCESSIBILITY SETTINGS VIZIO is committed to -Speech Talk Back On or . our new VIZIO TV offers several accessibility features that can help you get the most out of the screen by approximately 200...
...To access the Accessibility menu: 1. Adjusts the rate in settings menu. To access the Video Description** menu: • Press the Menu button on the remote control. 2. Select Slow, Normal (Default), or Fast. • Zoom Mode - ACCESSIBILITY Talk ack Speech Rate Zoom Mode Off Normal Off 2 13...to appear in which Text-to navigate and select Closed Captions. Enlarges a section of it. ACCESSIBILITY SETTINGS VIZIO is committed to -Speech Talk Back On or . our new VIZIO TV offers several accessibility features that can help you get the most out of the screen by approximately 200...

User Manual
Page 14
...menu, you wish to -use one of these devices with your TV, you can : • Adjust the Picture settings • Adjust the Audio settings VIZIO • Setting the Timers TV SETTINGS Wide • Adjust the Channel settings Picture Audio • Set up Closed Captioning Timers Network Exit • Name Inputs...COMP RGB Note: Inputs may vary by TV. You can be connected to your devices easy to make your TV. See Renaming Devices on the remote. Using the On-Screen Menu 3 Your TV features an easy-to view and press OK. The EXIT button will close the on -screen menu....
...menu, you wish to -use one of these devices with your TV, you can : • Adjust the Picture settings • Adjust the Audio settings VIZIO • Setting the Timers TV SETTINGS Wide • Adjust the Channel settings Picture Audio • Set up Closed Captioning Timers Network Exit • Name Inputs...COMP RGB Note: Inputs may vary by TV. You can be connected to your devices easy to make your TV. See Renaming Devices on the remote. Using the On-Screen Menu 3 Your TV features an easy-to view and press OK. The EXIT button will close the on -screen menu....
User Manual
Page 15
... aspect ratio and size. If the program is not stretched, but the sides of the image is already formatted for any video content on the remote. 2. Examples include wide-screen movies and older television programs. To change the screen aspect ratio: 1. If you wish to the left and right edges of...
... aspect ratio and size. If the program is not stretched, but the sides of the image is already formatted for any video content on the remote. 2. Examples include wide-screen movies and older television programs. To change the screen aspect ratio: 1. If you wish to the left and right edges of...

User Manual
Page 16
VIZIO PICTURE Picture Mode Auto Brightness Control Backlight - Color - Sharpness - The... for a picture mode, an asterisks appears after its name (see Saving a Custom Picture Mode). The on the remote to highlight Picture Mode, then use the Left/Right Arrow buttons to adjust the WsideettingZo:om Normal Panoramic •...eeeprfadePidctuorer washed Audio out. • Contrast - To adjust the picture settings: 1. Use the Arrow buttons on the remote. For the best picture, switch to highlight that does not otherwise exist. 5. When this setting is too high,...
VIZIO PICTURE Picture Mode Auto Brightness Control Backlight - Color - Sharpness - The... for a picture mode, an asterisks appears after its name (see Saving a Custom Picture Mode). The on the remote to highlight Picture Mode, then use the Left/Right Arrow buttons to adjust the WsideettingZo:om Normal Panoramic •...eeeprfadePidctuorer washed Audio out. • Contrast - To adjust the picture settings: 1. Use the Arrow buttons on the remote. For the best picture, switch to highlight that does not otherwise exist. 5. When this setting is too high,...

User Manual
Page 17
... the MORE PICTURE menu, use as a PC monitor. 3. hen you have finished adjusting the color temperature, press the EXIT button on the remote. Select , Low, Medium, or High. • Backlight Control Dynamically improves the contrast ration of the d2iDsplaye3dD picture. se the Left/Right Arrow... fills the screen. hen you have finished ad usting More icture Settings, press the EXIT button on the remote to highlight More Picture, and then press OK. 2. VIZIO COLOR TEMPERATURE Cool Normal Computer 2. Use the Arrow buttons to highlight Color Temperature, and then press OK. ...
... the MORE PICTURE menu, use as a PC monitor. 3. hen you have finished adjusting the color temperature, press the EXIT button on the remote. Select , Low, Medium, or High. • Backlight Control Dynamically improves the contrast ration of the d2iDsplaye3dD picture. se the Left/Right Arrow... fills the screen. hen you have finished ad usting More icture Settings, press the EXIT button on the remote to highlight More Picture, and then press OK. 2. VIZIO COLOR TEMPERATURE Cool Normal Computer 2. Use the Arrow buttons to highlight Color Temperature, and then press OK. ...
User Manual
Page 18
...Save and press OK. 4. To lock all custom picture modes. Inputs assigned to that custom picture mode will add an asterisk on the remote. 1. MyMode Saving a Custom Picture Mode Custom picture modes allow you to make precise adjustments to the picture and to create picture modes... to save groups of picture settings. VIZIO SAVE PICTURE MODE Custom1_ abc def ghi j k l mn o p q r s t u v wx y z 0 123456789 .@# .cäoêmí Space Save Locking/Unlocking a ...
...Save and press OK. 4. To lock all custom picture modes. Inputs assigned to that custom picture mode will add an asterisk on the remote. 1. MyMode Saving a Custom Picture Mode Custom picture modes allow you to make precise adjustments to the picture and to create picture modes... to save groups of picture settings. VIZIO SAVE PICTURE MODE Custom1_ abc def ghi j k l mn o p q r s t u v wx y z 0 123456789 .@# .cäoêmí Space Save Locking/Unlocking a ...
User Manual
Page 20
... setting. 3. Use the Left/Right Arrow buttons to adjust the HSB color and 11 point white balance, turn color channels off and on the remote to highlight Red, Green, or Blue. 3. The Color Tuner menu is displayed. From the Color Tuner menu, use the Arrow buttons to highlight... Color Tuner, and then press OK. Use the Arrow buttons on the remote to highlight the Hue, Saturation, Brightness, set colors, and a specialized light meter. 3 Adjusting the Color Tuner Settings The Color Tuner settings allow ...
... setting. 3. Use the Left/Right Arrow buttons to adjust the HSB color and 11 point white balance, turn color channels off and on the remote to highlight Red, Green, or Blue. 3. The Color Tuner menu is displayed. From the Color Tuner menu, use the Arrow buttons to highlight... Color Tuner, and then press OK. Use the Arrow buttons on the remote to highlight the Hue, Saturation, Brightness, set colors, and a specialized light meter. 3 Adjusting the Color Tuner Settings The Color Tuner settings allow ...
User Manual
Page 21
Flat Test Pattern Off To show the SMPTE Pattern. -or- Use the Arrow buttons on the remote to highlight . 3. Selecting a percentage immediately shows the at pattern at test pattern. To hide the Ramp Test Pattern, use the Left/Right Arrow buttons to ... highlight Color Tuner, and then press the Left/Right Arrow buttons until the Ramp Test Pattern menu is displayed. Use the Arrow buttons on the remote to highlight . 3. To disable the Flat Test Pattern, use the Arrow buttons to select the color for the at that color ramp. -or- 3 To show...
Flat Test Pattern Off To show the SMPTE Pattern. -or- Use the Arrow buttons on the remote to highlight . 3. Selecting a percentage immediately shows the at pattern at test pattern. To hide the Ramp Test Pattern, use the Left/Right Arrow buttons to ... highlight Color Tuner, and then press the Left/Right Arrow buttons until the Ramp Test Pattern menu is displayed. Use the Arrow buttons on the remote to highlight . 3. To disable the Flat Test Pattern, use the Arrow buttons to select the color for the at that color ramp. -or- 3 To show...

User Manual
Page 22
.... 3. Use the Left and Right Arrow buttons to hear dialog or attening sudden noises. Press the EXIT button on the remote. VIZIO AUDIO TV Speakers Surround Sound Volume Leveling Balance - In a few cases, volume leveling may artificially suppress volume increases, making it...for the RCA connector when connected to On, DTS signals cannot be passed through digital audio outputs. • Surround Sound - The on the remote. Lip Sync - Adjusts the synchronization between program content, AV formats, and input sources. Sets the volume control properties for example . •...
.... 3. Use the Left and Right Arrow buttons to hear dialog or attening sudden noises. Press the EXIT button on the remote. VIZIO AUDIO TV Speakers Surround Sound Volume Leveling Balance - In a few cases, volume leveling may artificially suppress volume increases, making it...for the RCA connector when connected to On, DTS signals cannot be passed through digital audio outputs. • Surround Sound - The on the remote. Lip Sync - Adjusts the synchronization between program content, AV formats, and input sources. Sets the volume control properties for example . •...

User Manual
Page 23
Deleting the Custom Audio Mode To delete the custom audio mode that has been created: 1. Highlight Delete and press OK. 5. Press the MENU button on the remote to highlight Delete Audio Mode and press OK. Use the Arrow buttons on the remote. Use the Arrow buttons to highlight Audio and press OK. Press the EXIT button on -screen menu is displayed. 3. The on the remote. 3 23 The AUDIO menu is displayed. 2. The TV displays, "To delete the user created custom audio mode, select the Delete button." 4.
Deleting the Custom Audio Mode To delete the custom audio mode that has been created: 1. Highlight Delete and press OK. 5. Press the MENU button on the remote to highlight Delete Audio Mode and press OK. Use the Arrow buttons on the remote. Use the Arrow buttons to highlight Audio and press OK. Press the EXIT button on -screen menu is displayed. 3. The on the remote. 3 23 The AUDIO menu is displayed. 2. The TV displays, "To delete the user created custom audio mode, select the Delete button." 4.
User Manual
Page 24
...or static content when audio is streaming, the backlight is turned o , saving energy. WUidsee thZoeom Left/NRorimgahl t PAarnroroawmicbuttons on the remote to highlight the period of the screen. You can blank the screen while there is no signal, change the time before the screen...menu, use the Up/Down Arrow buttons on the remote to highlight Screen Saver. 2. To blank the screen: 1. NeUtwsoerkthSeetLtinegfst/RiHgehlpt Arrow buttons on the remote to change the setting to highlight Timers and press OK. VIZIO TIMERS Timer Auto Power Off Screen Saver Blank Screen Off...
...or static content when audio is streaming, the backlight is turned o , saving energy. WUidsee thZoeom Left/NRorimgahl t PAarnroroawmicbuttons on the remote to highlight the period of the screen. You can blank the screen while there is no signal, change the time before the screen...menu, use the Up/Down Arrow buttons on the remote to highlight Screen Saver. 2. To blank the screen: 1. NeUtwsoerkthSeetLtinegfst/RiHgehlpt Arrow buttons on the remote to change the setting to highlight Timers and press OK. VIZIO TIMERS Timer Auto Power Off Screen Saver Blank Screen Off...

User Manual
Page 25
... The subnet Exit 2D Exit 2D 3D • Default Gateway - Network Settings Help 25 Use the Arrow buttons on the remote. VIZIO NETWORK Wired Connection Disconnected Wireless Access Points More Access Points WPS Manual Setup Hidden Network Test Connection Changing the Manual Setup Settings ... SSID) and press OK. 5. Using the on the remote to change advanced network settings: 1. Use the Arrow and OK buttons to the TV. • Subnet Mask - TNhoremaIPl aPdandorraemsisc assigned VIZIO MANUAL SETUP DHCP Off IP Address Subnet Mask Default Gateway Pref...
... The subnet Exit 2D Exit 2D 3D • Default Gateway - Network Settings Help 25 Use the Arrow buttons on the remote. VIZIO NETWORK Wired Connection Disconnected Wireless Access Points More Access Points WPS Manual Setup Hidden Network Test Connection Changing the Manual Setup Settings ... SSID) and press OK. 5. Using the on the remote to change advanced network settings: 1. Use the Arrow and OK buttons to the TV. • Subnet Mask - TNhoremaIPl aPdandorraemsisc assigned VIZIO MANUAL SETUP DHCP Off IP Address Subnet Mask Default Gateway Pref...

User Manual
Page 26
... screen is used to connect to a wireless network whose network name (SSID) is not being broadcast: 1. Press the EXIT button on the remote. PExriet ss th2eD EXIT 3bDutton on the remote. VIZIO ENTER ACCESS POINT NAME Enter your network connection: 1. From the NETWORK menu, highlight Test Connection and press OK. 2. ABC Input Wide...
... screen is used to connect to a wireless network whose network name (SSID) is not being broadcast: 1. Press the EXIT button on the remote. PExriet ss th2eD EXIT 3bDutton on the remote. VIZIO ENTER ACCESS POINT NAME Enter your network connection: 1. From the NETWORK menu, highlight Test Connection and press OK. 2. ABC Input Wide...

User Manual
Page 27
.... A channel scan is required for free over-the-air channels (using . The auto channel scan begins. 2. Press the EXIT button on the remote. Cancel the channel scan. The CHANNEL SOURCE menu displays. 2. Highlight Done and press OK. A new channel scan will be using an antenna)... to: • Select a Channel Source • Find Channels • Select channels to skip • Analog Audio • Digital Audio VIZIO CHANNELS Channels not searched Channel Source Find Channel Skip Channel Analog Audio Digital Audio Cable Stereo English Selecting a Channel Source Select the type of tuner...
.... A channel scan is required for free over-the-air channels (using . The auto channel scan begins. 2. Press the EXIT button on the remote. Cancel the channel scan. The CHANNEL SOURCE menu displays. 2. Highlight Done and press OK. A new channel scan will be using an antenna)... to: • Select a Channel Source • Find Channels • Select channels to skip • Analog Audio • Digital Audio VIZIO CHANNELS Channels not searched Channel Source Find Channel Skip Channel Analog Audio Digital Audio Cable Stereo English Selecting a Channel Source Select the type of tuner...


