
M3D651SV User Manual
Page 1
USER GUIDE MMODDEELLS // E3D320VX M// E33DD46205VX1SV // E3D470VX INSTALLING YOUR new TV CONTROLS & CONNECTIONS CONNECTING YOUR DEVICES USING THE ON-SCREEN MENU USING THE USB MEDIA PLAYER USING VIZIO INTERNET APPS Viewing 3d on your tv TROUBLESHOOTING & SUPPORT Help, SPECs, warranty & LEGAL
USER GUIDE MMODDEELLS // E3D320VX M// E33DD46205VX1SV // E3D470VX INSTALLING YOUR new TV CONTROLS & CONNECTIONS CONNECTING YOUR DEVICES USING THE ON-SCREEN MENU USING THE USB MEDIA PLAYER USING VIZIO INTERNET APPS Viewing 3d on your tv TROUBLESHOOTING & SUPPORT Help, SPECs, warranty & LEGAL

M3D651SV User Manual
Page 3
... Network (Best 20 Connecting to a Wireless Network 31 Changing the Advanced Network Settings 32 Testing Your Network Connection 32 Changing the TV Settings 33 Changing the Input Source 33 Setting the Tuner Mode 33 Scanning for Channels 33 Adding New Channels 34 Skipping Channels 35...the Screen Aspect Ratio 24 Setting Up Closed Captioning 24 Changing the Appearance of Contents Installing the TV 8 Inspecting the Package Contents 8 Installing the TV 8 Installing the TV Stand 8 Installing the TV on a Wall 10 Controls and Connections 11 Rear Panel 11 USING The Jag Wheel 12 ...
... Network (Best 20 Connecting to a Wireless Network 31 Changing the Advanced Network Settings 32 Testing Your Network Connection 32 Changing the TV Settings 33 Changing the Input Source 33 Setting the Tuner Mode 33 Scanning for Channels 33 Adding New Channels 34 Skipping Channels 35...the Screen Aspect Ratio 24 Setting Up Closed Captioning 24 Changing the Appearance of Contents Installing the TV 8 Inspecting the Package Contents 8 Installing the TV 8 Installing the TV Stand 8 Installing the TV on a Wall 10 Controls and Connections 11 Rear Panel 11 USING The Jag Wheel 12 ...

M3D651SV User Manual
Page 4
... Language 38 Setting the Time Zone 39 Adjusting the CEC Settings 39 Using the Help Menu 40 Displaying System Information 40 Resetting the TV Settings 40 Restoring the TV to Factory Default Settings 41 Using Guided Setup 41 Using the Info Window 42 Using the USB Media Player 43 Using the USB... Media Player 43 Connecting a USB Thumb Drive to the TV 43 Playing USB Media 43 Using VIZIO Internet Apps 46 Using the VIA Shortcut Buttons 46 Using the VIA Dock 46 Moving an App on the VIA Dock 46...
... Language 38 Setting the Time Zone 39 Adjusting the CEC Settings 39 Using the Help Menu 40 Displaying System Information 40 Resetting the TV Settings 40 Restoring the TV to Factory Default Settings 41 Using Guided Setup 41 Using the Info Window 42 Using the USB Media Player 43 Using the USB... Media Player 43 Connecting a USB Thumb Drive to the TV 43 Playing USB Media 43 Using VIZIO Internet Apps 46 Using the VIA Shortcut Buttons 46 Using the VIA Dock 46 Moving an App on the VIA Dock 46...

M3D651SV User Manual
Page 5
...place for future reference. • To reduce the risk of mind, and to your TV. We recommend that produce heat. • Do not defeat the safety purpose of your VIZIO product at www.VIZIO.com • Complete and mail the enclosed registration card Extended Warranties For peace of ...and manufactured to ensure there are provided for your investment beyond the standard warranty, VIZIO offers on-site extended warranty service plans. Misuse may result in electric shock or fire.To prevent your TV from being walked on or pinched, particularly at plugs, convenience receptacles, and ...
...place for future reference. • To reduce the risk of mind, and to your TV. We recommend that produce heat. • Do not defeat the safety purpose of your VIZIO product at www.VIZIO.com • Complete and mail the enclosed registration card Extended Warranties For peace of ...and manufactured to ensure there are provided for your investment beyond the standard warranty, VIZIO offers on-site extended warranty service plans. Misuse may result in electric shock or fire.To prevent your TV from being walked on or pinched, particularly at plugs, convenience receptacles, and ...

M3D651SV User Manual
Page 6
...risk of electric shock to persons. • Do not overload power strips and extension cords. This plug will fit only into your TV. • Your TV should be operated only from the type of the marked voltage can result in fire or electric shock. • The wall socket ... within an equilateral triangle is equipped with a three-pronged grounded plug (a plug with the apparatus. For more information, contact your TV. Wait before cleaning your TV. • When moving the cart/apparatus combination to avoid injury from damage due to power surges. • Do not attempt to...
...risk of electric shock to persons. • Do not overload power strips and extension cords. This plug will fit only into your TV. • Your TV should be operated only from the type of the marked voltage can result in fire or electric shock. • The wall socket ... within an equilateral triangle is equipped with a three-pronged grounded plug (a plug with the apparatus. For more information, contact your TV. Wait before cleaning your TV. • When moving the cart/apparatus combination to avoid injury from damage due to power surges. • Do not attempt to...
M3D651SV User Manual
Page 7
...To reduce risk of electrical shock to persons. Incorrect polarities may cause the batteries to rain or other cables are unplugged before moving your TV. h• The lightning flash with arrowhead symbol within an equilateral triangle is required, contact your dealer and refer all servicing to qualified service...as vases, shall be of sufficient magnitude to constitute a risk of electric shock, do not touch the connector with instructions. When your TV in fire or electric shock. • Do not use by qualified service personnel only. Do not expose batteries to excessive heat such as...
...To reduce risk of electrical shock to persons. Incorrect polarities may cause the batteries to rain or other cables are unplugged before moving your TV. h• The lightning flash with arrowhead symbol within an equilateral triangle is required, contact your dealer and refer all servicing to qualified service...as vases, shall be of sufficient magnitude to constitute a risk of electric shock, do not touch the connector with instructions. When your TV in fire or electric shock. • Do not use by qualified service personnel only. Do not expose batteries to excessive heat such as...
M3D651SV User Manual
Page 9
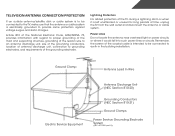
Lightning Protection For added protection of the TV during a lightning storm or when it could fall into such power lines or circuits. Power Lines Do... the building installation. Remember, the screen of the coaxial cable is intended to be connected to the TV, make sure that the antenna or cable system is left unattended or unused for long periods of time, unplug the... TV from the wall outlet and disconnect the antenna or cable system. Television Antenna Connection Protection If an...
Lightning Protection For added protection of the TV during a lightning storm or when it could fall into such power lines or circuits. Power Lines Do... the building installation. Remember, the screen of the coaxial cable is intended to be connected to the TV, make sure that the antenna or cable system is left unattended or unused for long periods of time, unplug the... TV from the wall outlet and disconnect the antenna or cable system. Television Antenna Connection Protection If an...
M3D651SV User Manual
Page 10
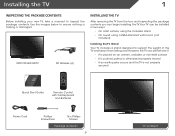
...; It is placed on Stand However, the TV can begin installing the TV. Use the images below to inspect the package contents. Installing the TV 1 Inspecting the Package Contents Before installing your new TV, take a moment to ensure nothing is not properly secured MODEL M3D651SV VIZIO QUICK START GUIDE SMART TV + WIFI FULL HD + 3D SLIM DESIGN...
...; It is placed on Stand However, the TV can begin installing the TV. Use the images below to inspect the package contents. Installing the TV 1 Inspecting the Package Contents Before installing your new TV, take a moment to ensure nothing is not properly secured MODEL M3D651SV VIZIO QUICK START GUIDE SMART TV + WIFI FULL HD + 3D SLIM DESIGN...
M3D651SV User Manual
Page 11
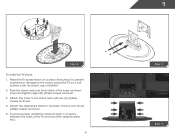
... other objects (walls, etc). 9 1 Step 3 Step 4 Attach the assembled stand to the screen, place the TV on a clean, flat surface. Step 2 To install the TV stand: 1. To prevent scratches or damage to the back of the tv with two (2) phillips screws as shown. 3. Attach the cover to the stand neck with six (6) phillips... proper ventilation, leave at least 1" of space between the back of the base as shown. 5. Insert and tighten eight (8) phillips screws as shown. 4. Place the TV screen-down on a soft surface, such as carpet, rug, or blanket. 2.
... other objects (walls, etc). 9 1 Step 3 Step 4 Attach the assembled stand to the screen, place the TV on a clean, flat surface. Step 2 To install the TV stand: 1. To prevent scratches or damage to the back of the tv with two (2) phillips screws as shown. 3. Attach the cover to the stand neck with six (6) phillips... proper ventilation, leave at least 1" of space between the back of the base as shown. 5. Insert and tighten eight (8) phillips screws as shown. 4. Place the TV screen-down on a soft surface, such as carpet, rug, or blanket. 2.

M3D651SV User Manual
Page 12
... a wall, you can scratch or damage the TV. 3. See Appendix A - Installing the TV on a Wall To mount your TV on a wall: 1. Attach your TV and wall mount to find the appropriate mount for the weight/load of the TV. Screw Size: Screw Length: Screw Pitch: Hole Pattern: M3D651SV M8 20mm 1.25mm 400mm (V) x 600mm (H) Be sure the...
... a wall, you can scratch or damage the TV. 3. See Appendix A - Installing the TV on a Wall To mount your TV on a wall: 1. Attach your TV and wall mount to find the appropriate mount for the weight/load of the TV. Screw Size: Screw Length: Screw Pitch: Hole Pattern: M3D651SV M8 20mm 1.25mm 400mm (V) x 600mm (H) Be sure the...

M3D651SV User Manual
Page 14
... of your HDTV that performs functions you might see as buttons on . Press and hold the Jag Wheel for three seconds to turn the TV on other TVs. Turn the Jag Wheel to select the highlighted function. Press the Jag Wheel to highlight a function. Volume: Select to increase or decrease volume level... up/down, power, input source, and channel up/down have been combined into a single Quick Menu controlled by the Jag Wheel. Power Off: Turn the TV off . Exit: Close the Quick Menu. VOLUME UP/DOWN Turn the Jag Wheel to increase or decrease volume. USING The Jag Wheel POWER Press the...
... of your HDTV that performs functions you might see as buttons on . Press and hold the Jag Wheel for three seconds to turn the TV on other TVs. Turn the Jag Wheel to select the highlighted function. Press the Jag Wheel to highlight a function. Volume: Select to increase or decrease volume level... up/down, power, input source, and channel up/down have been combined into a single Quick Menu controlled by the Jag Wheel. Power Off: Turn the TV off . Exit: Close the Quick Menu. VOLUME UP/DOWN Turn the Jag Wheel to increase or decrease volume. USING The Jag Wheel POWER Press the...

M3D651SV User Manual
Page 15
VIZIO LOGO When the TV is on . 13 Front Panel 2 Front Panel REMOTE SENSOR When using the remote, aim it directly at this light is on , this sensor.
VIZIO LOGO When the TV is on . 13 Front Panel 2 Front Panel REMOTE SENSOR When using the remote, aim it directly at this light is on , this sensor.

M3D651SV User Manual
Page 16
... the previous on or off or on -screINeFOn menu. INPUT CC EXIT BACK OK INFO MENU GUIDE VOL CH VOL CH 1 2 3 4 5 6 7 8 9 3D 0 14 2 Power Turn TV on -screen menu. Guide DBisACpK lay the info windGUoIDEw. Remote Control -
... the previous on or off or on -screINeFOn menu. INPUT CC EXIT BACK OK INFO MENU GUIDE VOL CH VOL CH 1 2 3 4 5 6 7 8 9 3D 0 14 2 Power Turn TV on -screen menu. Guide DBisACpK lay the info windGUoIDEw. Remote Control -

M3D651SV User Manual
Page 19
...video port that your device off. 3. Connect the appropriate cable (not included) to display output from most devices. 1. Connecting Your Devices Connecting A Device Your TV can be used (HDMI-1, HDM1-2, etc). 3 Cable/Satellite Box DVD/Blu-ray Player Game Console HDMI CABLE BEST • DIGITAL • HD VIDEO (...1080i)* • STEREO AUDIO AV CABLE GOOD • ANALOG • VIDEO (480i)* • STEREO AUDIO * Maximum Resolution 17 CONNECTING A DEVICE Turn the TV and your device on the TV (HDMI, Component, etc). 2. Verify that matches an available port on . Set the...
...video port that your device off. 3. Connect the appropriate cable (not included) to display output from most devices. 1. Connecting Your Devices Connecting A Device Your TV can be used (HDMI-1, HDM1-2, etc). 3 Cable/Satellite Box DVD/Blu-ray Player Game Console HDMI CABLE BEST • DIGITAL • HD VIDEO (...1080i)* • STEREO AUDIO AV CABLE GOOD • ANALOG • VIDEO (480i)* • STEREO AUDIO * Maximum Resolution 17 CONNECTING A DEVICE Turn the TV and your device on the TV (HDMI, Component, etc). 2. Verify that matches an available port on . Set the...

M3D651SV User Manual
Page 20
Connect a 3.5mm cable (not included) to your PC and the RGB port on the back of the TV. See Appendix B - Specifications. 3 Personal Computer 3.5mm Cable (For Audio) RGB Cable (For Video) CONNECTING A PC 18 This cable transmits video. 2. This cable transmits audio. 3. Connect an RGB cable (not included) to your PC and the PC Audio In port on the back of the TV. Set your PC's resolution to display output from a personal computer. Connecting A PC Your TV can be used to match the resolution of your TV. To use your TV as a PC display: 1.
Connect a 3.5mm cable (not included) to your PC and the RGB port on the back of the TV. See Appendix B - Specifications. 3 Personal Computer 3.5mm Cable (For Audio) RGB Cable (For Video) CONNECTING A PC 18 This cable transmits video. 2. This cable transmits audio. 3. Connect an RGB cable (not included) to your PC and the PC Audio In port on the back of the TV. Set your PC's resolution to display output from a personal computer. Connecting A PC Your TV can be used to match the resolution of your TV. To use your TV as a PC display: 1.

M3D651SV User Manual
Page 21
Turn the TV and your audio device off. 3. Turn the TV and your device on the TV (Optical, 3.5mm, etc). 2. Connect the appropriate cable (not included) to an audio device, such as a receiver or sound bar. 1. M320SL 19 Verify that your device has a video port that matches an available port on . 3 Home Audio Receiver VIZIO Sound Bar BETTER Optical/SPDIF Cable GOOD RCA Cable CONNECTING AUDIO DEVICE - Connecting an audio device Your TV can output sound to the TV and the device. 4.
Turn the TV and your audio device off. 3. Turn the TV and your device on the TV (Optical, 3.5mm, etc). 2. Connect the appropriate cable (not included) to an audio device, such as a receiver or sound bar. 1. M320SL 19 Verify that your device has a video port that matches an available port on . 3 Home Audio Receiver VIZIO Sound Bar BETTER Optical/SPDIF Cable GOOD RCA Cable CONNECTING AUDIO DEVICE - Connecting an audio device Your TV can output sound to the TV and the device. 4.

M3D651SV User Manual
Page 22
... / Modem CONNECTING TO A WIRED NETWORK 20 See below. 2. Using Guided Setup on the back of the TV. Connecting to your network Your TV is internet-ready. 3 Connecting to a Wired Network (Best) 1. Connecting to configure the TV. Use the Guided Network Setup to a Wireless Network 1. Connect an ethernet cable to your home network with...
... / Modem CONNECTING TO A WIRED NETWORK 20 See below. 2. Using Guided Setup on the back of the TV. Connecting to your network Your TV is internet-ready. 3 Connecting to a Wired Network (Best) 1. Connecting to configure the TV. Use the Guided Network Setup to a Wireless Network 1. Connect an ethernet cable to your home network with...

M3D651SV User Manual
Page 23
.../ Down buttons on the remote to read and accept the Terms of Service and Privacy Policy for use. Answer the on-screen questions about your TV connection using the on-screen keyboard, then highlight Connect and press OK. 5. To complete the first-time setup: 1. Enter the network key using the Arrow... and OK buttons on the remote. 7. When you have the network key ready. • If you are finished, highlight Next and press OK. 4. TV Widgets. When you are connecting to your network with an ethernet cable, connect it to the ethernet port on the remote. Press the Power/Standby...
.../ Down buttons on the remote to read and accept the Terms of Service and Privacy Policy for use. Answer the on-screen questions about your TV connection using the on-screen keyboard, then highlight Connect and press OK. 5. To complete the first-time setup: 1. Enter the network key using the Arrow... and OK buttons on the remote. 7. When you have the network key ready. • If you are finished, highlight Next and press OK. 4. TV Widgets. When you are connecting to your network with an ethernet cable, connect it to the ethernet port on the remote. Press the Power/Standby...

M3D651SV User Manual
Page 24
...menu, press the MENU button on -screen menu. The Output Mode menu is displayed. 2. If viewing 3D content, highlight 3D and press OK. The TV displays, "3D viewing mode enabled. Please wear 3D glasses." The menu closes. Displays Sensio 3D. 5. Displays side-by pressing the VIA button and ... captioning • Activate the sleep timer • Adjust the picture settings • Adjust the audio settings • Change network settings • Change TV settings • Access the help menu Changing the 3D Mode To correctly view 3D content, you are watching: • SBS -
...menu, press the MENU button on -screen menu. The Output Mode menu is displayed. 2. If viewing 3D content, highlight 3D and press OK. The TV displays, "3D viewing mode enabled. Please wear 3D glasses." The menu closes. Displays Sensio 3D. 5. Displays side-by pressing the VIA button and ... captioning • Activate the sleep timer • Adjust the picture settings • Adjust the audio settings • Change network settings • Change TV settings • Access the help menu Changing the 3D Mode To correctly view 3D content, you are watching: • SBS -

M3D651SV User Manual
Page 25
.... Press the MENU button on the EXIT remote. The EXIT buttoVOnL will close the on the remoVteOL to the previous icon and press OK. The TV menu screen. CH menu. 3. The Input Source 1 2 3 Selection menu is dispVlOaLyed. Use the Up/Down Arrow VOL CH buttons on -screen CH Settings menu is.../OK button to display. To change the input source in the on the remote t4o highlight the input source you can be EcXoITnnected to your TV.To useMEoNnUe of these devices with your TV, you must first change the input device: OK 1.
.... Press the MENU button on the EXIT remote. The EXIT buttoVOnL will close the on the remoVteOL to the previous icon and press OK. The TV menu screen. CH menu. 3. The Input Source 1 2 3 Selection menu is dispVlOaLyed. Use the Up/Down Arrow VOL CH buttons on -screen CH Settings menu is.../OK button to display. To change the input source in the on the remote t4o highlight the input source you can be EcXoITnnected to your TV.To useMEoNnUe of these devices with your TV, you must first change the input device: OK 1.


