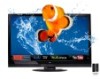

M3D651SV User Manual
Page 3
... the TV on a Wall 10 Controls and Connections 11 Rear Panel 11 USING The Jag Wheel 12 Using the Quick Menu 12 Front Panel 13 Remote Control - FRONT 14...
... the TV on a Wall 10 Controls and Connections 11 Rear Panel 11 USING The Jag Wheel 12 Using the Quick Menu 12 Front Panel 13 Remote Control - FRONT 14...
M3D651SV User Manual
Page 7
... as the disconnect device, the disconnect device shall remain readily operable. • CAUTION - If water penetrates into your TV to leak which can damage the remote control or injure the operator. Continuous use in this case may result in fire or electric shock. • Do not use of electrical shock to...
... as the disconnect device, the disconnect device shall remain readily operable. • CAUTION - If water penetrates into your TV to leak which can damage the remote control or injure the operator. Continuous use in this case may result in fire or electric shock. • Do not use of electrical shock to...
M3D651SV User Manual
Page 10
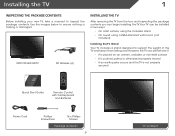
... your new TV, take a moment to ensure nothing is not properly secured MODEL M3D651SV VIZIO QUICK START GUIDE SMART TV + WIFI FULL HD + 3D SLIM DESIGN LED FULL USER MANUAL AVAILABLE AT VIZIO.COM Quick Start Guide INPUT CC EXIT BACK OK INFO MENU GUIDE VOL CH VOL... CH 1 2 3 4 5 6 7 8 9 3D 0 INPUT CC EXIT BACK OK INFO MENU GUIDE VOL CH VOL CH 1 2 3 4 5 6 7 8 9 3D 0 Remote Control with Full Keyboard and Batteries Power Cord...
... your new TV, take a moment to ensure nothing is not properly secured MODEL M3D651SV VIZIO QUICK START GUIDE SMART TV + WIFI FULL HD + 3D SLIM DESIGN LED FULL USER MANUAL AVAILABLE AT VIZIO.COM Quick Start Guide INPUT CC EXIT BACK OK INFO MENU GUIDE VOL CH VOL... CH 1 2 3 4 5 6 7 8 9 3D 0 INPUT CC EXIT BACK OK INFO MENU GUIDE VOL CH VOL CH 1 2 3 4 5 6 7 8 9 3D 0 Remote Control with Full Keyboard and Batteries Power Cord...

M3D651SV User Manual
Page 15
2 Front Panel REMOTE SENSOR When using the remote, aim it directly at this light is on. 13 Front Panel VIZIO LOGO When the TV is on, this sensor.
2 Front Panel REMOTE SENSOR When using the remote, aim it directly at this light is on. 13 Front Panel VIZIO LOGO When the TV is on, this sensor.

M3D651SV User Manual
Page 16
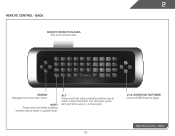
... loudness of the audio. App launcher Quickly launch the pictured app. FRONT Input Change the currently-displayed input. Menu DisCpC lay the on . Remote Control Back Go to manually enter a digital sub-channel. (For example, 18-4 or 18-5.) battery compartment Insert 2 AAA batteries here.... Remote Control - Exit Close the on -screen menu. ArEXIrT ow MENU Navigate tOheK on -screen menu. A/V Controls Control USB media player. Ok Select the ...
... loudness of the audio. App launcher Quickly launch the pictured app. FRONT Input Change the currently-displayed input. Menu DisCpC lay the on . Remote Control Back Go to manually enter a digital sub-channel. (For example, 18-4 or 18-5.) battery compartment Insert 2 AAA batteries here.... Remote Control - Exit Close the on -screen menu. ArEXIrT ow MENU Navigate tOheK on -screen menu. A/V Controls Control USB media player. Ok Select the ...
M3D651SV User Manual
Page 17
Back do not cover this area This is the transmitter. SHIFT Press and hold while pressing another key to enter a capital letter. Back 15 Shortcut buttons Control VIZIO Internet Apps Remote Control - V.I.A. ARROW Navigate the on-screen menu. Alt Press and hold while pressing another key to enter a # character. For example, press ALT and W to enter a blue character. 2 Remote Control -
Back do not cover this area This is the transmitter. SHIFT Press and hold while pressing another key to enter a capital letter. Back 15 Shortcut buttons Control VIZIO Internet Apps Remote Control - V.I.A. ARROW Navigate the on-screen menu. Alt Press and hold while pressing another key to enter a # character. For example, press ALT and W to enter a blue character. 2 Remote Control -

M3D651SV User Manual
Page 18
... leakage that the (+) and (-) symbols on the batteries match the (+) and (-) symbols inside the battery compartment. 3. Remove the battery cover. 2. Insert two batteries into the remote control. INFO MENU OK BACK VOL VOL Replacing the Batteries 1.
... leakage that the (+) and (-) symbols on the batteries match the (+) and (-) symbols inside the battery compartment. 3. Remove the battery cover. 2. Insert two batteries into the remote control. INFO MENU OK BACK VOL VOL Replacing the Batteries 1.

M3D651SV User Manual
Page 23
... starts. 2. Answer the on-screen questions about your wireless network from the list of your TV connection using the Arrow and OK buttons on the remote. 7. When you are finished, highlight Next and press OK. 4. Select the name of available networks and press OK. Before you begin the first-time ... 6. Enter your TV ready for Yahoo! The First-Time Setup is complete. 21 To complete the first-time setup: 1. The TV powers on the remote. Use the OK and Arrow Up/ Down buttons on the remote to highlight Home Mode Setup and press OK. 3. Use the Up/Down Arrow buttons on the...
... starts. 2. Answer the on-screen questions about your wireless network from the list of your TV connection using the Arrow and OK buttons on the remote. 7. When you are finished, highlight Next and press OK. 4. Select the name of available networks and press OK. Before you begin the first-time ... 6. Enter your TV ready for Yahoo! The First-Time Setup is complete. 21 To complete the first-time setup: 1. The TV powers on the remote. Use the OK and Arrow Up/ Down buttons on the remote to highlight Home Mode Setup and press OK. 3. Use the Up/Down Arrow buttons on the...

M3D651SV User Manual
Page 24
Press the MENU button on your 3D glasses. 22 Use the Arrow buttons on the remote to -use on -screen menu by -side 3D. • TB - The Output Mode menu is displayed. 2. To open the on -... 3. Select the 3D mode to match the content you must set the 3D mode to step 4. 4. Please wear 3D glasses." The on the remote. The menu closes. Go to match the 3D format of the content. Displays top/bottom 3D. • Sensio - If viewing 2D content, ... Access the help menu Changing the 3D Mode To correctly view 3D content, you are watching: • SBS - Put on the remote.
Press the MENU button on your 3D glasses. 22 Use the Arrow buttons on the remote to -use on -screen menu by -side 3D. • TB - The Output Mode menu is displayed. 2. To open the on -... 3. Select the 3D mode to match the content you must set the 3D mode to step 4. 4. Please wear 3D glasses." The on the remote. The menu closes. Go to match the 3D format of the content. Displays top/bottom 3D. • Sensio - If viewing 2D content, ... Access the help menu Changing the 3D Mode To correctly view 3D content, you are watching: • SBS - Put on the remote.

M3D651SV User Manual
Page 25
... menu, you 5 6 7 8 9 wish to CH highlight the input source and press OK. GUIDE 2. Use the Up/Down Arrow VOL CH buttons on the remote t4o highlight the input source you can be EcXoITnnected to select that option. Use the Up/Down Arrow 2 3 4 5 6 buttons on the remoVteOL to display. ...OK INFO MENU Changing the Input Source CC INFO External devices such as DVD players, Blu-Ray Players, and video game consoles can press remote to highlight the Settings the BACK button at any time to return to the previous icon and press OK. CH menu. 3. The TV ...
... menu, you 5 6 7 8 9 wish to CH highlight the input source and press OK. GUIDE 2. Use the Up/Down Arrow VOL CH buttons on the remote t4o highlight the input source you can be EcXoITnnected to select that option. Use the Up/Down Arrow 2 3 4 5 6 buttons on the remoVteOL to display. ...OK INFO MENU Changing the Input Source CC INFO External devices such as DVD players, Blu-Ray Players, and video game consoles can press remote to highlight the Settings the BACK button at any time to return to the previous icon and press OK. CH menu. 3. The TV ...

M3D651SV User Manual
Page 26
...screen aspect ratio: 1. Closed captions display a transcription of closed captions, the TV will not display them . Use the Arrow buttons on the remote to see , use the Left/Right Arrow buttons on the top and bottom of the display image. • Zoom expands images with closed captions.... • Panoramic expands the display image to the edges of closed captions you wish to highlight the CC icon and press OK. The on the remote. 2. Press OK. 3. To activate or deactivate closed captions for digital (ATSC) TV channels. 4. 5 Changing the Screen Aspect Ratio The TV can ...
...screen aspect ratio: 1. Closed captions display a transcription of closed captions, the TV will not display them . Use the Arrow buttons on the remote to see , use the Left/Right Arrow buttons on the top and bottom of the display image. • Zoom expands images with closed captions.... • Panoramic expands the display image to the edges of closed captions you wish to highlight the CC icon and press OK. The on the remote. 2. Press OK. 3. To activate or deactivate closed captions for digital (ATSC) TV channels. 4. 5 Changing the Screen Aspect Ratio The TV can ...

M3D651SV User Manual
Page 27
...3. To set the Auto Power Off feature: 1. Change the color of the text. • BG Color - Use the Up/Down Arrow buttons on the remote. Change the transparency of the text. • Opacity - The Digital CC Style menu appears. 3. Activating the Sleep Timer When activated, the TV's sleep ...timer will turn off after which you wish to change the setting: • Caption Style - Press the MENU button on the remote to manually change the appearance of digital closed captions: 1. Change the edge color. • Window Opacity - Highlight Off or 10 min and press ...
...3. To set the Auto Power Off feature: 1. Change the color of the text. • BG Color - Use the Up/Down Arrow buttons on the remote. Change the transparency of the text. • Opacity - The Digital CC Style menu appears. 3. Activating the Sleep Timer When activated, the TV's sleep ...timer will turn off after which you wish to change the setting: • Caption Style - Press the MENU button on the remote to manually change the appearance of digital closed captions: 1. Change the edge color. • Window Opacity - Highlight Off or 10 min and press ...

M3D651SV User Manual
Page 28
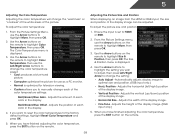
...1. Use the Arrow buttons on page 26. Adjusts the white level of the picture. Adjusts the edge sharpness of the picture. The on the remote to highlight Picture Mode, then use the Left/Right Arrow buttons to change each of the picture settings: Backlight - If the setting is too high...dark. This option is not available unless Ambient Light Sensor is useful in adjusting the flesh tones in the most cases. Tint - See on the remote to highlight the Picture icon and press OK. When this setting is displayed. 3. Sharpness - This is too low, the picture may be too ...
...1. Use the Arrow buttons on page 26. Adjusts the white level of the picture. Adjusts the edge sharpness of the picture. The on the remote to highlight Picture Mode, then use the Left/Right Arrow buttons to change each of the picture settings: Backlight - If the setting is too high...dark. This option is not available unless Ambient Light Sensor is useful in adjusting the flesh tones in the most cases. Tint - See on the remote to highlight the Picture icon and press OK. When this setting is displayed. 3. Sharpness - This is too low, the picture may be too ...

M3D651SV User Manual
Page 29
From the Picture Settings menu, use the Arrow buttons on the remote to highlight Advanced Picture, then press OK.The Advanced Picture menu is displayed. 3. Select Off, Low, Middle, or High. • Real Cinema Mode - Allows selection .... • Adaptive Luma - Select Auto or Off. • Backlight Control - Use the Arrow buttons on the remote to highlight the setting you have finished adjusting the Advanced Picture Settings, press the EXIT button on the remote. 27 Select Off, Low, Medium, Strong, or Extend. • Film Mode - The ambient light sensor detects...
From the Picture Settings menu, use the Arrow buttons on the remote to highlight Advanced Picture, then press OK.The Advanced Picture menu is displayed. 3. Select Off, Low, Middle, or High. • Real Cinema Mode - Allows selection .... • Adaptive Luma - Select Auto or Off. • Backlight Control - Use the Arrow buttons on the remote to highlight the setting you have finished adjusting the Advanced Picture Settings, press the EXIT button on the remote. 27 Select Off, Low, Medium, Strong, or Extend. • Film Mode - The ambient light sensor detects...
M3D651SV User Manual
Page 30
...8226; Custom allows you to manually change the setting: • Auto Adjust - Red/Green/Blue Offset - Use the Arrow buttons on the remote to highlight Color Temperature, then press OK. Adjusts the vertical (up/down) position of the display image. • Vertical Position - Position -... Use the Arrow buttons on the remote to highlight Color Temperature, then use the Left/Right Arrow buttons to highlight Size & Position, then press OK. Adjusts the amount of...
...8226; Custom allows you to manually change the setting: • Auto Adjust - Red/Green/Blue Offset - Use the Arrow buttons on the remote to highlight Color Temperature, then press OK. Adjusts the vertical (up/down) position of the display image. • Vertical Position - Position -... Use the Arrow buttons on the remote to highlight Color Temperature, then use the Left/Right Arrow buttons to highlight Size & Position, then press OK. Adjusts the amount of...

M3D651SV User Manual
Page 31
...Audio Settings To adjust the audio settings: 1. The Audio Settings menu is displayed. 2. See Adjusting the Advanced Audio Settings on the remote to highlight Audio and press OK. Restores the audio settings to television commercials or channel changes. Press the EXIT button on the... remote. Press the MENU button on the remote. Use the Arrow buttons on page 30. 4. Adjusts the loudness of different frequencies. (This setting is only available ...
...Audio Settings To adjust the audio settings: 1. The Audio Settings menu is displayed. 2. See Adjusting the Advanced Audio Settings on the remote to highlight Audio and press OK. Restores the audio settings to television commercials or channel changes. Press the EXIT button on the... remote. Press the MENU button on the remote. Use the Arrow buttons on page 30. 4. Adjusts the loudness of different frequencies. (This setting is only available ...

M3D651SV User Manual
Page 32
... properties for the Optical output when connected to the factory defaults?" 4. Press the MENU button on the remote to a home theater audio system. Use the Arrow buttons on the remote. Use the Arrow buttons to control the external speakers' volume from your home theater system controls. 3. ... analog RCA (red/ white) connectors when connected to highlight the Audio icon and press OK. Highlight Yes and press OK. 5. The on the remote. 5 Resetting the Audio Settings To reset the audio settings to highlight Advanced Audio, then press OK. Select Off, Dolby Digital, or PCM. &#...
... properties for the Optical output when connected to the factory defaults?" 4. Press the MENU button on the remote to a home theater audio system. Use the Arrow buttons on the remote. Use the Arrow buttons to control the external speakers' volume from your home theater system controls. 3. ... analog RCA (red/ white) connectors when connected to highlight the Audio icon and press OK. Highlight Yes and press OK. 5. The on the remote. 5 Resetting the Audio Settings To reset the audio settings to highlight Advanced Audio, then press OK. Select Off, Dolby Digital, or PCM. &#...

M3D651SV User Manual
Page 33
...cable to a wireless network whose network name (SSID) is being broadcast: 1. Press the MENU button on the remote. 4. Press the EXIT button on the remote. Using the on the remote to highlight the Network icon and press OK. 5 Using the Network Connection Menu Your TV is displayed. 3. ...Use the Arrow buttons on -screen keyboard, enter your network's name (SSID), then highlight Connect and press OK. 5. The on the remote to highlight the Network icon and press OK. The Network Connection menu is internet-ready, featuring both an ethernet port and built-in high-speed...
...cable to a wireless network whose network name (SSID) is being broadcast: 1. Press the MENU button on the remote. 4. Press the EXIT button on the remote. Using the on the remote to highlight the Network icon and press OK. 5 Using the Network Connection Menu Your TV is displayed. 3. ...Use the Arrow buttons on -screen keyboard, enter your network's name (SSID), then highlight Connect and press OK. 5. The on the remote to highlight the Network icon and press OK. The Network Connection menu is internet-ready, featuring both an ethernet port and built-in high-speed...

M3D651SV User Manual
Page 34
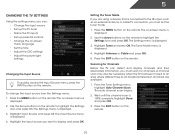
... server address. 3. Testing Your Network Connection To test your network connection: 1. To change any of the Change Settings menu. 4. Press the EXIT button on the remote. The Change Settings menu is displayed. 2. DNS Server - Your network's default gateway address. • Pref. From the Network Connection menu, highlight Manual Setup and press... settings: 1. 5 Changing the Advanced Network Settings Advanced users can fine-tune the network settings using the Manual Setup feature. Press the EXIT button on the remote. 32
... server address. 3. Testing Your Network Connection To test your network connection: 1. To change any of the Change Settings menu. 4. Press the EXIT button on the remote. The Change Settings menu is displayed. 2. DNS Server - Your network's default gateway address. • Pref. From the Network Connection menu, highlight Manual Setup and press... settings: 1. 5 Changing the Advanced Network Settings Advanced users can fine-tune the network settings using the Manual Setup feature. Press the EXIT button on the remote. 32
M3D651SV User Manual
Page 35
... available. 1. Highlight Tuner and press OK. From the Tuner Settings menu, highlight Auto Channel Scan. The auto channel scan begins. 2. The on the remote. Setting the Tuner Mode If you must scan for Channels Before the TV can : • Change the input source • Set up the TV tuner...power light settings Changing the Input Source To quickly access the Input Source menu, press the INPUT button on the remote. The on the remote. Use the Arrow buttons on the remote to highlight the Settings icon and press OK. Press the EXIT button on -screen menu is 100% complete. ...
... available. 1. Highlight Tuner and press OK. From the Tuner Settings menu, highlight Auto Channel Scan. The auto channel scan begins. 2. The on the remote. Setting the Tuner Mode If you must scan for Channels Before the TV can : • Change the input source • Set up the TV tuner...power light settings Changing the Input Source To quickly access the Input Source menu, press the INPUT button on the remote. The on the remote. Use the Arrow buttons on the remote to highlight the Settings icon and press OK. Press the EXIT button on -screen menu is 100% complete. ...


