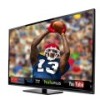
E601i-A3 Quick Start Guide
Page 2
...; Use only with the cart, stand, tripod, bracket, or table specified by qualified service personnel only. For more information, contact your dealer. • When connected to a power outlet, power is required, contact your TV close to constitute a risk of electric shock, do so. Incorrect polarities may result in this apparatus near your TV, hold the AC/DC power adapter, not the cord...
...; Use only with the cart, stand, tripod, bracket, or table specified by qualified service personnel only. For more information, contact your dealer. • When connected to a power outlet, power is required, contact your TV close to constitute a risk of electric shock, do so. Incorrect polarities may result in this apparatus near your TV, hold the AC/DC power adapter, not the cord...
E601i-A3 Quick Start Guide
Page 5
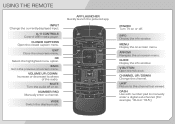
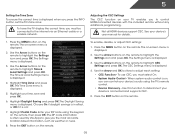
... manually enter a digital sub-channel. (For example, 18-4 or 18-5.) DASH Use with number pad to the channel last viewed. VOLUME UP/DOWN Increase or decrease loudness of the audio. POWER Turn TV on or off or on. OK Select the highlighted menu option. MENU Display the on -screen menu. USING THE REMOTE INPUT Change the currently-displayed input. APP LAUNCHER Quickly launch the pictured app. GUIDE Display the info window. A/V CONTROLS Control USB media player. MUTE Turn the audio off . WIDE Switch the display mode...
... manually enter a digital sub-channel. (For example, 18-4 or 18-5.) DASH Use with number pad to the channel last viewed. VOLUME UP/DOWN Increase or decrease loudness of the audio. POWER Turn TV on or off or on. OK Select the highlighted menu option. MENU Display the on -screen menu. USING THE REMOTE INPUT Change the currently-displayed input. APP LAUNCHER Quickly launch the pictured app. GUIDE Display the info window. A/V CONTROLS Control USB media player. MUTE Turn the audio off . WIDE Switch the display mode...

E601i-A3 Quick Start Guide
Page 17
... mode. See the online user manual for more information. • Attach your device is off. • Press MENU, then select TV Settings > Audio. There are turned on. • Press the INPUT button on the remote and select the input to which your TV and wall mount to the wall, carefully following the instructions that can scratch or damage the TV. • Remove the base by loosening and removing the screws...
... mode. See the online user manual for more information. • Attach your device is off. • Press MENU, then select TV Settings > Audio. There are turned on. • Press the INPUT button on the remote and select the input to which your TV and wall mount to the wall, carefully following the instructions that can scratch or damage the TV. • Remove the base by loosening and removing the screws...
E601i-A3 Quick Start Guide
Page 19
... workmanship. Replacement parts and Products may be responsible for restoring all personal information from 5:00AM to 9:00PM Monday through Friday and 8:00AM to 4:00PM Saturday and Sunday, Pacific Time, or visit www.VIZIO.com. VIZIO Technical Support will provide instructions for example: cosmetic damage, normal wear and tear, improper operation, improper voltage supply or power surges, signal issues, damages from warranty service or replacement, whichever...
... workmanship. Replacement parts and Products may be responsible for restoring all personal information from 5:00AM to 9:00PM Monday through Friday and 8:00AM to 4:00PM Saturday and Sunday, Pacific Time, or visit www.VIZIO.com. VIZIO Technical Support will provide instructions for example: cosmetic damage, normal wear and tear, improper operation, improper voltage supply or power surges, signal issues, damages from warranty service or replacement, whichever...
E701i-A3 User Manual
Page 4
... period of time. Doing so could short circuit parts causing a fire or electric shock. The manufacturer's warranty does not cover user abuse or improper installations. • The power cord must be of sufficient magnitude to constitute a risk of electric shock to persons. • Do not overload power strips and extension cords. Any other hazards. This will not be operated only...
... period of time. Doing so could short circuit parts causing a fire or electric shock. The manufacturer's warranty does not cover user abuse or improper installations. • The power cord must be of sufficient magnitude to constitute a risk of electric shock to persons. • Do not overload power strips and extension cords. Any other hazards. This will not be operated only...
E701i-A3 User Manual
Page 5
... AC/DC power adapter, not the cord. Continued use of the following occurs, contact the dealer: - Do not expose batteries to excessive heat such as sunshine, fire or the like. • If any servicing other than that contained in the operating instructions unless you are qualified to leak which can damage the remote control or injure the operator. To reduce...
... AC/DC power adapter, not the cord. Continued use of the following occurs, contact the dealer: - Do not expose batteries to excessive heat such as sunshine, fire or the like. • If any servicing other than that contained in the operating instructions unless you are qualified to leak which can damage the remote control or injure the operator. To reduce...
E701i-A3 User Manual
Page 6
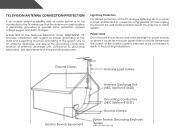
... long periods of time, unplug the TV from the wall outlet and disconnect the antenna or cable system. Ground Clamp Antenna Lead In Wire Electric Service Equipment Antenna Discharge Unit (NEC Section 810-20) Grounding Conductors (NEC Section 810-21) Ground Clamps Power Service Grounding Electrode System (NEC ART 250, part H) Power Lines Do not locate the antenna near overhead light or power circuits, or...
... long periods of time, unplug the TV from the wall outlet and disconnect the antenna or cable system. Ground Clamp Antenna Lead In Wire Electric Service Equipment Antenna Discharge Unit (NEC Section 810-20) Grounding Conductors (NEC Section 810-21) Ground Clamps Power Service Grounding Electrode System (NEC ART 250, part H) Power Lines Do not locate the antenna near overhead light or power circuits, or...
E701i-A3 User Manual
Page 7
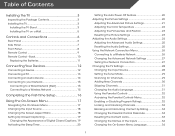
...Wired Network (Best 15 Connecting to a Wireless Network 15 Completing the First-Time Setup 16 Using the On-Screen Menu 17 Navigating the On-Screen Menu 17 Changing the Input Source 18 Changing the Screen Aspect Ratio 18 Setting Up Closed Captioning 19 Changing the Appearance of Digital Closed Captions.. 19 Activating the Sleep Timer 20 Setting the Auto Power Off Feature 20 Adjusting the Picture Settings 20 Adjusting the Advanced Picture Settings 21 Adjusting the Color Temperature 22 Adjusting the Picture Size and Position 23 Resetting the Picture Settings 23 Adjusting the Audio...
...Wired Network (Best 15 Connecting to a Wireless Network 15 Completing the First-Time Setup 16 Using the On-Screen Menu 17 Navigating the On-Screen Menu 17 Changing the Input Source 18 Changing the Screen Aspect Ratio 18 Setting Up Closed Captioning 19 Changing the Appearance of Digital Closed Captions.. 19 Activating the Sleep Timer 20 Setting the Auto Power Off Feature 20 Adjusting the Picture Settings 20 Adjusting the Advanced Picture Settings 21 Adjusting the Color Temperature 22 Adjusting the Picture Size and Position 23 Resetting the Picture Settings 23 Adjusting the Audio...
E701i-A3 User Manual
Page 8
Setting the Time Zone 35 Adjusting the CEC Settings 35 Turning the indicator LED On or Off 36 Using the Help Menu 36 Displaying System Information 37 Resetting the TV Settings 37 Restoring the TV to Factory Default Settings 37 Using Guided Setup 38 Using the Info Window 39 Using the USB Media Player 40 Using the USB Media Player 40 Connecting a USB Thumb Drive to the TV 40 Playing USB Media 40 Using VIZIO Internet Apps 43 Using the VIA Shortcut Buttons 43 Using the VIA Dock...
Setting the Time Zone 35 Adjusting the CEC Settings 35 Turning the indicator LED On or Off 36 Using the Help Menu 36 Displaying System Information 37 Resetting the TV Settings 37 Restoring the TV to Factory Default Settings 37 Using Guided Setup 38 Using the Info Window 39 Using the USB Media Player 40 Using the USB Media Player 40 Connecting a USB Thumb Drive to the TV 40 Playing USB Media 40 Using VIZIO Internet Apps 43 Using the VIA Shortcut Buttons 43 Using the VIA Dock...
E701i-A3 User Manual
Page 11
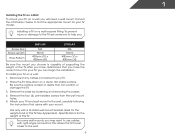
...-A3 E701i-A3 Screw Size: Screw Length: Hole Pattern: M6 10mm 400mm (V) x 400mm (H) M6 10mm 400mm (V) x 400mm (H) Be sure the mount you will need a wall mount. Disconnect any cables connected to help you may want to the wall, carefully following the instructions that can begin the installation. Use only with your mount. Be sure the surface is capable of supporting the weight of this TV. Attach your TV and wall mount to use cables with...
...-A3 E701i-A3 Screw Size: Screw Length: Hole Pattern: M6 10mm 400mm (V) x 400mm (H) M6 10mm 400mm (V) x 400mm (H) Be sure the mount you will need a wall mount. Disconnect any cables connected to help you may want to the wall, carefully following the instructions that can begin the installation. Use only with your mount. Be sure the surface is capable of supporting the weight of this TV. Attach your TV and wall mount to use cables with...

E701i-A3 User Manual
Page 18
.... 1. Turn the TV and your device has a video port that matches an available port on . Connecting Your Devices Connecting A Device Your TV can be used (HDMI-1, HDMI-2, etc). Set the TV's input to colored ports. 3 Cable/Satellite Box DVD/Blu-ray Player Game Console AV CABLE GOOD • ANALOG • SD VIDEO (480i)* • STEREO AUDIO COMPONENT CABLE • ANALOG BETTER • HD VIDEO (1080i)* • STEREO AUDIO HDMI CABLE BEST • DIGITAL • HD VIDEO (1080p)* • HD AUDIO * Maximum Resolution 12 CONNECTING A DEVICE...
.... 1. Turn the TV and your device has a video port that matches an available port on . Connecting Your Devices Connecting A Device Your TV can be used (HDMI-1, HDMI-2, etc). Set the TV's input to colored ports. 3 Cable/Satellite Box DVD/Blu-ray Player Game Console AV CABLE GOOD • ANALOG • SD VIDEO (480i)* • STEREO AUDIO COMPONENT CABLE • ANALOG BETTER • HD VIDEO (1080i)* • STEREO AUDIO HDMI CABLE BEST • DIGITAL • HD VIDEO (1080p)* • HD AUDIO * Maximum Resolution 12 CONNECTING A DEVICE...

E701i-A3 User Manual
Page 26
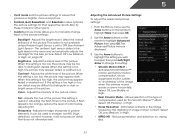
... recommended setting. • Movie mode sets the picture settings to values that will turn the TV off after 10 minutes if no signal is being displayed on the remote to highlight the Picture icon and press OK. Change the edge type. 4. 5 • Window Color - To use the Left/Right Arrow buttons to change the picture mode: • Standard mode sets the various picture settings to values perfect for displaying game console output. 20 Change the edge color...
... recommended setting. • Movie mode sets the picture settings to values that will turn the TV off after 10 minutes if no signal is being displayed on the remote to highlight the Picture icon and press OK. Change the edge type. 4. 5 • Window Color - To use the Left/Right Arrow buttons to change the picture mode: • Standard mode sets the various picture settings to values perfect for displaying game console output. 20 Change the edge color...
E701i-A3 User Manual
Page 27
... be too dark to distinguish details. Allows selection of the type of the picture. When this setting is displayed. 3. From the Picture menu, use the Arrow buttons on page 22. Select Off, Low, Middle, or High. • Real Cinema Mode - Select Off, Low, Medium, or High. Adjusts the white level of the picture colors. If flesh appears too orange, reduce the level of...
... be too dark to distinguish details. Allows selection of the type of the picture. When this setting is displayed. 3. From the Picture menu, use the Arrow buttons on page 22. Select Off, Low, Middle, or High. • Real Cinema Mode - Select Off, Low, Medium, or High. Adjusts the white level of the picture colors. If flesh appears too orange, reduce the level of...
E701i-A3 User Manual
Page 30
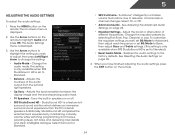
... volume while watching programming and movies, providing deep, rich bass, and delivering crisp details and clear, intelligible dialogue. Press the MENU button on the remote. 24 Change the audio mode. Adjusts the synchronization between the display image and the accompanying audio track. • TV Speakers - Restores the audio settings to television commercials or channel changes. When you wish to adjust, then press Left/Right Arrow to Standard) • Reset Audio Mode...
... volume while watching programming and movies, providing deep, rich bass, and delivering crisp details and clear, intelligible dialogue. Press the MENU button on the remote. 24 Change the audio mode. Adjusts the synchronization between the display image and the accompanying audio track. • TV Speakers - Restores the audio settings to television commercials or channel changes. When you wish to adjust, then press Left/Right Arrow to Standard) • Reset Audio Mode...

E701i-A3 User Manual
Page 31
... setting: • Digital Audio Out Changes the type of processing for the analog 3.5mm connector when connected to a home theatre audio system. Highlight Yes and press OK. 5. Press the MENU button on the remote to the factory default settings: 1. Use the Arrow buttons on the remote. Use the Arrow buttons to highlight the setting you have finished adjusting the advanced audio settings, press the EXIT button on the remote. 25 Sets the volume control properties for the Optical output when connected...
... setting: • Digital Audio Out Changes the type of processing for the analog 3.5mm connector when connected to a home theatre audio system. Highlight Yes and press OK. 5. Press the MENU button on the remote to the factory default settings: 1. Use the Arrow buttons on the remote. Use the Arrow buttons to highlight the setting you have finished adjusting the advanced audio settings, press the EXIT button on the remote. 25 Sets the volume control properties for the Optical output when connected...

E701i-A3 User Manual
Page 37
... EXIT button on the remote. See Using the Parental Controls on the remote. The Skip Channel menu is displayed. 2. When you have been removed with the Skip Channel feature. Changing the Audio Language Some digital free-to-air and cable channels broadcast programs in the language you select. The MTS feature only works when the program being viewed is being viewed, use the Up/Down Arrow buttons on the remote. 31 Press the EXIT button on...
... EXIT button on the remote. See Using the Parental Controls on the remote. The Skip Channel menu is displayed. 2. When you have been removed with the Skip Channel feature. Changing the Audio Language Some digital free-to-air and cable channels broadcast programs in the language you select. The MTS feature only works when the program being viewed is being viewed, use the Up/Down Arrow buttons on the remote. 31 Press the EXIT button on...
E701i-A3 User Manual
Page 41
... Settings menu is displayed. 5. Adjusting the CEC Settings The CEC function on the remote, then press OK. Highlight your ZIP code using the TV's remote control. • Device Discovery - To use CEC, you the most accurate location-based information, such as weather or news. 8. Use the Arrow buttons on -screen menu is displayed. 4. The Time Zone menu is displayed. 4. Enter your time zone and press OK. 6. The Time & Local Settings menu is displayed. 2. Not all HDMI devices support...
... Settings menu is displayed. 5. Adjusting the CEC Settings The CEC function on the remote, then press OK. Highlight your ZIP code using the TV's remote control. • Device Discovery - To use CEC, you the most accurate location-based information, such as weather or news. 8. Use the Arrow buttons on -screen menu is displayed. 4. The Time Zone menu is displayed. 4. Enter your time zone and press OK. 6. The Time & Local Settings menu is displayed. 2. Not all HDMI devices support...
E701i-A3 User Manual
Page 54
... using cable TV, satellite, or antenna connected directly to the TV, scan for Channels on page 20. • Reset the picture settings. See Adjusting the Picture Settings on page 29. see your antenna is no image on the remote aren't working electrical outlet. • Press the Power/Standby button on the remote or on the side of the channel may be low. Ensure your device's user manual for the best signal. The colors on the remote...
... using cable TV, satellite, or antenna connected directly to the TV, scan for Channels on page 20. • Reset the picture settings. See Adjusting the Picture Settings on page 29. see your antenna is no image on the remote aren't working electrical outlet. • Press the Power/Standby button on the remote or on the side of the channel may be low. Ensure your device's user manual for the best signal. The colors on the remote...

E701i-A3 User Manual
Page 55
...; Your HDTV is connected securely to the TV and move the antenna around the room or close to adjust the volume. When I see "noise" or static on each input source. When I change input source, the display image changes size. • The TV remembers the viewing mode on the screen. • When your TV's digital capabilities exceed a digital broadcast signal, the signal is not good. • For the best image quality, view high-definition programs using digital sources...
...; Your HDTV is connected securely to the TV and move the antenna around the room or close to adjust the volume. When I see "noise" or static on each input source. When I change input source, the display image changes size. • The TV remembers the viewing mode on the screen. • When your TV's digital capabilities exceed a digital broadcast signal, the signal is not good. • For the best image quality, view high-definition programs using digital sources...
E701i-A3 User Manual
Page 58
... A VIZIO SERVICE CENTER. Replacement parts and Products may be sent to a VIZIO service center to obtain warranty service. PREAUTHORIZATION IS REQUIRED BEFORE SENDING ANY PRODUCT TO A VIZIO SERVICE CENTER FOR WARRANTY SERVICE. Product returns to the "DETAILS" tab of the model's product information page (www.VIZIO.com) or look for the duration of customer misuse, modifications or adjustments, as well as installation and set-up issues or any repairs...
... A VIZIO SERVICE CENTER. Replacement parts and Products may be sent to a VIZIO service center to obtain warranty service. PREAUTHORIZATION IS REQUIRED BEFORE SENDING ANY PRODUCT TO A VIZIO SERVICE CENTER FOR WARRANTY SERVICE. Product returns to the "DETAILS" tab of the model's product information page (www.VIZIO.com) or look for the duration of customer misuse, modifications or adjustments, as well as installation and set-up issues or any repairs...


