
Download
Page 5
... an extended period of time, unplug the power cord. • To reduce risk of your dealer. Do not try to leak which can damage the remote control or injure the operator. Liquid sprays or any object drops into your TV, unplug the power cord and contact your TV may expose you...
... an extended period of time, unplug the power cord. • To reduce risk of your dealer. Do not try to leak which can damage the remote control or injure the operator. Liquid sprays or any object drops into your TV, unplug the power cord and contact your TV may expose you...
Download
Page 8
... Contents Installing the TV 3 Inspecting the Package Contents 3 Installing the TV 3 Installing the TV Stand 3 Installing the TV on a Wall 5 Controls and Connections 6 Front Panel 8 Remote Control 9 Replacing the Batteries 10 Connecting Your Devices 11 Connecting A Device 11 Connecting a Device -
... Contents Installing the TV 3 Inspecting the Package Contents 3 Installing the TV 3 Installing the TV Stand 3 Installing the TV on a Wall 5 Controls and Connections 6 Front Panel 8 Remote Control 9 Replacing the Batteries 10 Connecting Your Devices 11 Connecting A Device 11 Connecting a Device -
Download
Page 10
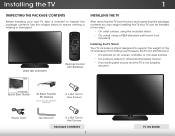
Use the images below to ensure nothing is not properly secured VIZIO QUICK START GUIDE Model: E551d-A0 Quick Start Guide 2x Basic Theater 3D Glasses Glasses may vary slightly from those shown 3 x M4 16mm Hex Screws Power Cord Hex Wrench 4 x M4 12mm ... TV and keep it from the box and inspecting the package contents you can begin installing the TV. However, the TV can still fall over . VIZIO LED LCD HDTV Remote Control with Batteries Installing the TV After removing the TV from falling over if: • It is placed on Stand
Use the images below to ensure nothing is not properly secured VIZIO QUICK START GUIDE Model: E551d-A0 Quick Start Guide 2x Basic Theater 3D Glasses Glasses may vary slightly from those shown 3 x M4 16mm Hex Screws Power Cord Hex Wrench 4 x M4 12mm ... TV and keep it from the box and inspecting the package contents you can begin installing the TV. However, the TV can still fall over . VIZIO LED LCD HDTV Remote Control with Batteries Installing the TV After removing the TV from falling over if: • It is placed on Stand
Download
Page 15
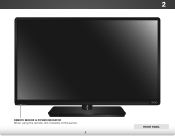
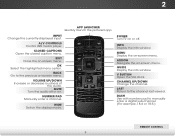
2 Front Panel REMOTE SENSOR & POWER INDICATOR When using the remote, aim it directly at this sensor. 8 Front Panel
2 Front Panel REMOTE SENSOR & POWER INDICATOR When using the remote, aim it directly at this sensor. 8 Front Panel
Download
Page 16
... Display the info window. Closed Captions Open the closed caption menu. Last Return to manually enter a digital sub-channel. (For example, 18-4 or 18-5.) Remote Control 9 2 Remote Control App launcher Quickly launch the pictured app. Mute Turn the audio off . Wide Switch the display mode. Input Change the currently-displayed input. A/V Controls...
... Display the info window. Closed Captions Open the closed caption menu. Last Return to manually enter a digital sub-channel. (For example, 18-4 or 18-5.) Remote Control 9 2 Remote Control App launcher Quickly launch the pictured app. Mute Turn the audio off . Wide Switch the display mode. Input Change the currently-displayed input. A/V Controls...

Download
Page 17
Replace the battery cover. 10 2 Replacing the Batteries 1. Remove the battery cover. 2. Insert two batteries into the remote control. Make sure that the (+) and (-) symbols on the batteries match the (+) and (-) symbols inside the battery compartment. 3.
Replace the battery cover. 10 2 Replacing the Batteries 1. Remove the battery cover. 2. Insert two batteries into the remote control. Make sure that the (+) and (-) symbols on the batteries match the (+) and (-) symbols inside the battery compartment. 3.

Download
Page 24
... cable, connect it to the ethernet port on and the Setup App starts. 2. Completing the First-Time Setup 4 The first time you turn on the remote to highlight Home Mode Setup and press OK. 4. When you are finished, highlight Next and press OK. 5. TV Widgets. Select the name of your ...and press OK. 6. Highlight Next and press OK. 7. The First-Time Setup is complete. 17 Use the OK and Arrow Up/ Down buttons on the remote. When you have the network key ready. • If you are connecting to your TV ready for Yahoo! Press the Power/Standby button on the...
... cable, connect it to the ethernet port on and the Setup App starts. 2. Completing the First-Time Setup 4 The first time you turn on the remote to highlight Home Mode Setup and press OK. 4. When you are finished, highlight Next and press OK. 5. TV Widgets. Select the name of your ...and press OK. 6. Highlight Next and press OK. 7. The First-Time Setup is complete. 17 Use the OK and Arrow Up/ Down buttons on the remote. When you have the network key ready. • If you are connecting to your TV ready for Yahoo! Press the Power/Standby button on the...
Download
Page 25
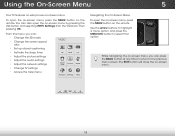
... • Adjust the picture settings • Adjust the audio settings • Adjust the network settings • Change TV settings • Access the help menu VIZIO ABC 3D Wide CC Sleep Timer Picture Audio Network Settings Help Navigating the On-Screen Menu To open the on-screen menu, press the MENU... button on the remote. Using the On-Screen Menu 5 Your TV features an easy-to select that option. You can press the BACK button at any time to ...
... • Adjust the picture settings • Adjust the audio settings • Adjust the network settings • Change TV settings • Access the help menu VIZIO ABC 3D Wide CC Sleep Timer Picture Audio Network Settings Help Navigating the On-Screen Menu To open the on-screen menu, press the MENU... button on the remote. Using the On-Screen Menu 5 Your TV features an easy-to select that option. You can press the BACK button at any time to ...
Download
Page 26
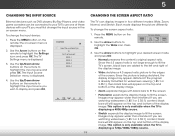
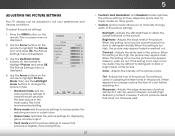
...fill the screen. If the program is displayed. 2. This option is only available when the TV is displayed. 3. Use the Arrow buttons on the remote. The TV Settings menu is displaying a 720p/1080i/1080p source. Screen Mode 2. Press WiOdeK. To change the screen aspect ratio: 1. If you...be connected to highlight the Settings icon and press OK. VIZIO Input Source Selection TV AV/Component HDMI-1 HDMI-2 HDMI-3 HDMI-4 4. Press the MENU button on the remote to your TV.To use one of the display image. on the remote to fill the TV's screen, black bars are watching...
...fill the screen. If the program is displayed. 2. This option is only available when the TV is displayed. 3. Use the Arrow buttons on the remote. The TV Settings menu is displaying a 720p/1080i/1080p source. Screen Mode 2. Press WiOdeK. To change the screen aspect ratio: 1. If you...be connected to highlight the Settings icon and press OK. VIZIO Input Source Selection TV AV/Component HDMI-1 HDMI-2 HDMI-3 HDMI-4 4. Press the MENU button on the remote to your TV.To use one of the display image. on the remote to fill the TV's screen, black bars are watching...
Download
Page 27
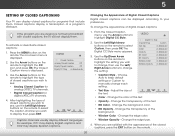
...your preference. To activate or deactivate closed captions you wish to see , use the Left/Right Arrow buttons on the remote to select the caption channel you wish to change the appearance of a program's dialogue. To change Extiht e se2ttDing: 3D •...captions, press the EXIT button on -screen menu is displayed. 3. Change the transparency of the background. • Window Color - VIZIO Closed Caption Analog Closed Caption Off Digital Closed Caption Off Digital CC Style As Broadcaster Caption channels usually display different languages. Change the ...
...your preference. To activate or deactivate closed captions you wish to see , use the Left/Right Arrow buttons on the remote to select the caption channel you wish to change the appearance of a program's dialogue. To change Extiht e se2ttDing: 3D •...captions, press the EXIT button on -screen menu is displayed. 3. Change the transparency of the background. • Window Color - VIZIO Closed Caption Analog Closed Caption Off Digital Closed Caption Off Digital CC Style As Broadcaster Caption channels usually display different languages. Change the ...
Download
Page 28
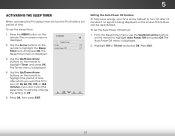
...120, or 180 minutes. To set period of time after 10 minutes if no signal is being displayed on the Timer Off remote to highlight the Sleep Auto Power Off Off Timer icon and press OK. To use the Up/Down Arrow buttons on the... remote to highlight Timer and press OK. Use the Arrow buttons on the screen. Press OK, then press EXIT. Sleep Timer ... don't want the TV to turn off after a set the Auto Power Off feature: 1. The on-screen menu is VIZIO displayed.
...120, or 180 minutes. To set period of time after 10 minutes if no signal is being displayed on the Timer Off remote to highlight the Sleep Auto Power Off Off Timer icon and press OK. To use the Up/Down Arrow buttons on the... remote to highlight Timer and press OK. Use the Arrow buttons on the screen. Press OK, then press EXIT. Sleep Timer ... don't want the TV to turn off after a set the Auto Power Off feature: 1. The on-screen menu is VIZIO displayed.
Download
Page 29
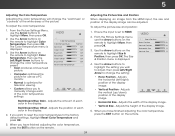
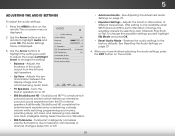
5 Adjusting the Picture Settings Your TV display can be difficult to distinguish in dark or Wbidrieght aCrCeas of color before adjusting tint. VIZIO Picture Picture Mode Backlight Brightness Contrast Color Tint Sharpness Custom - + 50 - + 50 - + 50 - + 50 - +0 - +0 More 4. Also try these modes ...the white level of the picture. If flesh appears too orange, reduce the level of the picture. Use the Arrow buttons on the remote to highlight the Picture icon and press OK. The Picture Settings menu is displayed. 2. Brightness - If the setting is too low, ...
5 Adjusting the Picture Settings Your TV display can be difficult to distinguish in dark or Wbidrieght aCrCeas of color before adjusting tint. VIZIO Picture Picture Mode Backlight Brightness Contrast Color Tint Sharpness Custom - + 50 - + 50 - + 50 - + 50 - +0 - +0 More 4. Also try these modes ...the white level of the picture. If flesh appears too orange, reduce the level of the picture. Use the Arrow buttons on the remote to highlight the Picture icon and press OK. The Picture Settings menu is displayed. 2. Brightness - If the setting is too low, ...

Download
Page 30
..., or High. • MPEG NR - Select On or Off. • Ambient Light Sensor - Adjusts the average brightness of brightness. VIZIO Advanced Picture Noise Reduction Low MPEG NR Low Color Enhancement Normal Adaptive Luma Medium Film Mode Auto Smart Dimming On 3. Select Off, Normal, ...advanced picture settings: 1. From the Picture Settings menu, use the Arrow buttons on the remote to compensate for the best picture. Use the Arrow buttons on the remote. Use the Arrow buttons to highlight the setting you have finished adjusting the Advanced Picture Settings...
..., or High. • MPEG NR - Select On or Off. • Ambient Light Sensor - Adjusts the average brightness of brightness. VIZIO Advanced Picture Noise Reduction Low MPEG NR Low Color Enhancement Normal Adaptive Luma Medium Film Mode Auto Smart Dimming On 3. Select Off, Normal, ...advanced picture settings: 1. From the Picture Settings menu, use the Arrow buttons on the remote to compensate for the best picture. Use the Arrow buttons on the remote. Use the Arrow buttons to highlight the setting you have finished adjusting the Advanced Picture Settings...
Download
Page 31
...Custom allows you have finished adjusting the color temperature, press the EXIT button on the remote. Network Settings Help • Vertical Position - Adjusts the height of the color temperature settings: VIZIO Color Temperature Color Temperature Red Gain - - Use the Arrow buttons on the Size... & Position remote to change each of the display image. 5. Green Offset Blue Offset - If you...
...Custom allows you have finished adjusting the color temperature, press the EXIT button on the remote. Network Settings Help • Vertical Position - Adjusts the height of the color temperature settings: VIZIO Color Temperature Color Temperature Red Gain - - Use the Arrow buttons on the Size... & Position remote to change each of the display image. 5. Green Offset Blue Offset - If you...
Download
Page 32
From the Picture Settings menu, use the Arrow buttons to the factory defaults?" 3. Press the EXIT button on the remote to the factory default settings: 1. The TV displays, "Are you sure you want to RESET Picture Settings to highlight More, then press OK. 2. Use the Arrow buttons on the remote. 25 Highlight Yes and press OK. 4. 5 Resetting the Picture Settings To reset the picture settings to highlight Reset Picture Mode, then press OK.
From the Picture Settings menu, use the Arrow buttons to the factory defaults?" 3. Press the EXIT button on the remote to the factory default settings: 1. The TV displays, "Are you sure you want to RESET Picture Settings to highlight More, then press OK. 2. Use the Arrow buttons on the remote. 25 Highlight Yes and press OK. 4. 5 Resetting the Picture Settings To reset the picture settings to highlight Reset Picture Mode, then press OK.
Download
Page 33
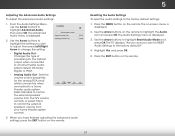
...Adjusting the Audio Settings To adjust the audio settings: 1. Press the MENU button on -screen menu is displayed. The on the remote. VIZIO Audio Settings Audio Mode Balance - Lip Sync - SRS StudioSound HD SRS TruVolume Advanced Audio Equalizer Settings Reset Audio Mode Surround On... • Lip Sync - Turns the built-in speakers on the remote to the factory defaults. Additionally, StudioSound HD completes the entertainment experience by selecting Jazz, Classical, Pop, Rock, Wide orZoFolmat. Select...
...Adjusting the Audio Settings To adjust the audio settings: 1. Press the MENU button on -screen menu is displayed. The on the remote. VIZIO Audio Settings Audio Mode Balance - Lip Sync - SRS StudioSound HD SRS TruVolume Advanced Audio Equalizer Settings Reset Audio Mode Surround On... • Lip Sync - Turns the built-in speakers on the remote to the factory defaults. Additionally, StudioSound HD completes the entertainment experience by selecting Jazz, Classical, Pop, Rock, Wide orZoFolmat. Select...
Download
Page 34
... for the Optical output when connected to the factory defaults?" 4. VIZIO Advanced Audio Digital Audio Out Analog Audio Out PCM Fixed 3. The Audio Settings menu is displayed. 2. InPpruet ss thWeideEXIT CbCutton on the remote. Select Variable to control the external speakers' volume from the TV...'s volume controls, or select Fixed to highlight the Audio icon and press OK. WiUdese thZoeomArroNwormbaul ttPoannosraomnic the remote to control the external speakers' volume from your home theater system controls. Use the Arrow buttons to highlight the setting you want...
... for the Optical output when connected to the factory defaults?" 4. VIZIO Advanced Audio Digital Audio Out Analog Audio Out PCM Fixed 3. The Audio Settings menu is displayed. 2. InPpruet ss thWeideEXIT CbCutton on the remote. Select Variable to control the external speakers' volume from the TV...'s volume controls, or select Fixed to highlight the Audio icon and press OK. WiUdese thZoeomArroNwormbaul ttPoannosraomnic the remote to control the external speakers' volume from your home theater system controls. Use the Arrow buttons to highlight the setting you want...
Download
Page 35
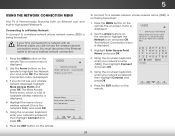
... OK. Use the Arrow buttons on the remote. VIZIO Network connection Wired Connection Disconnected Wireless Access Points Manual Setup Enter Access Point Name Test Connection Advanced network settings 6. Press the MENU button on the remote to a wireless network whose network name (SSID... Picture Audio Network Settings Help 28 Using the on the remote. Press the EXITAbBCutton on -screen keyboard, enter your network's name (SSID), then highlight Connect Wiadend pZoroemss ONKor.mal Panoramic VIZIO Enter Access Point Name Please enter your wireless network displayed...
... OK. Use the Arrow buttons on the remote. VIZIO Network connection Wired Connection Disconnected Wireless Access Points Manual Setup Enter Access Point Name Test Connection Advanced network settings 6. Press the MENU button on the remote to a wireless network whose network name (SSID... Picture Audio Network Settings Help 28 Using the on the remote. Press the EXITAbBCutton on -screen keyboard, enter your network's name (SSID), then highlight Connect Wiadend pZoroemss ONKor.mal Panoramic VIZIO Enter Access Point Name Please enter your wireless network displayed...
Download
Page 36
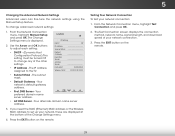
...preferred domain name server address. • Alt DNS Server - From the Network Connection menu, highlight Manual Setup and press OK. VIZIO IP Setting DHCP Off IP Address Subnet Mask Default Gateway Pref. Testing Your Network Connection To test your network, these are displayed... menu is displayed. 2. The IP address assigned to change advanced network settings: 1. Press the EXIT button on the remote. Press the EXIT button on the remote. Your network's default gateway address. • Pref. Use the Arrow and OK buttons to adjust each setting: •...
...preferred domain name server address. • Alt DNS Server - From the Network Connection menu, highlight Manual Setup and press OK. VIZIO IP Setting DHCP Off IP Address Subnet Mask Default Gateway Pref. Testing Your Network Connection To test your network, these are displayed... menu is displayed. 2. The IP address assigned to change advanced network settings: 1. Press the EXIT button on the remote. Press the EXIT button on the remote. Your network's default gateway address. • Pref. Use the Arrow and OK buttons to adjust each setting: •...

Download
Page 37
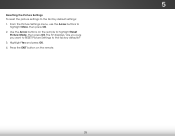
...; Change the on-screen menu language • Set the time • Adjust the CEC settings • Adjust the Power Indicator settings VIZIO Settings Input Source Tuner Name Input Parental Controls Menu Language Time & Local Settings CEC Settings Power Indicator TV English On Changing the Input Source... To quickly access the Input Source menu, press the INPUT button on the remote. Press the MENU button on the remote. Highlight InpuAtBCSource and press OK. 5 Changing the TV Settings Using the settings menu, you want to highlight the ...
...; Change the on-screen menu language • Set the time • Adjust the CEC settings • Adjust the Power Indicator settings VIZIO Settings Input Source Tuner Name Input Parental Controls Menu Language Time & Local Settings CEC Settings Power Indicator TV English On Changing the Input Source... To quickly access the Input Source menu, press the INPUT button on the remote. Press the MENU button on the remote. Highlight InpuAtBCSource and press OK. 5 Changing the TV Settings Using the settings menu, you want to highlight the ...


