Download
Page 3
...sure to inspect the package contents to protect your new VIZIO HDTV. When Reading this Manual When you to the presence of mind, and to ensure there are provided for future reference. Important Safety Instructions Your TV is intended to alert you see this symbol, please read... amplifiers) that you see this symbol, please read these instructions before operating your TV from the apparatus. • Only use , and maintenance of your TV. To get the most out of your new VIZIO product, read the accompanying helpful tip. Read the following instructions should be observed ...
...sure to inspect the package contents to protect your new VIZIO HDTV. When Reading this Manual When you to the presence of mind, and to ensure there are provided for future reference. Important Safety Instructions Your TV is intended to alert you see this symbol, please read... amplifiers) that you see this symbol, please read these instructions before operating your TV from the apparatus. • Only use , and maintenance of your TV. To get the most out of your new VIZIO product, read the accompanying helpful tip. Read the following instructions should be observed ...

Download
Page 4
... reliable operation of time. • Refer all servicing to persons. • Do not overload power strips and extension cords. Do not place your TV in fire or electric shock. • The wall socket should be operated only from tip-over. • Unplug this apparatus during lightning. If ...you are not blocked or covered. For more information, contact your TV safely. This plug will not be used for long period of time. If your outlet does not accommodate the three-pronged, have fallen into ...
... reliable operation of time. • Refer all servicing to persons. • Do not overload power strips and extension cords. Do not place your TV in fire or electric shock. • The wall socket should be operated only from tip-over. • Unplug this apparatus during lightning. If ...you are not blocked or covered. For more information, contact your TV safely. This plug will not be used for long period of time. If your outlet does not accommodate the three-pronged, have fallen into ...
Download
Page 5
... voltages, electric shock, and other cables are for an extended period of time, unplug the power cord. • To reduce risk of your TV may cause fire or electric shock. • Follow instructions for repair. The performance of electric shock, do so. • The lightning flash with...may be placed on the power cord may function abnormally. Unplug the power cord immediately and contact your dealer for moving your TV. • When unplugging your TV will not be exposed to dripping or splashing and no objects fill with arrowhead symbol within an h equilateral triangle is required...
... voltages, electric shock, and other cables are for an extended period of time, unplug the power cord. • To reduce risk of your TV may cause fire or electric shock. • Follow instructions for repair. The performance of electric shock, do so. • The lightning flash with...may be placed on the power cord may function abnormally. Unplug the power cord immediately and contact your dealer for moving your TV. • When unplugging your TV will not be exposed to dripping or splashing and no objects fill with arrowhead symbol within an h equilateral triangle is required...
Download
Page 6
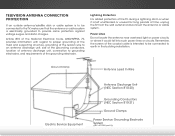
... electrodes, and requirements of the grounding electrode. Lightning Protection For added protection of the TV during a lightning storm or when it could fall into such power lines or circuits. Remember, the screen ...of time, unplug the TV from the wall outlet and disconnect the antenna or cable system. Ground Clamp Antenna Lead In ...is left unattended or unused for long periods of the coaxial cable is intended to be connected to the TV, make sure that the antenna or cable system is to be connected to earth in wire to an...
... electrodes, and requirements of the grounding electrode. Lightning Protection For added protection of the TV during a lightning storm or when it could fall into such power lines or circuits. Remember, the screen ...of time, unplug the TV from the wall outlet and disconnect the antenna or cable system. Ground Clamp Antenna Lead In ...is left unattended or unused for long periods of the coaxial cable is intended to be connected to the TV, make sure that the antenna or cable system is to be connected to earth in wire to an...
Download
Page 7
...Menu 28 Connecting to a Wireless Network 28 Changing the Advanced Network Settings 29 Testing Your Network Connection 29 Changing the TV Settings 30 Changing the Input Source 30 Setting the Tuner Mode 31 Scanning for Channels 31 Adding New Channels 32 Skipping...Changing the Parental Control Passcode 36 Resetting the Content Locks 36 Changing the Names of Contents Installing the TV 3 Inspecting the Package Contents 3 Installing the TV 3 Installing the TV Stand 3 Installing the TV on a Wall 5 Controls and Connections 6 Front Panel 8 Remote Control 9 Replacing the Batteries 10...
...Menu 28 Connecting to a Wireless Network 28 Changing the Advanced Network Settings 29 Testing Your Network Connection 29 Changing the TV Settings 30 Changing the Input Source 30 Setting the Tuner Mode 31 Scanning for Channels 31 Adding New Channels 32 Skipping...Changing the Parental Control Passcode 36 Resetting the Content Locks 36 Changing the Names of Contents Installing the TV 3 Inspecting the Package Contents 3 Installing the TV 3 Installing the TV Stand 3 Installing the TV on a Wall 5 Controls and Connections 6 Front Panel 8 Remote Control 9 Replacing the Batteries 10...

Download
Page 8
... the CEC Settings 38 Turning the Power Indicator On or Off 38 Using the Help Menu 39 Displaying System Information 39 Resetting the TV Settings 40 Restoring the TV to Factory Default Settings 40 Using Guided Setup 41 Using the Info Window 42 Using the USB Media Player 43 Using the USB... Media Player 43 Connecting a USB Thumb Drive to the TV 43 Playing USB Media 43 Using VIZIO Internet Apps 45 Using the VIA Shortcut Buttons 45 Using the VIA Dock 45 Moving an App on the VIA Dock 45...
... the CEC Settings 38 Turning the Power Indicator On or Off 38 Using the Help Menu 39 Displaying System Information 39 Resetting the TV Settings 40 Restoring the TV to Factory Default Settings 40 Using Guided Setup 41 Using the Info Window 42 Using the USB Media Player 43 Using the USB... Media Player 43 Connecting a USB Thumb Drive to the TV 43 Playing USB Media 43 Using VIZIO Internet Apps 45 Using the VIA Shortcut Buttons 45 Using the VIA Dock 45 Moving an App on the VIA Dock 45...
Download
Page 9
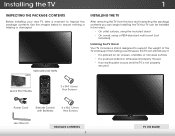
... still fall over . VIZIO LED LCD HDTV VIZIO Installing the TV After removing the TV from the box and inspecting the package contents you can be installed in two ways: • On a flat surface, using the included stand • On a wall, using a VESA-standard wall mount (not included) Installing the TV Stand Your TV includes a stand...
... still fall over . VIZIO LED LCD HDTV VIZIO Installing the TV After removing the TV from the box and inspecting the package contents you can be installed in two ways: • On a flat surface, using the included stand • On a wall, using a VESA-standard wall mount (not included) Installing the TV Stand Your TV includes a stand...
Download
Page 10
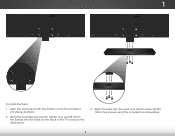
Using the included hex wrench, tighten four (4) M4 12mm hex screws into place as shown. 2. Align the neck piece with the neck and tighten three (3) M4 16mm hex screws using the included hex screwdriver. 4 1 To install the base: 1. Align the base with the bottom of the TV and slide it into the holes on the back of the TV to secure the neck piece. 3.
Using the included hex wrench, tighten four (4) M4 12mm hex screws into place as shown. 2. Align the neck piece with the neck and tighten three (3) M4 16mm hex screws using the included hex screwdriver. 4 1 To install the base: 1. Align the base with the bottom of the TV and slide it into the holes on the back of the TV to secure the neck piece. 3.
Download
Page 11
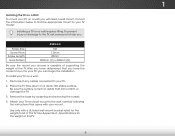
... cables connected to find the appropriate mount for your TV on a clean, flat, stable surface. To install your TV, you choose is clear of this TV. Place the TV face-down on a wall: 1. Screw Size: Screw Pitch: Screw Length: Hole Pattern: E550i-A0 M6 1.0mm 20mm 400mm (V) x 400mm (H) Be... sure the mount you can scratch or damage the TV. 3. After you have determined that...
... cables connected to find the appropriate mount for your TV on a clean, flat, stable surface. To install your TV, you choose is clear of this TV. Place the TV face-down on a wall: 1. Screw Size: Screw Pitch: Screw Length: Hole Pattern: E550i-A0 M6 1.0mm 20mm 400mm (V) x 400mm (H) Be... sure the mount you can scratch or damage the TV. 3. After you have determined that...

Download
Page 13
Change the channel. Side Panel 7 Change input source. Increase or decrease volume level. Turn TV off or on -screen menu. MENU - VOLUME UP/DOWN - INPUT - CHANNEL UP/DOWN - 2 INPUT MENU CH ^ CH VOL ^ VOL ^ ^ POWER - Open the on .
Change the channel. Side Panel 7 Change input source. Increase or decrease volume level. Turn TV off or on -screen menu. MENU - VOLUME UP/DOWN - INPUT - CHANNEL UP/DOWN - 2 INPUT MENU CH ^ CH VOL ^ VOL ^ ^ POWER - Open the on .

Download
Page 15
.../Down Increase or decrease loudness of the audio. Last Return to manually enter a digital sub-channel. (For example, 18-4 or 18-5.) Remote Control 9 Power Turn TV on -screen menu. Channel Up/Down Change the channel. Exit Close the on -screen menu. Number Pad Manually enter a channel. Arrow Navigate the on -screen...
.../Down Increase or decrease loudness of the audio. Last Return to manually enter a digital sub-channel. (For example, 18-4 or 18-5.) Remote Control 9 Power Turn TV on -screen menu. Channel Up/Down Change the channel. Exit Close the on -screen menu. Number Pad Manually enter a channel. Arrow Navigate the on -screen...
Download
Page 17
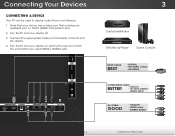
... your device off. 3. Connect the appropriate cable (not included) to display output from most devices. 1. Connecting Your Devices Connecting A Device Your TV can be used (HDMI-1, HDMI-2, etc). 1 2 (ARC) CABLE / ANTENNA 3 Cable/Satellite Box DVD/Blu-ray Player Game Console HDMI CABLE BEST &#...HD VIDEO (1080P)* • STEREO AUDIO AV CABLE GOOD • ANALOG • VIDEO (480i)* • STEREO AUDIO 11 * Maximum Resolution Turn the TV and your device on the TV (HDMI, Component, etc). 2. Verify that your device has a video port that matches an available port on . Set the...
... your device off. 3. Connect the appropriate cable (not included) to display output from most devices. 1. Connecting Your Devices Connecting A Device Your TV can be used (HDMI-1, HDMI-2, etc). 1 2 (ARC) CABLE / ANTENNA 3 Cable/Satellite Box DVD/Blu-ray Player Game Console HDMI CABLE BEST &#...HD VIDEO (1080P)* • STEREO AUDIO AV CABLE GOOD • ANALOG • VIDEO (480i)* • STEREO AUDIO 11 * Maximum Resolution Turn the TV and your device on the TV (HDMI, Component, etc). 2. Verify that your device has a video port that matches an available port on . Set the...

Download
Page 18
... are sent over the yellow connector while audio is the intelligent, all-digital interface that delivers both dazzling quality and unmatched ease of connecting your TV. 3 Connecting a Device - Audio and Video Cable Types AV CABLE AV cables (or Composite cables) are delivered with multi-channel surround audio...
... are sent over the yellow connector while audio is the intelligent, all-digital interface that delivers both dazzling quality and unmatched ease of connecting your TV. 3 Connecting a Device - Audio and Video Cable Types AV CABLE AV cables (or Composite cables) are delivered with multi-channel surround audio...

Download
Page 19
... your device on the TV (Optical, 3.5mm, etc). 2. Verify that your device has a video port that matches an available port on . 3 Home Audio Receiver VIZIO Sound Bar 1 2 (ARC) HDMI CABLE BEST • CFC 2-WAY COMMUNICATION • 2.0-5.1 DIGITAL AUDIO • PCM, DTS, DOBLY DIGITAL CABLE / ANTENNA 3.5MM CABLE GOOD • ...8226; DTS 5.1 CHANNEL 13 Connect the appropriate cable (not included) to an audio device, such as a receiver or sound bar. 1. Connecting an Audio Device Your TV can output sound to the TV and the device. 4. Turn the TV and your audio device off. 3.
... your device on the TV (Optical, 3.5mm, etc). 2. Verify that your device has a video port that matches an available port on . 3 Home Audio Receiver VIZIO Sound Bar 1 2 (ARC) HDMI CABLE BEST • CFC 2-WAY COMMUNICATION • 2.0-5.1 DIGITAL AUDIO • PCM, DTS, DOBLY DIGITAL CABLE / ANTENNA 3.5MM CABLE GOOD • ...8226; DTS 5.1 CHANNEL 13 Connect the appropriate cable (not included) to an audio device, such as a receiver or sound bar. 1. Connecting an Audio Device Your TV can output sound to the TV and the device. 4. Turn the TV and your audio device off. 3.

Download
Page 20
... transmit audio signals as pulses of connecting your devices to be sent over the red and white or 3.5mm connectors. Audio Return Channel-enabled (ARC) TVs allow audio to your audio device. Audio Cable Types RCA OR 3.5MM CABLE AV cables (or Composite cables) are digitally transmitted between devices. Audio signals...
... transmit audio signals as pulses of connecting your devices to be sent over the red and white or 3.5mm connectors. Audio Return Channel-enabled (ARC) TVs allow audio to your audio device. Audio Cable Types RCA OR 3.5MM CABLE AV cables (or Composite cables) are digitally transmitted between devices. Audio signals...

Download
Page 21
... HDMI Your Blu-Ray Player 15 Your Blu-Ray Player ARC Without HDMI ARC With HDMI ARC Built-in Tuner Built-in Tuner VIZIO Internet Apps Without an HDMI ARC setup, your TV will transmit audio signal to and from the built-in tuner and VIA apps to your... Home Audio Receiver can be removed. The HDMI cable will transmit audio signal from your TV with an all-digital audio/video connection. RCA (Audio) Your TV HDMI Your TV HDMI VIZIO Internet Apps With an HDMI ARC setup, the audio connection between your home audio receiver through a seperate audio connection. 3 Connecting ...
... HDMI Your Blu-Ray Player 15 Your Blu-Ray Player ARC Without HDMI ARC With HDMI ARC Built-in Tuner Built-in Tuner VIZIO Internet Apps Without an HDMI ARC setup, your TV will transmit audio signal to and from the built-in tuner and VIA apps to your... Home Audio Receiver can be removed. The HDMI cable will transmit audio signal from your TV with an all-digital audio/video connection. RCA (Audio) Your TV HDMI Your TV HDMI VIZIO Internet Apps With an HDMI ARC setup, the audio connection between your home audio receiver through a seperate audio connection. 3 Connecting ...
Download
Page 22
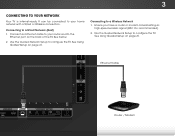
... the Guided Network Setup to a Wireless Network 1. Ethernet Cable 1 2 (ARC) CABLE / ANTENNA 16 Router / Modem Connecting to configure the TV. Use the Guided Network Setup to a Wired Network (Best) 1. See below. 2. Ensure you have a router or modem broadcasting as high-speed wireless signal (802.11n ... page 41. 3 Connecting to your home network with a Wired or Wireless connection. It can be connected to the Ethernet port on the back of the TV. Connect an Ethernet cable to your router and to your Network Your...
... the Guided Network Setup to a Wireless Network 1. Ethernet Cable 1 2 (ARC) CABLE / ANTENNA 16 Router / Modem Connecting to configure the TV. Use the Guided Network Setup to a Wired Network (Best) 1. See below. 2. Ensure you have a router or modem broadcasting as high-speed wireless signal (802.11n ... page 41. 3 Connecting to your home network with a Wired or Wireless connection. It can be connected to the Ethernet port on the back of the TV. Connect an Ethernet cable to your router and to your Network Your...
Download
Page 23
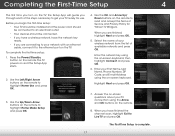
... it to read and accept the Terms of Service and Privacy Policy for use. Answer the on-screen questions about your TV connection using the on-screen keyboard. TV Widgets. Enter your TV ready for Yahoo! Highlight Next and press OK. 7. When you have the network key ready. • If you are finished... to your wireless network from the list of available networks and press OK. Completing the First-Time Setup 4 The first time you turn on the TV, the Setup App will guide you through each of the steps necessary to highlight Home Use and press OK. 3. Use the OK and Arrow Up...
... it to read and accept the Terms of Service and Privacy Policy for use. Answer the on-screen questions about your TV connection using the on-screen keyboard. TV Widgets. Enter your TV ready for Yahoo! Highlight Next and press OK. 7. When you have the network key ready. • If you are finished... to your wireless network from the list of available networks and press OK. Completing the First-Time Setup 4 The first time you turn on the TV, the Setup App will guide you through each of the steps necessary to highlight Home Use and press OK. 3. Use the OK and Arrow Up...

Download
Page 24
... • Activate the sleep timer • Adjust the picture settings • Adjust the audio settings • Adjust the network settings • Change TV settings • Access the help menu VIZIO ABC Input Wide CC Sleep Timer Picture Audio Network Settings Help Navigating the On-Screen Menu To open the on the remote... on -screen menu by pressing the VIA button and selecting HDTV Settings from the VIA Dock, then pressing OK. Using the On-Screen Menu 5 Your TV features an easy-to select that option.
... • Activate the sleep timer • Adjust the picture settings • Adjust the audio settings • Adjust the network settings • Change TV settings • Access the help menu VIZIO ABC Input Wide CC Sleep Timer Picture Audio Network Settings Help Navigating the On-Screen Menu To open the on the remote... on -screen menu by pressing the VIA button and selecting HDTV Settings from the VIA Dock, then pressing OK. Using the On-Screen Menu 5 Your TV features an easy-to select that option.

Download
Page 25
... Arrow buttons to highlight the input source and press OK. Use the Arrow buttons on the remote to highlight your TV.To use one of the display image. VIZIO Input Source Selection TV Comp/AV HDMI-1 HDMI-2 HDMI-3 HDMI-4 4. Press the MENU button on the remote. Press the MENU button on... the remote. This option is only available when the TV is displaying a 480i/480p source. • Stretch expands the display image to...
... Arrow buttons to highlight the input source and press OK. Use the Arrow buttons on the remote to highlight your TV.To use one of the display image. VIZIO Input Source Selection TV Comp/AV HDMI-1 HDMI-2 HDMI-3 HDMI-4 4. Press the MENU button on the remote. Press the MENU button on... the remote. This option is only available when the TV is displaying a 480i/480p source. • Stretch expands the display image to...


