
Download
Page 5
... back cover may result in fire or electric shock. • Do not use in the operating instructions unless you to leak which can damage the remote control or injure the operator. Continuous use your TV. Incorrect polarities may cause fire or electric shock. • Follow instructions for moving your TV. •...
... back cover may result in fire or electric shock. • Do not use in the operating instructions unless you to leak which can damage the remote control or injure the operator. Continuous use your TV. Incorrect polarities may cause fire or electric shock. • Follow instructions for moving your TV. •...
Download
Page 7
... Contents Installing the TV 3 Inspecting the Package Contents 3 Installing the TV 3 Installing the TV Stand 3 Installing the TV on a Wall 5 Controls and Connections 6 Front Panel 8 Remote Control 9 Replacing the Batteries 10 Connecting Your Devices 11 Connecting A Device 11 Connecting a Device - Audio and Video Cable Types....... 12 Connecting an Audio Device 13...
... Contents Installing the TV 3 Inspecting the Package Contents 3 Installing the TV 3 Installing the TV Stand 3 Installing the TV on a Wall 5 Controls and Connections 6 Front Panel 8 Remote Control 9 Replacing the Batteries 10 Connecting Your Devices 11 Connecting A Device 11 Connecting a Device - Audio and Video Cable Types....... 12 Connecting an Audio Device 13...
Download
Page 9
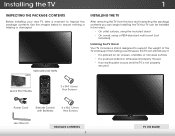
... TV, take a moment to ensure nothing is not properly secured QUICK START GUIDE Quick Start Guide Model: E390i-A1 3 x M4 16mm Hex Screws Power Cord Remote Control with Batteries 4 x M4 12mm Hex Screws Hex Wrench Package Contents 3 TV on an uneven, unstable, or non-level surface • It is pushed, pulled..., or otherwise improperly moved • If an earthquake occurs and the TV is missing or damaged. VIZIO LED LCD HDTV VIZIO Installing the TV After removing the TV from falling over if: • It is placed on Stand
... TV, take a moment to ensure nothing is not properly secured QUICK START GUIDE Quick Start Guide Model: E390i-A1 3 x M4 16mm Hex Screws Power Cord Remote Control with Batteries 4 x M4 12mm Hex Screws Hex Wrench Package Contents 3 TV on an uneven, unstable, or non-level surface • It is pushed, pulled..., or otherwise improperly moved • If an earthquake occurs and the TV is missing or damaged. VIZIO LED LCD HDTV VIZIO Installing the TV After removing the TV from falling over if: • It is placed on Stand

Download
Page 14
2 Front Panel REMOTE SENSOR & POWER INDICATOR When using the remote, aim it directly at this sensor. 8 Front Panel
2 Front Panel REMOTE SENSOR & POWER INDICATOR When using the remote, aim it directly at this sensor. 8 Front Panel

Download
Page 15
... decrease loudness of the audio. Power Turn TV on -screen menu. Last Return to manually enter a digital sub-channel. (For example, 18-4 or 18-5.) Remote Control 9 Closed Captions Open the closed caption menu. Info Display the info window. Exit Close the on . Mute Turn the audio off . V Button Open ...the VIA dock. Arrow Navigate the on -screen menu. Dash Use with number pad to the channel last viewed. 2 Remote Control App launcher Quickly launch the pictured app. Back Go to the previous on -screen menu. Channel Up/Down Change the channel.
... decrease loudness of the audio. Power Turn TV on -screen menu. Last Return to manually enter a digital sub-channel. (For example, 18-4 or 18-5.) Remote Control 9 Closed Captions Open the closed caption menu. Info Display the info window. Exit Close the on . Mute Turn the audio off . V Button Open ...the VIA dock. Arrow Navigate the on -screen menu. Dash Use with number pad to the channel last viewed. 2 Remote Control App launcher Quickly launch the pictured app. Back Go to the previous on -screen menu. Channel Up/Down Change the channel.

Download
Page 16
Insert two batteries into the remote control. Make sure that the (+) and (-) symbols on the batteries match the (+) and (-) symbols inside the battery compartment. 3. Remove the battery cover. 2. Replace the battery cover. 10 2 Replacing the Batteries 1.
Insert two batteries into the remote control. Make sure that the (+) and (-) symbols on the batteries match the (+) and (-) symbols inside the battery compartment. 3. Remove the battery cover. 2. Replace the battery cover. 10 2 Replacing the Batteries 1.
Download
Page 23
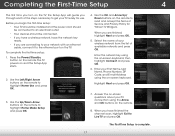
...-screen questions about your network with an ethernet cable, connect it to the ethernet port on the remote to Live TV and press OK. When you are connecting to your TV connection using the Arrow... and OK buttons on -screen keyboard. Enter the network key using the on the remote. 8. Highlight Next and press OK. 7. Before you begin the first-time setup: • Your TV...of your First Name, Last Name, Phone Number, ZIP Code, and E-mail Address using the on the remote to highlight Home Use and press OK. 3. Press the Power/Standby button on and the Setup App ...
...-screen questions about your network with an ethernet cable, connect it to the ethernet port on the remote to Live TV and press OK. When you are connecting to your TV connection using the Arrow... and OK buttons on -screen keyboard. Enter the network key using the on the remote. 8. Highlight Next and press OK. 7. Before you begin the first-time setup: • Your TV...of your First Name, Last Name, Phone Number, ZIP Code, and E-mail Address using the on the remote to highlight Home Use and press OK. 3. Press the Power/Standby button on and the Setup App ...

Download
Page 24
...Arrow buttons to highlight a menu option, and press the MENU/OK button to select that option. Wide Zoom Normal Panoramic While navigating the on the remote. To open the on-screen menu, press the MENU button on -screen menu. From this menu, you can: • Change the input source...Adjust the picture settings • Adjust the audio settings • Adjust the network settings • Change TV settings • Access the help menu VIZIO ABC Input Wide CC Sleep Timer Picture Audio Network Settings Help Navigating the On-Screen Menu To open the on-screen menu, press the MENU...
...Arrow buttons to highlight a menu option, and press the MENU/OK button to select that option. Wide Zoom Normal Panoramic While navigating the on the remote. To open the on-screen menu, press the MENU button on -screen menu. From this menu, you can: • Change the input source...Adjust the picture settings • Adjust the audio settings • Adjust the network settings • Change TV settings • Access the help menu VIZIO ABC Input Wide CC Sleep Timer Picture Audio Network Settings Help Navigating the On-Screen Menu To open the on-screen menu, press the MENU...

Download
Page 25
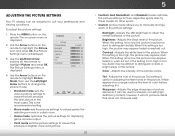
...Wide Zoom Normal Panoramic 3. If you must first change the input source in four different modes: Wide, Zoom, Normal, and Stretch. VIZIO Input Source Selection TV Comp/AV HDMI-1 HDMI-2 HDMI-3 HDMI-4 4. Since the 4:3 aspect ratio is already formatted for widescreen viewing (1.... appear on -screen menu is being stretched, the display image may appear wider than intended. Press the MENU button on the remote. Press WiOdeK. Screen Mode 2. To change the screen aspect ratio: 1. Each mode displays the picture differently. NetworkImSaetgtinegss mHaeylpappear wider...
...Wide Zoom Normal Panoramic 3. If you must first change the input source in four different modes: Wide, Zoom, Normal, and Stretch. VIZIO Input Source Selection TV Comp/AV HDMI-1 HDMI-2 HDMI-3 HDMI-4 4. Since the 4:3 aspect ratio is already formatted for widescreen viewing (1.... appear on -screen menu is being stretched, the display image may appear wider than intended. Press the MENU button on the remote. Press WiOdeK. Screen Mode 2. To change the screen aspect ratio: 1. Each mode displays the picture differently. NetworkImSaetgtinegss mHaeylpappear wider...
Download
Page 26
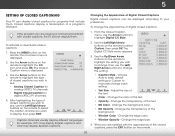
...8226; Opacity - Closed captions display a transcription of the text. • BG Color - Use the Left/Right Arrow buttons on the remote. VIZIO Digital CC Style Caption Style Custom Text Size As Broadcast Color As Broadcast Opacity As Broadcast 3. Change the transparency of a program's dialogue...size of the closed captions, press the EXIT button on the remote to manually change , then use the Left/ Right Arrow buttons to highlight Digital CC Style. 2. Change the background color. VIZIO Closed Caption Analog Closed Caption Off Digital Closed Caption Off Digital ...
...8226; Opacity - Closed captions display a transcription of the text. • BG Color - Use the Left/Right Arrow buttons on the remote. VIZIO Digital CC Style Caption Style Custom Text Size As Broadcast Color As Broadcast Opacity As Broadcast 3. Change the transparency of a program's dialogue...size of the closed captions, press the EXIT button on the remote to manually change , then use the Left/ Right Arrow buttons to highlight Digital CC Style. 2. Change the background color. VIZIO Closed Caption Analog Closed Caption Off Digital Closed Caption Off Digital ...

Download
Page 27
...Timer menu, use the sleep timer: 1. Highlight Off or 10 min and press OK. Press the MENU button on the remote to turn off after a set the Auto Power Off feature: 1. Sleep Timer 2. To set period of time after which...Audio Network Settings Help 21 The Timers menu is displayed. 3. The on-screen menu is being displayed on the remote to highlight the period of time. Use the Up/Down Arrow buttons on the screen. This feature can be ... TV's sleep timer will turn the TV off after 10 minutes if no signal is VIZIO displayed. Use the Up/Down Arrow buttons on the...
...Timer menu, use the sleep timer: 1. Highlight Off or 10 min and press OK. Press the MENU button on the remote to turn off after a set the Auto Power Off feature: 1. Sleep Timer 2. To set period of time after which...Audio Network Settings Help 21 The Timers menu is displayed. 3. The on-screen menu is being displayed on the remote to highlight the period of time. Use the Up/Down Arrow buttons on the screen. This feature can be ... TV's sleep timer will turn the TV off after 10 minutes if no signal is VIZIO displayed. Use the Up/Down Arrow buttons on the...
Download
Page 28
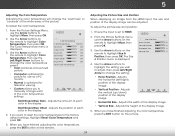
... the various picture settings to manually change each of the picture settings: Wide Exit Input Backlight - Use the Arrow buttons on the remote to highlight the Picture icon and press OK. Adjusts the black level of the picture. Contrast - Network Sharpness - To adjust the... is the recommended setting. • Movie mode sets the picture settings to values perfect for watching a movie in dark or Wbidrieght aCrCeas of the picture. VIZIO Picture Picture Mode Backlight Brightness Contrast Color Tint Sharpness Custom - + 50 - + 50 - + 50 - + 50 - +0 - +0 More 4. Adjusts...
... the various picture settings to manually change each of the picture settings: Wide Exit Input Backlight - Use the Arrow buttons on the remote to highlight the Picture icon and press OK. Adjusts the black level of the picture. Contrast - Network Sharpness - To adjust the... is the recommended setting. • Movie mode sets the picture settings to values perfect for watching a movie in dark or Wbidrieght aCrCeas of the picture. VIZIO Picture Picture Mode Backlight Brightness Contrast Color Tint Sharpness Custom - + 50 - + 50 - + 50 - + 50 - +0 - +0 More 4. Adjusts...

Download
Page 29
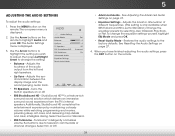
Use the Arrow buttons on the remote. VIZIO Advanced Picture Noise Reduction Low MPEG NR Low Color Enhancement Normal Adaptive Luma Medium Film Mode Auto Smart Dimming On 3. Adjusts the average brightness of ..., or Wide HiZgoohm. Use the Arrow buttons to highlight the setting you have finished adjusting the Advanced Picture Settings, press the EXIT button on the remote to change the setting: Ambient Light Sensor Medium • Noise Reduction Diminishes artifacts in the room and automatically adjusts the backlight for watching film. Select...
Use the Arrow buttons on the remote. VIZIO Advanced Picture Noise Reduction Low MPEG NR Low Color Enhancement Normal Adaptive Luma Medium Film Mode Auto Smart Dimming On 3. Adjusts the average brightness of ..., or Wide HiZgoohm. Use the Arrow buttons to highlight the setting you have finished adjusting the Advanced Picture Settings, press the EXIT button on the remote to change the setting: Ambient Light Sensor Medium • Noise Reduction Diminishes artifacts in the room and automatically adjusts the backlight for watching film. Select...
Download
Page 30
...the width of the display image. • Horizontal Size - When you have finished adjusting the color temperature, press the EXIT button on the remote to highlight More, then press OK. 2. To adjust the picture size and position: 1. Vertical Position + 16 Horizontal Size - +0 3. ... Color Temperature Adjusting the color temperature will change the "warmness" or "coolness" of the white areas of the color temperature settings: VIZIO Color Temperature Color Temperature Red Gain - - Green Gain Blue Gain - If you to change each of the picture. Ensure the ...
...the width of the display image. • Horizontal Size - When you have finished adjusting the color temperature, press the EXIT button on the remote to highlight More, then press OK. 2. To adjust the picture size and position: 1. Vertical Position + 16 Horizontal Size - +0 3. ... Color Temperature Adjusting the color temperature will change the "warmness" or "coolness" of the white areas of the color temperature settings: VIZIO Color Temperature Color Temperature Red Gain - - Green Gain Blue Gain - If you to change each of the picture. Ensure the ...

Download
Page 31
The TV displays, "Are you sure you want to RESET Picture Settings to highlight More, then press OK. 2. Highlight Yes and press OK. 4. Use the Arrow buttons on the remote. 25 From the Picture Settings menu, use the Arrow buttons to the factory defaults?" 3. 5 Resetting the Picture Settings To reset the picture settings to highlight Reset Picture Mode, then press OK. Press the EXIT button on the remote to the factory default settings: 1.
The TV displays, "Are you sure you want to RESET Picture Settings to highlight More, then press OK. 2. Highlight Yes and press OK. 4. Use the Arrow buttons on the remote. 25 From the Picture Settings menu, use the Arrow buttons to the factory defaults?" 3. 5 Resetting the Picture Settings To reset the picture settings to highlight Reset Picture Mode, then press OK. Press the EXIT button on the remote to the factory default settings: 1.
Download
Page 32
...StudioSound HD completes the entertainment experience by selecting Jazz, Classical, Pop, Rock, Wide orZoFolmat. See Resetting the Audio Settings on the remote. Use the Arrow buttons to change the setting: • Balance - SRS StudioSound HD SRS TruVolume Advanced Audio Equalizer Settings Reset ...-screen menu is a feature-rich surround sound solution which delivers an immersive surround sound experience from the left and right speakers. VIZIO Audio Settings Audio Mode Balance - StudioSound HD™ is displayed. 2. See Adjusting the Advanced Audio Settings on or off. &#...
...StudioSound HD completes the entertainment experience by selecting Jazz, Classical, Pop, Rock, Wide orZoFolmat. See Resetting the Audio Settings on the remote. Use the Arrow buttons to change the setting: • Balance - SRS StudioSound HD SRS TruVolume Advanced Audio Equalizer Settings Reset ...-screen menu is a feature-rich surround sound solution which delivers an immersive surround sound experience from the left and right speakers. VIZIO Audio Settings Audio Mode Balance - StudioSound HD™ is displayed. 2. See Adjusting the Advanced Audio Settings on or off. &#...

Download
Page 33
... Digital, or PCM. • Analog Audio Out - Press the MENU button on the remote. WiUdese thZoeomArroNwormbaul ttPoannosraomnic the remote to highlight Reset Audio Mode and press OK. Use the Arrow buttons to highlight the Audio icon and press OK. VIZIO Advanced Audio Digital Audio Out Analog Audio Out PCM Fixed 3. Highlight Yes aABnCd...
... Digital, or PCM. • Analog Audio Out - Press the MENU button on the remote. WiUdese thZoeomArroNwormbaul ttPoannosraomnic the remote to highlight Reset Audio Mode and press OK. Use the Arrow buttons to highlight the Audio icon and press OK. VIZIO Advanced Audio Digital Audio Out Analog Audio Out PCM Fixed 3. Highlight Yes aABnCd...

Download
Page 34
... keyboard, enter your TV is internet-ready, featuring both an Ethernet port and built-in high-speed Wireless-N. Using the on the remote. You must disconnect the Ethernet cable to highlight the Network icon and press OK. To connect to a wireless network whose network name... and press OK. 6. The on the remote to set up a wireless network connection. 1. Press the EXITAbBCutton on the remote. Press the MENU button on the remote. The More Access Points menu, which is a list of your Access point name. VIZIO Network connection Wired Connection Disconnected Wireless Access Points...
... keyboard, enter your TV is internet-ready, featuring both an Ethernet port and built-in high-speed Wireless-N. Using the on the remote. You must disconnect the Ethernet cable to highlight the Network icon and press OK. To connect to a wireless network whose network name... and press OK. 6. The on the remote to set up a wireless network connection. 1. Press the EXITAbBCutton on the remote. Press the MENU button on the remote. The More Access Points menu, which is a list of your Access point name. VIZIO Network connection Wired Connection Disconnected Wireless Access Points...

Download
Page 35
... buttons to adjust each setting: • DHCP - (Dynamic Host Configuration Protocol) This setting must be turned Off to the TV. VIZIO IP Setting DHCP Off IP Address Subnet Mask Default Gateway Pref. Testing Your Network Connection To test your network connection. Exit 2D 3D ... Server RJ45 MAC 0:0:0:0:0:0 Wireless MAC FF:FF:FF:FF:FF:FF • Subnet Mask - DNS Server - Press the EXIT button on the remote. To change any of the other settings. • IP Address - The IP address assigned to change advanced network settings: 1. From the Network...
... buttons to adjust each setting: • DHCP - (Dynamic Host Configuration Protocol) This setting must be turned Off to the TV. VIZIO IP Setting DHCP Off IP Address Subnet Mask Default Gateway Pref. Testing Your Network Connection To test your network connection. Exit 2D 3D ... Server RJ45 MAC 0:0:0:0:0:0 Wireless MAC FF:FF:FF:FF:FF:FF • Subnet Mask - DNS Server - Press the EXIT button on the remote. To change any of the other settings. • IP Address - The IP address assigned to change advanced network settings: 1. From the Network...

Download
Page 36
...you want to highlight the Settings Exit 2D 3D icon and press OK. Highlight InpuAtBCSource and press OK. Press the MENU button on the remote. To change the input source from the Settings menu: Wide Zoom Normal Panoramic 1. InHpuigt hligWhidtethe iCnCput source you can: • Change... Change the on-screen menu language • Set the time • Adjust the CEC settings • Adjust the Power Indicator settings VIZIO Settings Input Source Tuner Name Input Parental Controls Menu Language Time & Local Settings CEC Settings Power Indicator TV English On Changing the Input...
...you want to highlight the Settings Exit 2D 3D icon and press OK. Highlight InpuAtBCSource and press OK. Press the MENU button on the remote. To change the input source from the Settings menu: Wide Zoom Normal Panoramic 1. InHpuigt hligWhidtethe iCnCput source you can: • Change... Change the on-screen menu language • Set the time • Adjust the CEC settings • Adjust the Power Indicator settings VIZIO Settings Input Source Tuner Name Input Parental Controls Menu Language Time & Local Settings CEC Settings Power Indicator TV English On Changing the Input...


