
User Manual (English)
Page 5
... internal components may cause the batteries to persons. • When unplugging your TV in environments with heavy dust or high humidity may cause fire or electric shock. • Follow instructions for use of electrical shock to leak which can damage the remote control or injure the operator. Operating your TV, hold the AC/DC power adapter, not the cord. These servicing instructions...
... internal components may cause the batteries to persons. • When unplugging your TV in environments with heavy dust or high humidity may cause fire or electric shock. • Follow instructions for use of electrical shock to leak which can damage the remote control or injure the operator. Operating your TV, hold the AC/DC power adapter, not the cord. These servicing instructions...

User Manual (English)
Page 6
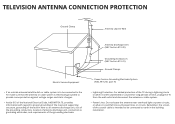
... Electric Service Equipment Power Service Grounding Electrode System (NEC ART 250, part H) vi Remember, the screen of the coaxial cable is intended to be connected to the TV, make sure that the antenna or cable system is...Code, ANSI/NFPSA 70, provides information with regard to proper grounding of the mast and supporting structure, grounding of the lead-in the building installation. Lightning Protection For added protection of time, unplug the TV from the wall outlet and disconnect the antenna or cable system. TELEVISION ANTENNA CONNECTION PROTECTION If an outside antenna...
... Electric Service Equipment Power Service Grounding Electrode System (NEC ART 250, part H) vi Remember, the screen of the coaxial cable is intended to be connected to the TV, make sure that the antenna or cable system is...Code, ANSI/NFPSA 70, provides information with regard to proper grounding of the mast and supporting structure, grounding of the lead-in the building installation. Lightning Protection For added protection of time, unplug the TV from the wall outlet and disconnect the antenna or cable system. TELEVISION ANTENNA CONNECTION PROTECTION If an outside antenna...

User Manual (English)
Page 7
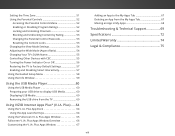
... the Picture Mode Edit Settings 31 Adjusting the Color Calibration Settings 32 Adjusting the Color Tuner Settings 32 Creating a Custom Picture Mode 35 Locking and Unlocking the Custom Picture Modes 36 Deleting a Custom Picture Mode 36 Adjusting the Audio Settings 37 Changing the Equalizer Settings 38 Delete the Custom Audio Mode 38 Setting Timers 39 Setting the Sleep Timer 39 Setting the Auto Power Off Feature 39 Enabling the Screen Saver 39 Blanking the Screen 40 Using the Network Connection Menu 41 Connecting to a Wireless Network 41 Changing the Manual Setup Settings 41...
... the Picture Mode Edit Settings 31 Adjusting the Color Calibration Settings 32 Adjusting the Color Tuner Settings 32 Creating a Custom Picture Mode 35 Locking and Unlocking the Custom Picture Modes 36 Deleting a Custom Picture Mode 36 Adjusting the Audio Settings 37 Changing the Equalizer Settings 38 Delete the Custom Audio Mode 38 Setting Timers 39 Setting the Sleep Timer 39 Setting the Auto Power Off Feature 39 Enabling the Screen Saver 39 Blanking the Screen 40 Using the Network Connection Menu 41 Connecting to a Wireless Network 41 Changing the Manual Setup Settings 41...
User Manual (English)
Page 8
... 53 Changing the Parental Control Passcode 53 Resetting the Content Locks 53 Changing the View Mode Settings 54 Adjusting the Wide Mode (Aspect Ratio 54 Changing Your TV's DLNA Name 55 Controlling Other Devices with CEC 55 Turning the Power Indicator On or Off 56 Restoring the TV to Factory Default Settings 57 Enabling and Disabling Smart Interactivity 57 Using the Guided Setup Menu 58 Using the Info Window 59 Using the USB Media Player 60 Using the USB Media Player 60...
... 53 Changing the Parental Control Passcode 53 Resetting the Content Locks 53 Changing the View Mode Settings 54 Adjusting the Wide Mode (Aspect Ratio 54 Changing Your TV's DLNA Name 55 Controlling Other Devices with CEC 55 Turning the Power Indicator On or Off 56 Restoring the TV to Factory Default Settings 57 Enabling and Disabling Smart Interactivity 57 Using the Guided Setup Menu 58 Using the Info Window 59 Using the USB Media Player 60 Using the USB Media Player 60...
User Manual (English)
Page 12
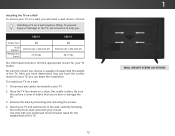
... of supporting the weight of this TV. 12 1 WALL MOUNT SCREW LOCATIONS Consult Installing a TV on a wall requires lifting. Remove the base by loosening and removing the screws. 4. E50-C1 E55-C1 Screw Size: Hole Pattern: Weight w/o Stand: M6 200 mm (V) x 200 mm (H) 27.56 lbs M6 300 mm (V) x 300 mm (H) 34.17 lbs the information below to the wall, carefully following the instructions that can begin the installation. Installing the TV on a Wall To mount...
... of supporting the weight of this TV. 12 1 WALL MOUNT SCREW LOCATIONS Consult Installing a TV on a wall requires lifting. Remove the base by loosening and removing the screws. 4. E50-C1 E55-C1 Screw Size: Hole Pattern: Weight w/o Stand: M6 200 mm (V) x 200 mm (H) 27.56 lbs M6 300 mm (V) x 300 mm (H) 34.17 lbs the information below to the wall, carefully following the instructions that can begin the installation. Installing the TV on a Wall To mount...

User Manual (English)
Page 15
... TV if it is off.) 1 POWER Turn TV on or off or on -screen menu. WIDE Change the display mode. ARROW Navigate the on and off. INPUT Change the currently displayed input. V BUTTON Open the VIZIO Internet Apps Plus® (V.I.A. LAST Return to the previous on . CLOSED CAPTIONS Turn closed captions on -screen menu. BACK Go to the channel last viewed. DASH Use with number pad to manually enter a digital sub-channel. (For example, 18-4 or 18-5.) REMOTE CONTROL 15
... TV if it is off.) 1 POWER Turn TV on or off or on -screen menu. WIDE Change the display mode. ARROW Navigate the on and off. INPUT Change the currently displayed input. V BUTTON Open the VIZIO Internet Apps Plus® (V.I.A. LAST Return to the previous on . CLOSED CAPTIONS Turn closed captions on -screen menu. BACK Go to the channel last viewed. DASH Use with number pad to manually enter a digital sub-channel. (For example, 18-4 or 18-5.) REMOTE CONTROL 15
User Manual (English)
Page 28
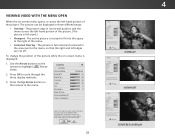
...screen menu is displayed: 1. VIZIO Network Settings Help PICTURE Picture Mode Backlight Brightness Contrast Color Tint Sharpness Standard - + 85 - + 50 - + 50 - + 59 - +0 - +9 More Picture Picture Mode Edit Color Calibration Select from preset picture modes. VIZIO PICTURE Picture Mode Backlight - Standard picture mode meets ENERGY STAR® requirements. To reduce video delay (lag) when gaming, use Calibrated mode. For the best picture, use Game mode. 3D Sleep Timer Picture Audio Network Settings Help VIEWPORT ABC Input Sleep Timer VIZIO...
...screen menu is displayed: 1. VIZIO Network Settings Help PICTURE Picture Mode Backlight Brightness Contrast Color Tint Sharpness Standard - + 85 - + 50 - + 50 - + 59 - +0 - +9 More Picture Picture Mode Edit Color Calibration Select from preset picture modes. VIZIO PICTURE Picture Mode Backlight - Standard picture mode meets ENERGY STAR® requirements. To reduce video delay (lag) when gaming, use Calibrated mode. For the best picture, use Game mode. 3D Sleep Timer Picture Audio Network Settings Help VIEWPORT ABC Input Sleep Timer VIZIO...

User Manual (English)
Page 29
... remote. 29 Use the Arrow buttons on -screen menu is displayed. 3. More Picture Picture Mode Edit Color Calibration Standard + 85 + 50 + 50 + 59 +0 +9 • Standard mode sets the various picture settings to values that does not otherwise exist. 5. For the best picture, use the Left/Right Arrow buttons to adjust the setting: • Backlight - When this setting is useful in Sleep Timer adPjuicstutrieng tAhudeioflesh tones in a dark room. • Vivid mode sets the picture settings to values that picture setting, then use Calibrated mode. Adjusts...
... remote. 29 Use the Arrow buttons on -screen menu is displayed. 3. More Picture Picture Mode Edit Color Calibration Standard + 85 + 50 + 50 + 59 +0 +9 • Standard mode sets the various picture settings to values that does not otherwise exist. 5. For the best picture, use the Left/Right Arrow buttons to adjust the setting: • Backlight - When this setting is useful in Sleep Timer adPjuicstutrieng tAhudeioflesh tones in a dark room. • Vivid mode sets the picture settings to values that picture setting, then use Calibrated mode. Adjusts...
User Manual (English)
Page 37
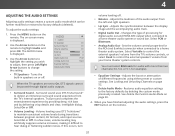
..., turn volume leveling off . 4 ADJUSTING THE AUDIO SETTINGS Adjusting audio settings creates a custom audio mode which can be passed through digital audio outputs. • Surround Sound - Select On or Off. • Volume Leveling - Sets the volume control properties for the RCA (red & white) connector when connected to control the external speakers' volume from the left and right speakers. • Lip Sync - Adjusts the synchronization between program content, AV formats, and input sources. Press the MENU button on the remote. 37 Use the Arrow buttons to change the setting...
..., turn volume leveling off . 4 ADJUSTING THE AUDIO SETTINGS Adjusting audio settings creates a custom audio mode which can be passed through digital audio outputs. • Surround Sound - Select On or Off. • Volume Leveling - Sets the volume control properties for the RCA (red & white) connector when connected to control the external speakers' volume from the left and right speakers. • Lip Sync - Adjusts the synchronization between program content, AV formats, and input sources. Press the MENU button on the remote. 37 Use the Arrow buttons to change the setting...
User Manual (English)
Page 58
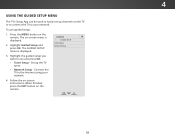
... the TV tuner. • Network Setup - VIZIO GUIDED SETUP Tuner Setup Network Setup 3. Highlight Guided Setup and press OK. Set up channels on the TV or to connect the TV to your network. 4. Connect the TV to use guided setup: 1. Follow the on -screen menu is displayed. Wide Zoom Normal Panoramic Exit 2D 3D ABC Input Wide CC Sleep Timer Picture Audio Network Settings Help 58 Highlight the guided setup you want to the Internet using your network. The on -screen instructions. Press the MENU button on the remote. When finished...
... the TV tuner. • Network Setup - VIZIO GUIDED SETUP Tuner Setup Network Setup 3. Highlight Guided Setup and press OK. Set up channels on the TV or to connect the TV to your network. 4. Connect the TV to use guided setup: 1. Follow the on -screen menu is displayed. Wide Zoom Normal Panoramic Exit 2D 3D ABC Input Wide CC Sleep Timer Picture Audio Network Settings Help 58 Highlight the guided setup you want to the Internet using your network. The on -screen instructions. Press the MENU button on the remote. When finished...
User Manual (English)
Page 70
... the audio connections of external devices (Blu-ray player, game console, cable/satellite box) that are connected to the TV. • If you are using cable TV, satellite, or an antenna connected directly to the TV, scan for details. • Adjust Brightness, Contrast, or Backlight. See Adjusting the Picture Settings on page 29. • Press the INPUT button on page 37. Ensure your device's user manual for channels. See Adjusting the Picture Settings on the...
... the audio connections of external devices (Blu-ray player, game console, cable/satellite box) that are connected to the TV. • If you are using cable TV, satellite, or an antenna connected directly to the TV, scan for details. • Adjust Brightness, Contrast, or Backlight. See Adjusting the Picture Settings on page 29. • Press the INPUT button on page 37. Ensure your device's user manual for channels. See Adjusting the Picture Settings on the...

User Manual (English)
Page 71
... the source you switch from, the difference may be noticeable. • See Changing the Screen Aspect Ratio on the remote to a window for the best signal. The picture is connected securely to the TV and move the antenna around the room or close to match your TV's display capabilities. However, sometimes pixels may be interfering with HDMI cables. • If you are using an antenna, the signal...
... the source you switch from, the difference may be noticeable. • See Changing the Screen Aspect Ratio on the remote to a window for the best signal. The picture is connected securely to the TV and move the antenna around the room or close to match your TV's display capabilities. However, sometimes pixels may be interfering with HDMI cables. • If you are using an antenna, the signal...

User Manual (English)
Page 74
..., improper operation, improper voltage supply or power surges, signal issues, damages from warranty service or replacement, whichever is within the warranty period, VIZIO will cover return shipping to the original purchaser of a new Product against defects in materials and workmanship. To determine if this occurs, your product, refer to you always clear all applicable data and passwords. Products with unreadable or removed serial numbers...
..., improper operation, improper voltage supply or power surges, signal issues, damages from warranty service or replacement, whichever is within the warranty period, VIZIO will cover return shipping to the original purchaser of a new Product against defects in materials and workmanship. To determine if this occurs, your product, refer to you always clear all applicable data and passwords. Products with unreadable or removed serial numbers...
Quickstart Guide (English)
Page 2
... is required, contact your TV from damage due to power surges. • Do not attempt to repair or service your TV. For more information, contact your TV close to smoke. Read the following occurs, contact the dealer: - Operating your dealer. • When connected to a power outlet, power is used as power-supply cord or plug is provided. • Never push any objects on...
... is required, contact your TV from damage due to power surges. • Do not attempt to repair or service your TV. For more information, contact your TV close to smoke. Read the following occurs, contact the dealer: - Operating your dealer. • When connected to a power outlet, power is used as power-supply cord or plug is provided. • Never push any objects on...
Quickstart Guide (English)
Page 3
...; Lightning Protection: For added protection of time, unplug the TV from the wall outlet and disconnect the antenna or cable system. • Power Lines: Do not locate the antenna near overhead light or power circuits, or where it is to be connected to earth in the building installation. TELEVISION ANTENNA CONNECTION PROTECTION Ground Clamp Antenna Lead In Wire Antenna Discharge Unit (NEC Section 810-20) Grounding...
...; Lightning Protection: For added protection of time, unplug the TV from the wall outlet and disconnect the antenna or cable system. • Power Lines: Do not locate the antenna near overhead light or power circuits, or where it is to be connected to earth in the building installation. TELEVISION ANTENNA CONNECTION PROTECTION Ground Clamp Antenna Lead In Wire Antenna Discharge Unit (NEC Section 810-20) Grounding...
Quickstart Guide (English)
Page 16
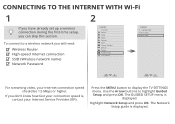
... connection SSID (Wireless network name) Network Password 2 VIZIO TV SETTINGS Picture Audio Timers Network Tuner CC Closed Captions Devices System Guided Setup User Manual Wide VIZIO GUIDED SETUP ZoComhanneNl Soermtuapl Panoramic Network Setup Exit 2D 3D ABC Input Wide CC Sleep Timer Picture Audio Network Settings Help Wide Exit Input Sleep Timer Networ For streaming video, your Internet Service Provider (ISP). To connect to a wireless network you can skip this section. Highlight Network Setup and press OK. Use the Arrow buttons to display the TV SETTINGS menu...
... connection SSID (Wireless network name) Network Password 2 VIZIO TV SETTINGS Picture Audio Timers Network Tuner CC Closed Captions Devices System Guided Setup User Manual Wide VIZIO GUIDED SETUP ZoComhanneNl Soermtuapl Panoramic Network Setup Exit 2D 3D ABC Input Wide CC Sleep Timer Picture Audio Network Settings Help Wide Exit Input Sleep Timer Networ For streaming video, your Internet Service Provider (ISP). To connect to a wireless network you can skip this section. Highlight Network Setup and press OK. Use the Arrow buttons to display the TV SETTINGS menu...
Quickstart Guide (English)
Page 20
... the power cord is set Volume Control to which your connected devices are properly inserted, matching the - Be sure TV Speakers is securely connected to the AC socket on the remote and select the input to External. The TV displays "No Signal." • Be sure your device is connected (HDMI-1, HDMI-2, COMP, etc.). Adjust the video settings of your external device There is no sound. • Press the VOLUME UP button on the remote...
... the power cord is set Volume Control to which your connected devices are properly inserted, matching the - Be sure TV Speakers is securely connected to the AC socket on the remote and select the input to External. The TV displays "No Signal." • Be sure your device is connected (HDMI-1, HDMI-2, COMP, etc.). Adjust the video settings of your external device There is no sound. • Press the VOLUME UP button on the remote...

Quickstart Guide (English)
Page 21
... operation. FCC Warning Changes or modifications not expressly approved by this Limited Warranty. Country USA Germany UK Japan Canada Compliance Control Regulation UL VDE BASE/BS Electric Appliance Control Act CSA Image(s) under this warranty is properly grounded. LIMITED WARRANTY ON PARTS AND LABOR Covers units purchased as installation and set-up issues or any , must utilize either repair or replace the Product at VIZIO...
... operation. FCC Warning Changes or modifications not expressly approved by this Limited Warranty. Country USA Germany UK Japan Canada Compliance Control Regulation UL VDE BASE/BS Electric Appliance Control Act CSA Image(s) under this warranty is properly grounded. LIMITED WARRANTY ON PARTS AND LABOR Covers units purchased as installation and set-up issues or any , must utilize either repair or replace the Product at VIZIO...
Quickstart Guide (English)
Page 22
... damage, normal wear and tear, improper operation, improper voltage supply or power surges, signal issues, damages from warranty service or replacement, whichever is required to the unit and does not include de-installation or re-installation of customer misuse, modifications or adjustments, as well as originally purchased. Replacement parts and units are not covered. Type of the original warranty or for a period of one year...
... damage, normal wear and tear, improper operation, improper voltage supply or power surges, signal issues, damages from warranty service or replacement, whichever is required to the unit and does not include de-installation or re-installation of customer misuse, modifications or adjustments, as well as originally purchased. Replacement parts and units are not covered. Type of the original warranty or for a period of one year...
Quickstart Guide (English)
Page 23
... wear and tear, improper operation, improper voltage supply or power surges, signal issues, damages from the unit before it was purchased. R.L. de C.V. R.L. R.L. VIZIO Sales & Marketing México S. R.L. This warranty does not cover, for warranty service. authorized service center. THERE ARE NO EXPRESS WARRANTIES OTHER THAN THOSE LISTED OR DESCRIBED ABOVE. VIZIO Sales & Marketing México S. THIS WARRANTY IS SUBJECT TO CHANGE WITHOUT NOTICE. CHECK www...
... wear and tear, improper operation, improper voltage supply or power surges, signal issues, damages from the unit before it was purchased. R.L. de C.V. R.L. R.L. VIZIO Sales & Marketing México S. R.L. This warranty does not cover, for warranty service. authorized service center. THERE ARE NO EXPRESS WARRANTIES OTHER THAN THOSE LISTED OR DESCRIBED ABOVE. VIZIO Sales & Marketing México S. THIS WARRANTY IS SUBJECT TO CHANGE WITHOUT NOTICE. CHECK www...


