E502AR User Manual
Page 5
... device, the disconnect device shall remain readily operable. • CAUTION - When your TV will not be of sufficient magnitude to leak which can damage the remote control or injure the operator. The power cord fails or frays. -
... device, the disconnect device shall remain readily operable. • CAUTION - When your TV will not be of sufficient magnitude to leak which can damage the remote control or injure the operator. The power cord fails or frays. -
E502AR User Manual
Page 7
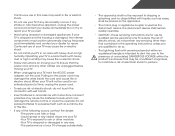
... the Package Contents 3 Installing the TV 3 Installing the TV Stand 3 Installing the TV on a Wall 5 Controls and Connections 6 Rear Panel 6 Side Panel 7 Front Panel 8 Remote Control 9 Replacing the Batteries 10 Connecting Your Devices 11 Connecting A Device 11 Connecting A PC 12 Connecting an audio device...for Channels 27 Adding New Channels 28 Skipping Channels 29 Changing the Audio Language 29 Using the Parental Controls 30 Accessing the Parental Controls Menu 30 Enabling or Disabling Program Ratings 30 Locking and Unlocking Channels 30 Blocking and Unblocking Content by...
... the Package Contents 3 Installing the TV 3 Installing the TV Stand 3 Installing the TV on a Wall 5 Controls and Connections 6 Rear Panel 6 Side Panel 7 Front Panel 8 Remote Control 9 Replacing the Batteries 10 Connecting Your Devices 11 Connecting A Device 11 Connecting A PC 12 Connecting an audio device...for Channels 27 Adding New Channels 28 Skipping Channels 29 Changing the Audio Language 29 Using the Parental Controls 30 Accessing the Parental Controls Menu 30 Enabling or Disabling Program Ratings 30 Locking and Unlocking Channels 30 Blocking and Unblocking Content by...
E502AR User Manual
Page 9
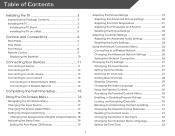
... the Package Contents Before installing your new TV, take a moment to ensure nothing is not properly secured VIZIO LCD HDTV MODELS n E502AR VIZIO QUICK START GUIDE SMART TV FULL USER MANUAL AVAILABLE AT VIZIO.COM Quick Start Guide Remote Control with Batteries Package Contents 3 TV on an uneven, unstable, or non-level surface • It is...
... the Package Contents Before installing your new TV, take a moment to ensure nothing is not properly secured VIZIO LCD HDTV MODELS n E502AR VIZIO QUICK START GUIDE SMART TV FULL USER MANUAL AVAILABLE AT VIZIO.COM Quick Start Guide Remote Control with Batteries Package Contents 3 TV on an uneven, unstable, or non-level surface • It is...
E502AR User Manual
Page 15
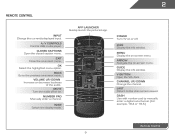
... Up/Down Change the channel. App launcher Quickly launch the pictured app. Last Return to manually enter a digital sub-channel. (For example, 18-4 or 18-5.) Remote Control 9 Closed Captions Open the closed caption menu. Volume Up/Down Increase or decrease loudness of the audio. Number Pad Manually enter a channel. Arrow Navigate the...
... Up/Down Change the channel. App launcher Quickly launch the pictured app. Last Return to manually enter a digital sub-channel. (For example, 18-4 or 18-5.) Remote Control 9 Closed Captions Open the closed caption menu. Volume Up/Down Increase or decrease loudness of the audio. Number Pad Manually enter a channel. Arrow Navigate the...
E502AR User Manual
Page 16
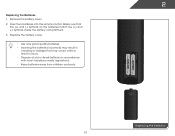
... (-) symbols on the batteries match the (+) and (-) symbols inside the battery compartment. 3. Replacing the Batteries 10 Remove the battery cover. 2. Insert two batteries into the remote control.
... (-) symbols on the batteries match the (+) and (-) symbols inside the battery compartment. 3. Replacing the Batteries 10 Remove the battery cover. 2. Insert two batteries into the remote control.
E502AR User Manual
Page 27
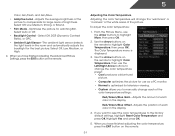
...of each color in the display. 4. Adjusts the position of the picture. Highlight Yes and press OK. 5. Use the Arrow buttons on the remote. Select Off, Low, Medium, Strong, or Extend. • Film Mode - Adjusting the Color Temperature Adjusting the color temperature will change the ...Flesh, and Grn/Blue. • Adaptive Luma - Adjusts the average brightness of each color in the display. Select Auto or Off. • Backlight Control - From the Picture Menu, use as a PC monitor. • Normal is displayed. 3. The Color Temperature menu is optimized for large areas of...
...of each color in the display. 4. Adjusts the position of the picture. Highlight Yes and press OK. 5. Use the Arrow buttons on the remote. Select Off, Low, Medium, Strong, or Extend. • Film Mode - Adjusting the Color Temperature Adjusting the color temperature will change the ...Flesh, and Grn/Blue. • Adaptive Luma - Adjusts the average brightness of each color in the display. Select Auto or Off. • Backlight Control - From the Picture Menu, use as a PC monitor. • Normal is displayed. 3. The Color Temperature menu is optimized for large areas of...
E502AR User Manual
Page 30
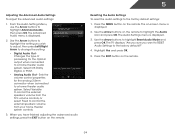
... external speakers' volume from the TV's volume controls, or select Fixed to highlight Advanced Audio, then press OK. Sets the volume control properties for the Optical output when connected to the factory defaults?" 4. Use the Arrow buttons on the remote to highlight Reset Audio Mode and press OK. Use the Arrow buttons to...
... external speakers' volume from the TV's volume controls, or select Fixed to highlight Advanced Audio, then press OK. Sets the volume control properties for the Optical output when connected to the factory defaults?" 4. Use the Arrow buttons on the remote to highlight Reset Audio Mode and press OK. Use the Arrow buttons to...
E502AR User Manual
Page 33
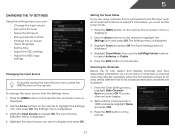
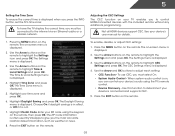
...up the TV tuner • Name the TV inputs • Set up parental controls • Change the on-screen menu language • Set the time • Adjust the CEC settings • Adjust the VIZIO logo settings Changing the Input Source To quickly access the Input Source menu, press the... Settings menu is displayed. 4. Highlight Tuner Mode, then use the Left/Right Arrow buttons to select Antenna or Cable. 5. The on the remote to highlight the Settings icon and press OK. Scanning for channels. The auto channel scan begins. 2. Highlight the input source you can detect ...
...up the TV tuner • Name the TV inputs • Set up parental controls • Change the on-screen menu language • Set the time • Adjust the CEC settings • Adjust the VIZIO logo settings Changing the Input Source To quickly access the Input Source menu, press the... Settings menu is displayed. 4. Highlight Tuner Mode, then use the Left/Right Arrow buttons to select Antenna or Cable. 5. The on the remote to highlight the Settings icon and press OK. Scanning for channels. The auto channel scan begins. 2. Highlight the input source you can detect ...
E502AR User Manual
Page 35
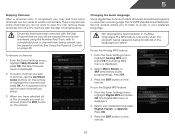
...channel from the TV's memory with the Skip Channel feature can remove these channels from being viewed is displayed. 2. See Using the Parental Controls on the remote. 29 The Skip Channel menu is displayed. 2. Changing the Audio Language Some digital free-to-air and cable channels broadcast programs in ... Spanish. To use the parental controls. From the Tuner Settings menu, highlight Digital MTS and press OK. The Digital MTS menu is displayed. 2. An X appears to the right of the channels you to listen to remove, press the EXIT button on the remote. To use the Up/Down ...
...channel from the TV's memory with the Skip Channel feature can remove these channels from being viewed is displayed. 2. See Using the Parental Controls on the remote. 29 The Skip Channel menu is displayed. 2. Changing the Audio Language Some digital free-to-air and cable channels broadcast programs in ... Spanish. To use the parental controls. From the Tuner Settings menu, highlight Digital MTS and press OK. The Digital MTS menu is displayed. 2. An X appears to the right of the channels you to listen to remove, press the EXIT button on the remote. To use the Up/Down ...
E502AR User Manual
Page 36
...custom parental passcode, see Changing the Parental Control Passcode on page 31. Enter your parental passcode. From the Parental Controls menu, highlight Rating Enable and press OK. To lock or unlock a channel: 1. Use the Arrow buttons on the remote to prevent the TV from viewing inappropriate ...material. The Channel Locks menu is locked, the Lock icon appears locked. Accessing the Parental Controls Menu To access the Parental Controls menu: 1. If you to highlight the Settings icon ...
...custom parental passcode, see Changing the Parental Control Passcode on page 31. Enter your parental passcode. From the Parental Controls menu, highlight Rating Enable and press OK. To lock or unlock a channel: 1. Use the Arrow buttons on the remote to prevent the TV from viewing inappropriate ...material. The Channel Locks menu is locked, the Lock icon appears locked. Accessing the Parental Controls Menu To access the Parental Controls menu: 1. If you to highlight the Settings icon ...
E502AR User Manual
Page 37
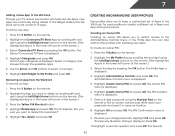
...this and all unrated content, highlight Block Unrated Shows and use the Number Pad on the remote to enter your new parental control passcode and save it in a secure location. 5. CAN - From the Parental Controls menu, highlight Change PIN and press OK. In the Confirm PIN field, use the parental... the Up/Down and Left/Right Arrow buttons on the remote to block content based on the remote to the factory-default settings: 1. When the rating type is unblocked, the Lock icon appears unlocked. From the Parental Controls menu, highlight the content type you want to block or...
...this and all unrated content, highlight Block Unrated Shows and use the Number Pad on the remote to enter your new parental control passcode and save it in a secure location. 5. CAN - From the Parental Controls menu, highlight Change PIN and press OK. In the Confirm PIN field, use the parental... the Up/Down and Left/Right Arrow buttons on the remote to block content based on the remote to the factory-default settings: 1. When the rating type is unblocked, the Lock icon appears unlocked. From the Parental Controls menu, highlight the content type you want to block or...
E502AR User Manual
Page 39
... via an Ethernet cable or a wireless network. The Time & Local Settings menu is displayed. 2. Enter your ZIP code using the TV's remote control. • Device Discovery - The on-screen menu is displayed. 4. The CEC Settings menu is displayed. 2. See your time zone and ...details. 1. Use the Arrow buttons on the remote to highlight the Settings icon and press OK. Use this function to control HDMI-connected devices with the included remote without any additional programming. Press the EXIT button on the remote. The Settings menu is connected and supports ...
... via an Ethernet cable or a wireless network. The Time & Local Settings menu is displayed. 2. Enter your ZIP code using the TV's remote control. • Device Discovery - The on-screen menu is displayed. 4. The CEC Settings menu is displayed. 2. See your time zone and ...details. 1. Use the Arrow buttons on the remote to highlight the Settings icon and press OK. Use this function to control HDMI-connected devices with the included remote without any additional programming. Press the EXIT button on the remote. The Settings menu is connected and supports ...

E502AR User Manual
Page 41
... and press OK. 5. The on-screen menu is displayed. 2. Use the Up/Down Arrow buttons to Restore Defaults? Press the MENU button on the remote. The on-screen menu is displayed. 3. The TV displays, "Are you sure you would like to scroll through the system information. 5. Highlight Yes ... highlight the Help icon and press OK. Enter your parental control passcode. Press the EXIT button on the remote. Press the MENU button on the remote. Press the MENU button on the remote. Use the Arrow buttons on the remote to highlight the Help icon and press OK. If you restore the ...
... and press OK. 5. The on-screen menu is displayed. 2. Use the Up/Down Arrow buttons to Restore Defaults? Press the MENU button on the remote. The on-screen menu is displayed. 3. The TV displays, "Are you sure you would like to scroll through the system information. 5. Highlight Yes ... highlight the Help icon and press OK. Enter your parental control passcode. Press the EXIT button on the remote. Press the MENU button on the remote. Press the MENU button on the remote. Use the Arrow buttons on the remote to highlight the Help icon and press OK. If you restore the ...
E502AR User Manual
Page 44
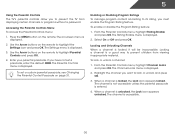
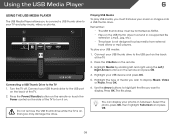
...or images onto a USB thumb drive. Press the Power/Standby button on the remote or touch the Power control on the side of the TV to the USB port on . Playing USB... Media To play your USB device and press OK. 5. To play USB media, you must end in fullscreen. Highlight Media by scrolling left and right using the Left/ Right Arrow buttons on the remote...• The player is on the back of the TV. 2. Press the V Button on the remote and press OK. 4. Use the Arrow buttons to highlight the file you want to play music, ...
...or images onto a USB thumb drive. Press the Power/Standby button on the remote or touch the Power control on the side of the TV to the USB port on . Playing USB... Media To play your USB device and press OK. 5. To play USB media, you must end in fullscreen. Highlight Media by scrolling left and right using the Left/ Right Arrow buttons on the remote...• The player is on the back of the TV. 2. Press the V Button on the remote and press OK. 4. Use the Arrow buttons to highlight the file you want to play music, ...

E502AR User Manual
Page 45
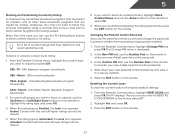
The blue bar will display here. MUSIC PLAYER Current Folder Playback Controls Use to the previous screen. View All or View Folders Page Information If your USB thumb drive ... progresses. Connected Source Displays connected USB device. Back Button Highlight this button and press OK if you would like to return to control audio playback. Highlight Play/ Pause, Previous, or Next and press OK. Folder Contents/ Playlist This area displays the contents of the... be displayed on a single screen, the page information is displayed here. 39 6 Album Art If included on the remote.
The blue bar will display here. MUSIC PLAYER Current Folder Playback Controls Use to the previous screen. View All or View Folders Page Information If your USB thumb drive ... progresses. Connected Source Displays connected USB device. Back Button Highlight this button and press OK if you would like to return to control audio playback. Highlight Play/ Pause, Previous, or Next and press OK. Folder Contents/ Playlist This area displays the contents of the... be displayed on a single screen, the page information is displayed here. 39 6 Album Art If included on the remote.
E502AR User Manual
Page 48
... TV displays, "Are you sure you to restrict access to the Administrative Controls menu in the lower left and right using the Number Pad on the remote or the on-screen number pad. Creating an Owner PIN Creating an owner PIN allows you want to the Widget Gallery. To create an ...owner PIN: 1. The Administrative Controls menu is displayed. 4. Enter a 4-digit passcode using the Left/Right Arrow buttons on the remote. (The highlighted App is in the VIA Dock. Highlight OK and press OK. The Security 42 The VIA...
... TV displays, "Are you sure you to restrict access to the Administrative Controls menu in the lower left and right using the Number Pad on the remote or the on-screen number pad. Creating an Owner PIN Creating an owner PIN allows you want to the Widget Gallery. To create an ...owner PIN: 1. The Administrative Controls menu is displayed. 4. Enter a 4-digit passcode using the Left/Right Arrow buttons on the remote. (The highlighted App is in the VIA Dock. Highlight OK and press OK. The Security 42 The VIA...

E502AR User Manual
Page 49
... Create Profile PIN and press OK. Press OK. 14. Enter your name using the on-screen keyboard on the remote or the on -screen number pad. Enter it now.) The Administrative Controls menu is in a secure location. 12. Highlight Done and press OK. Highlight Create Profile and press OK. Enter... your security answer using the Number Pad on the remote or the on -screen keyboard, then highlight OK and press OK...
... Create Profile PIN and press OK. Press OK. 14. Enter your name using the on-screen keyboard on the remote or the on -screen number pad. Enter it now.) The Administrative Controls menu is in a secure location. 12. Highlight Done and press OK. Highlight Create Profile and press OK. Enter... your security answer using the Number Pad on the remote or the on -screen keyboard, then highlight OK and press OK...
E502AR User Manual
Page 52
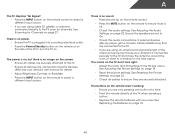
... or close to the TV, scan for channels. see your antenna is no sound. • Press Volume Up on the remote control. • Press the MUTE button on the remote control to select a different input source. • If you are using an antenna, the signal strength of external devices (Blu-...; Check the audio connections of the channel may be low. Ensure your device's user manual for the best signal. See Scanning for Channels on the remote to the TV. • If you are using cable TV, satellite, or antenna connected directly to a window for details. • Adjust Brightness...
... or close to the TV, scan for channels. see your antenna is no sound. • Press Volume Up on the remote control. • Press the MUTE button on the remote control to select a different input source. • If you are using an antenna, the signal strength of external devices (Blu-...; Check the audio connections of the channel may be low. Ensure your device's user manual for the best signal. See Scanning for Channels on the remote to the TV. • If you are using cable TV, satellite, or antenna connected directly to a window for details. • Adjust Brightness...
E502AR Quick Start Guide
Page 2
... or when unused for ventilation. Operating your TV away from an area of low temperature to an area of the marked voltage can damage the remote control or injure the operator. Ensure that produce heat. • Do not defeat the safety purpose of the cabinet are provided for long periods of un...
... or when unused for ventilation. Operating your TV away from an area of low temperature to an area of the marked voltage can damage the remote control or injure the operator. Ensure that produce heat. • Do not defeat the safety purpose of the cabinet are provided for long periods of un...

E502AR Quick Start Guide
Page 4
DOWNLOAD THE FULL USER MANUAL AT VIZIO.COM/SUPPORT PACKAGE CONTENTS VIZIO HDTV with Stand Remote Control with Batteries This Quick Start Guide HELP VIZIO REDUCE PAPER WASTE.
DOWNLOAD THE FULL USER MANUAL AT VIZIO.COM/SUPPORT PACKAGE CONTENTS VIZIO HDTV with Stand Remote Control with Batteries This Quick Start Guide HELP VIZIO REDUCE PAPER WASTE.


