E500AR User Manual
Page 4
... type of power source indicated on your TV to avoid causing fire, electric shock, or component damage. • A distance of at your TV. For more information, contact your dealer. • When connected to a power outlet, power is always flowing into the slots and openings on the top of your TV. Opening...
... type of power source indicated on your TV to avoid causing fire, electric shock, or component damage. • A distance of at your TV. For more information, contact your dealer. • When connected to a power outlet, power is always flowing into the slots and openings on the top of your TV. Opening...
E500AR User Manual
Page 6
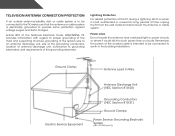
Article 810 of the National Electrical Code, ANSI/NFPSA 70, provides information with regard to proper grounding of the mast and supporting structure, grounding of the lead-in the building installation. Lightning Protection For added protection of ...
Article 810 of the National Electrical Code, ANSI/NFPSA 70, provides information with regard to proper grounding of the mast and supporting structure, grounding of the lead-in the building installation. Lightning Protection For added protection of ...
E500AR User Manual
Page 8
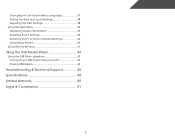
Changing the On-Screen Menu Language 37 Setting the Time and Local Settings 38 Adjusting the CEC Settings 38 Using the Help Menu 39 Displaying System Information 39 Resetting the TV Settings 39 Restoring the TV to Factory Default Settings 40 Using Setup Wizard 40 Using the Info Window 41 Using the USB Media Player 42 Using the USB Photo slideshow 42 Connecting a USB Thumb Drive to the TV 42 Playing USB Media 43 Troubleshooting & Technical Support 45 Specifications 48 Limited Warranty 50 Legal & Compliance 51 2
Changing the On-Screen Menu Language 37 Setting the Time and Local Settings 38 Adjusting the CEC Settings 38 Using the Help Menu 39 Displaying System Information 39 Resetting the TV Settings 39 Restoring the TV to Factory Default Settings 40 Using Setup Wizard 40 Using the Info Window 41 Using the USB Media Player 42 Using the USB Photo slideshow 42 Connecting a USB Thumb Drive to the TV 42 Playing USB Media 43 Troubleshooting & Technical Support 45 Specifications 48 Limited Warranty 50 Legal & Compliance 51 2
E500AR User Manual
Page 10
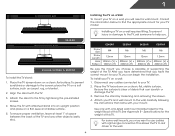
.... Remove the stand by tightening the pre-installed screws. 4. Specifications for your TV. 2. Align the stand with your TV model: E240AR E320AR, E420AR, & E500AR To install the TV stand: 1. For some wall mounts, you . Place the TV screen-down on a clean, flat, stable surface. Installing a TV on... a flat, level, and stable surface. 5. Place the TV face-down on a clean, flat surface. Consult the information below to use cables with a UL-listed wall mount bracket rated for your mount. To prevent injury or damage to the TV, ask someone to...
.... Remove the stand by tightening the pre-installed screws. 4. Specifications for your TV. 2. Align the stand with your TV model: E240AR E320AR, E420AR, & E500AR To install the TV stand: 1. For some wall mounts, you . Place the TV screen-down on a clean, flat, stable surface. Installing a TV on... a flat, level, and stable surface. 5. Place the TV face-down on a clean, flat surface. Consult the information below to use cables with a UL-listed wall mount bracket rated for your mount. To prevent injury or damage to the TV, ask someone to...

E500AR User Manual
Page 38
... menu is connected to the RF input, such as an external antenna or cable TV connection, you can detect and display channels and their associated information, you want to highlight the Settings icon and press OK. Press the MENU button on the remote. A channel scan may also be necessary when the...
... menu is connected to the RF input, such as an external antenna or cable TV connection, you can detect and display channels and their associated information, you want to highlight the Settings icon and press OK. Press the MENU button on the remote. A channel scan may also be necessary when the...

E500AR User Manual
Page 45
... the MENU button on the remote. 39 Use the Up/Down Arrow buttons to its factory default settings • Start setup wizard 5 Displaying System Information To display a summary of the TV settings: 1. Press the EXIT button on the remote. Highlight Reset TV Settings and press OK. The TV displays,... "Are you sure you are finished reviewing the system information, press the EXIT button on -screen menu is displayed. 2. The on the remote. Resetting the TV Settings To reset the TV's picture and ...
... the MENU button on the remote. 39 Use the Up/Down Arrow buttons to its factory default settings • Start setup wizard 5 Displaying System Information To display a summary of the TV settings: 1. Press the EXIT button on the remote. Highlight Reset TV Settings and press OK. The TV displays,... "Are you sure you are finished reviewing the system information, press the EXIT button on -screen menu is displayed. 2. The on the remote. Resetting the TV Settings To reset the TV's picture and ...

E500AR User Manual
Page 47
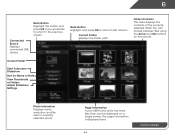
Using the Info Window The Info Window can be displayed by pressing the INFO or GUIDE button on the remote: • Press the INFO or GUIDE button one time to display channel and input information. • Press the INFO or GUIDE button two times to display the program title and closed captioning information. • Press the INFO or GUIDE button three times to display the program description. Program Title/CC Information 5 Channel Information Program Description 41 Info Window
Using the Info Window The Info Window can be displayed by pressing the INFO or GUIDE button on the remote: • Press the INFO or GUIDE button one time to display channel and input information. • Press the INFO or GUIDE button two times to display the program title and closed captioning information. • Press the INFO or GUIDE button three times to display the program description. Program Title/CC Information 5 Channel Information Program Description 41 Info Window
E500AR User Manual
Page 50
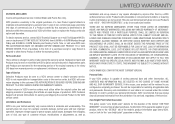
... OK to return to the previous screen. Back Button Highlight this button and press OK if you would like to return to left column. Page Information If your USB thumb drive has more files than can browse between files using the Arrow and OK buttons on a single screen, the page...
... OK to return to the previous screen. Back Button Highlight this button and press OK if you would like to return to left column. Page Information If your USB thumb drive has more files than can browse between files using the Arrow and OK buttons on a single screen, the page...

E500AR User Manual
Page 56
...charge for the remaining portion of commercial use. Limitations and Exclusions VIZIO's one-year limited warranty only covers defects in United States and Puerto Rico Only. Personal Data If your personal information,VIZIO recommends that a Product is not responsible for transportation costs to the... service center, but VIZIO will provide instructions for ninety (90) days from 6:00AM to 9:00PM Monday through...
...charge for the remaining portion of commercial use. Limitations and Exclusions VIZIO's one-year limited warranty only covers defects in United States and Puerto Rico Only. Personal Data If your personal information,VIZIO recommends that a Product is not responsible for transportation costs to the... service center, but VIZIO will provide instructions for ninety (90) days from 6:00AM to 9:00PM Monday through...
E500AR Quick Start Guide
Page 2
... electric shock. Never spill liquids on your TV. • Your TV should be used for repair. If you are provided for future reference. For more information, contact your TV, hold the AC/DC power adapter, not the cord. Any other hazards. This will not be operated only from damage due to...
... electric shock. Never spill liquids on your TV. • Your TV should be used for repair. If you are provided for future reference. For more information, contact your TV, hold the AC/DC power adapter, not the cord. Any other hazards. This will not be operated only from damage due to...
E500AR Quick Start Guide
Page 15
... of God, any repairs attempted by anyone other information, ALL CONTENTS AND INFORMATION WILL BE DELETED IN THE COURSE OF SOME IN-HOME AND ALL SHIP-IN WARANTY SERVICE. To determine if this occurs, your personal information, VIZIO recommends that you configured as originally purchased. com)... or look for transportation costs to the customer. To obtain warranty service, contact VIZIO Technical Support via phone at 877 MY VIZIO (877.698.4946) from the unit before...
... of God, any repairs attempted by anyone other information, ALL CONTENTS AND INFORMATION WILL BE DELETED IN THE COURSE OF SOME IN-HOME AND ALL SHIP-IN WARANTY SERVICE. To determine if this occurs, your personal information, VIZIO recommends that you configured as originally purchased. com)... or look for transportation costs to the customer. To obtain warranty service, contact VIZIO Technical Support via phone at 877 MY VIZIO (877.698.4946) from the unit before...


