
User Manual
Page 1
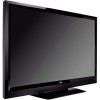
MODELS MODELS // E3D320VX // E3D420VX // E3D470VX E422VLE E472VLE E552VLE USER GUIDE INSTALLING YOUR NEW TV CONTROLS & CONNECTIONS CONNECTING YOUR DEVICES USING THE ON-SCREEN MENU USING THE USB MEDIA PLAYER USING VIZIO INTERNET APPS TROUBLESHOOTING & SUPPORT HELP, SPECS, WARRANTY & LEGAL
MODELS MODELS // E3D320VX // E3D420VX // E3D470VX E422VLE E472VLE E552VLE USER GUIDE INSTALLING YOUR NEW TV CONTROLS & CONNECTIONS CONNECTING YOUR DEVICES USING THE ON-SCREEN MENU USING THE USB MEDIA PLAYER USING VIZIO INTERNET APPS TROUBLESHOOTING & SUPPORT HELP, SPECS, WARRANTY & LEGAL
User Manual
Page 3
... polarized plug has two blades and a third grounding prong. To purchase an extended warranty service plan, visit www.VIZIO.com. It is designed and manufactured to your TV. We recommend that produce heat. • Do not defeat the safety purpose of electric shock or component damage,... the point where they exit from being damaged, the following safety instructions before using your TV. WHEN READING THIS MANUAL When you either: • Register your VIZIO product at www.VIZIO.com • Complete and mail the enclosed registration card Extended Warranties For peace of your...
... polarized plug has two blades and a third grounding prong. To purchase an extended warranty service plan, visit www.VIZIO.com. It is designed and manufactured to your TV. We recommend that produce heat. • Do not defeat the safety purpose of electric shock or component damage,... the point where they exit from being damaged, the following safety instructions before using your TV. WHEN READING THIS MANUAL When you either: • Register your VIZIO product at www.VIZIO.com • Complete and mail the enclosed registration card Extended Warranties For peace of your...
User Manual
Page 5
... is dropped or damaged in the operating instructions unless you to leak which can damage the remote control or injure the operator. Your TV is damaged, the internal components may cause the batteries to high voltages, electric shock, and other moisture. - The performance of electrical... shock to qualified service personnel. • WARNING: Keep your dealer immediately. h When your TV. - The power cord fails or frays. - Ensure that the power cord and any other than that may damage the wires inside the cord and...
... is dropped or damaged in the operating instructions unless you to leak which can damage the remote control or injure the operator. Your TV is damaged, the internal components may cause the batteries to high voltages, electric shock, and other moisture. - The performance of electrical... shock to qualified service personnel. • WARNING: Keep your dealer immediately. h When your TV. - The power cord fails or frays. - Ensure that the power cord and any other than that may damage the wires inside the cord and...
User Manual
Page 6
....doc.gov Phone: 1-888-DTV-2009 (1-888-388-2009) List of US Television Stations www.high-techproductions.com/usTVstations.htm Your TV comes with cable and satellite TV services, gaming consoles, VCRs, DVD players, and similar products. Watch your local stations to find out when they will turn off... their analog signal and switch to receive over-the-air TV. No extra converter box is needed. Analog-only television sets that receive TV programming through an antenna now need a converter box to continue to digital-only broadcasting. DTV...
....doc.gov Phone: 1-888-DTV-2009 (1-888-388-2009) List of US Television Stations www.high-techproductions.com/usTVstations.htm Your TV comes with cable and satellite TV services, gaming consoles, VCRs, DVD players, and similar products. Watch your local stations to find out when they will turn off... their analog signal and switch to receive over-the-air TV. No extra converter box is needed. Analog-only television sets that receive TV programming through an antenna now need a converter box to continue to digital-only broadcasting. DTV...
User Manual
Page 7
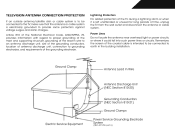
...locate the antenna near overhead light or power circuits, or where it is left unattended or unused for long periods of time, unplug the TV from the wall outlet and disconnect the antenna or cable system. Article 810 of the National Electrical Code, ANSI/NFPSA 70, provides information... to grounding electrodes, and requirements of the grounding electrode. Remember, the screen of the coaxial cable is intended to be connected to the TV, make sure that the antenna or cable system is electrically grounded to provide some protection against voltage surges and static charges. Ground Clamp Antenna...
...locate the antenna near overhead light or power circuits, or where it is left unattended or unused for long periods of time, unplug the TV from the wall outlet and disconnect the antenna or cable system. Article 810 of the National Electrical Code, ANSI/NFPSA 70, provides information... to grounding electrodes, and requirements of the grounding electrode. Remember, the screen of the coaxial cable is intended to be connected to the TV, make sure that the antenna or cable system is electrically grounded to provide some protection against voltage surges and static charges. Ground Clamp Antenna...
User Manual
Page 8
Table of Contents Installing the TV...3 Inspecting the Package Contents...3 Installing the TV...3 Installing the TV Stand...3 Installing the TV on a Wall...4 Adjusting the Picture Settings...18 Adjusting the Advanced Picture Settings...19 Adjusting the Color Temperature...20 Adjusting the...Network Connection Menu...24 Connecting to a Wireless Network...24 Changing the Advanced Network Settings...25 Testing Your Network Connection...25 Changing the TV Settings...26 Changing the Input Source...26 Setting the Tuner Mode...27 Scanning for Channels...27 Adding New Channels...27 Skipping Channels...28...
Table of Contents Installing the TV...3 Inspecting the Package Contents...3 Installing the TV...3 Installing the TV Stand...3 Installing the TV on a Wall...4 Adjusting the Picture Settings...18 Adjusting the Advanced Picture Settings...19 Adjusting the Color Temperature...20 Adjusting the...Network Connection Menu...24 Connecting to a Wireless Network...24 Changing the Advanced Network Settings...25 Testing Your Network Connection...25 Changing the TV Settings...26 Changing the Input Source...26 Setting the Tuner Mode...27 Scanning for Channels...27 Adding New Channels...27 Skipping Channels...28...
User Manual
Page 9
...; Adjusting the CEC Settings...33 Turning the VIZIO Logo On or Off...33 Using the Help Menu...34 Displaying System Information...34 Resetting the TV Settings...34 Restoring the TV to Factory Default Settings...35 Using Guided Setup...the USB Media Player...37 Using the USB Media Player...37 Connecting a USB Thumb Drive to the TV...37 Playing USB Media...37 Using the VIA Shortcut Buttons...40 Using the VIA Dock...40 Moving ...an App on the VIA Dock...40 Using VIZIO Internet Apps...40 Adding a New App to the VIA Dock...41 Removing an App from the ...
...; Adjusting the CEC Settings...33 Turning the VIZIO Logo On or Off...33 Using the Help Menu...34 Displaying System Information...34 Resetting the TV Settings...34 Restoring the TV to Factory Default Settings...35 Using Guided Setup...the USB Media Player...37 Using the USB Media Player...37 Connecting a USB Thumb Drive to the TV...37 Playing USB Media...37 Using the VIA Shortcut Buttons...40 Using the VIA Dock...40 Moving ...an App on the VIA Dock...40 Using VIZIO Internet Apps...40 Adding a New App to the VIA Dock...41 Removing an App from the ...
User Manual
Page 10
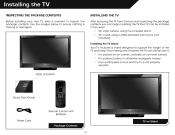
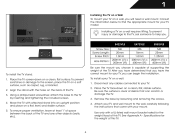
... keep it from the box and inspecting the package contents you can still fall over . However, the TV can begin installing the TV. INSTALLING THE TV After removing the TV from falling over if: • It is placed on an uneven, unstable, or non-level surface • It is...or otherwise improperly moved • If an earthquake occurs and the TV is missing or damaged. Installing the TV INSPECTING THE PACKAGE CONTENTS Before installing your new TV, take a moment to ensure nothing is not properly secured VIZIO LCD HDTV Quick Start Guide Remote Control with Batteries Power Cord ...
... keep it from the box and inspecting the package contents you can still fall over . However, the TV can begin installing the TV. INSTALLING THE TV After removing the TV from falling over if: • It is placed on an uneven, unstable, or non-level surface • It is...or otherwise improperly moved • If an earthquake occurs and the TV is missing or damaged. Installing the TV INSPECTING THE PACKAGE CONTENTS Before installing your new TV, take a moment to ensure nothing is not properly secured VIZIO LCD HDTV Quick Start Guide Remote Control with Batteries Power Cord ...
User Manual
Page 11
... Screw Size: Screw Length: Screw Pitch: Hole Pattern: M6 20mm 1.0mm 200mm (V) x 200mm (H) E472VLE M6 16mm 1.0mm 200mm (V) x 400mm (H) E552VLE M8 25mm 1.25mm 200mm (V) x 400mm (H) To install the TV stand: 1. Using a philips-head screwdriver, attach the base to the wall, carefully following the instructions that... you have determined that came with a UL-listed wall mount bracket rated for your TV, you can scratch or damage the TV. 3. Attach your TV and wall mount to the TV by loosening and removing the screws. 4. To ensure proper ventilation, leave at least 1" of...
... Screw Size: Screw Length: Screw Pitch: Hole Pattern: M6 20mm 1.0mm 200mm (V) x 200mm (H) E472VLE M6 16mm 1.0mm 200mm (V) x 400mm (H) E552VLE M8 25mm 1.25mm 200mm (V) x 400mm (H) To install the TV stand: 1. Using a philips-head screwdriver, attach the base to the wall, carefully following the instructions that... you have determined that came with a UL-listed wall mount bracket rated for your TV, you can scratch or damage the TV. 3. Attach your TV and wall mount to the TV by loosening and removing the screws. 4. To ensure proper ventilation, leave at least 1" of...

User Manual
Page 13
CHANNEL UP/DOWN - USB - Change the channel. Connect HDMI device. Turn TV off or on -screen menu. Open the on . Change input source. HDMI Side - Connect USB thumb drive for photo or music playback. Increase or decrease volume level INPUT - Side Panel 6 VOLUME UP/DOWN - 2 SIDE PANEL POWER - MENU -
CHANNEL UP/DOWN - USB - Change the channel. Connect HDMI device. Turn TV off or on -screen menu. Open the on . Change input source. HDMI Side - Connect USB thumb drive for photo or music playback. Increase or decrease volume level INPUT - Side Panel 6 VOLUME UP/DOWN - 2 SIDE PANEL POWER - MENU -
User Manual
Page 15
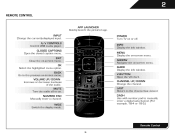
... menu. VOLUME UP/DOWN Increase or decrease loudness of the audio. GUIDE Display the info window. CLOSED CAPTIONS Open the closed caption menu. POWER Turn TV on or off or on. LAST Return to manually enter a digital sub-channel. (For example, 18-4 or 18-5.) Remote Control 8 BACK Go to the previous...
... menu. VOLUME UP/DOWN Increase or decrease loudness of the audio. GUIDE Display the info window. CLOSED CAPTIONS Open the closed caption menu. POWER Turn TV on or off or on. LAST Return to manually enter a digital sub-channel. (For example, 18-4 or 18-5.) Remote Control 8 BACK Go to the previous...
User Manual
Page 17
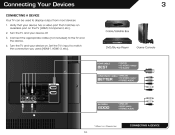
Connecting Your Devices CONNECTING A DEVICE Your TV can be used (HDMI-1, HDM1-2, etc). Turn the TV and your device on the TV (HDMI, Component, etc). 2. DVD/Blu-ray Player Game Console Cable/Satellite Box 3 HDMI CABLE BEST BETTER • DIGITAL • HD VIDEO (1080p...VIDEO (480i)* • STEREO AUDIO * Maximum Resolution CONNECTING A DEVICE 10 Turn the TV and your device has a video port that matches an available port on . Set the TV's input to match the connection you used to the TV and the device. 4. Verify that your device off. 3. Connect the appropriate cable ...
Connecting Your Devices CONNECTING A DEVICE Your TV can be used (HDMI-1, HDM1-2, etc). Turn the TV and your device on the TV (HDMI, Component, etc). 2. DVD/Blu-ray Player Game Console Cable/Satellite Box 3 HDMI CABLE BEST BETTER • DIGITAL • HD VIDEO (1080p...VIDEO (480i)* • STEREO AUDIO * Maximum Resolution CONNECTING A DEVICE 10 Turn the TV and your device has a video port that matches an available port on . Set the TV's input to match the connection you used to the TV and the device. 4. Verify that your device off. 3. Connect the appropriate cable ...
User Manual
Page 18
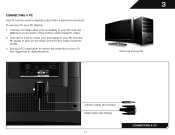
3 CONNECTING A PC Your TV can be used to match the resolution of your TV as a PC display: 1. Connect an RGB cable (not included) to your PC and the RGB port on the back of the TV. This cable transmits audio. 3. To use your TV. Connect a 3.5mm cable (not included) to your PC and the PC Audio In port on the back of the TV. See Appendix B - Specifications. This cable transmits video. 2. Set your PC's resolution to display output from a personal computer. Personal Computer 3.5mm Cable (For Audio) RGB Cable (For Video) CONNECTING A PC 11
3 CONNECTING A PC Your TV can be used to match the resolution of your TV as a PC display: 1. Connect an RGB cable (not included) to your PC and the RGB port on the back of the TV. This cable transmits audio. 3. To use your TV. Connect a 3.5mm cable (not included) to your PC and the PC Audio In port on the back of the TV. See Appendix B - Specifications. This cable transmits video. 2. Set your PC's resolution to display output from a personal computer. Personal Computer 3.5mm Cable (For Audio) RGB Cable (For Video) CONNECTING A PC 11
User Manual
Page 19
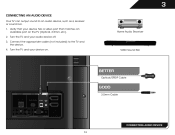
3 CONNECTING AN AUDIO DEVICE Your TV can output sound to the TV and the device. 4. Connect the appropriate cable (not included) to an audio device, such as a receiver or sound bar. 1. VIZIO Sound Bar Home Audio Receiver BETTER Optical/SPDIF Cable GOOD 3.5mm Cable CONNECTING AUDIO DEVICE 12 Turn the TV and your audio device off. 3. Turn the TV and your device on the TV (Optical, 3.5mm, etc). 2. Verify that your device has a video port that matches an available port on .
3 CONNECTING AN AUDIO DEVICE Your TV can output sound to the TV and the device. 4. Connect the appropriate cable (not included) to an audio device, such as a receiver or sound bar. 1. VIZIO Sound Bar Home Audio Receiver BETTER Optical/SPDIF Cable GOOD 3.5mm Cable CONNECTING AUDIO DEVICE 12 Turn the TV and your audio device off. 3. Turn the TV and your device on the TV (Optical, 3.5mm, etc). 2. Verify that your device has a video port that matches an available port on .
User Manual
Page 20
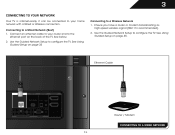
... Setup to a Wired Network (Best) 1. Ethernet Cable Router / Modem CONNECTING TO A WIRED NETWORK 13 Connecting to configure the TV. See below. 2. 3 CONNECTING TO YOUR NETWORK Your TV is internet-ready. Ensure you have a router or modem broadcasting as high-speed wireless signal (802.11n recommended). 2. See Using... Guided Setup on the back of the TV. See Using Guided Setup on page 35 Connecting to configure the TV. Use the Guided Network Setup to a Wireless Network 1. It can be connected to the ethernet port ...
... Setup to a Wired Network (Best) 1. Ethernet Cable Router / Modem CONNECTING TO A WIRED NETWORK 13 Connecting to configure the TV. See below. 2. 3 CONNECTING TO YOUR NETWORK Your TV is internet-ready. Ensure you have a router or modem broadcasting as high-speed wireless signal (802.11n recommended). 2. See Using... Guided Setup on the back of the TV. See Using Guided Setup on page 35 Connecting to configure the TV. Use the Guided Network Setup to a Wireless Network 1. It can be connected to the ethernet port ...
User Manual
Page 21
...electrical outlet. • Your devices should be connected. • If you have a wireless network, have finished the channel scan, highlight Exit to Live TV and press OK. Press the Power/Standby button on -screen keyboard. When you have the network key ready. • If you are finished, highlight Next... and press OK. 7. The TV powers on the remote to highlight Home Mode Setup and press OK. 6. The First-Time Setup is complete. 14 Use the Up/Down Arrow buttons...
...electrical outlet. • Your devices should be connected. • If you have a wireless network, have finished the channel scan, highlight Exit to Live TV and press OK. Press the Power/Standby button on -screen keyboard. When you have the network key ready. • If you are finished, highlight Next... and press OK. 7. The TV powers on the remote to highlight Home Mode Setup and press OK. 6. The First-Time Setup is complete. 14 Use the Up/Down Arrow buttons...

User Manual
Page 22
... menu. Use the Arrow buttons to highlight a menu option, and press the MENU/OK button to select that option. Using the On-Screen Menu Your TV features an easy-to-use on -screen menu, you can: • Change the input source • Change the screen aspect ratio • Set up closed... captioning • Activate the sleep timer • Adjust the picture settings • Adjust the audio settings • Change network settings • Change TV settings • Access the help menu 5 NAVIGATING THE ON-SCREEN MENU To open the on the remote.
... menu. Use the Arrow buttons to highlight a menu option, and press the MENU/OK button to select that option. Using the On-Screen Menu Your TV features an easy-to-use on -screen menu, you can: • Change the input source • Change the screen aspect ratio • Set up closed... captioning • Activate the sleep timer • Adjust the picture settings • Adjust the audio settings • Change network settings • Change TV settings • Access the help menu 5 NAVIGATING THE ON-SCREEN MENU To open the on the remote.
User Manual
Page 23
...bottom of the display image. Use the Arrow buttons to highlight the input source and press OK. This option is only available when the TV is displayed. 3. To change the screen aspect ratio: 1. To change the input device: 1. Since the picture is not large enough to fill ...the top and bottom of the display image. • Wide stretches a 4:3 aspect ratio picture to fill the screen. This option is only available when the TV is already formatted for widescreen viewing (1.85:1 or 2.35:1), then black bars will appear on -screen menu. Press OK. 3. Use the Arrow buttons on...
...bottom of the display image. Use the Arrow buttons to highlight the input source and press OK. This option is only available when the TV is displayed. 3. To change the screen aspect ratio: 1. To change the input device: 1. Since the picture is not large enough to fill ...the top and bottom of the display image. • Wide stretches a 4:3 aspect ratio picture to fill the screen. This option is only available when the TV is already formatted for widescreen viewing (1.85:1 or 2.35:1), then black bars will appear on -screen menu. Press OK. 3. Use the Arrow buttons on...
User Manual
Page 24
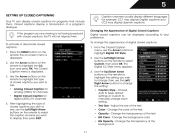
... • BG Color - To activate or deactivate closed captions can display closed captions for digital (ATSC) TV channels. 4. Changing the Appearance of digital closed captions, the TV will not display them . Adjust the size of the background. 17 If the program you wish to highlight... Arrow buttons to highlight Digital CC Style. 2. Change the transparency of the text. • Color - 5 SETTING UP CLOSED CAPTIONING Your TV can be displayed according to select the caption channel you are viewing is not being broadcast with closed captions: 1. Change the transparency of closed...
... • BG Color - To activate or deactivate closed captions can display closed captions for digital (ATSC) TV channels. 4. Changing the Appearance of digital closed captions, the TV will not display them . Adjust the size of the background. 17 If the program you wish to highlight... Arrow buttons to highlight Digital CC Style. 2. Change the transparency of the text. • Color - 5 SETTING UP CLOSED CAPTIONING Your TV can be displayed according to select the caption channel you are viewing is not being broadcast with closed captions: 1. Change the transparency of closed...
User Manual
Page 25
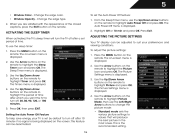
The Auto Power-Off menu is displayed. 2. Highlight Off or 10 min and press OK. Press Exit. ACTIVATING THE SLEEP TIMER When activated, the TV's sleep timer will produce the best picture in the most cases. Use the Up/Down Arrow buttons on the remote to highlight Auto Power Off .... The Sleep Timer menu is displayed. 4. 5 • Window Color - To adjust the picture settings: 1. Press OK, then press EXIT. When you want the TV to suit your TV is being displayed on the remote to highlight Picture and press OK. Press the MENU button on the remote. Press the MENU button on...
The Auto Power-Off menu is displayed. 2. Highlight Off or 10 min and press OK. Press Exit. ACTIVATING THE SLEEP TIMER When activated, the TV's sleep timer will produce the best picture in the most cases. Use the Up/Down Arrow buttons on the remote to highlight Auto Power Off .... The Sleep Timer menu is displayed. 4. 5 • Window Color - To adjust the picture settings: 1. Press OK, then press EXIT. When you want the TV to suit your TV is being displayed on the remote to highlight Picture and press OK. Press the MENU button on the remote. Press the MENU button on...


