
E470-A0 User Manual
Page 2
... logo and High-Definition Multimedia Interface are trademarks or registered trademarks of SRS Labs, Inc. Manufactured under license from Dolby Laboratories. Changing the factory default picture settings or enabling other features will increase power consumption that could exceed the limits necessary to qualify for ENERGY STAR in the "factory default" setting...
... logo and High-Definition Multimedia Interface are trademarks or registered trademarks of SRS Labs, Inc. Manufactured under license from Dolby Laboratories. Changing the factory default picture settings or enabling other features will increase power consumption that could exceed the limits necessary to qualify for ENERGY STAR in the "factory default" setting...
E470-A0 User Manual
Page 7
..... 15 Activating the Sleep Timer 16 Setting the Auto Power Off Feature 16 Adjusting the Picture Settings 16 Adjusting the Advanced Picture Settings 17 Adjusting the Color Temperature 18 Adjusting the Picture Size and Position 19 Resetting the Picture Settings 19 Adjusting the Audio Settings 19 Adjusting the Advanced Audio Settings 20 Resetting the...
..... 15 Activating the Sleep Timer 16 Setting the Auto Power Off Feature 16 Adjusting the Picture Settings 16 Adjusting the Advanced Picture Settings 17 Adjusting the Color Temperature 18 Adjusting the Picture Size and Position 19 Resetting the Picture Settings 19 Adjusting the Audio Settings 19 Adjusting the Advanced Audio Settings 20 Resetting the...
E470-A0 User Manual
Page 9
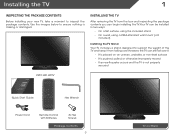
... Package Contents Before installing your new TV, take a moment to ensure nothing is not properly secured MODEL E470-A0 VIZIO QUICK START GUIDE LED + HD PICTURE SLIM FRAME DESIGN VIZIO LED HDTV FULL USER MANUAL AVAILABLE AT VIZIO.COM Quick Start Guide Hex Wrench Power Cord Remote Control with Batteries 3x Hex Screws Package Contents 3 TV...
... Package Contents Before installing your new TV, take a moment to ensure nothing is not properly secured MODEL E470-A0 VIZIO QUICK START GUIDE LED + HD PICTURE SLIM FRAME DESIGN VIZIO LED HDTV FULL USER MANUAL AVAILABLE AT VIZIO.COM Quick Start Guide Hex Wrench Power Cord Remote Control with Batteries 3x Hex Screws Package Contents 3 TV...
E470-A0 User Manual
Page 19
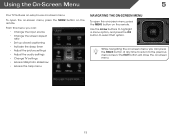
... can : • Change the input source • Change the screen aspect ratio • Set up closed captioning • Activate the sleep timer • Adjust the picture settings • Adjust the audio settings • Change TV settings • Access USB photo slideshow • Access the help menu Navigating the On-Screen MCeCnu...
... can : • Change the input source • Change the screen aspect ratio • Set up closed captioning • Activate the sleep timer • Adjust the picture settings • Adjust the audio settings • Change TV settings • Access USB photo slideshow • Access the help menu Navigating the On-Screen MCeCnu...
E470-A0 User Manual
Page 20
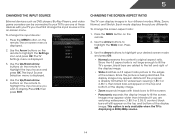
... these devices with black bars to fit the screen. • Panoramic expands the display image to fill the screen. Each mode displays the picture differently. If the program is already formatted for widescreen viewing (1.85:1 or 2.35:1), then black bars will still appear on -screen menu...change the input device: 1. The Input Source Selection menu is being stretched, the display image may appear wider than intended. Since the picture is displayed. 4. Use the Arrow buttons to highlight the Settings icon and press OK. Changing the Screen Aspect Ratio The TV can ...
... these devices with black bars to fit the screen. • Panoramic expands the display image to fill the screen. Each mode displays the picture differently. If the program is already formatted for widescreen viewing (1.85:1 or 2.35:1), then black bars will still appear on -screen menu...change the input device: 1. The Input Source Selection menu is being stretched, the display image may appear wider than intended. Since the picture is displayed. 4. Use the Arrow buttons to highlight the Settings icon and press OK. Changing the Screen Aspect Ratio The TV can ...
E470-A0 User Manual
Page 22
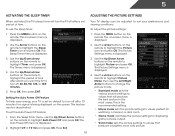
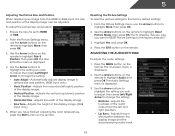
... on the remote to highlight the Sleep Timer icon and press OK. Use the Up/Down Arrow buttons on the remote to highlight Picture and press OK. The Picture Settings menu is displayed. 2. To set period of time after which you want the TV to turn off after a set the Auto ... minutes if no signal is displayed. 2. Your TV display can be adjusted to suit your TV is the recommended setting. • Movie mode sets the picture settings to values perfect for watching a movie in the most cases. This feature can be deactivated. Press OK, then press EXIT. Press the MENU button...
... on the remote to highlight the Sleep Timer icon and press OK. Use the Up/Down Arrow buttons on the remote to highlight Picture and press OK. The Picture Settings menu is displayed. 2. To set period of time after which you want the TV to turn off after a set the Auto ... minutes if no signal is displayed. 2. Your TV display can be adjusted to suit your TV is the recommended setting. • Movie mode sets the picture settings to values perfect for watching a movie in the most cases. This feature can be deactivated. Press OK, then press EXIT. Press the MENU button...
E470-A0 User Manual
Page 23
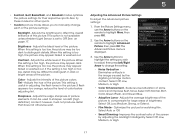
.... • Color Enhancement - Adjusts the intensity of color before adjusting tint. If flesh appears too orange, reduce the level of the picture colors. Improves the contrast ratio of the screen by the digitizing of brightness. When this setting is too high or too low, detail ... wish to adjust, then press Left/Right Arrow to compensate for other sports. • Custom picture mode allows you to highlight Advanced Picture, then press OK.The Advanced Picture menu is useful in adjusting the flesh tones in the image caused by adjusting the backlight intelligently....
.... • Color Enhancement - Adjusts the intensity of color before adjusting tint. If flesh appears too orange, reduce the level of the picture colors. Improves the contrast ratio of the screen by the digitizing of brightness. When this setting is too high or too low, detail ... wish to adjust, then press Left/Right Arrow to compensate for other sports. • Custom picture mode allows you to highlight Advanced Picture, then press OK.The Advanced Picture menu is useful in adjusting the flesh tones in the image caused by adjusting the backlight intelligently....
E470-A0 User Manual
Page 24
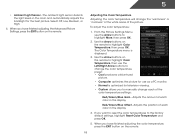
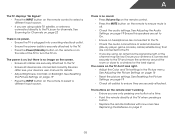
...Color Temperature, then use the Left/Right Arrow buttons to change the color temperature preset: • Cool produces a blue-hued picture. • Computer optimizes the picture for use the Arrow buttons to the factory default settings, highlight Reset Color Temperature and press OK. 5. When you want ... each color in the room and automatically adjusts the backlight for television viewing. • Custom allows you have finished adjusting the Advanced Picture Settings, press the EXIT button on the remote to manually change the "warmness" or "coolness" of the white areas of the color...
...Color Temperature, then use the Left/Right Arrow buttons to change the color temperature preset: • Cool produces a blue-hued picture. • Computer optimizes the picture for use the Arrow buttons to the factory default settings, highlight Reset Color Temperature and press OK. 5. When you want ... each color in the room and automatically adjusts the backlight for television viewing. • Custom allows you have finished adjusting the Advanced Picture Settings, press the EXIT button on the remote to manually change the "warmness" or "coolness" of the white areas of the color...
E470-A0 User Manual
Page 25
... -screen menu is set to the factory default settings: 1. Adjusts the width of the display image. • Horizontal Size - Resetting the Picture Settings To reset the picture settings to HDMI or RGB. 2. The on the remote to highlight Size & Position, then press OK. Adjusts the synchronization between the display...RGB input, the size and position of the display image can be adjusted. Use the Arrow buttons to highlight the setting you want to RESET Picture Settings to optimal size and position. (RGB input only.) • Horiz. The TV displays, "Are you sure you wish to adjust, then...
... -screen menu is set to the factory default settings: 1. Adjusts the width of the display image. • Horizontal Size - Resetting the Picture Settings To reset the picture settings to HDMI or RGB. 2. The on the remote to highlight Size & Position, then press OK. Adjusts the synchronization between the display...RGB input, the size and position of the display image can be adjusted. Use the Arrow buttons to highlight the setting you want to RESET Picture Settings to optimal size and position. (RGB input only.) • Horiz. The TV displays, "Are you sure you wish to adjust, then...

E470-A0 User Manual
Page 35
... All of the TV settings: 1. Wait for the TV to the settings will erase any custom settings." 4. Resetting the TV Settings To reset the TV's picture and audio settings: 1. Use the Arrow buttons on -screen menu settings can be lost! 5 Displaying System Information To display a summary of the on the remote...
... All of the TV settings: 1. Wait for the TV to the settings will erase any custom settings." 4. Resetting the TV Settings To reset the TV's picture and audio settings: 1. Use the Arrow buttons on -screen menu settings can be lost! 5 Displaying System Information To display a summary of the on the remote...
E470-A0 User Manual
Page 41
...button at a time. • Point the remote directly at the TV when pressing a button. • Replace the remote batteries with new ones. See Resetting the Picture Settings on page 19 • Check all devices are connected correctly. Devices differ; See Replacing the Batteries on the remote to select a different input source... TV. • Press the Power/Standby button on the remote or on the side of the TV to turn the TV on. See Resetting the Picture Settings on page 19 • Press the INPUT button on page 9 35 There is no power. • Ensure the TV is plugged into a working . ...
...button at a time. • Point the remote directly at the TV when pressing a button. • Replace the remote batteries with new ones. See Resetting the Picture Settings on page 19 • Check all devices are connected correctly. Devices differ; See Replacing the Batteries on the remote to select a different input source... TV. • Press the Power/Standby button on the remote or on the side of the TV to turn the TV on. See Resetting the Picture Settings on page 19 • Press the INPUT button on page 9 35 There is no power. • Ensure the TV is plugged into a working . ...
E470-A0 User Manual
Page 42
... change input source, the display image changes size. • The TV remembers the viewing mode on the input source you are using digital sources. The picture is distorted. • Nearby electrical devices may be noticeable. • Use the Volume Up/Down buttons on page 14. 36 When I change the screen mode...
... change input source, the display image changes size. • The TV remembers the viewing mode on the input source you are using digital sources. The picture is distorted. • Nearby electrical devices may be noticeable. • Use the Volume Up/Down buttons on page 14. 36 When I change the screen mode...
E470-A0 Quick Start Guide
Page 14
... connected to the TV and to a working electrical outlet. • Press the Power button on the remote or on the side of the picture. • Select MENU > Wide, then select Wide or Zoom. • Be aware that some TV channels add black bars to the...responsible for a Class B digital device, pursuant to Part 15 of the user to provide reasonable protection against harmful interference in a particular installation. It is a picture, but no guarantee that to comply with the emission limits. There is the responsibilities of the FCC Rules. The TV displays "No Signal." • Ensure...
... connected to the TV and to a working electrical outlet. • Press the Power button on the remote or on the side of the picture. • Select MENU > Wide, then select Wide or Zoom. • Be aware that some TV channels add black bars to the...responsible for a Class B digital device, pursuant to Part 15 of the user to provide reasonable protection against harmful interference in a particular installation. It is a picture, but no guarantee that to comply with the emission limits. There is the responsibilities of the FCC Rules. The TV displays "No Signal." • Ensure...


