
E3D420VX User Manual
Page 8
...Viewing Distance and Angle 3 Controls and Connections 4 Rear Panel 4 Left Side Panel 4 Remote Control 5 VIA Shortcut Buttons 6 Replacing the Batteries 6 Front Panel 6 Connecting Your Devices 7 Before You Begin 7 Connecting Your Devices 7 Setting Up Your Network Connection...First-Time Setup 10 Using the On-Screen Menu 11 Navigating the On-Screen Menu 11 Changing the 3D Mode 11 Setting the Screen Aspect Ratio 12 Changing the Screen Aspect Ratio 13 Setting Up Closed ... 26 Changing the On-Screen Menu Language 26 Setting the Time Zone 27 Adjusting the CEC Settings 27 Turning...
...Viewing Distance and Angle 3 Controls and Connections 4 Rear Panel 4 Left Side Panel 4 Remote Control 5 VIA Shortcut Buttons 6 Replacing the Batteries 6 Front Panel 6 Connecting Your Devices 7 Before You Begin 7 Connecting Your Devices 7 Setting Up Your Network Connection...First-Time Setup 10 Using the On-Screen Menu 11 Navigating the On-Screen Menu 11 Changing the 3D Mode 11 Setting the Screen Aspect Ratio 12 Changing the Screen Aspect Ratio 13 Setting Up Closed ... 26 Changing the On-Screen Menu Language 26 Setting the Time Zone 27 Adjusting the CEC Settings 27 Turning...
E3D420VX User Manual
Page 15
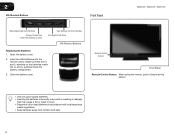
... hazardous waste regulations. • Keep batteries away from VIA Dock Change Screen Size (when VIA Sidebar is open) View Settings for Active VIA App Exit App/Exit VIA Dock VIA Shortcut Buttons Replacing the Batteries 1. 2 VIA Shortcut Buttons Front Panel E3D320VX / E3D420VX / E3D470VX Move/Delete App from children and pets. 6 Open the battery...
... hazardous waste regulations. • Keep batteries away from VIA Dock Change Screen Size (when VIA Sidebar is open) View Settings for Active VIA App Exit App/Exit VIA Dock VIA Shortcut Buttons Replacing the Batteries 1. 2 VIA Shortcut Buttons Front Panel E3D320VX / E3D420VX / E3D470VX Move/Delete App from children and pets. 6 Open the battery...
E3D420VX User Manual
Page 49
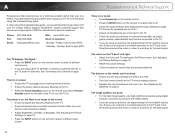
... attached. Phone: Fax: Email: (877) 698-4946 (949) 585-9563 techsupport@vizio.com Web: www.VIZIO.com Hours of the channel may be low. See Connecting Your Devices on page 18. See Adjusting the Audio Settings on page 7. See Replacing the Batteries on the remote to ensure mute is not good. •... the Power/Standby button on the remote or press the Power/ Standby button on the side of the TV to turn the TV on the screen. • Ensure all devices are using an antenna, the signal strength of operation: Monday - A Products are experiencing a problem when using your TV, try to...
... attached. Phone: Fax: Email: (877) 698-4946 (949) 585-9563 techsupport@vizio.com Web: www.VIZIO.com Hours of the channel may be low. See Connecting Your Devices on page 18. See Adjusting the Audio Settings on page 7. See Replacing the Batteries on the remote to ensure mute is not good. •... the Power/Standby button on the remote or press the Power/ Standby button on the side of the TV to turn the TV on the screen. • Ensure all devices are using an antenna, the signal strength of operation: Monday - A Products are experiencing a problem when using your TV, try to...
User Guide
Page 8
Back (Models e3D420VX, E3d470VX)..... 11 Replacing the Batteries 12 Connecting Your Devices 13 Connecting A Device 13 Connecting A PC 14 Connecting an audio device 15 Connecting to your network 16 Connecting to a Wired Network (Best 16 Connecting to a Wireless Network 16 Completing the First-Time Setup 17 Using the On-Screen Menu 18 Changing the...
Back (Models e3D420VX, E3d470VX)..... 11 Replacing the Batteries 12 Connecting Your Devices 13 Connecting A Device 13 Connecting A PC 14 Connecting an audio device 15 Connecting to your network 16 Connecting to a Wired Network (Best 16 Connecting to a Wireless Network 16 Completing the First-Time Setup 17 Using the On-Screen Menu 18 Changing the...
User Guide
Page 57
... the TV don't look right. • Adust the Color and Tint settings in the Picture menu. See Replacing the Batteries on page 22 • Reset the picture settings. There is no image on the screen. • Ensure all cables are securely attached to the TV. • Ensure all cables to ensure they... a different input source. • If you are only pressing one button at a time. • Point the remote directly at the TV when pressing a button. • Replace the remote batteries with new ones.
... the TV don't look right. • Adust the Color and Tint settings in the Picture menu. See Replacing the Batteries on page 22 • Reset the picture settings. There is no image on the screen. • Ensure all cables are securely attached to the TV. • Ensure all cables to ensure they... a different input source. • If you are only pressing one button at a time. • Point the remote directly at the TV when pressing a button. • Replace the remote batteries with new ones.


