
E3D470VX Quick Start Guide
Page 2
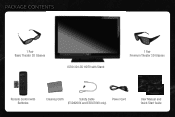
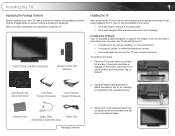
PACKAGE CONTENTS 1 Pair Basic Theater 3D Glasses VIZIO 3D LCD HDTV with Stand 1 Pair Premium Theater 3D Glasses 1 Remote Control with Batteries Cleaning Cloth Safety Cable Power Cord (E3D420VX and E3D470VX only) User Manual and Quick Start Guide
PACKAGE CONTENTS 1 Pair Basic Theater 3D Glasses VIZIO 3D LCD HDTV with Stand 1 Pair Premium Theater 3D Glasses 1 Remote Control with Batteries Cleaning Cloth Safety Cable Power Cord (E3D420VX and E3D470VX only) User Manual and Quick Start Guide
E3D470VX Quick Start Guide
Page 3
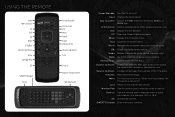
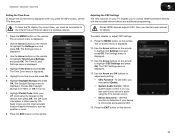
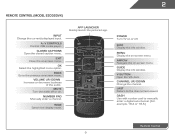
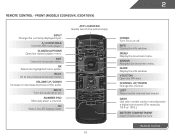
USING THE REMOTE Input App Launcher CC Exit OK Back V Button Volume Up/Down Mute Number Pad 3D QWERTY Keypad Arrow Power/Standby A/V Controls Info Menu Arrow Guide VIA Shortcuts Channel Up/Down Last Dash (-) Battery Compartment VIA Shortcuts Power/Standby: Turn the TV on -...on -screen menu and episode guide. Channel Up/Down: Change the channel. Dash (-): Use with number pad to the previous on . VIA Shortcuts: Control VIZIO Internet Apps. Number Pad: Use the number pad to the channel last viewed. QWERTY Keypad: Enter letters and numbers. Last: Return to manually enter ...
USING THE REMOTE Input App Launcher CC Exit OK Back V Button Volume Up/Down Mute Number Pad 3D QWERTY Keypad Arrow Power/Standby A/V Controls Info Menu Arrow Guide VIA Shortcuts Channel Up/Down Last Dash (-) Battery Compartment VIA Shortcuts Power/Standby: Turn the TV on -...on -screen menu and episode guide. Channel Up/Down: Change the channel. Dash (-): Use with number pad to the previous on . VIA Shortcuts: Control VIZIO Internet Apps. Number Pad: Use the number pad to the channel last viewed. QWERTY Keypad: Enter letters and numbers. Last: Return to manually enter ...
E3D420VX User Manual
Page 5
... any other hazards. These servicing instructions are qualified to the presence of the following occurs, contact the dealer: - E3D320VX / E3D420VX / E3D470VX • Do not overload power strips and extension cords. If water penetrates into your TV yourself. If your TV is dropped and the...Only power of electric shock, do not touch the connector with instructions. To reduce the risk of the marked voltage can damage the remote control or injure the operator. To avoid electric shock, avoid handling the power cord during electrical storms. • Unplug your TV during ...
... any other hazards. These servicing instructions are qualified to the presence of the following occurs, contact the dealer: - E3D320VX / E3D420VX / E3D470VX • Do not overload power strips and extension cords. If water penetrates into your TV yourself. If your TV is dropped and the...Only power of electric shock, do not touch the connector with instructions. To reduce the risk of the marked voltage can damage the remote control or injure the operator. To avoid electric shock, avoid handling the power cord during electrical storms. • Unplug your TV during ...
E3D420VX User Manual
Page 8
... 3 Incorrect 3D Viewing Distance and Angle 3 Correct 3D Viewing Distance and Angle 3 Controls and Connections 4 Rear Panel 4 Left Side Panel 4 Remote Control 5 VIA Shortcut Buttons 6 Replacing the Batteries 6 Front Panel 6 Connecting Your Devices ...Skipping Channels 23 Changing the Audio Language 23 Using the Parental Controls 24 Accessing the Parental Controls Menu 24 Enabling or Disabling Program Ratings 24 Locking and Unlocking... 24 Blocking and Unblocking Content by Rating 25 Changing the Parental Control Passcode 25 Resetting the Content Locks 25 Changing the Names of the...
... 3 Incorrect 3D Viewing Distance and Angle 3 Correct 3D Viewing Distance and Angle 3 Controls and Connections 4 Rear Panel 4 Left Side Panel 4 Remote Control 5 VIA Shortcut Buttons 6 Replacing the Batteries 6 Front Panel 6 Connecting Your Devices ...Skipping Channels 23 Changing the Audio Language 23 Using the Parental Controls 24 Accessing the Parental Controls Menu 24 Enabling or Disabling Program Ratings 24 Locking and Unlocking... 24 Blocking and Unblocking Content by Rating 25 Changing the Parental Control Passcode 25 Resetting the Content Locks 25 Changing the Names of the...
E3D420VX User Manual
Page 10
VIZIO 3D LED LCD HDTV with Stand Remote Control with attached stand into an upright position and place on a flat, level, and stable surface. Move the TV with Batteries Installing the TV After removing ... can begin installing the TV. When you can still fall over . Place the TV screen-down on a clean, flat surface. Cleaning Cloth Safety Cable (E3D420VX & E3D470VX only) Power Cord 3. Using a Phillips-head screwdriver, attach the base to ensure nothing is not properly secured To install the TV stand: 1.
VIZIO 3D LED LCD HDTV with Stand Remote Control with attached stand into an upright position and place on a flat, level, and stable surface. Move the TV with Batteries Installing the TV After removing ... can begin installing the TV. When you can still fall over . Place the TV screen-down on a clean, flat surface. Cleaning Cloth Safety Cable (E3D420VX & E3D470VX only) Power Cord 3. Using a Phillips-head screwdriver, attach the base to ensure nothing is not properly secured To install the TV stand: 1.

E3D420VX User Manual
Page 14
... -screen menu. Menu: Display the on -screen menu and episode guide. VIA Shortcuts: Control VIZIO Internet Apps. E3D320VX / E3D420VX / E3D470VX Remote Control Input App Launcher CC Exit OK Back V Button Volume Up/Down Mute Number Pad 3D QWERTY Keypad Arrow Power/Standby A/V Controls Info Menu Arrow Guide VIA Shortcuts Channel Up/Down Last Dash (-) Battery Compartment...
... -screen menu. Menu: Display the on -screen menu and episode guide. VIA Shortcuts: Control VIZIO Internet Apps. E3D320VX / E3D420VX / E3D470VX Remote Control Input App Launcher CC Exit OK Back V Button Volume Up/Down Mute Number Pad 3D QWERTY Keypad Arrow Power/Standby A/V Controls Info Menu Arrow Guide VIA Shortcuts Channel Up/Down Last Dash (-) Battery Compartment...
E3D420VX User Manual
Page 15
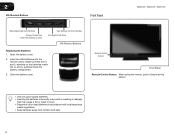
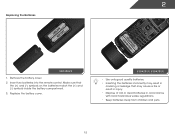
2 VIA Shortcut Buttons Front Panel E3D320VX / E3D420VX / E3D470VX Move/Delete App from children and pets. 6 Insert two AAA batteries into the remote control. Close the battery cover. Remote Control Sensor Front Panel Remote Control Sensor: When using the remote, point it directly at this sensor. • Use only good quality batteries. • Inserting the batteries incorrectly may result in...
2 VIA Shortcut Buttons Front Panel E3D320VX / E3D420VX / E3D470VX Move/Delete App from children and pets. 6 Insert two AAA batteries into the remote control. Close the battery cover. Remote Control Sensor Front Panel Remote Control Sensor: When using the remote, point it directly at this sensor. • Use only good quality batteries. • Inserting the batteries incorrectly may result in...
E3D420VX User Manual
Page 36
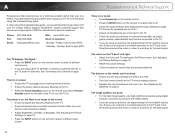
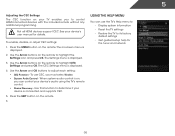
...your device is connected and supports CEC. 13. When system audio control is on, you can control your device's audio using the keypad on your ZIP code using the TV's remote control. • Device Discovery - E3D320VX / E3D420VX / E3D470VX 5 Setting the Time Zone To ensure the correct time is displayed... press OK. Not all HDMI devices support CEC. Press the MENU button on the remote. The on the remote to control HDMI-connected devices with the included remote without any additional programming. Use the Arrow buttons on -screen menu is displayed. 12. The CEC Settings menu is ...
...your device is connected and supports CEC. 13. When system audio control is on, you can control your device's audio using the keypad on your ZIP code using the TV's remote control. • Device Discovery - E3D320VX / E3D420VX / E3D470VX 5 Setting the Time Zone To ensure the correct time is displayed... press OK. Not all HDMI devices support CEC. Press the MENU button on the remote. The on the remote to control HDMI-connected devices with the included remote without any additional programming. Use the Arrow buttons on -screen menu is displayed. 12. The CEC Settings menu is ...
E3D420VX User Manual
Page 49
... signal strength of the TV to select a different input source. Phone: Fax: Email: (877) 698-4946 (949) 585-9563 techsupport@vizio.com Web: www.VIZIO.com Hours of VIZIO's commitment to the TV. • Ensure all cables to the TV. • If you are integral parts of operation: Monday - ...room or close to 4pm (PST) The TV displays "No Signal." • Press the INPUT button on page 6. See Replacing the Batteries on the remote control to select a different input source. • If you are still experiencing an issue with new ones. see your antenna is off. • Check...
... signal strength of the TV to select a different input source. Phone: Fax: Email: (877) 698-4946 (949) 585-9563 techsupport@vizio.com Web: www.VIZIO.com Hours of VIZIO's commitment to the TV. • Ensure all cables to the TV. • If you are integral parts of operation: Monday - ...room or close to 4pm (PST) The TV displays "No Signal." • Press the INPUT button on page 6. See Replacing the Batteries on the remote control to select a different input source. • If you are still experiencing an issue with new ones. see your antenna is off. • Check...
E3D420VX User Manual
Page 52
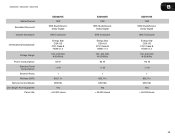
E3D320VX / E3D420VX / E3D470VX Watts/Channel Simulated Surround: Volume Normalizer: Certifications/Compliance: Voltage Range: Power Consumption: Standby Power Consumption: Ethernet Ports: Wireless (WiFi): Remote Control Model: Zero Bright Pixel Guarantee: Panel Life: E3D320VX 10W SRS StudioSound, Dolby Digital SRS TruVolume Energy Star CSA-US FCC ..., Dolby Digital SRS TruVolume Energy Star CSA-US FCC Class B HDMI v1.4 100~240 VAC @ 50/60Hz 93 W 50,000 Hours B E3D470VX 10W SRS StudioSound, Dolby Digital SRS TruVolume Energy Star CSA-US FCC Class B HDMI v1.4 100~240 VAC @ 50/60Hz 112 W 50,...
E3D320VX / E3D420VX / E3D470VX Watts/Channel Simulated Surround: Volume Normalizer: Certifications/Compliance: Voltage Range: Power Consumption: Standby Power Consumption: Ethernet Ports: Wireless (WiFi): Remote Control Model: Zero Bright Pixel Guarantee: Panel Life: E3D320VX 10W SRS StudioSound, Dolby Digital SRS TruVolume Energy Star CSA-US FCC ..., Dolby Digital SRS TruVolume Energy Star CSA-US FCC Class B HDMI v1.4 100~240 VAC @ 50/60Hz 93 W 50,000 Hours B E3D470VX 10W SRS StudioSound, Dolby Digital SRS TruVolume Energy Star CSA-US FCC Class B HDMI v1.4 100~240 VAC @ 50/60Hz 112 W 50,...
User Guide
Page 5
... time, unplug the power cord. • To reduce risk of the following occurs, contact the dealer: - Do not try to leak which can damage the remote control or injure the operator. Operating your TV in accordance with heavy dust or high humidity may cause the batteries to repair your TV, hold the...
... time, unplug the power cord. • To reduce risk of the following occurs, contact the dealer: - Do not try to leak which can damage the remote control or injure the operator. Operating your TV in accordance with heavy dust or high humidity may cause the batteries to repair your TV, hold the...
User Guide
Page 8
...33 Locking and Unlocking Channels 33 Blocking and Unblocking Content by Rating 33 Changing the Parental Control Passcode 34 1 FRONT (Models e3D420VX, E3d470VX)... 10 Remote Control - Back (Models e3D420VX, E3d470VX)..... 11 Replacing the Batteries 12 Connecting Your Devices 13 Connecting A Device 13 Connecting A...Package Contents 3 Installing the TV 3 Installing the TV Stand 3 Installing the TV on a Wall 4 Controls and Connections 5 Rear Panel (Model E3D320VX 5 Rear Panel (Models e3D420VX, E3d470VX 6 Side Panel 7 Front Panel 8 Remote Control (Model E3D320VX 9 Remote Control -
...33 Locking and Unlocking Channels 33 Blocking and Unblocking Content by Rating 33 Changing the Parental Control Passcode 34 1 FRONT (Models e3D420VX, E3d470VX)... 10 Remote Control - Back (Models e3D420VX, E3d470VX)..... 11 Replacing the Batteries 12 Connecting Your Devices 13 Connecting A Device 13 Connecting A...Package Contents 3 Installing the TV 3 Installing the TV Stand 3 Installing the TV on a Wall 4 Controls and Connections 5 Rear Panel (Model E3D320VX 5 Rear Panel (Models e3D420VX, E3d470VX 6 Side Panel 7 Front Panel 8 Remote Control (Model E3D320VX 9 Remote Control -

User Guide
Page 10
However, the TV can begin installing the TV. VIZIO LCD HDTV 3D Glasses (2) Installing the TV After removing the TV from falling over if: • It is placed on an uneven, unstable, or non-... GUIDE VOL CH VOL CH 1 2 3 4 5 6 7 8 9 3D 0 INPUT CC EXIT BACK OK INFO MENU GUIDE VOL CH VOL CH 1 2 3 4 5 6 7 8 9 3D 0 (For Model E3D320VX) (For Models E3D420VX, E3D470VX) Remote Control with Batteries Package Contents 3 TV on Stand Your TV can be installed in two ways: • On a flat surface, using the included stand • On...
However, the TV can begin installing the TV. VIZIO LCD HDTV 3D Glasses (2) Installing the TV After removing the TV from falling over if: • It is placed on an uneven, unstable, or non-... GUIDE VOL CH VOL CH 1 2 3 4 5 6 7 8 9 3D 0 INPUT CC EXIT BACK OK INFO MENU GUIDE VOL CH VOL CH 1 2 3 4 5 6 7 8 9 3D 0 (For Model E3D320VX) (For Models E3D420VX, E3D470VX) Remote Control with Batteries Package Contents 3 TV on Stand Your TV can be installed in two ways: • On a flat surface, using the included stand • On...
User Guide
Page 16
... Last Return to the previous on . Dash Use with number pad to manually enter a digital sub-channel. (For example, 18-4 or 18-5.) Remote Control 9 Closed Captions Open the closed caption menu. Number Pad Manually enter a channel. App launcher Quickly launch the pictured app. Arrow Navigate the on... or off or on -screen menu. V Button Open the VIA dock. 2 Remote Control (Model E3D320VX) Input Change the currently-displayed input. Exit Close the on -screen menu. Ok Select the highlighted menu option. Wide Switch the ...
... Last Return to the previous on . Dash Use with number pad to manually enter a digital sub-channel. (For example, 18-4 or 18-5.) Remote Control 9 Closed Captions Open the closed caption menu. Number Pad Manually enter a channel. App launcher Quickly launch the pictured app. Arrow Navigate the on... or off or on -screen menu. V Button Open the VIA dock. 2 Remote Control (Model E3D320VX) Input Change the currently-displayed input. Exit Close the on -screen menu. Ok Select the highlighted menu option. Wide Switch the ...
User Guide
Page 17
... CC EXIT BACK OK INFO MENU GUIDE VOL CH VOL CH 1 2 3 4 5 6 7 8 9 3D 0 10 2 Power Turn TV on . Remote Control Remote Control - Exit Close the on -screINeFOn menu. INPUT Info Display the info window. FRONT (Models e3D420VX, E3d470VX) Input Change the currently-displayed input. Number Pad Manually enter a channel. 3D Switch the 3D display mode. Ok...
... CC EXIT BACK OK INFO MENU GUIDE VOL CH VOL CH 1 2 3 4 5 6 7 8 9 3D 0 10 2 Power Turn TV on . Remote Control Remote Control - Exit Close the on -screINeFOn menu. INPUT Info Display the info window. FRONT (Models e3D420VX, E3d470VX) Input Change the currently-displayed input. Number Pad Manually enter a channel. 3D Switch the 3D display mode. Ok...

User Guide
Page 18
SHIFT Press and hold while pressing another key to enter a capital letter. Back 11 2 Remote Control - Alt Press and hold while pressing another key to enter a # character. V.I.A. Shortcut buttons Control VIZIO Internet Apps Remote Control - Back (Models e3D420VX, E3d470VX) do not cover this area This is the transmitter. For example, press ALT and W to enter a blue character. ARROW Navigate the on-screen menu.
SHIFT Press and hold while pressing another key to enter a capital letter. Back 11 2 Remote Control - Alt Press and hold while pressing another key to enter a # character. V.I.A. Shortcut buttons Control VIZIO Internet Apps Remote Control - Back (Models e3D420VX, E3d470VX) do not cover this area This is the transmitter. For example, press ALT and W to enter a blue character. ARROW Navigate the on-screen menu.
User Guide
Page 19
Insert two batteries into the remote control. Replace the battery cover. E3D420VX, E3D470VX • Use only good quality batteries. • Inserting the batteries incorrectly may result in cracking or leakage that the (+) and (-) symbols on the batteries match ...
Insert two batteries into the remote control. Replace the battery cover. E3D420VX, E3D470VX • Use only good quality batteries. • Inserting the batteries incorrectly may result in cracking or leakage that the (+) and (-) symbols on the batteries match ...
User Guide
Page 43
... 3. See your device is connected and supports CEC. 5. Use this function to control HDMI-connected devices with the included remote without any additional programming. Use the Arrow buttons on the remote to its factory default settings • Get guided setup help for details. When ...device's user manual for the tuner and network 36 Using the Help Menu You can control your TV enables you must select Enable. • System Audio Control - 5 Adjusting the CEC Settings The CEC function on your device's audio using the TV's remote control. • Device Discovery -
... 3. See your device is connected and supports CEC. 5. Use this function to control HDMI-connected devices with the included remote without any additional programming. Use the Arrow buttons on the remote to its factory default settings • Get guided setup help for details. When ...device's user manual for the tuner and network 36 Using the Help Menu You can control your TV enables you must select Enable. • System Audio Control - 5 Adjusting the CEC Settings The CEC function on your device's audio using the TV's remote control. • Device Discovery -
User Guide
Page 57
... to the TV. • Ensure all cables to ensure they are securely attached. A The TV displays "No Signal." • Press the INPUT button on the remote control to select a different input source. • If you are only pressing one button at a time. • Point the... ones. See Scanning for details. • Adjust Brightness, Contrast, or Backlight. There is no sound. • Press Volume Up on the remote control. • Press the MUTE button on the remote to ensure mute is no image on page 30 There is no headphones are connected to the TV. • Check the audio...
... to the TV. • Ensure all cables to ensure they are securely attached. A The TV displays "No Signal." • Press the INPUT button on the remote control to select a different input source. • If you are only pressing one button at a time. • Point the... ones. See Scanning for details. • Adjust Brightness, Contrast, or Backlight. There is no sound. • Press Volume Up on the remote control. • Press the MUTE button on the remote to ensure mute is no image on page 30 There is no headphones are connected to the TV. • Check the audio...

User Guide
Page 60
Watts/Channel Simulated Surround: Volume Normalizer: Certifications/ Compliance: Voltage Range: Power Consumption: Standby Power Consumption: Ethernet Ports: Wireless (WiFi): Remote Control Model: Zero Bright Pixel Guarantee: Panel Life: E3D320VX 10W SRS StudioSound, Dolby Digital Plus SRS TruVolume Energy Star CSA-US FCC Class... Digital Plus SRS TruVolume Energy Star CSA-US FCC Class B HDMI v1.4 108~132 VAC @ 50/60Hz 75.3 W (Average) 50,000 Hours B E3D470VX 10W SRS StudioSound, Dolby Digital Plus SRS TruVolume Energy Star CSA-US FCC Class B HDMI v1.4 108~132 VAC @ 50/60Hz 89.6 W (Average)...
Watts/Channel Simulated Surround: Volume Normalizer: Certifications/ Compliance: Voltage Range: Power Consumption: Standby Power Consumption: Ethernet Ports: Wireless (WiFi): Remote Control Model: Zero Bright Pixel Guarantee: Panel Life: E3D320VX 10W SRS StudioSound, Dolby Digital Plus SRS TruVolume Energy Star CSA-US FCC Class... Digital Plus SRS TruVolume Energy Star CSA-US FCC Class B HDMI v1.4 108~132 VAC @ 50/60Hz 75.3 W (Average) 50,000 Hours B E3D470VX 10W SRS StudioSound, Dolby Digital Plus SRS TruVolume Energy Star CSA-US FCC Class B HDMI v1.4 108~132 VAC @ 50/60Hz 89.6 W (Average)...


