E3D420VX User Manual
Page 8
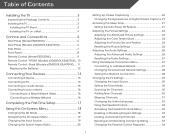
... TV for 3D Viewing 3 Incorrect 3D Viewing Distance and Angle 3 Correct 3D Viewing Distance and Angle 3 Controls and Connections 4 Rear Panel 4 Left Side Panel 4 Remote Control 5 VIA Shortcut Buttons 6 Replacing the Batteries 6 Front Panel 6 Connecting Your Devices 7 Before You Begin 7 Connecting Your Devices 7 Setting Up Your Network Connection 9 Connecting to A Wired Network 9 Connecting... the Names of the Inputs 26 Changing the On-Screen Menu Language 26 Setting the Time Zone 27 Adjusting the CEC Settings 27 Turning the VIZIO Logo On or Off 28
... TV for 3D Viewing 3 Incorrect 3D Viewing Distance and Angle 3 Correct 3D Viewing Distance and Angle 3 Controls and Connections 4 Rear Panel 4 Left Side Panel 4 Remote Control 5 VIA Shortcut Buttons 6 Replacing the Batteries 6 Front Panel 6 Connecting Your Devices 7 Before You Begin 7 Connecting Your Devices 7 Setting Up Your Network Connection 9 Connecting to A Wired Network 9 Connecting... the Names of the Inputs 26 Changing the On-Screen Menu Language 26 Setting the Time Zone 27 Adjusting the CEC Settings 27 Turning the VIZIO Logo On or Off 28
E3D420VX User Manual
Page 13
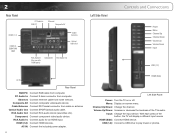
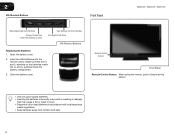
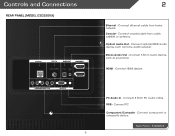
2 Rear Panel HDMI (1, 2) HDMI (3) E3D470VX ONLY PC Audio In RGB PC Ethernet Composite AV Cable/ Antenna Optical Audio Out RCA Audio In (For use with HDMI ports) Component RCA Audio Out Left Side Panel Controls and Connections Power Menu Channel Up Channel Down Volume Up Volume Down Input USB (1,2) AC IN Rear Panel RGB PC... HDMI (Side): Connect HDMI device. RCA Audio Out: Connect RCA audio device (soundbar, etc). AC IN: Connect the included power adapter. 4 HDMI (Side) Left Side Panel Power: Turn the TV on -screen menu. PC Audio In: Connect 3.5mm connector from cable or antenna.
2 Rear Panel HDMI (1, 2) HDMI (3) E3D470VX ONLY PC Audio In RGB PC Ethernet Composite AV Cable/ Antenna Optical Audio Out RCA Audio In (For use with HDMI ports) Component RCA Audio Out Left Side Panel Controls and Connections Power Menu Channel Up Channel Down Volume Up Volume Down Input USB (1,2) AC IN Rear Panel RGB PC... HDMI (Side): Connect HDMI device. RCA Audio Out: Connect RCA audio device (soundbar, etc). AC IN: Connect the included power adapter. 4 HDMI (Side) Left Side Panel Power: Turn the TV on -screen menu. PC Audio In: Connect 3.5mm connector from cable or antenna.
E3D420VX User Manual
Page 15
...VIA Sidebar is open) View Settings for Active VIA App Exit App/Exit VIA Dock VIA Shortcut Buttons Replacing the Batteries 1. Remote Control Sensor Front Panel Remote Control Sensor: When using the remote, point it directly at this sensor. • Use only good quality batteries. • Inserting the batteries... the (+) and (-) symbols inside the battery compartment. 3. Insert two AAA batteries into the remote control. Close the battery cover. 2 VIA Shortcut Buttons Front Panel E3D320VX / E3D420VX / E3D470VX Move/Delete App from children and pets. 6 Open the battery cover. 2.
...VIA Sidebar is open) View Settings for Active VIA App Exit App/Exit VIA Dock VIA Shortcut Buttons Replacing the Batteries 1. Remote Control Sensor Front Panel Remote Control Sensor: When using the remote, point it directly at this sensor. • Use only good quality batteries. • Inserting the batteries... the (+) and (-) symbols inside the battery compartment. 3. Insert two AAA batteries into the remote control. Close the battery cover. 2 VIA Shortcut Buttons Front Panel E3D320VX / E3D420VX / E3D470VX Move/Delete App from children and pets. 6 Open the battery cover. 2.
E3D420VX User Manual
Page 18
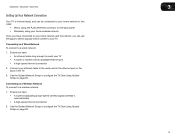
...configure the TV. Connect your TV • A router or modem with an available ethernet port • A high-speed internet connection 2. E3D320VX / E3D420VX / E3D470VX 3 Setting Up Your Network Connection Your TV is internet-ready, and can use VIA apps to deliver popular online content to your TV. Ensure you... can be connected to your home network in two ways: • Wired, using the RJ45 (ethernet) connector on the back panel • Wirelessly, using your home wireless network Once you have connected to the ethernet port on the back of the TV. 3. Ensure you have ...
...configure the TV. Connect your TV • A router or modem with an available ethernet port • A high-speed internet connection 2. E3D320VX / E3D420VX / E3D470VX 3 Setting Up Your Network Connection Your TV is internet-ready, and can use VIA apps to deliver popular online content to your TV. Ensure you... can be connected to your home network in two ways: • Wired, using the RJ45 (ethernet) connector on the back panel • Wirelessly, using your home wireless network Once you have connected to the ethernet port on the back of the TV. 3. Ensure you have ...
E3D420VX User Manual
Page 52
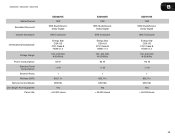
E3D320VX / E3D420VX / E3D470VX Watts/Channel Simulated Surround: Volume Normalizer: Certifications/Compliance: Voltage Range: Power Consumption: Standby Power Consumption: Ethernet Ports: Wireless (WiFi): Remote Control Model: Zero Bright Pixel Guarantee: Panel Life: E3D320VX 10W SRS StudioSound, Dolby Digital SRS TruVolume Energy Star CSA-US FCC Class B ...Dolby Digital SRS TruVolume Energy Star CSA-US FCC Class B HDMI v1.4 100~240 VAC @ 50/60Hz 93 W 50,000 Hours B E3D470VX 10W SRS StudioSound, Dolby Digital SRS TruVolume Energy Star CSA-US FCC Class B HDMI v1.4 100~240 VAC @ 50/60Hz 112 W...
E3D320VX / E3D420VX / E3D470VX Watts/Channel Simulated Surround: Volume Normalizer: Certifications/Compliance: Voltage Range: Power Consumption: Standby Power Consumption: Ethernet Ports: Wireless (WiFi): Remote Control Model: Zero Bright Pixel Guarantee: Panel Life: E3D320VX 10W SRS StudioSound, Dolby Digital SRS TruVolume Energy Star CSA-US FCC Class B ...Dolby Digital SRS TruVolume Energy Star CSA-US FCC Class B HDMI v1.4 100~240 VAC @ 50/60Hz 93 W 50,000 Hours B E3D470VX 10W SRS StudioSound, Dolby Digital SRS TruVolume Energy Star CSA-US FCC Class B HDMI v1.4 100~240 VAC @ 50/60Hz 112 W...
User Guide
Page 8
Back (Models e3D420VX, E3d470VX)..... 11 Replacing the Batteries 12 Connecting Your Devices 13 Connecting A Device 13 Connecting A PC 14 Connecting an audio device 15 Connecting to your ...3 Installing the TV 3 Installing the TV Stand 3 Installing the TV on a Wall 4 Controls and Connections 5 Rear Panel (Model E3D320VX 5 Rear Panel (Models e3D420VX, E3d470VX 6 Side Panel 7 Front Panel 8 Remote Control (Model E3D320VX 9 Remote Control - FRONT (Models e3D420VX, E3d470VX)... 10 Remote Control - Table of Digital Closed Captions.. 21 Activating the Sleep Timer 21 Setting the Auto...
Back (Models e3D420VX, E3d470VX)..... 11 Replacing the Batteries 12 Connecting Your Devices 13 Connecting A Device 13 Connecting A PC 14 Connecting an audio device 15 Connecting to your ...3 Installing the TV 3 Installing the TV Stand 3 Installing the TV on a Wall 4 Controls and Connections 5 Rear Panel (Model E3D320VX 5 Rear Panel (Models e3D420VX, E3d470VX 6 Side Panel 7 Front Panel 8 Remote Control (Model E3D320VX 9 Remote Control - FRONT (Models e3D420VX, E3d470VX)... 10 Remote Control - Table of Digital Closed Captions.. 21 Activating the Sleep Timer 21 Setting the Auto...
User Guide
Page 12
Optical Audio Out - Connect optical/SPDIF audio device, such as sound bar. Connect 3.5mm audio device, such as home audio receiver. Connect component or composite device. Rear Panel - Coaxial - Connect HDMI device. Connect 3.5mm PC audio cable RGB - E3D320VX 5 Connect PC Component/Compsite - HDMI - Connect ethernet cable from cable, satellite, or antenna. PC Audio In - Connect coaxial cable from home network. Stereo Audio Out - Controls and Connections Rear Panel (Model E3D320VX) 2 Ethernet -
Optical Audio Out - Connect optical/SPDIF audio device, such as sound bar. Connect 3.5mm audio device, such as home audio receiver. Connect component or composite device. Rear Panel - Coaxial - Connect HDMI device. Connect 3.5mm PC audio cable RGB - E3D320VX 5 Connect PC Component/Compsite - HDMI - Connect ethernet cable from cable, satellite, or antenna. PC Audio In - Connect coaxial cable from home network. Stereo Audio Out - Controls and Connections Rear Panel (Model E3D320VX) 2 Ethernet -

User Guide
Page 13
Coaxial - Stereo Audio Out - Optical Audio Out - HDMI - Connect coaxial cable from home network. Connect 3.5mm PC audio cable RGB - Connect component or composite device. Connect optical/SPDIF audio device, such as sound bar. Connect HDMI device. (HDMI-3 only available on E3D470VX) PC Audio In - Rear Panel (Models e3D420VX, E3d470VX) 2 Ethernet - Connect ethernet cable from cable, satellite, or antenna. Connect 3.5mm audio device, such as home audio receiver. Rear Panel - E3D420VX, E3D470VX 6 Connect PC Component/Compsite -
Coaxial - Stereo Audio Out - Optical Audio Out - HDMI - Connect coaxial cable from home network. Connect 3.5mm PC audio cable RGB - Connect component or composite device. Connect optical/SPDIF audio device, such as sound bar. Connect HDMI device. (HDMI-3 only available on E3D470VX) PC Audio In - Rear Panel (Models e3D420VX, E3d470VX) 2 Ethernet - Connect ethernet cable from cable, satellite, or antenna. Connect 3.5mm audio device, such as home audio receiver. Rear Panel - E3D420VX, E3D470VX 6 Connect PC Component/Compsite -

User Guide
Page 14
Turn TV off or on -screen menu. MENU - INPUT - HDMI - Change input source. Change the channel. Increase or decrease volume level. CHANNEL UP/DOWN - VOLUME UP/DOWN - Connect USB thumb drive to play photo, music, or video. Side Panel POWER - USB - Connect HDMI device. 7 2 Side Panel Open the on .
Turn TV off or on -screen menu. MENU - INPUT - HDMI - Change input source. Change the channel. Increase or decrease volume level. CHANNEL UP/DOWN - VOLUME UP/DOWN - Connect USB thumb drive to play photo, music, or video. Side Panel POWER - USB - Connect HDMI device. 7 2 Side Panel Open the on .

User Guide
Page 15
2 Front Panel REMOTE SENSOR When using the remote, aim it directly at this sensor. 8 Front Panel
2 Front Panel REMOTE SENSOR When using the remote, aim it directly at this sensor. 8 Front Panel

User Guide
Page 60
...Volume Normalizer: Certifications/ Compliance: Voltage Range: Power Consumption: Standby Power Consumption: Ethernet Ports: Wireless (WiFi): Remote Control Model: Zero Bright Pixel Guarantee: Panel Life: E3D320VX 10W SRS StudioSound, Dolby Digital Plus SRS TruVolume Energy Star CSA-US FCC Class B HDMI v1.4 108~132 VAC @ 50/60Hz 49...Digital Plus SRS TruVolume Energy Star CSA-US FCC Class B HDMI v1.4 108~132 VAC @ 50/60Hz 75.3 W (Average) 50,000 Hours B E3D470VX 10W SRS StudioSound, Dolby Digital Plus SRS TruVolume Energy Star CSA-US FCC Class B HDMI v1.4 108~132 VAC @ 50/60Hz 89.6 W (...
...Volume Normalizer: Certifications/ Compliance: Voltage Range: Power Consumption: Standby Power Consumption: Ethernet Ports: Wireless (WiFi): Remote Control Model: Zero Bright Pixel Guarantee: Panel Life: E3D320VX 10W SRS StudioSound, Dolby Digital Plus SRS TruVolume Energy Star CSA-US FCC Class B HDMI v1.4 108~132 VAC @ 50/60Hz 49...Digital Plus SRS TruVolume Energy Star CSA-US FCC Class B HDMI v1.4 108~132 VAC @ 50/60Hz 75.3 W (Average) 50,000 Hours B E3D470VX 10W SRS StudioSound, Dolby Digital Plus SRS TruVolume Energy Star CSA-US FCC Class B HDMI v1.4 108~132 VAC @ 50/60Hz 89.6 W (...


