User Manual
Page 4
... back and bottom of at your TV close to smoke or moisture may be used for your TV. • Use only with the cart, stand, tripod, bracket, or table specified by the manufacturer, or sold with arrowhead symbol within an equilateral triangle is intended to alert the user to the...
... back and bottom of at your TV close to smoke or moisture may be used for your TV. • Use only with the cart, stand, tripod, bracket, or table specified by the manufacturer, or sold with arrowhead symbol within an equilateral triangle is intended to alert the user to the...

User Manual
Page 7
... Language 31 Setting Up Closed Captioning 32 Changing the Appearance of Contents Installing the TV 3 Inspecting the Package Contents 3 Installing the TV 4 Installing the TV Stand 4 Installing the TV on the Input Menu 34 Changing the TV Settings 35 Viewing System Information 35 Changing the On-Screen Menu Language 36 Setting...
... Language 31 Setting Up Closed Captioning 32 Changing the Appearance of Contents Installing the TV 3 Inspecting the Package Contents 3 Installing the TV 4 Installing the TV Stand 4 Installing the TV on the Input Menu 34 Changing the TV Settings 35 Viewing System Information 35 Changing the On-Screen Menu Language 36 Setting...
User Manual
Page 10
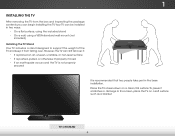
... weight of the TV and keep it from the box and inspecting the package contents you can be installed in the base installation. TV ON STAND 4 1 INSTALLING THE TV After removing the TV from falling over if: • It is placed on an uneven, unstable, or non-level surface •...recommended that two people take part in two ways: • On a flat surface, using the included stand • On a wall, using a VESA-standard wall mount (not included) Installing the TV Stand Your TV includes a stand designed to the screen, place the TV on a clean, flat surface. Your TV can begin installing ...
... weight of the TV and keep it from the box and inspecting the package contents you can be installed in the base installation. TV ON STAND 4 1 INSTALLING THE TV After removing the TV from falling over if: • It is placed on an uneven, unstable, or non-level surface •...recommended that two people take part in two ways: • On a flat surface, using the included stand • On a wall, using a VESA-standard wall mount (not included) Installing the TV Stand Your TV includes a stand designed to the screen, place the TV on a clean, flat surface. Your TV can begin installing ...
User Manual
Page 12
... of supporting the weight of the TV. Attach your TV and wall mount to help you will need a wall mount. Screw Size: Hole Pattern: Weight w/o Stand: E390-B1E M4 200mm (V) x 200mm (H) 16.42 lbs Be sure the mount you can scratch or damage the TV. 3. Disconnect any cables connected to find the appropriate...
... of supporting the weight of the TV. Attach your TV and wall mount to help you will need a wall mount. Screw Size: Hole Pattern: Weight w/o Stand: E390-B1E M4 200mm (V) x 200mm (H) 16.42 lbs Be sure the mount you can scratch or damage the TV. 3. Disconnect any cables connected to find the appropriate...

User Manual
Page 53
Specifications B Screen Size: Viewable Area: Dimensions w/ Stand: w/o Stand: Weight w/ Stand: w/o Stand: TV Type: Refresh Rate: Maximum Resolution: Pixel Pitch: Response Time: Brightness: Viewing Angle: HDMI Inputs: Component Video Inputs: Composite Inputs: RF Antenna Input: USB 2.0 Ports: Audio Outputs: OSD Languages: E390-B1E 39" Class 38.5" 34.72"" x 22.20" x 7.66" 34.72" x 20.51" x 2.91" 18.63...
Specifications B Screen Size: Viewable Area: Dimensions w/ Stand: w/o Stand: Weight w/ Stand: w/o Stand: TV Type: Refresh Rate: Maximum Resolution: Pixel Pitch: Response Time: Brightness: Viewing Angle: HDMI Inputs: Component Video Inputs: Composite Inputs: RF Antenna Input: USB 2.0 Ports: Audio Outputs: OSD Languages: E390-B1E 39" Class 38.5" 34.72"" x 22.20" x 7.66" 34.72" x 20.51" x 2.91" 18.63...
Quickstart Guide (Englsih)
Page 2
... from being damaged, the following instructions should be used for the installation, use attachments/accessories specified by the manufacturer. • Use only with the cart, stand, tripod, bracket, or table specified by qualified service personnel only. Do not place your TV in a bookcase or cabinet unless proper ventilation is provided. •...
... from being damaged, the following instructions should be used for the installation, use attachments/accessories specified by the manufacturer. • Use only with the cart, stand, tripod, bracket, or table specified by qualified service personnel only. Do not place your TV in a bookcase or cabinet unless proper ventilation is provided. •...

Quickstart Guide (Englsih)
Page 6
PACKAGE CONTENTS VIZIO LED HDTV with Stand Remote Control with Batteries This Quick Start Guide Power Cord 2 x M6 12mm Phillips Screws 3 x M4 12mm Phillips Screws
PACKAGE CONTENTS VIZIO LED HDTV with Stand Remote Control with Batteries This Quick Start Guide Power Cord 2 x M6 12mm Phillips Screws 3 x M4 12mm Phillips Screws

Quickstart Guide (Englsih)
Page 9
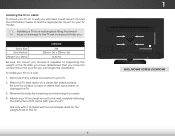
2 3 Align the base with the bottom of the TV to secure the stand to the TV. Using a Phillips screwdriver, tighten two (2) M6 12mm screws into the back of the TV and slide it into place as shown. Align the stand with the neck piece and slide it to secure it into place as shown. When you are finished, place the TV on a stable, level surface. Using a Phillips screwdriver, tighten three (3) M4 12mm screws into the bottom of the base to the neck piece.
2 3 Align the base with the bottom of the TV to secure the stand to the TV. Using a Phillips screwdriver, tighten two (2) M6 12mm screws into the back of the TV and slide it into place as shown. Align the stand with the neck piece and slide it to secure it into place as shown. When you are finished, place the TV on a stable, level surface. Using a Phillips screwdriver, tighten three (3) M4 12mm screws into the bottom of the base to the neck piece.

Quickstart Guide (Englsih)
Page 14
Available at www.VIZIO.com This Product Sold Separately With outstanding audio performance and a built-in the house. VIZIO RECOMMENDS S2121w-D0 2.1 Channel Sound Stand with Integrated Subwoofer Introducing an evolution in home theater and compact, versatile design that delivers booming audio where there isn't room for TVs up to 55 inch class in traditional media cabinets or any room in subwoofer, the VIZIO 21" 2.1 Sound Stand is the perfect and convenient audio upgrade for a sound bar.
Available at www.VIZIO.com This Product Sold Separately With outstanding audio performance and a built-in the house. VIZIO RECOMMENDS S2121w-D0 2.1 Channel Sound Stand with Integrated Subwoofer Introducing an evolution in home theater and compact, versatile design that delivers booming audio where there isn't room for TVs up to 55 inch class in traditional media cabinets or any room in subwoofer, the VIZIO 21" 2.1 Sound Stand is the perfect and convenient audio upgrade for a sound bar.
