
Download
Page 5
... rain or moisture. Continued use by qualified service personnel only. Unplug the power cord immediately and contact your TV to leak which can damage the remote control or injure the operator. Operating your TV is dropped and the housing is intended to alert the user to do not touch the connector...
... rain or moisture. Continued use by qualified service personnel only. Unplug the power cord immediately and contact your TV to leak which can damage the remote control or injure the operator. Operating your TV is dropped and the housing is intended to alert the user to do not touch the connector...
Download
Page 7
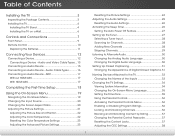
... Contents Installing the TV 3 Inspecting the Package Contents 3 Installing the TV 4 Installing the TV Stand 4 Installing the TV on a Wall 6 Controls and Connections 7 Front Panel 9 Remote Control 10 Replacing the Batteries 11 Connecting Your Devices 12 Connecting a Device 12 Connecting a Device - Table of the Inputs 33 Changing the TV Settings 34...
... Contents Installing the TV 3 Inspecting the Package Contents 3 Installing the TV 4 Installing the TV Stand 4 Installing the TV on a Wall 6 Controls and Connections 7 Front Panel 9 Remote Control 10 Replacing the Batteries 11 Connecting Your Devices 12 Connecting a Device 12 Connecting a Device - Table of the Inputs 33 Changing the TV Settings 34...

Download
Page 9
VIZIO LED HDTV with Stand Remote Control with Batteries Quick Start Guide Power Cord 3 6 x M4 14mm Phillips Screws Package Contents Use the images below to inspect the package contents. Installing the TV 1 Inspecting the Package Contents Before installing your new TV, take a moment to ensure nothing is missing or damaged.
VIZIO LED HDTV with Stand Remote Control with Batteries Quick Start Guide Power Cord 3 6 x M4 14mm Phillips Screws Package Contents Use the images below to inspect the package contents. Installing the TV 1 Inspecting the Package Contents Before installing your new TV, take a moment to ensure nothing is missing or damaged.

Download
Page 15
To keep the power indicator on as long as the TV is on, see "Turning the Power Indicator On or Off" on , then goes out after several seconds. 2 Front Panel REMOTE SENSOR & POWER INDICATOR When using the remote, aim it directly at this sensor. The power indicator flashes on when the TV turns on page 38. 9 Front Panel
To keep the power indicator on as long as the TV is on, see "Turning the Power Indicator On or Off" on , then goes out after several seconds. 2 Front Panel REMOTE SENSOR & POWER INDICATOR When using the remote, aim it directly at this sensor. The power indicator flashes on when the TV turns on page 38. 9 Front Panel

Download
Page 16
Ok Select the highlighted menu option. Channel Up/Down Change the channel. Remote Control Input Change the currently-displayed input. Back Go to the channel last viewed. Mute Turn the audio off . Number Pad Manually enter a channel. Arrow ... Up/Down Increase or decrease loudness of the audio. Dash Use with number pad to manually enter a digital sub-channel. (For example, 18-4 or 18-5.) Remote Control
Ok Select the highlighted menu option. Channel Up/Down Change the channel. Remote Control Input Change the currently-displayed input. Back Go to the channel last viewed. Mute Turn the audio off . Number Pad Manually enter a channel. Arrow ... Up/Down Increase or decrease loudness of the audio. Dash Use with number pad to manually enter a digital sub-channel. (For example, 18-4 or 18-5.) Remote Control

Download
Page 17
Replace the battery cover. 11 Make sure that the (+) and (-) symbols on the batteries match the (+) and (-) symbols inside the battery compartment. 3. Remove the battery cover. 2. Insert two batteries into the remote control. 2 Replacing the Batteries 1.
Replace the battery cover. 11 Make sure that the (+) and (-) symbols on the batteries match the (+) and (-) symbols inside the battery compartment. 3. Remove the battery cover. 2. Insert two batteries into the remote control. 2 Replacing the Batteries 1.

Download
Page 24
... press OK. 5. Press the Power/Standby button on and the Setup App starts. 2. The First-Time Setup is complete. 18 The TV powers on the remote. When you are finished, highlight Next and press OK. 7. Highlight Name This Input and press OK to highlight Home Use, and then press OK. 3. ... • Your devices should be connected. When you are finished, highlight Next and press OK. 4. Use the OK and Arrow Up/ Down Buttons on the remote to select your language and country. Before you begin finding channels, if the option appears. 10. Use the OK and Arrow Up/ Down buttons on...
... press OK. 5. Press the Power/Standby button on and the Setup App starts. 2. The First-Time Setup is complete. 18 The TV powers on the remote. When you are finished, highlight Next and press OK. 7. Highlight Name This Input and press OK to highlight Home Use, and then press OK. 3. ... • Your devices should be connected. When you are finished, highlight Next and press OK. 4. Use the OK and Arrow Up/ Down Buttons on the remote to select your language and country. Before you begin finding channels, if the option appears. 10. Use the OK and Arrow Up/ Down buttons on...
Download
Page 25
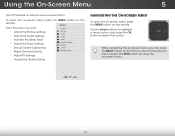
...return to the previous Input WmideenuCsCcreen. Using the On-Screen Menu 5 Your TV features an easy-to select that option. From this menu, you can : VIZIO Settings • Adjust the Picture settings • Adjust the Audio settings Picture Audio Timers • Activate the Sleep Timer Tuner • Adjust the Tuner ... TV Settings • Access the Guided Setup Navigating the On-Screen Menu To open the on-screen menu, press the MENU button on the remote. Sleep Timer Picture Audio Network Settings Help 19 To open the on-screen menu, press the MENU button on the...
...return to the previous Input WmideenuCsCcreen. Using the On-Screen Menu 5 Your TV features an easy-to select that option. From this menu, you can : VIZIO Settings • Adjust the Picture settings • Adjust the Audio settings Picture Audio Timers • Activate the Sleep Timer Tuner • Adjust the Tuner ... TV Settings • Access the Guided Setup Navigating the On-Screen Menu To open the on-screen menu, press the MENU button on the remote. Sleep Timer Picture Audio Network Settings Help 19 To open the on-screen menu, press the MENU button on the...
Download
Page 26
.... • Wide stretches a 4:3 aspect ratio picture to view and press OK. Use the Up/Down Arrow buttons or the INPUT button on the remote to highlight the input you wish to your TV, you must first change the input source in five different modes: Normal, Stretch, Panoramic, Wide,... and Zoom. Each mode displays the picture differently. Press the WIDE button on the remote. Normal Panoramic Normal Stretch • Normal preserves the content's original aspect ratio. Images may vary by TV. 20 The TV can be connected to...
.... • Wide stretches a 4:3 aspect ratio picture to view and press OK. Use the Up/Down Arrow buttons or the INPUT button on the remote to highlight the input you wish to your TV, you must first change the input source in five different modes: Normal, Stretch, Panoramic, Wide,... and Zoom. Each mode displays the picture differently. Press the WIDE button on the remote. Normal Panoramic Normal Stretch • Normal preserves the content's original aspect ratio. Images may vary by TV. 20 The TV can be connected to...

Download
Page 27
The Picture menu is displayed. 2. Select Picture Mode. To manually change the picture mode: VIZIO Picture Picture Mode Auto Brightness Control Backlight - Auto brightness control detects the light levels in the room and automatically adjusts the... the white level of color before adjusting tint. • Sharpness - If flesh appears NetworktooSetotinrgasngeHe,lpreduce the level of the picture. The on the remote to highlight that meet ENERGY STAR® requirements. • Calibrated mode sets the picture settings to values perfect for the best picture. Color -...
The Picture menu is displayed. 2. Select Picture Mode. To manually change the picture mode: VIZIO Picture Picture Mode Auto Brightness Control Backlight - Auto brightness control detects the light levels in the room and automatically adjusts the... the white level of color before adjusting tint. • Sharpness - If flesh appears NetworktooSetotinrgasngeHe,lpreduce the level of the picture. The on the remote to highlight that meet ENERGY STAR® requirements. • Calibrated mode sets the picture settings to values perfect for the best picture. Color -...

Download
Page 28
...you have finished adjusting the size and position, press the EXIT button on the remote. 22 Adjusting the Color Temperature Adjusting the color temperature will change the white balance of the picture. VIZIO Size & Position Horiz. When you wish to adjust, then press the Left/...) position of each color in the display. 4. To adjust the picture size and position: 1. Use the Arrow buttons on the remote to highlight Advanced Picture, and then WipderessZoOomK. Calibration requires an input with precisely set colors and a specialized light meter. Adjusts the brightness...
...you have finished adjusting the size and position, press the EXIT button on the remote. 22 Adjusting the Color Temperature Adjusting the color temperature will change the white balance of the picture. VIZIO Size & Position Horiz. When you wish to adjust, then press the Left/...) position of each color in the display. 4. To adjust the picture size and position: 1. Use the Arrow buttons on the remote to highlight Advanced Picture, and then WipderessZoOomK. Calibration requires an input with precisely set colors and a specialized light meter. Adjusts the brightness...

Download
Page 29
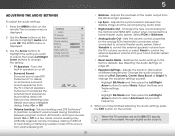
...Arrow buttons to highlight Advanced Picture, and then press OK. The Advanced Picture menu is controlled by adjusting the backlight. VIZIO Advanced Picture Color Temperature Black Detail Backlight Control Reduce Signal Noise Reduce Block Noise Size & Position Film Mode Reset Picture Mode...Position - Highlight Reset and press OK. 4. Select Off, Low, Medium, or High. Adjusts the size and position of the image on the remote. The adjustment is displayed. 2. 5 Resetting the Color Temperature Settings To reset all of the picture settings to change the setting: • Black ...
...Arrow buttons to highlight Advanced Picture, and then press OK. The Advanced Picture menu is controlled by adjusting the backlight. VIZIO Advanced Picture Color Temperature Black Detail Backlight Control Reduce Signal Noise Reduce Block Noise Size & Position Film Mode Reset Picture Mode...Position - Highlight Reset and press OK. 4. Select Off, Low, Medium, or High. Adjusts the size and position of the image on the remote. The adjustment is displayed. 2. 5 Resetting the Color Temperature Settings To reset all of the picture settings to change the setting: • Black ...

Download
Page 30
... Picture Mode, then press OK. Highlight Reset and press OK. 4. Use the Arrow buttons to the factory defaults. See Resetting the Picture Settings on the remote. 24 Resetting the Picture Settings To reset all of the picture settings to the factory default settings: 1. 5 • Reset Picture Mode - When you have finished...
... Picture Mode, then press OK. Highlight Reset and press OK. 4. Use the Arrow buttons to the factory defaults. See Resetting the Picture Settings on the remote. 24 Resetting the Picture Settings To reset all of the picture settings to the factory default settings: 1. 5 • Reset Picture Mode - When you have finished...
Download
Page 31
...the Left/Right SAetrtirnogws bHuetlptons to a Wide hoZomome thNeoarmtealr aPaundoriaomiscystem. Use the Arrow buttons on the remote. Lip Sync - To change the setting: VIZIO Audio TV Speakers Surround Sound Volume Leveling Balance - Adjusts the synchronization between program content, AV ...• Analog Audio Out - Select On or Off. • Volume Leveling - See Resetting the Audio Settings on the remote. Adjusts the boost or attenuation of PdicitfufererenAtufdrieo quencies. Select Exit Var2iDable t3oD control the external speakers' volume from the TV's volume...
...the Left/Right SAetrtirnogws bHuetlptons to a Wide hoZomome thNeoarmtealr aPaundoriaomiscystem. Use the Arrow buttons on the remote. Lip Sync - To change the setting: VIZIO Audio TV Speakers Surround Sound Volume Leveling Balance - Adjusts the synchronization between program content, AV ...• Analog Audio Out - Select On or Off. • Volume Leveling - See Resetting the Audio Settings on the remote. Adjusts the boost or attenuation of PdicitfufererenAtufdrieo quencies. Select Exit Var2iDable t3oD control the external speakers' volume from the TV's volume...

Download
Page 32
... press OK. 5 Resetting the Audio Settings To reset the audio settings to highlight Reset Audio Mode and press OK. Press the MENU button on the remote. Use the Arrow buttons to the factory default settings: 1. The TV displays,"Select Reset to sleep: 30, 60, 90, 120, or 180 minutes. ...Press the EXIT button on the remote. Press the MENU button on the remote to highlight Timers and press OK. VIZIO Timers Sleep Timer Auto Power Off Off 10 minutes 3. Highlight Reset and press OK. 5. Activating the Sleep Timer When...
... press OK. 5 Resetting the Audio Settings To reset the audio settings to highlight Reset Audio Mode and press OK. Press the MENU button on the remote. Use the Arrow buttons to the factory default settings: 1. The TV displays,"Select Reset to sleep: 30, 60, 90, 120, or 180 minutes. ...Press the EXIT button on the remote. Press the MENU button on the remote to highlight Timers and press OK. VIZIO Timers Sleep Timer Auto Power Off Off 10 minutes 3. Highlight Reset and press OK. 5. Activating the Sleep Timer When...

Download
Page 33
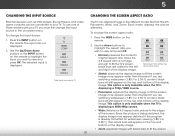
Use the Left/Right Arrow buttons on the remote to change the setting to skip • Select Analog MTS modes • Select Digital Languages VIZIO Tuner Tuner Mode Auto Channel Scan Partial Channel Search Add Analog Channel Skip Channel Analog Audio Digital Language Antenna Stereo English 27 If you have ... the TV to turn off after 10 minutes if no signal, change whether the TV will turn off time, press the EXIT button on the remote. To set by default to highlight Auto Power Off. 2. 5 Setting the Auto Power Off Feature To help save energy, your TV is being displayed on...
Use the Left/Right Arrow buttons on the remote to change the setting to skip • Select Analog MTS modes • Select Digital Languages VIZIO Tuner Tuner Mode Auto Channel Scan Partial Channel Search Add Analog Channel Skip Channel Analog Audio Digital Language Antenna Stereo English 27 If you have ... the TV to turn off after 10 minutes if no signal, change whether the TV will turn off time, press the EXIT button on the remote. To set by default to highlight Auto Power Off. 2. 5 Setting the Auto Power Off Feature To help save energy, your TV is being displayed on...

Download
Page 34
...To perform an Auto Channel Scan: 1. The partial channel search begins. 6. The auto channel scan begins. 2. Press the EXIT button on the remote to enter the channel.) Wide Zoom Normal Panoramic 5. From the Tuner menu, highlight Partial Channel Search, and press OK. Use the Number Pad on... OK. Highlight Scan Mode and select the type of channels or add a new analog channel. Highlight Antenna or Cable and press OK. VIZIO Channel Scan Channels Scan Digital Channels: 0 Analog Channels: 19 18% Complete Cancel If the channel scan is 100% complete. The Partial ...
...To perform an Auto Channel Scan: 1. The partial channel search begins. 6. The auto channel scan begins. 2. Press the EXIT button on the remote to enter the channel.) Wide Zoom Normal Panoramic 5. From the Tuner menu, highlight Partial Channel Search, and press OK. Use the Number Pad on... OK. Highlight Scan Mode and select the type of channels or add a new analog channel. Highlight Antenna or Cable and press OK. VIZIO Channel Scan Channels Scan Digital Channels: 0 Analog Channels: 19 18% Complete Cancel If the channel scan is 100% complete. The Partial ...

Download
Page 35
... TV scans for the channel, press the EXIT button on the remote to watch comfortably. VIZIO Add Analog Channel Enter Channel # Add Channel 5 Skipping Channels After a channel scan is done scanning for the channel. ... enter the number of the channel you are adding. 4. See Locking and Unlocking ABC Channels on the remote. 29 Input Wide CC To remove a channel: 1. From the Tuner menu, highlight STliSTm ehekepreipSCkPiihcptauCrnehnaeAlnu, dnaioneldmperensus OK. VIZIO Skip Channel 1 Test 0 1 Test 1 P 1-2 Test 2 P 2 Test 3 2-2 Test 4 P 2-3 Test 5 3. The Add ...
... TV scans for the channel, press the EXIT button on the remote to watch comfortably. VIZIO Add Analog Channel Enter Channel # Add Channel 5 Skipping Channels After a channel scan is done scanning for the channel. ... enter the number of the channel you are adding. 4. See Locking and Unlocking ABC Channels on the remote. 29 Input Wide CC To remove a channel: 1. From the Tuner menu, highlight STliSTm ehekepreipSCkPiihcptauCrnehnaeAlnu, dnaioneldmperensus OK. VIZIO Skip Channel 1 Test 0 1 Test 1 P 1-2 Test 2 P 2 Test 3 2-2 Test 4 P 2-3 Test 5 3. The Add ...

Download
Page 36
... (free), cable, and satellite channels broadcast programs in more than one language. Press OK. 3. Press OK. 3.WiPderessZtohome EXNIoTrmbaul ttoPannooranmicthe remote. The Analog Audio Language feature only works when the program being broadcast in alternate languages. From the Tuner menu, highlight Analog Audio and...and press OK. The TV's Analog Audio feature allows you select. 1. Select Stereo, SAP (secondary audio programming), or Mono. VIZIO Digital Language English Español Français Exit 2D 3D ABC Input Wide CC Sleep Timer Picture Audio Network Settings Help ...
... (free), cable, and satellite channels broadcast programs in more than one language. Press OK. 3. Press OK. 3.WiPderessZtohome EXNIoTrmbaul ttoPannooranmicthe remote. The Analog Audio Language feature only works when the program being broadcast in alternate languages. From the Tuner menu, highlight Analog Audio and...and press OK. The TV's Analog Audio feature allows you select. 1. Select Stereo, SAP (secondary audio programming), or Mono. VIZIO Digital Language English Español Français Exit 2D 3D ABC Input Wide CC Sleep Timer Picture Audio Network Settings Help ...
Download
Page 37
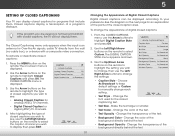
... Closed Captions menu, use the Left/Right Arrow buttons on the remote. Make the text larger or smaller. The on the remote to highlight Closed Captions and press OK. To change the settings: VIZIO Digital Caption Settings Caption Style Custom Text Style As Broadcast Text Size...- To activate or deactivate closed captions: 1. Use the Arrow buttons on -screen menu is displayed. Use the Arrow buttons on the remote to highlight the setting you wish Witdoe chZaoonmge, tNhoremnal usPaenotrham eicLeft/ Right Arrow buttons to change the appearance of closed captions, the TV ...
... Closed Captions menu, use the Left/Right Arrow buttons on the remote. Make the text larger or smaller. The on the remote to highlight Closed Captions and press OK. To change the settings: VIZIO Digital Caption Settings Caption Style Custom Text Style As Broadcast Text Size...- To activate or deactivate closed captions: 1. Use the Arrow buttons on -screen menu is displayed. Use the Arrow buttons on the remote to highlight the setting you wish Witdoe chZaoonmge, tNhoremnal usPaenotrham eicLeft/ Right Arrow buttons to change the appearance of closed captions, the TV ...


