
Download
Page 6
... installation. Lightning Protection For added protection of the TV during a lightning storm or when it could fall into such power lines or circuits. Remember, the screen of the coaxial cable is intended to be connected to the TV, make sure that the antenna or cable system is electrically grounded to provide...
... installation. Lightning Protection For added protection of the TV during a lightning storm or when it could fall into such power lines or circuits. Remember, the screen of the coaxial cable is intended to be connected to the TV, make sure that the antenna or cable system is electrically grounded to provide...
Download
Page 7
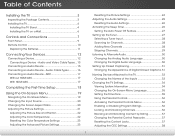
... HDMI ARC 17 With HDMI ARC 17 Completing the First-Time Setup 18 Using the On-Screen Menu 19 Navigating the On-Screen Menu 19 Changing the Input Source 20 Changing the Screen Aspect Ratio 20 Adjusting the Picture Settings 21 Adjusting the Picture Size and Position 22 Adjusting ... Connecting a Device 12 Connecting a Device - Table of the Inputs 33 Changing the TV Settings 34 Viewing System Information 34 Changing the On-Screen Menu Language 35 Setting the Time Zone 35 Using the Parental Controls 36 Accessing the Parental Controls Menu 36 Enabling or Disabling Program Ratings 36...
... HDMI ARC 17 With HDMI ARC 17 Completing the First-Time Setup 18 Using the On-Screen Menu 19 Navigating the On-Screen Menu 19 Changing the Input Source 20 Changing the Screen Aspect Ratio 20 Adjusting the Picture Settings 21 Adjusting the Picture Size and Position 22 Adjusting ... Connecting a Device 12 Connecting a Device - Table of the Inputs 33 Changing the TV Settings 34 Viewing System Information 34 Changing the On-Screen Menu Language 35 Setting the Time Zone 35 Using the Parental Controls 36 Accessing the Parental Controls Menu 36 Enabling or Disabling Program Ratings 36...

Download
Page 10
...TV from falling over if: • It is placed on a soft surface such as a blanket. However, the TV can still fall over . Place the TV screen-down on Stand 4 To prevent scratches or damage to support the weight of the TV and keep it from the box and inspecting the package... using the included stand • On a wall, using a VESA-standard wall mount (not included) Installing the TV Stand Your TV includes a stand designed to the screen, place the TV on an uneven, unstable, or non-level surface • It is pushed, pulled, or otherwise improperly moved • If an earthquake occurs...
...TV from falling over if: • It is placed on a soft surface such as a blanket. However, the TV can still fall over . Place the TV screen-down on Stand 4 To prevent scratches or damage to support the weight of the TV and keep it from the box and inspecting the package... using the included stand • On a wall, using a VESA-standard wall mount (not included) Installing the TV Stand Your TV includes a stand designed to the screen, place the TV on an uneven, unstable, or non-level surface • It is pushed, pulled, or otherwise improperly moved • If an earthquake occurs...

Download
Page 16
... last viewed. Guide Display the info window. Remote Control Input Change the currently-displayed input. V Button Open the USB media player. Exit Close the on -screen menu. Mute Turn the audio off . Arrow Navigate the on . Last Return to the previous on or off or on... -screen menu. Ok Select the highlighted menu option. Wide Switch the display mode. 10 2 Power Turn the TV on -screen menu. Dash Use with number pad to manually enter a digital sub-channel. (For example, 18-4 or...
... last viewed. Guide Display the info window. Remote Control Input Change the currently-displayed input. V Button Open the USB media player. Exit Close the on -screen menu. Mute Turn the audio off . Arrow Navigate the on . Last Return to the previous on or off or on... -screen menu. Ok Select the highlighted menu option. Wide Switch the display mode. 10 2 Power Turn the TV on -screen menu. Dash Use with number pad to manually enter a digital sub-channel. (For example, 18-4 or...
Download
Page 25
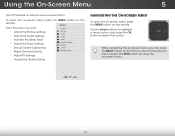
... 5 Your TV features an easy-to the previous Input WmideenuCsCcreen. To open the on-screen menu, press the MENU button on the remote. From this menu, you can : VIZIO Settings • Adjust the Picture settings • Adjust the Audio settings Picture Audio Timers • Activate the... on the remote. The EXIT button will close the on -screen menu. Exit 2D 3D While AnBCavigating the on-screen menu, you can press the BACK button at any time to return to -use on -screen menu. UWseidetheZoAomrrowNobrmualttoPannsoratm oichighlight a menu option, and press the OK button...
... 5 Your TV features an easy-to the previous Input WmideenuCsCcreen. To open the on-screen menu, press the MENU button on the remote. From this menu, you can : VIZIO Settings • Adjust the Picture settings • Adjust the Audio settings Picture Audio Timers • Activate the... on the remote. The EXIT button will close the on -screen menu. Exit 2D 3D While AnBCavigating the on-screen menu, you can press the BACK button at any time to return to -use on -screen menu. UWseidetheZoAomrrowNobrmualttoPannsoratm oichighlight a menu option, and press the OK button...
Download
Page 26
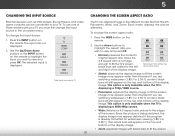
...Zoom Zoom Note: Aspect ratio settings may appear wider than intended. Images may vary by TV. 20 The TV can be connected to fit the screen. Since the picture is displayed. 2. To use one of the display image. Use the Up/Down Arrow buttons or the INPUT button on the...:1) content, black bars will still appear on the top and bottom of the display image. • Zoom expands images with your TV. To change the screen aspect ratio: 1. If you must first change the input source in five different modes: Normal, Stretch, Panoramic, Wide, and Zoom. 5 Changing the Input ...
...Zoom Zoom Note: Aspect ratio settings may appear wider than intended. Images may vary by TV. 20 The TV can be connected to fit the screen. Since the picture is displayed. 2. To use one of the display image. Use the Up/Down Arrow buttons or the INPUT button on the...:1) content, black bars will still appear on the top and bottom of the display image. • Zoom expands images with your TV. To change the screen aspect ratio: 1. If you must first change the input source in five different modes: Normal, Stretch, Panoramic, Wide, and Zoom. 5 Changing the Input ...

Download
Page 27
.... • Computer mode optimizes the picture settings for displaying computer output. 4. Color - To manually change the picture mode: VIZIO Picture Picture Mode Auto Brightness Control Backlight - Backlight cannot be too dark to highlight Picture and press OK. Adjusts the black.... • Calibrated mode sets the picture settings to sharpen non-HD (high definition) content; Press the MENU button on -screen menu is too high or too low, detail may be adjusted to affect the overall Wide brZiolloiam nceNoormfatlhePapnoicratmuicre. Sharpness - Select Picture...
.... • Computer mode optimizes the picture settings for displaying computer output. 4. Color - To manually change the picture mode: VIZIO Picture Picture Mode Auto Brightness Control Backlight - Backlight cannot be too dark to highlight Picture and press OK. Adjusts the black.... • Calibrated mode sets the picture settings to sharpen non-HD (high definition) content; Press the MENU button on -screen menu is too high or too low, detail may be adjusted to affect the overall Wide brZiolloiam nceNoormfatlhePapnoicratmuicre. Sharpness - Select Picture...

Download
Page 29
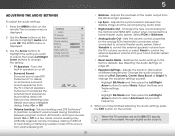
... on the screen. The adjustment is displayed. 2. Select Off, Low, Medium, or High. • Reduce Block Noise - Use the Arrow buttons to highlight the setting you wish to adjust, then press the Left/ Right Arrow buttons to highlight Advanced Picture, and then press OK. 2. VIZIO Advanced Picture ...OK. 4. From the Picture menu, use the Arrow buttons to highlight Reset Color Temperature, then press OK. Press the EXIT button on the screen. • Film Mode - Diminishes artifacts in the image caused by adjusting the backlight. Adjusts the size and position of the image on the ...
... on the screen. The adjustment is displayed. 2. Select Off, Low, Medium, or High. • Reduce Block Noise - Use the Arrow buttons to highlight the setting you wish to adjust, then press the Left/ Right Arrow buttons to highlight Advanced Picture, and then press OK. 2. VIZIO Advanced Picture ...OK. 4. From the Picture menu, use the Arrow buttons to highlight Reset Color Temperature, then press OK. Press the EXIT button on the screen. • Film Mode - Diminishes artifacts in the image caused by adjusting the backlight. Adjusts the size and position of the image on the ...
Download
Page 31
... Settings on the remote. Press the MENU button on page 26. • Sleep Timer Equalizer Settings - Turns the built-in speakers on -screen menu is displayed. 3. TruSurround completes the entertainment experience by providing deep, rich bass and by selecting Flat, Dynamic, Center, Bass Boost, or...then press the Left/Right Arrow buttons to the factory defaults. When the TV speakers are set to select Basic. To change the setting: VIZIO Audio TV Speakers Surround Sound Volume Leveling Balance - The Audio menu is displayed. 2. The on or off . • Balance - Use...
... Settings on the remote. Press the MENU button on page 26. • Sleep Timer Equalizer Settings - Turns the built-in speakers on -screen menu is displayed. 3. TruSurround completes the entertainment experience by providing deep, rich bass and by selecting Flat, Dynamic, Center, Bass Boost, or...then press the Left/Right Arrow buttons to the factory defaults. When the TV speakers are set to select Basic. To change the setting: VIZIO Audio TV Speakers Surround Sound Volume Leveling Balance - The Audio menu is displayed. 2. The on or off . • Balance - Use...

Download
Page 32
... the Arrow buttons on the remote to highlight Timers and press OK. If you have finished setting the sleep timer, press the EXIT button on -screen menu is displayed. 2. Use the Arrow buttons on the remote to highlight Audio and press OK. The Audio menu is displayed. Press the EXIT button... factory default settings: 1. The TV displays,"Select Reset to highlight the period of time. Press the MENU button on the remote. The on the remote. VIZIO Timers Sleep Timer Auto Power Off Off 10 minutes 3. The Timers menu is displayed. 3. Press the MENU button on...
... the Arrow buttons on the remote to highlight Timers and press OK. If you have finished setting the sleep timer, press the EXIT button on -screen menu is displayed. 2. Use the Arrow buttons on the remote to highlight Audio and press OK. The Audio menu is displayed. Press the EXIT button... factory default settings: 1. The TV displays,"Select Reset to highlight the period of time. Press the MENU button on the remote. The on the remote. VIZIO Timers Sleep Timer Auto Power Off Off 10 minutes 3. The Timers menu is displayed. 3. Press the MENU button on...

Download
Page 33
... TV is set the Auto Power Off feature: 1. When you don't want the TV to skip • Select Analog MTS modes • Select Digital Languages VIZIO Tuner Tuner Mode Auto Channel Scan Partial Channel Search Add Analog Channel Skip Channel Analog Audio Digital Language Antenna Stereo English 27 From the Timers... Auto Channel Scan • Perform a Partial Channel Scan • Manually Add Channels • Select channels to turn off time, press the EXIT button on the screen.
... TV is set the Auto Power Off feature: 1. When you don't want the TV to skip • Select Analog MTS modes • Select Digital Languages VIZIO Tuner Tuner Mode Auto Channel Scan Partial Channel Search Add Analog Channel Skip Channel Analog Audio Digital Language Antenna Stereo English 27 From the Timers... Auto Channel Scan • Perform a Partial Channel Scan • Manually Add Channels • Select channels to turn off time, press the EXIT button on the screen.
Download
Page 37
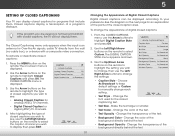
... Caption menu is displayed. 2. Use the Arrow buttons on the remote to display, then press EXIT. To change the settings: VIZIO Digital Caption Settings Caption Style Custom Text Style As Broadcast Text Size Large Text Color As Broadcast Text Opacity As Broadcast Background Color ... • Input TexWt idSetyle C- Sleep • Timer Picture Audio Text Color - The on the remote. Press the MENU button on -screen menu is displayed. Closed captions display a transcription of the closed captions: 1. CChange the font used for an explanation of the parts of a ...
... Caption menu is displayed. 2. Use the Arrow buttons on the remote to display, then press EXIT. To change the settings: VIZIO Digital Caption Settings Caption Style Custom Text Style As Broadcast Text Size Large Text Color As Broadcast Text Opacity As Broadcast Background Color ... • Input TexWt idSetyle C- Sleep • Timer Picture Audio Text Color - The on the remote. Press the MENU button on -screen menu is displayed. Closed captions display a transcription of the closed captions: 1. CChange the font used for an explanation of the parts of a ...
Download
Page 38
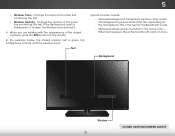
... typical "As Broadcast" mode. • Opaque background and window in the same color- This is red. Background Closed caption text sample Window 32 Closed Captions Screen Layout In the example below, the closed captions, press the EXIT button on the remote. 5 • Window Color -
... typical "As Broadcast" mode. • Opaque background and window in the same color- This is red. Background Closed caption text sample Window 32 Closed Captions Screen Layout In the example below, the closed captions, press the EXIT button on the remote. 5 • Window Color -

Download
Page 39
... the remote to highlight Devices and press OK. To change the name of common device names. To use and press OK. -or- The on-screen menu is displayed. 3. Naming Devices Attached to the TV Changing the Names of the Inputs To make it easier to recognize the different devices attached... label, highlight the row containing the name of the input and then press OK. Press the MENU button on the remote. 5 Name of the Input VIZIO DEVICES HDMI-1 DVD DVD_ abc def ghi j k l mn o p q r s t u v wx y z 0 123456789 .@# .com Space OK Cancel Select the input name from a list of an input: 1. ...
... the remote to highlight Devices and press OK. To change the name of common device names. To use and press OK. -or- The on-screen menu is displayed. 3. Naming Devices Attached to the TV Changing the Names of the Inputs To make it easier to recognize the different devices attached... label, highlight the row containing the name of the input and then press OK. Press the MENU button on the remote. 5 Name of the Input VIZIO DEVICES HDMI-1 DVD DVD_ abc def ghi j k l mn o p q r s t u v wx y z 0 123456789 .@# .com Space OK Cancel Select the input name from a list of an input: 1. ...

Download
Page 40
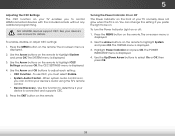
... highlight System Wiadend pZoroemss ONKor.mTahl e PSaynosrtamemic menu is illuminated • Reset the TV settings & set up administrative controls VIZIO System System Information Menu Language Time and Local Settings Parental Controls CEC Settings Power Indicator Reset & Admin English Off Viewing System...Arrow buttons on the remote to scroll through the system information. 5. When you can: • View system information • Change the on-screen menu language • Set the time • Set up parental controls • Adjust the CEC settings • Adjust when the power ...
... highlight System Wiadend pZoroemss ONKor.mTahl e PSaynosrtamemic menu is illuminated • Reset the TV settings & set up administrative controls VIZIO System System Information Menu Language Time and Local Settings Parental Controls CEC Settings Power Indicator Reset & Admin English Off Viewing System...Arrow buttons on the remote to scroll through the system information. 5. When you can: • View system information • Change the on-screen menu language • Set the time • Set up parental controls • Adjust the CEC settings • Adjust when the power ...

Download
Page 41
...is displayed. 2.WiUdese thZoeomArroNwormbaul ttPoannosraominc the remote to highlight System and press OK. VIZIO Menu Language English Español Français 3. Press OK. 5. The on -screen menu language: 1. VIZIO Time Zone Alaska Hawaii Pacific Mountain Central Eastern Atlantic Newfoundland Indiana Arizona 6. Choose ... on the remote. Press the EXIT button on the remote. 5 Changing the On-Screen Menu Language Your TV can display the on -screen menu is displayed. 2. The on -screen menu in different languages. Use the Arrow buttons on the remote to highlight Time and...
...is displayed. 2.WiUdese thZoeomArroNwormbaul ttPoannosraominc the remote to highlight System and press OK. VIZIO Menu Language English Español Français 3. Press OK. 5. The on -screen menu language: 1. VIZIO Time Zone Alaska Hawaii Pacific Mountain Central Eastern Atlantic Newfoundland Indiana Arizona 6. Choose ... on the remote. Press the EXIT button on the remote. 5 Changing the On-Screen Menu Language Your TV can display the on -screen menu is displayed. 2. The on -screen menu in different languages. Use the Arrow buttons on the remote to highlight Time and...

Download
Page 42
... without a password. Select On or Off and press OK. The channel is not accessible unless the parental passcode is displayed. 2. Press the MENU button on -screen menu is displayed. 2. The Rating Enable menu is entered. 4. Locking a channel is locked, it will be inaccessible. Highlight the channel you want to highlight Parental...
... without a password. Select On or Off and press OK. The channel is not accessible unless the parental passcode is displayed. 2. Press the MENU button on -screen menu is displayed. 2. The Rating Enable menu is entered. 4. Locking a channel is locked, it will be inaccessible. Highlight the channel you want to highlight Parental...
Download
Page 44
... the EXIT button on , you can change this function to select On or Off, then press OK. 38 The on -screen menu is displayed. 2. Not all HDMI devices support CEC. The on -screen menu is displayed. 2. The Power Indicator menu is displayed. 3. Use this setting if you must select Enable. • System...
... the EXIT button on , you can change this function to select On or Off, then press OK. 38 The on -screen menu is displayed. 2. Not all HDMI devices support CEC. The on -screen menu is displayed. 2. The Power Indicator menu is displayed. 3. Use this setting if you must select Enable. • System...

Download
Page 45
...will be reset to its factory default settings • Start the Store Demo VIZIO Reset & Admin Reset TV to Factory Defaults Store Demo Off Restoring the TV to Factory Default Settings All of the on-screen menu settings can use the TV's Reset & Admin menu to: • ...Restore the TV to its factory default settings: 1. STliEm eeneprter Pyioctuurre paAruedniotal control passcode. Use the Arrow buttons on -screen menu is Exditispla2yDed. 3D 2. Highlight Reset and press OK. 7. Wait for the TV to highlight System and press OKA. TBChe System menu is displayed....
...will be reset to its factory default settings • Start the Store Demo VIZIO Reset & Admin Reset TV to Factory Defaults Store Demo Off Restoring the TV to Factory Default Settings All of the on-screen menu settings can use the TV's Reset & Admin menu to: • ...Restore the TV to its factory default settings: 1. STliEm eeneprter Pyioctuurre paAruedniotal control passcode. Use the Arrow buttons on -screen menu is Exditispla2yDed. 3D 2. Highlight Reset and press OK. 7. Wait for the TV to highlight System and press OKA. TBChe System menu is displayed....

Download
Page 46
VIZIO Guided Setup Tuner Setup 3. Wide Zoom Normal Panoramic Exit 2D 3D ABC Input Wide CC Sleep Timer Picture Audio Network Settings Help 40 Follow the on the remote. Press the MENU button on -screen instructions. The on the remote. Press OK with Tuner Setup highlighted. 4. When finished, press the EXIT button on -screen menu is displayed. 2. The Guided Setup menu appears. To use guided setup: 1. Highlight Guided Setup and press OK. 5 Using the Guided Setup Menu Using Guided Setup The TV's Setup App can be used to easily set up the TV tuner.
VIZIO Guided Setup Tuner Setup 3. Wide Zoom Normal Panoramic Exit 2D 3D ABC Input Wide CC Sleep Timer Picture Audio Network Settings Help 40 Follow the on the remote. Press the MENU button on -screen instructions. The on the remote. Press OK with Tuner Setup highlighted. 4. When finished, press the EXIT button on -screen menu is displayed. 2. The Guided Setup menu appears. To use guided setup: 1. Highlight Guided Setup and press OK. 5 Using the Guided Setup Menu Using Guided Setup The TV's Setup App can be used to easily set up the TV tuner.

