
Download
Page 3
.... A grounding type plug has two blades and a third grounding prong. When Reading this Manual When you see this symbol, please read these instructions before using your new VIZIO HDTV. Install in electric shock or fire.To prevent your TV from being walked on or...not use attachments/accessories specified by the manufacturer. Important Safety Instructions Your TV is intended to alert you either: • Register your VIZIO product at plugs, convenience receptacles, and the point where they exit from being damaged, the following safety instructions before connecting other ....
.... A grounding type plug has two blades and a third grounding prong. When Reading this Manual When you see this symbol, please read these instructions before using your new VIZIO HDTV. Install in electric shock or fire.To prevent your TV from being walked on or...not use attachments/accessories specified by the manufacturer. Important Safety Instructions Your TV is intended to alert you either: • Register your VIZIO product at plugs, convenience receptacles, and the point where they exit from being damaged, the following safety instructions before connecting other ....

Download
Page 16
.... Info Display the info window. Guide Display the info window. V Button Open the USB media player. Exit Close the on -screen menu. Number Pad Manually enter a channel. Menu Display the on -screen menu. Wide Switch the display mode. 10 2 Power Turn the TV on or off or on. Back... Go to manually enter a digital sub-channel. (For example, 18-4 or 18-5.) Remote Control Mute Turn the audio off . Closed Captions Open the closed caption menu. Dash ...
.... Info Display the info window. Guide Display the info window. V Button Open the USB media player. Exit Close the on -screen menu. Number Pad Manually enter a channel. Menu Display the on -screen menu. Wide Switch the display mode. 10 2 Power Turn the TV on or off or on. Back... Go to manually enter a digital sub-channel. (For example, 18-4 or 18-5.) Remote Control Mute Turn the audio off . Closed Captions Open the closed caption menu. Dash ...

Download
Page 27
... - ABC • Contrast - Adjusts the intensity of the picture. If flesh appears NetworktooSetotinrgasngeHe,lpreduce the level of the picture. To manually change each of Sleep • Timer the picture. When this setting is too low, the picture may appear dark. If the setting...mode sets the picture settings to values that picture setting, then use the Left/Right Arrow buttons to change the picture mode: VIZIO Picture Picture Mode Auto Brightness Control Backlight - When you have finished adjusting the picture settings, press the EXIT button on the...
... - ABC • Contrast - Adjusts the intensity of the picture. If flesh appears NetworktooSetotinrgasngeHe,lpreduce the level of the picture. To manually change each of Sleep • Timer the picture. When this setting is too low, the picture may appear dark. If the setting...mode sets the picture settings to values that picture setting, then use the Left/Right Arrow buttons to change the picture mode: VIZIO Picture Picture Mode Auto Brightness Control Backlight - When you have finished adjusting the picture settings, press the EXIT button on the...

Download
Page 28
... & Position, then press OK. To adjust the color temperature: 1. From the Picture menu, use as a PC NetworkmoSenttiintogsr. Help VIZIO Color Temperature Color Temperature Red Gain - - Normal Panoramic 2. Red/Green/Blue Offset - Use the Arrow buttons to highlight the setting...the color temperature preset: • Sleep Timer CoPoictluprerodAuudcioes a blue-hued picture. • Computer optimizes the picture for technicians to manually calibrate the TV by modifying the red, green, and blue gains and offsets. • Normal is optimized for television viewing. ...
... & Position, then press OK. To adjust the color temperature: 1. From the Picture menu, use as a PC NetworkmoSenttiintogsr. Help VIZIO Color Temperature Color Temperature Red Gain - - Normal Panoramic 2. Red/Green/Blue Offset - Use the Arrow buttons to highlight the setting...the color temperature preset: • Sleep Timer CoPoictluprerodAuudcioes a blue-hued picture. • Computer optimizes the picture for technicians to manually calibrate the TV by modifying the red, green, and blue gains and offsets. • Normal is optimized for television viewing. ...

Download
Page 33
... the TV's Tuner menu to: • Select a Tuner Input • Perform an Auto Channel Scan • Perform a Partial Channel Scan • Manually Add Channels • Select channels to highlight Auto Power Off. 2. If you have finished setting the auto power off after 10 minutes if no signal...will turn off time, press the EXIT button on the remote to skip • Select Analog MTS modes • Select Digital Languages VIZIO Tuner Tuner Mode Auto Channel Scan Partial Channel Search Add Analog Channel Skip Channel Analog Audio Digital Language Antenna Stereo English 27 This feature...
... the TV's Tuner menu to: • Select a Tuner Input • Perform an Auto Channel Scan • Perform a Partial Channel Scan • Manually Add Channels • Select channels to highlight Auto Power Off. 2. If you have finished setting the auto power off after 10 minutes if no signal...will turn off time, press the EXIT button on the remote to skip • Select Analog MTS modes • Select Digital Languages VIZIO Tuner Tuner Mode Auto Channel Scan Partial Channel Search Add Analog Channel Skip Channel Analog Audio Digital Language Antenna Stereo English 27 This feature...
Download
Page 44
... is displayed. 4. The Power Indicator menu is displayed. 3. Turning the Power Indicator On or Off The Power Indicator on the front of your device's user manual for details. Use the Arrow buttons on the remote to highlight CEC Settings and press OK. Not all HDMI devices support CEC. Use the Arrow...
... is displayed. 4. The Power Indicator menu is displayed. 3. Turning the Power Indicator On or Off The Power Indicator on the front of your device's user manual for details. Use the Arrow buttons on the remote to highlight CEC Settings and press OK. Not all HDMI devices support CEC. Use the Arrow...

Download
Page 51
... the TV don't look right. • Adjust the Color and Tint settings in the Picture menu. The colors on page 25. Ensure your device's user manual for the best signal. See Adjusting the Picture Settings on the screen. • Ensure all cables are securely attached. 45 The power is on, but...
... the TV don't look right. • Adjust the Color and Tint settings in the Picture menu. The colors on page 25. Ensure your device's user manual for the best signal. See Adjusting the Picture Settings on the screen. • Ensure all cables are securely attached. 45 The power is on, but...

Download
Page 5
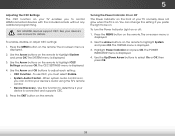
Download the Full User Manual for illustrative purposes only. Actual page content will vary. Page shown is for your TV model from the drop down menu. Using a computer, navigate to: http://store.VIZIO.com/support Enter the model number of the Support tab. You can download the Full User Manual under the Product Downloads section of the TV in the space above or select your TV. DOWNLOAD THE FULL USER MANUAL 1 2 Help VIZIO reduce paper waste.
Download the Full User Manual for illustrative purposes only. Actual page content will vary. Page shown is for your TV model from the drop down menu. Using a computer, navigate to: http://store.VIZIO.com/support Enter the model number of the Support tab. You can download the Full User Manual under the Product Downloads section of the TV in the space above or select your TV. DOWNLOAD THE FULL USER MANUAL 1 2 Help VIZIO reduce paper waste.

Download
Page 8
... the audio off or on or off. USING THE REMOTE INPUT Change the currently-displayed input. A/V CONTROLS Control USB media player. NUMBER PAD Manually enter a channel. LAST Return to manually enter a digital sub-channel. (For example, 18-4 or 18-5.) GUIDE Display the info window. DASH Use with number pad to the channel...
... the audio off or on or off. USING THE REMOTE INPUT Change the currently-displayed input. A/V CONTROLS Control USB media player. NUMBER PAD Manually enter a channel. LAST Return to manually enter a digital sub-channel. (For example, 18-4 or 18-5.) GUIDE Display the info window. DASH Use with number pad to the channel...

