

E370VT User Manual
Page 4
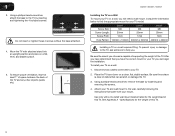
... when the apparatus has been damaged in a bookcase or cabinet unless proper ventilation is damaged, liquid has been spilled or E320VT / E370VT / E420VT objects have an electrician install the correct outlet, or use , and maintenance of power source indicated on the label. A...other apparatus (including amplifiers) that may be sure these instructions. • Heed all warnings. • Follow all servicing to ground your TV. • Read these instructions. • Keep these openings are provided for long periods of high temperature, condensation may cause fire or ...
... when the apparatus has been damaged in a bookcase or cabinet unless proper ventilation is damaged, liquid has been spilled or E320VT / E370VT / E420VT objects have an electrician install the correct outlet, or use , and maintenance of power source indicated on the label. A...other apparatus (including amplifiers) that may be sure these instructions. • Heed all warnings. • Follow all servicing to ground your TV. • Read these instructions. • Keep these openings are provided for long periods of high temperature, condensation may cause fire or ...
E370VT User Manual
Page 5
...magnitude to constitute a risk of uninsulated DANGEROUS VOLTAGE within the product's enclosure that the power cord and any servicing other moisture. - When your TV if any abnormality occurs. The power cord fails or frays. - h The lightning flash with arrowhead symbol within an equilateral triangle is damaged, the...• To reduce risk of electric shock, do not touch the connector with instructions. Unplug the power cord immediately and contact your TV. E320VT / E370VT / E420VT to constitute a risk of the following occurs, contact the dealer: -
...magnitude to constitute a risk of uninsulated DANGEROUS VOLTAGE within the product's enclosure that the power cord and any servicing other moisture. - When your TV if any abnormality occurs. The power cord fails or frays. - h The lightning flash with arrowhead symbol within an equilateral triangle is damaged, the...• To reduce risk of electric shock, do not touch the connector with instructions. Unplug the power cord immediately and contact your TV. E320VT / E370VT / E420VT to constitute a risk of the following occurs, contact the dealer: -
E370VT User Manual
Page 6
...Telecommunications and Information Administration) Web: www.ntia.doc.gov Phone: 1-888-DTV-2009 (1-888-388-2009) List of time, unplug the TV from the wall outlet and disconnect the antenna or cable system. Electric Service Equipment Grounding Conductors (NEC Section 810-21) Ground Clamps Power... that the antenna or cable system is electrically grounded to provide some protection against voltage surges and static charges. E320VT / E370VT / E420VT Television Antenna Connection Protection If an outside antenna/satellite dish or cable system is to be connected to earth in the building...
...Telecommunications and Information Administration) Web: www.ntia.doc.gov Phone: 1-888-DTV-2009 (1-888-388-2009) List of time, unplug the TV from the wall outlet and disconnect the antenna or cable system. Electric Service Equipment Grounding Conductors (NEC Section 810-21) Ground Clamps Power... that the antenna or cable system is electrically grounded to provide some protection against voltage surges and static charges. E320VT / E370VT / E420VT Television Antenna Connection Protection If an outside antenna/satellite dish or cable system is to be connected to earth in the building...

E370VT User Manual
Page 7
...Control 5 Replacing the Batteries 6 Connecting Your Devices 7 Before You Begin 7 Connecting Your Devices 7 Completing the First-Time Setup 9 Adjusting the TV Settings 10 Setting Up Channels 10 Changing the Signal Source 10 Changing the Input Source 11 Customizing and Removing Input Names 11 Customizing Input Names...New or Additional Channels 13 Scanning for Channels 13 Customizing Channel Names 14 Changing the On-Screen Menu Language 14 Setting the TV's Date and Time 15 Setting the Time Zone 15 Adjusting the Time for Daylight Savings 15 Enabling or Disabling Automatic...
...Control 5 Replacing the Batteries 6 Connecting Your Devices 7 Before You Begin 7 Connecting Your Devices 7 Completing the First-Time Setup 9 Adjusting the TV Settings 10 Setting Up Channels 10 Changing the Signal Source 10 Changing the Input Source 11 Customizing and Removing Input Names 11 Customizing Input Names...New or Additional Channels 13 Scanning for Channels 13 Customizing Channel Names 14 Changing the On-Screen Menu Language 14 Setting the TV's Date and Time 15 Setting the Time Zone 15 Adjusting the Time for Daylight Savings 15 Enabling or Disabling Automatic...
E370VT User Manual
Page 8
... Control Passcode 28 Resetting the Content Locks 28 Viewing System Info and Resetting to Factory Defaults 28 Displaying System Information 28 Restoring the TV to the Factory Default Settings 29 Restarting the Setup App 29 Setting Up Closed Captioning 29 Changing the Appearance of Digital Closed Captions... and Labor 35 Type of Service 35 Limitations and Exclusions 35 Personal Data 35 Zero Bright Pixel Defect Guarantee 35 E320VT / E370VT / E420VT Legal & Compliance 36 FCC Class B Radio Interference Statement 36 Notice...36 FCC warning 36 Caution 36 Open Source Software Notice 36
... Control Passcode 28 Resetting the Content Locks 28 Viewing System Info and Resetting to Factory Defaults 28 Displaying System Information 28 Restoring the TV to the Factory Default Settings 29 Restarting the Setup App 29 Setting Up Closed Captioning 29 Changing the Appearance of Digital Closed Captions... and Labor 35 Type of Service 35 Limitations and Exclusions 35 Personal Data 35 Zero Bright Pixel Defect Guarantee 35 E320VT / E370VT / E420VT Legal & Compliance 36 FCC Class B Radio Interference Statement 36 Notice...36 FCC warning 36 Caution 36 Open Source Software Notice 36
E370VT User Manual
Page 9
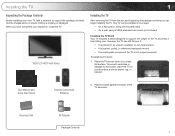
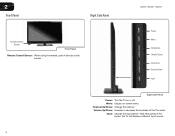
VIZIO LCD HDTV with Batteries 2. Your TV can still fall over . Use the images below to inspect the package contents. Cleaning Cloth RF Adapter Package Contents 1 User Manual and Quick Start Guide Remote Control with Stand Installing the TV After removing the TV from falling over if: • ... surface, using the included stand • On a wall, using a VESA-standard wall mount (not included) Installing the TV Stand Your TV includes a stand designed to the screen, place the TV on a soft surface, such as shown. To prevent scratches or damage to support the weight of the...
VIZIO LCD HDTV with Batteries 2. Your TV can still fall over . Use the images below to inspect the package contents. Cleaning Cloth RF Adapter Package Contents 1 User Manual and Quick Start Guide Remote Control with Stand Installing the TV After removing the TV from falling over if: • ... surface, using the included stand • On a wall, using a VESA-standard wall mount (not included) Installing the TV Stand Your TV includes a stand designed to the screen, place the TV on a soft surface, such as shown. To prevent scratches or damage to support the weight of the...
E370VT User Manual
Page 10
... A - After you have determined that can begin the installation. To install your mount. Disconnect any other objects (walls, etc). 1" E320VT / E370VT / E420VT Installing the TV on a Wall To mount your TV model: E320VT E370VT E420VT Screw Size: M6 M6 M6 Screw Length: 20mm 20mm 20mm Screw Pitch: 1mm 1mm 1mm Hole Pattern: 100mm x 100mm...
... A - After you have determined that can begin the installation. To install your mount. Disconnect any other objects (walls, etc). 1" E320VT / E370VT / E420VT Installing the TV on a Wall To mount your TV model: E320VT E370VT E420VT Screw Size: M6 M6 M6 Screw Length: 20mm 20mm 20mm Screw Pitch: 1mm 1mm 1mm Hole Pattern: 100mm x 100mm...
E370VT User Manual
Page 11
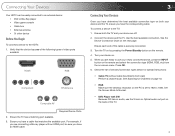
... Out USB USB 4 USB Power Cord COMPONENT 1 (BETTER) Y V Pb/Cb Pr/Cr L RGB PC / COMPONENT 2 R Component 1/ RGB PC/ DTV/TV Composite Component 2 3 3 2 2 HDMI ARC ARC 1 HDMI (BEST) PC/COMPONENT 2 AUDIO E320VT E370VT 1 RGB PC/ HDMI (BEST) Component 2 PC/COMPONENT 2 AUDIO Audio In E420VT Rear Panel 2 Component 1/ Connect component or composite video/audio...
... Out USB USB 4 USB Power Cord COMPONENT 1 (BETTER) Y V Pb/Cb Pr/Cr L RGB PC / COMPONENT 2 R Component 1/ RGB PC/ DTV/TV Composite Component 2 3 3 2 2 HDMI ARC ARC 1 HDMI (BEST) PC/COMPONENT 2 AUDIO E320VT E370VT 1 RGB PC/ HDMI (BEST) Component 2 PC/COMPONENT 2 AUDIO Audio In E420VT Rear Panel 2 Component 1/ Connect component or composite video/audio...
E370VT User Manual
Page 12
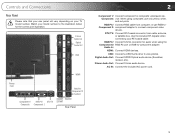
Volume Up/Down: Increase or decrease the loudness of the button, the TV will display a different input source. 4 Channel Up/Down: Change the channel. Input: Change the input device. 2 Front Panel Right Side Panel Remote Control Sensor Front Panel Remote Control Sensor: When using the remote, point it directly at this sensor. With each press of the TVs audio. E320VT / E370VT / E420VT Power Menu Channel Up Channel Down Volume Up Volume Down Input Right Side Panel Power: Turn the TV on -screen menu. Menu: Display on or off.
Volume Up/Down: Increase or decrease the loudness of the button, the TV will display a different input source. 4 Channel Up/Down: Change the channel. Input: Change the input device. 2 Front Panel Right Side Panel Remote Control Sensor Front Panel Remote Control Sensor: When using the remote, point it directly at this sensor. With each press of the TVs audio. E320VT / E370VT / E420VT Power Menu Channel Up Channel Down Volume Up Volume Down Input Right Side Panel Power: Turn the TV on -screen menu. Menu: Display on or off.

E370VT User Manual
Page 13
...Arrow: Navigate the on -screen menu. Channel Up/Down: Change the channel. Exit: Close the on -screen menu options. When mute is activated, the TV's audio is turned off or on or off. Mute: Turn the sound off . Input: Change the input device. Back: Go to manually enter a ... number pad to the previous on -screen menu. Remote Control 5 Info: Display the Info Window. ton, the channel will display a different input. E320VT / E370VT / E420VT Input CC Exit OK Back Volume Up/Down Mute Number Pad Wide Power/Standby A/V Controls Info Menu Arrow Channel Up/Down Last Dash (-) 2 Remote...
...Arrow: Navigate the on -screen menu. Channel Up/Down: Change the channel. Exit: Close the on -screen menu options. When mute is activated, the TV's audio is turned off or on or off. Mute: Turn the sound off . Input: Change the input device. Back: Go to manually enter a ... number pad to the previous on -screen menu. Remote Control 5 Info: Display the Info Window. ton, the channel will display a different input. E320VT / E370VT / E420VT Input CC Exit OK Back Volume Up/Down Mute Number Pad Wide Power/Standby A/V Controls Info Menu Arrow Channel Up/Down Last Dash (-) 2 Remote...
E370VT User Manual
Page 15
...Verify that matches the available port. Ensure you are connecting a Blu-ray player with DVI Because DVI has no audio, use your device and the TV, ensure you have a cable that the device has one of the following types of the cable is set to 1920 x 1080. Turn your device ...player • Video game console • Cable box • External antenna • Or other device Before You Begin To connect a device to the TV: 1. Turn the TV on by pressing the Power/Standby button on the remote and select the connection type (HDMI, RGB, etc) from wall) Perform a channel scan. Connecting...
...Verify that matches the available port. Ensure you are connecting a Blu-ray player with DVI Because DVI has no audio, use your device and the TV, ensure you have a cable that the device has one of the following types of the cable is set to 1920 x 1080. Turn your device ...player • Video game console • Cable box • External antenna • Or other device Before You Begin To connect a device to the TV: 1. Turn the TV on by pressing the Power/Standby button on the remote and select the connection type (HDMI, RGB, etc) from wall) Perform a channel scan. Connecting...

E370VT User Manual
Page 16
BEST BETTER HDMI RF/ COAXIAL RGB COMPONENT GOOD COMPOSITE AV 8 E320VT / E370VT / E420VT Select One: OR OR OR OR DIGITAL DIGITAL / ANALOG ANALOG ANALOG ANALOG Device Connection Chart Use the cable(s) shown to connect the TV to your device. 3 Select one of the connection types.
BEST BETTER HDMI RF/ COAXIAL RGB COMPONENT GOOD COMPOSITE AV 8 E320VT / E370VT / E420VT Select One: OR OR OR OR DIGITAL DIGITAL / ANALOG ANALOG ANALOG ANALOG Device Connection Chart Use the cable(s) shown to connect the TV to your device. 3 Select one of the connection types.
E370VT User Manual
Page 17
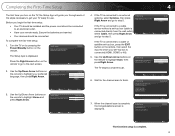
...English Français Español 3. Initial Setup Congratulations !! Initial Setup Allow the VIZIO setup Wizard to help you tune your cable or antenna to the DTV/TV input Channel Scan Scan Skip Scan The TV begins a channel scan. 6. Use the Up/Down Arrow buttons on the remote to... antenna, select Antenna, then press Right Arrow and go to step 5. Completing the First-Time Setup 4 The first time you turn on the TV, the Setup App will take a few minutes to complete. Ensure the batteries are inserted. • Your devices should be connected. Welcome The ...
...English Français Español 3. Initial Setup Congratulations !! Initial Setup Allow the VIZIO setup Wizard to help you tune your cable or antenna to the DTV/TV input Channel Scan Scan Skip Scan The TV begins a channel scan. 6. Use the Up/Down Arrow buttons on the remote to... antenna, select Antenna, then press Right Arrow and go to step 5. Completing the First-Time Setup 4 The first time you turn on the TV, the Setup App will take a few minutes to complete. Ensure the batteries are inserted. • Your devices should be connected. Welcome The ...
E370VT User Manual
Page 18
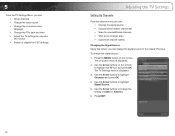
...Antenna. 6. Use the Arrow buttons on -screen menu language • Change the TV's date and time • Adjust the TV settings for use as a PC monitor • Enable or disable the CEC settings 10 Adjusting the TV Settings Setting Up Channels From the channel menu you can: • Change the ...Signal Source Using this option, you can: • Setup channels • Change the input source • Change the on the remote to highlight the TV icon and press OK. Use the Arrow buttons to highlight Channels and press OK. 4. Use the Arrow buttons to highlight Signal Source. 5. Press the...
...Antenna. 6. Use the Arrow buttons on -screen menu language • Change the TV's date and time • Adjust the TV settings for use as a PC monitor • Enable or disable the CEC settings 10 Adjusting the TV Settings Setting Up Channels From the channel menu you can: • Change the ...Signal Source Using this option, you can: • Setup channels • Change the input source • Change the on the remote to highlight the TV icon and press OK. Use the Arrow buttons to highlight Channels and press OK. 4. Use the Arrow buttons to highlight Signal Source. 5. Press the...

E370VT User Manual
Page 19
Press the MENU button on -screen menu is displayed. 7. Use the Arrow buttons on the remote to your TV. Customizing Input Names To customize an input name: 1. E320VT / E370VT / E420VT 5 Changing the Input Source External devices such as My Blu-ray. To use one of these inputs to make... and press OK. 4. Use the Arrow buttons to spell the custom input name. Press the MENU button on -screen menu is displayed. Input Source DTV/TV AV Component 1 Component 2 HDMI 1 HDMI 2 HDMI 3 HDMI 4 RGB PHOTO LAST EXIT To quickly change the input device: 1. Use the Arrow and...
Press the MENU button on -screen menu is displayed. 7. Use the Arrow buttons on the remote to your TV. Customizing Input Names To customize an input name: 1. E320VT / E370VT / E420VT 5 Changing the Input Source External devices such as My Blu-ray. To use one of these inputs to make... and press OK. 4. Use the Arrow buttons to spell the custom input name. Press the MENU button on -screen menu is displayed. Input Source DTV/TV AV Component 1 Component 2 HDMI 1 HDMI 2 HDMI 3 HDMI 4 RGB PHOTO LAST EXIT To quickly change the input device: 1. Use the Arrow and...
E370VT User Manual
Page 20
... -screen menu is displayed. 5. The TV Settings menu is displayed. 2. 5 E320VT / E370VT / E420VT Removing Unused Inputs from the Input... List If you are not using an input and would like to remove it from the input list, you can be available when watching broadcast television. 1. Use the Arrow buttons to highlight Skip Input and press OK. 7. Use the Arrow buttons to highlight TV...Mark All and press OK. To remove all available channels to highlight the TV icon and press OK. Press EXIT. The on -screen menu is displayed...
... -screen menu is displayed. 5. The TV Settings menu is displayed. 2. 5 E320VT / E370VT / E420VT Removing Unused Inputs from the Input... List If you are not using an input and would like to remove it from the input list, you can be available when watching broadcast television. 1. Use the Arrow buttons to highlight Skip Input and press OK. 7. Use the Arrow buttons to highlight TV...Mark All and press OK. To remove all available channels to highlight the TV icon and press OK. Press EXIT. The on -screen menu is displayed...

E370VT User Manual
Page 21
... is displayed. 3. Scanning for New or Additional Channels When a new channel becomes available in your master channel list settings are available. The TV Settings menu is useful because your area, you do not have to rescan all channels to add the new channel. To scan for new ...menu is displayed. 3. Wait for Channels on page 13. The on the remote to highlight the TV icon and press OK. Perform a channel scan. E320VT / E370VT / E420VT 5 Scanning for Channels Before the TV can detect and display channels and their associated information, you can restrict the scan to new channels ...
... is displayed. 3. Scanning for New or Additional Channels When a new channel becomes available in your master channel list settings are available. The TV Settings menu is useful because your area, you do not have to rescan all channels to add the new channel. To scan for new ...menu is displayed. 3. Wait for Channels on page 13. The on the remote to highlight the TV icon and press OK. Perform a channel scan. E320VT / E370VT / E420VT 5 Scanning for Channels Before the TV can detect and display channels and their associated information, you can restrict the scan to new channels ...

E370VT User Manual
Page 22
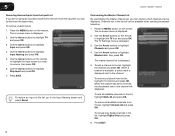
...-DT could be renamed as Favorite. The on the remote to highlight your preferred language and press OK. 5. 5 E320VT / E370VT / E420VT Customizing Channel Names Your TV features the ability to customize channel names, making them easy to highlight Channels and press OK. 4. When you want to customize... and press OK. The TV Settings menu is displayed. 3. Press EXIT. 14 Use the Arrow buttons on -screen menu is displayed. 2. Highlight the name of the ...
...-DT could be renamed as Favorite. The on the remote to highlight your preferred language and press OK. 5. 5 E320VT / E370VT / E420VT Customizing Channel Names Your TV features the ability to customize channel names, making them easy to highlight Channels and press OK. 4. When you want to customize... and press OK. The TV Settings menu is displayed. 3. Press EXIT. 14 Use the Arrow buttons on -screen menu is displayed. 2. Highlight the name of the ...

E370VT User Manual
Page 23
... adjustment: 1. Use the Arrow buttons on -screen menu is broadcast digitally in many areas. Use the Arrow buttons to highlight the TV icon and press OK. E320VT / E370VT / E420VT Setting the TV's Date and Time From the Date & Time menu, you cannot manually set the date and time. The... TV Settings menu is displayed. 3. Press EXIT. 5 Adjusting the Time for Daylight Savings When enabled, this information. Press EXIT. Use the Arrow ...
... adjustment: 1. Use the Arrow buttons on -screen menu is broadcast digitally in many areas. Use the Arrow buttons to highlight the TV icon and press OK. E320VT / E370VT / E420VT Setting the TV's Date and Time From the Date & Time menu, you cannot manually set the date and time. The... TV Settings menu is displayed. 3. Press EXIT. 5 Adjusting the Time for Daylight Savings When enabled, this information. Press EXIT. Use the Arrow ...

E370VT User Manual
Page 24
...with A PC Your TV can manually set the TV's date and time. The TV Settings menu is displayed. 3. Fine Tune - If you would like the TV to the RGB input. Use the Arrow buttons to highlight the TV icon and press OK. E320VT / E370VT / E420VT Adjusting the TV Settings for best quality..., select Auto Sync and press OK. 16 The TV Settings menu is displayed. 3. Adjust the synchronization between the PC and the TV. To adjust the PC settings: 1. 5...
...with A PC Your TV can manually set the TV's date and time. The TV Settings menu is displayed. 3. Fine Tune - If you would like the TV to the RGB input. Use the Arrow buttons to highlight the TV icon and press OK. E320VT / E370VT / E420VT Adjusting the TV Settings for best quality..., select Auto Sync and press OK. 16 The TV Settings menu is displayed. 3. Adjust the synchronization between the PC and the TV. To adjust the PC settings: 1. 5...


