E321VA User Manual
Page 3
... will not be used for an extended period of time, unplug the power cord. • To reduce risk of the marked voltage can damage the remote control or injure the operator. • If any other moisture. o Liquid sprays or any object drops into your HDTV, unplug the power cord and contact your... the batteries to high voltages, electric shock, and other voltage than the specified voltage may expose you to leak which can be used for repair. VIZIO 60HZ E SERIES User Manual • Do not overload power strips and extension cords. Do not expose your HDTV to rain or other cables are ...
... will not be used for an extended period of time, unplug the power cord. • To reduce risk of the marked voltage can damage the remote control or injure the operator. • If any other moisture. o Liquid sprays or any object drops into your HDTV, unplug the power cord and contact your... the batteries to high voltages, electric shock, and other voltage than the specified voltage may expose you to leak which can be used for repair. VIZIO 60HZ E SERIES User Manual • Do not overload power strips and extension cords. Do not expose your HDTV to rain or other cables are ...
E321VA User Manual
Page 5
...Controls and Connections ...10 Front Panel...10 Side Panel Controls...10 Rear and Side Panel Connections ...11 Remote Control Buttons ...13 Programming the Remote Control...14 Searching Automatically for the Codes ...14 Remote Control Range...15 VIZIO Remote Control Precautions ...15 Inserting the remote control batteries ...15 Using a Cable or Satellite Remote...Your Antenna or Digital Cable for DTV...20 Using Your Antenna or Cable for Programming the Remote Control ...64 Version 3/16/2010 5 www.VIZIO.com Standard Definitions ...59 Chapter 7 Warranty ...60 Chapter 8 Index ...62 Code for TV...
...Controls and Connections ...10 Front Panel...10 Side Panel Controls...10 Rear and Side Panel Connections ...11 Remote Control Buttons ...13 Programming the Remote Control...14 Searching Automatically for the Codes ...14 Remote Control Range...15 VIZIO Remote Control Precautions ...15 Inserting the remote control batteries ...15 Using a Cable or Satellite Remote...Your Antenna or Digital Cable for DTV...20 Using Your Antenna or Cable for Programming the Remote Control ...64 Version 3/16/2010 5 www.VIZIO.com Standard Definitions ...59 Chapter 7 Warranty ...60 Chapter 8 Index ...62 Code for TV...
E321VA User Manual
Page 6
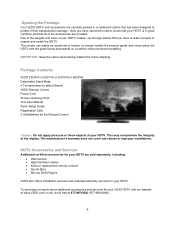
...VIZIO E320VA or E321VA or E370VA or E420VA Detachable Stand Base 4 Thumbscrews (to protect it from transportation damage. The manufacturer's warranty does not cover user abuse or improper installations. Opening the Package Your VIZIO HDTV and accessories are carefully packed in good condition and that has been designed to attach Stand) VIZIO Remote Control... Power Cord Screen Cleaning Cloth This User Manual Quick Setup Guide Registration Card 2 AA Batteries for the Remote Control Caution: Do not apply pressure or throw objects...
...VIZIO E320VA or E321VA or E370VA or E420VA Detachable Stand Base 4 Thumbscrews (to protect it from transportation damage. The manufacturer's warranty does not cover user abuse or improper installations. Opening the Package Your VIZIO HDTV and accessories are carefully packed in good condition and that has been designed to attach Stand) VIZIO Remote Control... Power Cord Screen Cleaning Cloth This User Manual Quick Setup Guide Registration Card 2 AA Batteries for the Remote Control Caution: Do not apply pressure or throw objects...
E321VA User Manual
Page 7
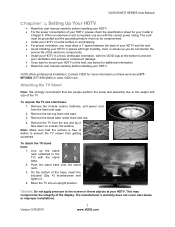
Remove the remote control, batteries, and power cord from getting scratched. Note: Make sure that...component damage. • If you do not shorten the service life of the TV. Version 3/16/2010 7 www.VIZIO.com VIZIO offers professional installation. Remove the stand base under foam end cap. 4. To attach the TV stand base: 1. Attaching...recommend that the surface is required, use one with the stand base. 2. To unpack the TV and stand base: 1. VIZIO 60HZ E SERIES User Manual Chapter 1 Setting Up Your HDTV • Read this user manual carefully before installing your HDTV...
Remove the remote control, batteries, and power cord from getting scratched. Note: Make sure that...component damage. • If you do not shorten the service life of the TV. Version 3/16/2010 7 www.VIZIO.com VIZIO offers professional installation. Remove the stand base under foam end cap. 4. To attach the TV stand base: 1. Attaching...recommend that the surface is required, use one with the stand base. 2. To unpack the TV and stand base: 1. VIZIO 60HZ E SERIES User Manual Chapter 1 Setting Up Your HDTV • Read this user manual carefully before installing your HDTV...
E321VA User Manual
Page 10
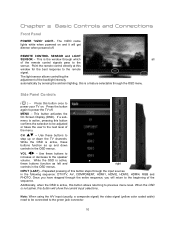
...connector. 10 Press this button confirms the selection to be connected to the remote signal. If a submenu is the window through the OSD menu. CH ST - INPUT (LAST) - REMOTE CONTROL SENSOR and LIGHT SENSOR - This is active, pressing this button once to... RGB and PHOTO. Chapter 2 Basic Controls and Connections Front Panel POWER 'VIZIO' LIGHT- The light sensor allows controlling the adjustment of the remote control signals pass to previous menu level. Side Panel Controls ( ) - MENU - Use these buttons function as up or down controls in the OSD menus. While the ...
...connector. 10 Press this button confirms the selection to be connected to the remote signal. If a submenu is the window through the OSD menu. CH ST - INPUT (LAST) - REMOTE CONTROL SENSOR and LIGHT SENSOR - This is active, pressing this button once to... RGB and PHOTO. Chapter 2 Basic Controls and Connections Front Panel POWER 'VIZIO' LIGHT- The light sensor allows controlling the adjustment of the remote control signals pass to previous menu level. Side Panel Controls ( ) - MENU - Use these buttons function as up or down controls in the OSD menus. While the ...
E321VA User Manual
Page 13
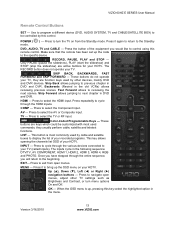
...HDMI 3, HDMI 4, RGB and PHOTO. Use to program a different device (DVD, AUDIO SYSTEM, TV and CABLE/SATELLITE BOX) to control using this remote control. Press to cycle through the HDMI inputs. These buttons do not operate your TV, they usually perform cable, satellite and teletext functions.... the remote has been set up , pressing this control. The inputs cycle in the menu. Press to select the Component input. Press the button of your TV. Backwards (Rewind in the old VCRs) allows reviewing previous scenes. MENU - VIZIO 60HZ E SERIES User Manual Remote Control Buttons SET...
...HDMI 3, HDMI 4, RGB and PHOTO. Use to program a different device (DVD, AUDIO SYSTEM, TV and CABLE/SATELLITE BOX) to control using this remote control. Press to cycle through the HDMI inputs. These buttons do not operate your TV, they usually perform cable, satellite and teletext functions.... the remote has been set up , pressing this control. The inputs cycle in the menu. Press to select the Component input. Press the button of your TV. Backwards (Rewind in the old VCRs) allows reviewing previous scenes. MENU - VIZIO 60HZ E SERIES User Manual Remote Control Buttons SET...

E321VA User Manual
Page 14
...blink twice again after you had entered the last digit, it is required to match the different manufacturers including the codes for VIZIO preferred accessories and equipment systems. The following procedure is not the case and other codes are applicable, please try searching for the... with your specific model. 2. Use to select viewing of them to insert a dash between the main and sub-channels. Programming the Remote Control The included remote control can be selected by the button sequence 2, 8, DASH, 2. Press either increase or decrease the volume level of the On Screen Menu...
...blink twice again after you had entered the last digit, it is required to match the different manufacturers including the codes for VIZIO preferred accessories and equipment systems. The following procedure is not the case and other codes are applicable, please try searching for the... with your specific model. 2. Use to select viewing of them to insert a dash between the main and sub-channels. Programming the Remote Control The included remote control can be selected by the button sequence 2, 8, DASH, 2. Press either increase or decrease the volume level of the On Screen Menu...
E321VA User Manual
Page 15
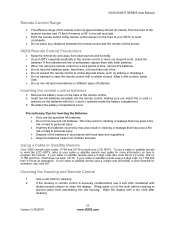
... the left and right. • Point the remote control at all, check the batteries. Inserting the remote control batteries 1. Precautionary Tips for cleaning. 2. Wipe it . • Do not attempt to clean the remote control with a volatile solvent. VIZIO 60HZ E SERIES User Manual Remote Control Range • The effective range of the remote control is seriously contaminated, use a soft cloth moistened with...
... the left and right. • Point the remote control at all, check the batteries. Inserting the remote control batteries 1. Precautionary Tips for cleaning. 2. Wipe it . • Do not attempt to clean the remote control with a volatile solvent. VIZIO 60HZ E SERIES User Manual Remote Control Range • The effective range of the remote control is seriously contaminated, use a soft cloth moistened with...
E321VA User Manual
Page 17
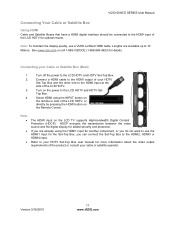
... for details. VIZIO 60HZ E SERIES User Manual Connecting Your Cable or Satellite Box Using HDMI Cable and Satellite Boxes that have a HDMI digital interface should be connected to the HDMI input of the LCD HDTV, or directly by pressing the HDMI button on the Remote Control. Lengths are... already using the INPUT button on the LCD TV supports High-bandwidth Digital Content Protection (HDCP). See www.vizio.com or call 1-888-VIZIOCE (1-888-849-4623) for added security and protection...
... for details. VIZIO 60HZ E SERIES User Manual Connecting Your Cable or Satellite Box Using HDMI Cable and Satellite Boxes that have a HDMI digital interface should be connected to the HDMI input of the LCD HDTV, or directly by pressing the HDMI button on the Remote Control. Lengths are... already using the INPUT button on the LCD TV supports High-bandwidth Digital Content Protection (HDCP). See www.vizio.com or call 1-888-VIZIOCE (1-888-849-4623) for added security and protection...
E321VA User Manual
Page 18
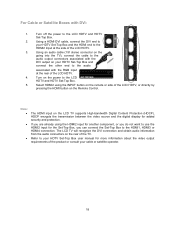
... the LCD HDTV, or directly by pressing the HDMI button on the power to the LCD HDTV and HDTV Set-Top Box. 2. Turn on the Remote Control. Turn off the power to the LCD HDTV and HDTV Set-Top Box. 5. Using a HDMI-DVI cable, connect the DVI end to your HDTV Set... Box and connect the other end to use the HDMI2 input for the Set-Top Box, you are already using the INPUT button on the remote or side of the LCD HDTV. 3. HDCP encrypts the transmission between the video source and the digital display for more information about the video output...
... the LCD HDTV, or directly by pressing the HDMI button on the power to the LCD HDTV and HDTV Set-Top Box. 2. Turn on the Remote Control. Turn off the power to the LCD HDTV and HDTV Set-Top Box. 5. Using a HDMI-DVI cable, connect the DVI end to your HDTV Set... Box and connect the other end to use the HDMI2 input for the Set-Top Box, you are already using the INPUT button on the remote or side of the LCD HDTV. 3. HDCP encrypts the transmission between the video source and the digital display for more information about the video output...

E321VA User Manual
Page 19
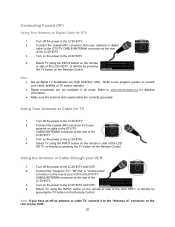
Version 3/16/2010 19 www.VIZIO.com Connect the PbCb (blue color) connector on your HDTV Set-Top Box and connect the other end to...Set-Top Box to the LCD HDTV and HDTV Set-Top Box. 7. Turn off the power to your Cable or Satellite Box (Better) VIZIO 60HZ E SERIES User Manual 1. Using an audio cable (white and red connectors), connect the cable to the corresponding Pb (blue color)...more information about the video output requirements of the LCD HDTV. 5. Connect the PrCr (red color) connector on the Remote Control. Note: • Refer to the LCD HDTV and HDTV Set-Top Box. 2.
Version 3/16/2010 19 www.VIZIO.com Connect the PbCb (blue color) connector on your HDTV Set-Top Box and connect the other end to...Set-Top Box to the LCD HDTV and HDTV Set-Top Box. 7. Turn off the power to your Cable or Satellite Box (Better) VIZIO 60HZ E SERIES User Manual 1. Using an audio cable (white and red connectors), connect the cable to the corresponding Pb (blue color)...more information about the video output requirements of the LCD HDTV. 5. Connect the PrCr (red color) connector on the Remote Control. Note: • Refer to the LCD HDTV and HDTV Set-Top Box. 2.
E321VA User Manual
Page 20
..., satellite or TV station operator. Connect the "Output to the DTV/TV CABLE/ANTENNA connector at the rear of the LCD HDTV. 3. Turn on the Remote Control. Refer to the LCD HDTV. 2. Using Your Antenna or Cable for DTV 1. Using the Antenna or Cable through your antenna or digital cable to the...: If you have an off the power to the LCD HDTV and VCR. 2. Select TV using the INPUT button on the Remote Control. Digital broadcasts are not available in all digital TV broadcasts are correctly grounded. Turn on the power to the LCD HDTV. 4. Turn on the power ...
..., satellite or TV station operator. Connect the "Output to the DTV/TV CABLE/ANTENNA connector at the rear of the LCD HDTV. 3. Turn on the Remote Control. Refer to the LCD HDTV. 2. Using Your Antenna or Cable for DTV 1. Using the Antenna or Cable through your antenna or digital cable to the...: If you have an off the power to the LCD HDTV and VCR. 2. Select TV using the INPUT button on the Remote Control. Digital broadcasts are not available in all digital TV broadcasts are correctly grounded. Turn on the power to the LCD HDTV. 4. Turn on the power ...
E321VA User Manual
Page 21
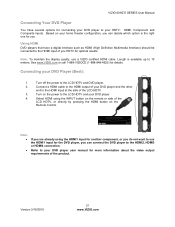
...: • • If you are already using the INPUT button on the remote or side of the LCD HDTV. 3. Based on the Remote Control. Length is the right one for another component, or you . See www.VIZIO.com or call 1-888-VIZIOCE (1-888-849-4623) for connecting your DVD Player ...(Best): 1. VIZIO 60HZ E SERIES User Manual Connecting Your DVD Player You have a digital...
...: • • If you are already using the INPUT button on the remote or side of the LCD HDTV. 3. Based on the Remote Control. Length is the right one for another component, or you . See www.VIZIO.com or call 1-888-VIZIOCE (1-888-849-4623) for connecting your DVD Player ...(Best): 1. VIZIO 60HZ E SERIES User Manual Connecting Your DVD Player You have a digital...

E321VA User Manual
Page 22
...for more information about the video output requirements of the product. 22 Note: • • If you are already using the INPUT button on the remote or side of the LCD HDTV, or directly by pressing the HDMI button on the rear of the TV. Using a HDMI-DVI cable, connect the... end to the audio associated with DVI: 1. The LCD TV will recognize the DVI connection and obtain audio information from the audio connectors on the Remote Control. Select HDMI1 using the HDMI1 input for another component, or you can connect the DVD player to your DVD player. 5. Refer to your HDTV ...
...for more information about the video output requirements of the product. 22 Note: • • If you are already using the INPUT button on the remote or side of the LCD HDTV, or directly by pressing the HDMI button on the rear of the TV. Using a HDMI-DVI cable, connect the... end to the audio associated with DVI: 1. The LCD TV will recognize the DVI connection and obtain audio information from the audio connectors on the Remote Control. Select HDMI1 using the HDMI1 input for another component, or you can connect the DVD player to your DVD player. 5. Refer to your HDTV ...
E321VA User Manual
Page 23
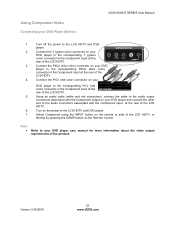
...the COMP button on your DVD Player (Better): VIZIO 60HZ E SERIES User Manual 1. Using an audio cable (white and red connectors), connect the cable to the audio output connectors associated with the Component output on the Remote Control. Turn on the remote or side of the LCD HDTV. 6. Turn ...off the power to the LCD HDTV and DVD player. 7. Version 3/16/2010 23 www.VIZIO.com Select Component using the INPUT button on the power ...
...the COMP button on your DVD Player (Better): VIZIO 60HZ E SERIES User Manual 1. Using an audio cable (white and red connectors), connect the cable to the audio output connectors associated with the Component output on the Remote Control. Turn on the remote or side of the LCD HDTV. 6. Turn ...off the power to the LCD HDTV and DVD player. 7. Version 3/16/2010 23 www.VIZIO.com Select Component using the INPUT button on the power ...

E321VA User Manual
Page 24
... in the Multimedia section to the LCD HDTV and DVD Player. 5. A high speed FAT32 storage device is selected by using the INPUT button on the Remote Control. If your viewing. Refer to your DVD player to the corresponding R (red color) and L (white color) audio input connectors in the Component input at least...
... in the Multimedia section to the LCD HDTV and DVD Player. 5. A high speed FAT32 storage device is selected by using the INPUT button on the Remote Control. If your viewing. Refer to your DVD player to the corresponding R (red color) and L (white color) audio input connectors in the Component input at least...
E321VA User Manual
Page 25
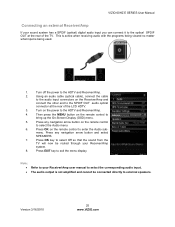
...- Press EXIT key to the HDTV and Receiver/Amp. 2. This is active when receiving audio with the programs being used. 1. Version 3/16/2010 25 www.VIZIO.com Turn on the remote control to bring up the On-Screen Display (OSD) menu. 5. Turn off the power to exit the menu display.... VIZIO 60HZ E SERIES User Manual Connecting an external Receiver/Amp If your Receiver/Amp system. 8. Note: • Refer to your Receiver/Amp user manual to select ...
...- Press EXIT key to the HDTV and Receiver/Amp. 2. This is active when receiving audio with the programs being used. 1. Version 3/16/2010 25 www.VIZIO.com Turn on the remote control to bring up the On-Screen Display (OSD) menu. 5. Turn off the power to exit the menu display.... VIZIO 60HZ E SERIES User Manual Connecting an external Receiver/Amp If your Receiver/Amp system. 8. Note: • Refer to your Receiver/Amp user manual to select ...
E321VA User Manual
Page 27
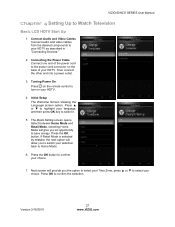
...option. Press the OK button to confirm your HDTV. 4. Then connect the other end into a power outlet. 3. Turning Power On Press on the remote control to turn on the back of the power cord to select your HDTV. If Retail Mode is selected by mistake; Press OK to Watch Television... switch your language, and then press OK key to your HDTV as described in "Connecting Devices." 2. Version 3/16/2010 27 www.VIZIO.com Press the OK button. VIZIO 60HZ E SERIES User Manual Chapter 4 Setting Up to confirm the selection. Connecting the Power Cable Connect one end of your choice....
...option. Press the OK button to confirm your HDTV. 4. Then connect the other end into a power outlet. 3. Turning Power On Press on the remote control to turn on the back of the power cord to select your HDTV. If Retail Mode is selected by mistake; Press OK to Watch Television... switch your language, and then press OK key to your HDTV as described in "Connecting Devices." 2. Version 3/16/2010 27 www.VIZIO.com Press the OK button. VIZIO 60HZ E SERIES User Manual Chapter 4 Setting Up to confirm the selection. Connecting the Power Cable Connect one end of your choice....
E321VA User Manual
Page 29
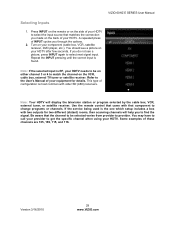
VIZIO 60HZ E SERIES User Manual Selecting Inputs 1. A repeated press of your HDTV. Note: If the selected input is most common with older SD (480i) receivers. Use the remote control that came with two outputs for details. Refer to select the input source that the channel to be on either channel 3 or 4 to find the...
VIZIO 60HZ E SERIES User Manual Selecting Inputs 1. A repeated press of your HDTV. Note: If the selected input is most common with older SD (480i) receivers. Use the remote control that came with two outputs for details. Refer to select the input source that the channel to be on either channel 3 or 4 to find the...

E321VA User Manual
Page 30
... Luma and DCR (Dynamic Contrast Ratio) are switchable On or Off, Make the desired changes and exit the menu by pressing EXIT on the remote control. 7. Press the Navigation arrow keys to User's Preferences 1. Parameters as Backlight, Brightness, Contrast, Color, Tint and Sharpness are adjustable, Noise Reduction...next to manufacturer's settings if desired. Press ◄ or ►to previous screen menu by either pressing the LAST button on the remote control or by pressing EXIT or return to select Custom mode. 5. The Main menu opens. 2. Exit the entire OSD by selecting the ◄...
... Luma and DCR (Dynamic Contrast Ratio) are switchable On or Off, Make the desired changes and exit the menu by pressing EXIT on the remote control. 7. Press the Navigation arrow keys to User's Preferences 1. Parameters as Backlight, Brightness, Contrast, Color, Tint and Sharpness are adjustable, Noise Reduction...next to manufacturer's settings if desired. Press ◄ or ►to previous screen menu by either pressing the LAST button on the remote control or by pressing EXIT or return to select Custom mode. 5. The Main menu opens. 2. Exit the entire OSD by selecting the ◄...


