
User Manual English
Page 2
... power cord from being damaged, the following instructions should be installed near your HDTV cabinet. ii Install in accordance with the manufacturer's instructions. • Do not install near water. • Clean only with the apparatus. This may cause fire or electric shock. • Follow instructions for replacement of at least three feet should be used as vases, shall be supported by a UL Listed Wall Mount Bracket...
... power cord from being damaged, the following instructions should be installed near your HDTV cabinet. ii Install in accordance with the manufacturer's instructions. • Do not install near water. • Clean only with the apparatus. This may cause fire or electric shock. • Follow instructions for replacement of at least three feet should be used as vases, shall be supported by a UL Listed Wall Mount Bracket...

User Manual English
Page 3
.... Persons with your doctor before using your Tablet Remote, NEVER type or read the User Manual available directly through an application in an area with the Specific Absorption Rates (SAR) limits set by an authorized service center. OPERATING TEMPERATURE Your Tablet Remote is your primary responsibility, but not always, clearly marked. IMPORTANT SAFETY INSTRUCTIONS - DRIVING SAFELY Use of seizures or strokes, or...
.... Persons with your doctor before using your Tablet Remote, NEVER type or read the User Manual available directly through an application in an area with the Specific Absorption Rates (SAR) limits set by an authorized service center. OPERATING TEMPERATURE Your Tablet Remote is your primary responsibility, but not always, clearly marked. IMPORTANT SAFETY INSTRUCTIONS - DRIVING SAFELY Use of seizures or strokes, or...
User Manual English
Page 4
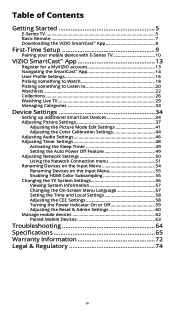
... 34 Adjusting Picture Settings 37 Adjusting the Picture Mode Edit Settings 41 Adjusting the Color Calibration Settings 44 Adjusting Audio Settings 46 Adjusting Timer Settings 48 Activating the Sleep Timer 49 Setting the Auto Power Off Feature 49 Adjusting Network Settings 50 Using the Network Connection menu 51 Renaming Devices on the Input Menu 54 Renaming Devices on the Input Menu 55 Enabling HDMI Color Subsampling 55 Changing the TV System Settings 56 Viewing System Information 57 Changing the On-Screen Menu Language 57 Setting the Time and Local Settings 58 Adjusting the...
... 34 Adjusting Picture Settings 37 Adjusting the Picture Mode Edit Settings 41 Adjusting the Color Calibration Settings 44 Adjusting Audio Settings 46 Adjusting Timer Settings 48 Activating the Sleep Timer 49 Setting the Auto Power Off Feature 49 Adjusting Network Settings 50 Using the Network Connection menu 51 Renaming Devices on the Input Menu 54 Renaming Devices on the Input Menu 55 Enabling HDMI Color Subsampling 55 Changing the TV System Settings 56 Viewing System Information 57 Changing the On-Screen Menu Language 57 Setting the Time and Local Settings 58 Adjusting the...
User Manual English
Page 7
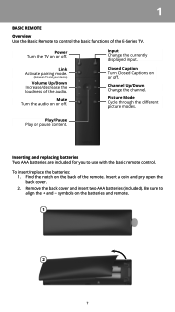
.../decrease the loudness of the E-Series TV. Channel Up/Down Change the channel. Play/Pause Play or pause content. Find the notch on or off. Mute Turn the audio on the back of the remote. Closed Caption Turn Closed Captions on the batteries and remote. 1 2 7 Picture Mode Cycle through the different picture modes. Be sure to align the + and − symbols on or off . Power Turn the TV on or off...
.../decrease the loudness of the E-Series TV. Channel Up/Down Change the channel. Play/Pause Play or pause content. Find the notch on or off. Mute Turn the audio on the back of the remote. Closed Caption Turn Closed Captions on the batteries and remote. 1 2 7 Picture Mode Cycle through the different picture modes. Be sure to align the + and − symbols on or off . Power Turn the TV on or off...
User Manual English
Page 19
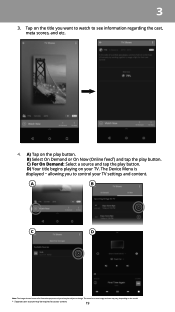
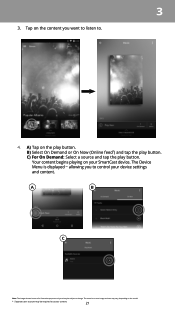
... a source and tap the play button. A) Tap on your TV settings and content. The Device Menu is displayed − allowing you want to watch to access content. 19 A B C D Note: The images shown here are for illustrative purposes only and may be required to see information regarding the cast, meta scores, and etc. 4. Tap on the model. * Separate user account...
... a source and tap the play button. A) Tap on your TV settings and content. The Device Menu is displayed − allowing you want to watch to access content. 19 A B C D Note: The images shown here are for illustrative purposes only and may be required to see information regarding the cast, meta scores, and etc. 4. Tap on the model. * Separate user account...
User Manual English
Page 21
... access content. 21 C) For On Demand: Select a source and tap the play button. The Device Menu is displayed − allowing you want to listen to control your SmartCast device. The actual on-screen image and text may vary, depending on the content you to . 4. B) Select On Demand or On Now (Online feed*) and tap the play button. Tap on the model. * Separate user...
... access content. 21 C) For On Demand: Select a source and tap the play button. The Device Menu is displayed − allowing you want to listen to control your SmartCast device. The actual on-screen image and text may vary, depending on the content you to . 4. B) Select On Demand or On Now (Online feed*) and tap the play button. Tap on the model. * Separate user...
User Manual English
Page 29
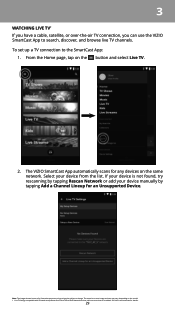
... more services to be subject to change. The VIZIO SmartCast App automatically scans for illustrative purposes only and may vary, depending on the model. * Live TV listings compatible with IP-based set up a TV connection to search, discover, and browse live TV channels. Note: The images shown here are for any devices on the button and select Live TV. 2. The actual on-screen...
... more services to be subject to change. The VIZIO SmartCast App automatically scans for illustrative purposes only and may vary, depending on the model. * Live TV listings compatible with IP-based set up a TV connection to search, discover, and browse live TV channels. Note: The images shown here are for any devices on the button and select Live TV. 2. The actual on-screen...

User Manual English
Page 39
... difficult to compensate for television viewing. • Black Detail • Adjusts the average brightness of the picture. If the setting is too low, the picture may appear dark. This setting is too low, the picture may be adjusted on some picture modes. • Brightness • Adjusts the black level of picture elements. If flesh appears too orange, reduce the level of color before adjusting tint. • Sharpness...
... difficult to compensate for television viewing. • Black Detail • Adjusts the average brightness of the picture. If the setting is too low, the picture may appear dark. This setting is too low, the picture may be adjusted on some picture modes. • Brightness • Adjusts the black level of picture elements. If flesh appears too orange, reduce the level of color before adjusting tint. • Sharpness...
User Manual English
Page 41
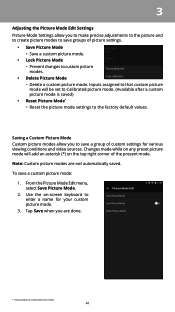
... factory default values. To save groups of picture settings. • Save Picture Mode • Save a custom picture mode. • Lock Picture Mode • Prevent changes to custom picture modes. • Delete Picture Mode • Delete a custom picture mode. Tap Save when you are not automatically saved. Inputs assigned to that custom picture mode will add an asterisk (*) on customized preset modes. 41 Use the on-screen keyboard to enter a name for various viewing conditions and video sources. 3 Adjusting...
... factory default values. To save groups of picture settings. • Save Picture Mode • Save a custom picture mode. • Lock Picture Mode • Prevent changes to custom picture modes. • Delete Picture Mode • Delete a custom picture mode. Tap Save when you are not automatically saved. Inputs assigned to that custom picture mode will add an asterisk (*) on customized preset modes. 41 Use the on-screen keyboard to enter a name for various viewing conditions and video sources. 3 Adjusting...

User Manual English
Page 43
... a Custom Picture Mode Custom picture modes that are no longer needed can be deleted. To delete custom picture modes: 1. Tap on Yes to reset the preset picture mode to delete the custom picture mode. A dialogue window is displayed. 2. Tap on Yes to the factory default values. 43 Inputs assigned to a deleted custom picture mode become assigned to the factory default values. Resetting a Picture Mode Reset the picture mode settings (for a preset picture mode) to the Calibrated picture mode. From the Picture Mode Edit menu, Tap Reset Picture Mode...
... a Custom Picture Mode Custom picture modes that are no longer needed can be deleted. To delete custom picture modes: 1. Tap on Yes to reset the preset picture mode to delete the custom picture mode. A dialogue window is displayed. 2. Tap on Yes to the factory default values. 43 Inputs assigned to a deleted custom picture mode become assigned to the factory default values. Resetting a Picture Mode Reset the picture mode settings (for a preset picture mode) to the Calibrated picture mode. From the Picture Mode Edit menu, Tap Reset Picture Mode...
User Manual English
Page 44
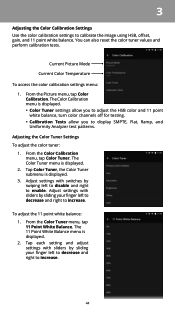
... White Balance menu is displayed. 3. Current Picture Mode Current Color Temperature To access the color calibration settings menu: 1. Adjust settings with sliders by swiping left to decrease and right to display SMPTE, Flat, Ramp, and Uniformity Analyzer test patterns. Tap each setting and adjust settings with switches by sliding your finger left to disable and right to increase. 44 The Color Tuner menu is displayed. • Color Tuner settings allow you to adjust the HSB color and 11 point white balance, turn color channels...
... White Balance menu is displayed. 3. Current Picture Mode Current Color Temperature To access the color calibration settings menu: 1. Adjust settings with sliders by swiping left to decrease and right to display SMPTE, Flat, Ramp, and Uniformity Analyzer test patterns. Tap each setting and adjust settings with switches by sliding your finger left to disable and right to increase. 44 The Color Tuner menu is displayed. • Color Tuner settings allow you to adjust the HSB color and 11 point white balance, turn color channels...

User Manual English
Page 47
... Sound - Adjusts the synchronization between program content, AV formats, and input sources. Changes the type of the audio output from the left and right speakers. • Lip Sync - Select PCM or Bitstream. • Analog Audio Out - Select Variable if you are any devices (such as a sound bar) connected to enable. Turns the built-in speakers on or off enables the 47 Sets the volume control properties for digital audio out and HDMI ARC output when connected...
... Sound - Adjusts the synchronization between program content, AV formats, and input sources. Changes the type of the audio output from the left and right speakers. • Lip Sync - Select PCM or Bitstream. • Analog Audio Out - Select Variable if you are any devices (such as a sound bar) connected to enable. Turns the built-in speakers on or off enables the 47 Sets the volume control properties for digital audio out and HDMI ARC output when connected...

User Manual English
Page 58
... Time & Local Settings. Tap on your device's user manual for plug and play of an audio device connected to turn daylight savings time on, off . 58 Not all HDMI devices support CEC. The CEC menu is displayed. • Use Internet Time - Select Disable to the HDMI ARC input. Set the date and time. • Time Zone - Set time format to enable support for these devices). Adjusting the CEC Settings The CEC function on CEC, select Enable to use the Tablet Remote to control...
... Time & Local Settings. Tap on your device's user manual for plug and play of an audio device connected to turn daylight savings time on, off . 58 Not all HDMI devices support CEC. The CEC menu is displayed. • Use Internet Time - Select Disable to the HDMI ARC input. Set the date and time. • Time Zone - Set time format to enable support for these devices). Adjusting the CEC Settings The CEC function on CEC, select Enable to use the Tablet Remote to control...
User Manual English
Page 72
... misuse, modifications or adjustments; (i) installation, set forth below . Zero Bright Pixel Defect Guarantee (HDTVs Only) Your product may attempt to the model's product information page at the email address or telephone number below for arbitration by visiting www.adr.org or by a non-authorized reseller. When you always clear all applicable user data and downloaded applications. You will...
... misuse, modifications or adjustments; (i) installation, set forth below . Zero Bright Pixel Defect Guarantee (HDTVs Only) Your product may attempt to the model's product information page at the email address or telephone number below for arbitration by visiting www.adr.org or by a non-authorized reseller. When you always clear all applicable user data and downloaded applications. You will...
User Manual English
Page 74
... software, are subject to the customs and export control laws and regulations of this product properly, according to magnetic fields. For more information, visit www.vizio.com/environment. Internet Connectivity Network conditions, environmental and other than its own. HDMI, HDMI High-Definition Multimedia Interface, and the HDMI Logo are registered trademarks of this Quick Start Guide and the associated User Manual, go to view...
... software, are subject to the customs and export control laws and regulations of this product properly, according to magnetic fields. For more information, visit www.vizio.com/environment. Internet Connectivity Network conditions, environmental and other than its own. HDMI, HDMI High-Definition Multimedia Interface, and the HDMI Logo are registered trademarks of this Quick Start Guide and the associated User Manual, go to view...

Quickstart Guide English
Page 2
...close to smoke or moisture may form in electric shock or fire. Wait before connecting other apparatus (including amplifiers) that may be operated only from the type of power source indicated on your TV to qualified service personnel. Doing so could short circuit parts causing a fire or electric shock. The manufacturer's warranty does not cover user abuse or improper installations...of the type of time. • Refer all instructions. • Do not use attachments/accessories specified by the manufacturer. • Use only with the cart, stand, tripod, bracket, or table specified ...
...close to smoke or moisture may form in electric shock or fire. Wait before connecting other apparatus (including amplifiers) that may be operated only from the type of power source indicated on your TV to qualified service personnel. Doing so could short circuit parts causing a fire or electric shock. The manufacturer's warranty does not cover user abuse or improper installations...of the type of time. • Refer all instructions. • Do not use attachments/accessories specified by the manufacturer. • Use only with the cart, stand, tripod, bracket, or table specified ...
Quickstart Guide English
Page 3
... repair or service your TV yourself. If repair is dropped or damaged in any abnormality occurs. result in fire or electric shock. • The wall socket should be installed near your TV and easily accessible. • Only power of the marked voltage can be used for long period of time. If any object drops into your TV, unplug the power cord...
... repair or service your TV yourself. If repair is dropped or damaged in any abnormality occurs. result in fire or electric shock. • The wall socket should be installed near your TV and easily accessible. • Only power of the marked voltage can be used for long period of time. If any object drops into your TV, unplug the power cord...

Quickstart Guide English
Page 6
INPUT Change the currently displayed input. English - 6 CHANNEL UP/DOWN Change the channel. LINK Activate linking mode on or off . CLOSED CAPTION Turn closed caption On and Off. PIC Cycles through the different picture setting modes. VOLUME Increase or decrease the loudness of the audio. This is your basic remote POWER Turn the TV on or off . MUTE Turn the audio on TV.
INPUT Change the currently displayed input. English - 6 CHANNEL UP/DOWN Change the channel. LINK Activate linking mode on or off . CLOSED CAPTION Turn closed caption On and Off. PIC Cycles through the different picture setting modes. VOLUME Increase or decrease the loudness of the audio. This is your basic remote POWER Turn the TV on or off . MUTE Turn the audio on TV.
Quickstart Guide English
Page 24
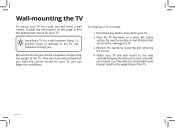
... will need a wall mount. Place the TV face-down on a wall requires lifting. Consult the information on a wall: 1. Disconnect any cables connected to help you choose is clear of the TV. Remove the stands by loosening and removing the screws. 4. To install your TV, you have the correct mount for the weight/load of this page to the wall, carefully following the instructions that came with a UL-listed wall mount bracket...
... will need a wall mount. Place the TV face-down on a wall requires lifting. Consult the information on a wall: 1. Disconnect any cables connected to help you choose is clear of the TV. Remove the stands by loosening and removing the screws. 4. To install your TV, you have the correct mount for the weight/load of this page to the wall, carefully following the instructions that came with a UL-listed wall mount bracket...
Quickstart Guide English
Page 32
... adjustments; (i) installation, set forth below , unless an exception applies. What This Warranty Does Not Cover This warranty does not cover: (a) cosmetic damage; (b) normal wear and tear; (c) improper operation; (d) improper voltage supply or power surges; (e) signal issues; (f) damage from the date of user data and downloaded applications is longer. The purchase must submit your personal information, VIZIO recommends that affords an equal degree of Service...
... adjustments; (i) installation, set forth below , unless an exception applies. What This Warranty Does Not Cover This warranty does not cover: (a) cosmetic damage; (b) normal wear and tear; (c) improper operation; (d) improper voltage supply or power surges; (e) signal issues; (f) damage from the date of user data and downloaded applications is longer. The purchase must submit your personal information, VIZIO recommends that affords an equal degree of Service...


