
User Manual (English)
Page 5
... not perform any other cables are unplugged before moving your TV, hold the AC/DC power adapter, not the cord. Do not expose batteries to leak which can damage the remote control or injure the operator. • WARNING: Keep your dealer immediately. Continuous use in fire or electric shock. • Do not use by qualified service personnel only. Pulling...
... not perform any other cables are unplugged before moving your TV, hold the AC/DC power adapter, not the cord. Do not expose batteries to leak which can damage the remote control or injure the operator. • WARNING: Keep your dealer immediately. Continuous use in fire or electric shock. • Do not use by qualified service personnel only. Pulling...
User Manual (English)
Page 6
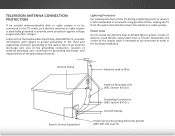
Remember, the screen of the coaxial cable is left unattended or unused for long periods of time, unplug the TV from the wall outlet and disconnect the antenna or cable system. Power Lines Do not locate the antenna near overhead light or power circuits, or where it is intended to be connected to the TV, make sure that the antenna or cable system is electrically...
Remember, the screen of the coaxial cable is left unattended or unused for long periods of time, unplug the TV from the wall outlet and disconnect the antenna or cable system. Power Lines Do not locate the antenna near overhead light or power circuits, or where it is intended to be connected to the TV, make sure that the antenna or cable system is electrically...
User Manual (English)
Page 7
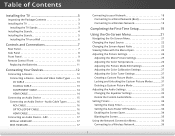
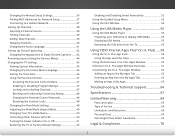
... Color Calibration Settings 27 Adjusting the Color Tuner Settings 27 Creating a Custom Picture Mode 30 Locking and Unlocking the Custom Picture Modes 31 Deleting a Custom Picture Mode 31 Adjusting the Audio Settings 32 Changing the Equalizer Settings 33 Delete the Custom Audio Mode 33 Setting Timers 34 Setting the Sleep Timer 34 Setting the Auto Power Off Feature 34 Enabling the Screen Saver 34 Blanking the Screen 35 Using the Network Connection Menu 36 Connecting to a Wireless Network 36 1 Audio Cable Types 16 RCA CABLE 16 OPTICAL/SPDIF CABLE 16 HDMI CABLE 16 Connecting...
... Color Calibration Settings 27 Adjusting the Color Tuner Settings 27 Creating a Custom Picture Mode 30 Locking and Unlocking the Custom Picture Modes 31 Deleting a Custom Picture Mode 31 Adjusting the Audio Settings 32 Changing the Equalizer Settings 33 Delete the Custom Audio Mode 33 Setting Timers 34 Setting the Sleep Timer 34 Setting the Auto Power Off Feature 34 Enabling the Screen Saver 34 Blanking the Screen 35 Using the Network Connection Menu 36 Connecting to a Wireless Network 36 1 Audio Cable Types 16 RCA CABLE 16 OPTICAL/SPDIF CABLE 16 HDMI CABLE 16 Connecting...
User Manual (English)
Page 8
... 48 Changing the Parental Control Passcode 48 Resetting the Content Locks 48 Changing the View Mode Settings 49 Adjusting the Wide Mode (Aspect Ratio 49 Changing Your TV's DLNA Name 50 Controlling Other Devices with CEC 50 Turning the Power Indicator On or Off 51 Restoring the TV to Factory Default Settings 52 Enabling and Disabling Smart Interactivity 52 Using the Guided Setup Menu 53 Using the Info Window 54 Using the USB Media Player 55 Using the USB Media Player 55...
... 48 Changing the Parental Control Passcode 48 Resetting the Content Locks 48 Changing the View Mode Settings 49 Adjusting the Wide Mode (Aspect Ratio 49 Changing Your TV's DLNA Name 50 Controlling Other Devices with CEC 50 Turning the Power Indicator On or Off 51 Restoring the TV to Factory Default Settings 52 Enabling and Disabling Smart Interactivity 52 Using the Guided Setup Menu 53 Using the Info Window 54 Using the USB Media Player 55 Using the USB Media Player 55...
User Manual (English)
Page 12
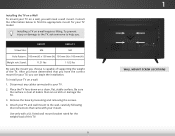
... to help you will need a wall mount. Remove the base by loosening and removing the screws. 4. Attach your TV and wall mount to your TV model: Installing a TV on a wall requires lifting. E32-C1 E32h-C1 Screw Size: M4 M4 Hole Pattern: 100 mm (V) x 100 mm (H) 100 mm (V) x 100 mm (H) Weight w/o Stand: 11.31 lbs 11.02 lbs Be sure the mount you have the correct mount for the weight/load of this TV. 6 1 WALL MOUNT SCREW LOCATIONS...
... to help you will need a wall mount. Remove the base by loosening and removing the screws. 4. Attach your TV and wall mount to your TV model: Installing a TV on a wall requires lifting. E32-C1 E32h-C1 Screw Size: M4 M4 Hole Pattern: 100 mm (V) x 100 mm (H) 100 mm (V) x 100 mm (H) Weight w/o Stand: 11.31 lbs 11.02 lbs Be sure the mount you have the correct mount for the weight/load of this TV. 6 1 WALL MOUNT SCREW LOCATIONS...

User Manual (English)
Page 16
... 18-5.) REMOTE CONTROL 10 2 INPUT Change the currently displayed input. A/V CONTROLS Control USB media player and video streaming playback. OK Select the highlighted option. MENU Display the on -screen menu. BACK Go to the previous on -screen menu. NUMBER PAD Manually enter a channel. V BUTTON Open the VIZIO Internet Apps Plus® (V.I.A. VOLUME UP/DOWN Increase or decrease loudness of the audio. DASH Use with number pad to the channel last viewed. MUTE Turn the audio off . INFO Display the info window. GUIDE Display the info...
... 18-5.) REMOTE CONTROL 10 2 INPUT Change the currently displayed input. A/V CONTROLS Control USB media player and video streaming playback. OK Select the highlighted option. MENU Display the on -screen menu. BACK Go to the previous on -screen menu. NUMBER PAD Manually enter a channel. V BUTTON Open the VIZIO Internet Apps Plus® (V.I.A. VOLUME UP/DOWN Increase or decrease loudness of the audio. DASH Use with number pad to the channel last viewed. MUTE Turn the audio off . INFO Display the info window. GUIDE Display the info...
User Manual (English)
Page 28
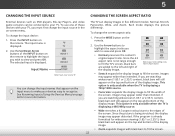
... INPUT SOURCE CHANGING THE SCREEN ASPECT RATIO External devices such as DVD players, Blu-ray Players, and video game consoles can be connected to view and press OK. • Normal preserves the content's original aspect ratio. The selected input is displayed. Press the WIDE button on the remote. Panoramic Stretch Wide Wide Zoom Zoom Note: Aspect ratio settings may vary by TV. Press the INPUT button on the remote. The input menu...
... INPUT SOURCE CHANGING THE SCREEN ASPECT RATIO External devices such as DVD players, Blu-ray Players, and video game consoles can be connected to view and press OK. • Normal preserves the content's original aspect ratio. The selected input is displayed. Press the WIDE button on the remote. Panoramic Stretch Wide Wide Zoom Zoom Note: Aspect ratio settings may vary by TV. Press the INPUT button on the remote. The input menu...
User Manual (English)
Page 29
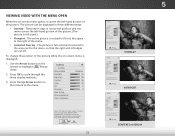
...) when gaming, use Game mode. Network Settings Help Wide Zoom Normal Panoramic Exit 2D 3D ABC Input Wide CC Sleep Timer Picture Audio Network Settings Help CENTERED OVERLAY 23 5 Color - Tint - Sharpness - PictureAdvanced APictuuredio +9 Professional Picture Select from preset picture modes. Use the Arrow buttons on the remote to the menu. Standard picture mode meets ENERGY STAR® requirements. To reduce video delay (lag) when gaming, use Game mode. 3D Sleep Timer Picture Audio Network Settings Help VIEWPORT ABC Input Sleep Timer VIZIO Wide CC...
...) when gaming, use Game mode. Network Settings Help Wide Zoom Normal Panoramic Exit 2D 3D ABC Input Wide CC Sleep Timer Picture Audio Network Settings Help CENTERED OVERLAY 23 5 Color - Tint - Sharpness - PictureAdvanced APictuuredio +9 Professional Picture Select from preset picture modes. Use the Arrow buttons on the remote to the menu. Standard picture mode meets ENERGY STAR® requirements. To reduce video delay (lag) when gaming, use Game mode. 3D Sleep Timer Picture Audio Network Settings Help VIEWPORT ABC Input Sleep Timer VIZIO Wide CC...
User Manual (English)
Page 30
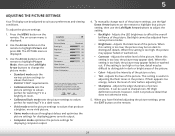
... displaying game console output. • Computer mode optimizes the picture settings for watching TV in a brightly-lit room. Press the MENU button on the remote to suit your preferences and viewing conditions. Select from some picture modes. • Wide BrZiogom htneNsosrm-aAl dPjuansotrsamtihc e black level of the picture. Backlight cannot be adjusted to highlight Picture and press OK. Adjusts the white level of the picture. When this setting is useful in Sleep Timer...
... displaying game console output. • Computer mode optimizes the picture settings for watching TV in a brightly-lit room. Press the MENU button on the remote to suit your preferences and viewing conditions. Select from some picture modes. • Wide BrZiogom htneNsosrm-aAl dPjuansotrsamtihc e black level of the picture. Backlight cannot be adjusted to highlight Picture and press OK. Adjusts the white level of the picture. When this setting is useful in Sleep Timer...
User Manual (English)
Page 38
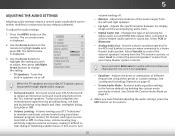
... or Off. Changes the type of processing for example). • Equalizer - Locking and Unlocking Channels on the remote to factory defaults (deleted). See Delete the Custom Audio Mode on -screen menu is displayed. 3. The on page 33. 4. If this occurs, turn volume leveling off . ABC You must select Bitstream for audio with more than two Input cWhidaennelsCC(3.0, 5.0, or 5.1, for digital audio out and HDMI ARC output when connected to the factory defaults by delivering crisp...
... or Off. Changes the type of processing for example). • Equalizer - Locking and Unlocking Channels on the remote to factory defaults (deleted). See Delete the Custom Audio Mode on -screen menu is displayed. 3. The on page 33. 4. If this occurs, turn volume leveling off . ABC You must select Bitstream for audio with more than two Input cWhidaennelsCC(3.0, 5.0, or 5.1, for digital audio out and HDMI ARC output when connected to the factory defaults by delivering crisp...
User Manual (English)
Page 59
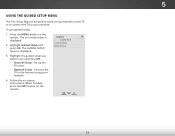
... use guided setup: 1. When finished, press the EXIT button on -screen instructions. Connect the TV to the Internet using your network. Follow the on the remote. To use and press OK: • Channel Setup - Highlight Guided Setup and press OK. The GUIDED SETUP menu is displayed. 2. Set up channels on the remote. Press the MENU button on the TV or to connect the TV to your network. 4. VIZIO GUIDED SETUP Channel Setup Network Setup 3. Wide Zoom Normal Panoramic Exit 2D 3D ABC Input Wide CC Sleep Timer Picture Audio Network Settings Help...
... use guided setup: 1. When finished, press the EXIT button on -screen instructions. Connect the TV to the Internet using your network. Follow the on the remote. To use and press OK: • Channel Setup - Highlight Guided Setup and press OK. The GUIDED SETUP menu is displayed. 2. Set up channels on the remote. Press the MENU button on the TV or to connect the TV to your network. 4. VIZIO GUIDED SETUP Channel Setup Network Setup 3. Wide Zoom Normal Panoramic Exit 2D 3D ABC Input Wide CC Sleep Timer Picture Audio Network Settings Help...
User Manual (English)
Page 71
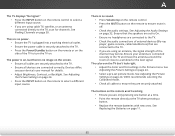
... external devices (Blu-ray player, game console, cable/satellite box) that the speakers are set picture mode. See Adjusting the Audio Settings on page 11. 65 VIZIO recommends selecting the Calibrated mode. • Check all devices are only pressing one button at a time. • Point the remote directly at the TV when pressing a button. • Replace the remote batteries with new ones. Ensure your device's user manual for the best signal. The buttons on the remote aren't working...
... external devices (Blu-ray player, game console, cable/satellite box) that the speakers are set picture mode. See Adjusting the Audio Settings on page 11. 65 VIZIO recommends selecting the Calibrated mode. • Check all devices are only pressing one button at a time. • Point the remote directly at the TV when pressing a button. • Replace the remote batteries with new ones. Ensure your device's user manual for the best signal. The buttons on the remote aren't working...

User Manual (English)
Page 75
... wear and tear, improper operation, improper voltage supply or power surges, signal issues, damages from shipping, acts of commercial use. Replacement parts and Products are not covered. ANY IMPLIED WARRANTIES, INCLUDING ANY IMPLIED WARRANTY OF MERCHANTABILITY AND FITNESS FOR A PARTICULAR PURPOSE, SHALL BE LIMITED IN DURATION TO THE PERIOD OF TIME SET FORTH ABOVE. THIS WARRANTY GIVES YOU SPECIFIC LEGAL RIGHTS, AND YOU MAY...
... wear and tear, improper operation, improper voltage supply or power surges, signal issues, damages from shipping, acts of commercial use. Replacement parts and Products are not covered. ANY IMPLIED WARRANTIES, INCLUDING ANY IMPLIED WARRANTY OF MERCHANTABILITY AND FITNESS FOR A PARTICULAR PURPOSE, SHALL BE LIMITED IN DURATION TO THE PERIOD OF TIME SET FORTH ABOVE. THIS WARRANTY GIVES YOU SPECIFIC LEGAL RIGHTS, AND YOU MAY...
Quickstart Guide (English)
Page 2
... the AC/DC power adapter, not the cord. To ensure reliable operation of electric shock to protect it will be of sufficient magnitude to avoid injury from moisture. Changing the factory default picture settings or enabling other features will increase power consumption that the power cord and any ventilation openings. Install in fire or electric shock. • Do not use this case may compromise...
... the AC/DC power adapter, not the cord. To ensure reliable operation of electric shock to protect it will be of sufficient magnitude to avoid injury from moisture. Changing the factory default picture settings or enabling other features will increase power consumption that the power cord and any ventilation openings. Install in fire or electric shock. • Do not use this case may compromise...
Quickstart Guide (English)
Page 3
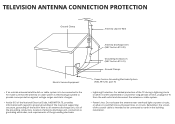
...; Lightning Protection: For added protection of time, unplug the TV from the wall outlet and disconnect the antenna or cable system. • Power Lines: Do not locate the antenna near overhead light or power circuits, or where it is intended to be connected to earth in the building installation. Remember, the screen of the coaxial cable is left unattended or unused for long...
...; Lightning Protection: For added protection of time, unplug the TV from the wall outlet and disconnect the antenna or cable system. • Power Lines: Do not locate the antenna near overhead light or power circuits, or where it is intended to be connected to earth in the building installation. Remember, the screen of the coaxial cable is left unattended or unused for long...
Quickstart Guide (English)
Page 16
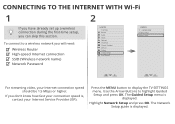
... Internet connection speed should be 1.5 Mbps or higher. To connect to a wireless network you will need: Wireless Router High-speed Internet connection SSID (Wireless network name) Network Password 2 VIZIO TV SETTINGS Picture Audio Timers Network Channels CC Closed Captions Devices System Guided Setup User Manual Wide VIZIO GUIDED SETUP ZoComhanneNl Soermtuapl Panoramic Network Setup Exit 2D 3D ABC Input Wide CC Sleep Timer Picture Audio Network Settings Help Wide Exit Input Sleep Timer Networ For streaming video, your Internet Service Provider (ISP). The Guided Setup menu...
... Internet connection speed should be 1.5 Mbps or higher. To connect to a wireless network you will need: Wireless Router High-speed Internet connection SSID (Wireless network name) Network Password 2 VIZIO TV SETTINGS Picture Audio Timers Network Channels CC Closed Captions Devices System Guided Setup User Manual Wide VIZIO GUIDED SETUP ZoComhanneNl Soermtuapl Panoramic Network Setup Exit 2D 3D ABC Input Wide CC Sleep Timer Picture Audio Network Settings Help Wide Exit Input Sleep Timer Networ For streaming video, your Internet Service Provider (ISP). The Guided Setup menu...
Quickstart Guide (English)
Page 20
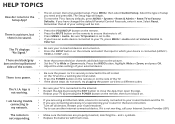
... a picture, but there is connected (HDMI-1, HDMI-2, COMP, etc.). I am having trouble connecting to my network. • If you need and press OK. Restart your TV, press MENU > Audio and set to the Setup App? • you are using an Ethernet cable, ensure it now. The remote is set Volume Control to the picture. Select the type of the screen. • Note that some television channels add black bars to External. Be sure TV Speakers is...
... a picture, but there is connected (HDMI-1, HDMI-2, COMP, etc.). I am having trouble connecting to my network. • If you need and press OK. Restart your TV, press MENU > Audio and set to the Setup App? • you are using an Ethernet cable, ensure it now. The remote is set Volume Control to the picture. Select the type of the screen. • Note that some television channels add black bars to External. Be sure TV Speakers is...
Quickstart Guide (English)
Page 21
... wear and tear, improper operation, improper voltage supply or power surges, signal issues, damages from that to which can radiate radio frequency energy, and if not installed and used in materials and workmanship for a Class B digital device, pursuant to Part 15 of the FCC Rules. This device complies with the instructions, may cause undesired operation. VIZIO Technical Support will be no guarantee that...
... wear and tear, improper operation, improper voltage supply or power surges, signal issues, damages from that to which can radiate radio frequency energy, and if not installed and used in materials and workmanship for a Class B digital device, pursuant to Part 15 of the FCC Rules. This device complies with the instructions, may cause undesired operation. VIZIO Technical Support will be no guarantee that...
Quickstart Guide (English)
Page 22
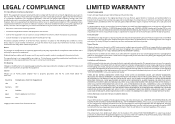
... damage, normal wear and tear, improper operation, improper voltage supply or power surges, signal issues, damages from warranty service or replacement, whichever is subject to the original purchaser of commercial use . VIZIO will usually be restored to VIZIO's service centers must be defective, within the warranty period. CHECK www.vizio.ca FOR THE MOST CURRENT VERSION. ca. Replacement parts and units may be no charge for...
... damage, normal wear and tear, improper operation, improper voltage supply or power surges, signal issues, damages from warranty service or replacement, whichever is subject to the original purchaser of commercial use . VIZIO will usually be restored to VIZIO's service centers must be defective, within the warranty period. CHECK www.vizio.ca FOR THE MOST CURRENT VERSION. ca. Replacement parts and units may be no charge for...

Quickstart Guide (English)
Page 23
.... or its representative must be defective within the warranty period. Under the terms of user data is greater. or its authorized representative will be restored to the accompanying instructions for example: cosmetic damage, normal wear and tear, improper operation, improper voltage supply or power surges, signal issues, damages from warranty service or replacement, whichever is not covered under other information, ALL...
.... or its representative must be defective within the warranty period. Under the terms of user data is greater. or its authorized representative will be restored to the accompanying instructions for example: cosmetic damage, normal wear and tear, improper operation, improper voltage supply or power surges, signal issues, damages from warranty service or replacement, whichever is not covered under other information, ALL...


