

E321MV User Manual
Page 2
... LLC. Manufactured under license from Dolby Laboratories. This product qualifies for ENERGY STAR in the "factory default" setting and this is the setting in which power savings will increase power consumption that could exceed the limits necessary to qualify for ENERGY STAR rating.
... LLC. Manufactured under license from Dolby Laboratories. This product qualifies for ENERGY STAR in the "factory default" setting and this is the setting in which power savings will increase power consumption that could exceed the limits necessary to qualify for ENERGY STAR rating.

E321MV User Manual
Page 4
...This is a safety feature. Do not defeat the safety purpose of the grounded plug. • When connected to a power outlet, power is always flowing into a grounded power outlet. Install in the back and bottom of the cabinet are not blocked or covered. This may cause fire or electric ... is provided. • Never push any object into the apparatus, the apparatus has been exposed E321MV to rain or moisture, does not operate normally or has been dropped. • Unplug the power cord before turning on or pinched, particularly at least three feet should be sure these instructions....
...This is a safety feature. Do not defeat the safety purpose of the grounded plug. • When connected to a power outlet, power is always flowing into a grounded power outlet. Install in the back and bottom of the cabinet are not blocked or covered. This may cause fire or electric ... is provided. • Never push any object into the apparatus, the apparatus has been exposed E321MV to rain or moisture, does not operate normally or has been dropped. • Unplug the power cord before turning on or pinched, particularly at least three feet should be sure these instructions....

E321MV User Manual
Page 5
...fire or electric shock. • Do not use your TV. - E321MV • Do not overload power strips and extension cords. If water penetrates into your TV if any smoke or odor becomes apparent, unplug the power cord and contact your dealer for moving your TV. • When...disconnect device shall remain readily operable. • CAUTION - Ensure that may cause fire or electric shock. • Do not touch the power cord during a lightning storm or when it will not be used for long period of uninsulated DANGEROUS VOLTAGE within an equilateral triangle is ...
...fire or electric shock. • Do not use your TV. - E321MV • Do not overload power strips and extension cords. If water penetrates into your TV if any smoke or odor becomes apparent, unplug the power cord and contact your dealer for moving your TV. • When...disconnect device shall remain readily operable. • CAUTION - Ensure that may cause fire or electric shock. • Do not touch the power cord during a lightning storm or when it will not be used for long period of uninsulated DANGEROUS VOLTAGE within an equilateral triangle is ...

E321MV User Manual
Page 6
...-only television sets that the antenna or cable system is needed. Electric Service Equipment Grounding Conductors (NEC Section 810-21) Ground Clamps Power Service Grounding Electrode System (NEC ART 250, part H) Lightning Protection For added protection of the National Electrical Code, ANSI/NFPSA 70,... Antenna Discharge Unit (NEC Section 810-20) Your TV comes with a built-in tuner capable of the grounding electrode. E321MV Television Antenna Connection Protection If an outside antenna/satellite dish or cable system is to be connected to earth in the building installation....
...-only television sets that the antenna or cable system is needed. Electric Service Equipment Grounding Conductors (NEC Section 810-21) Ground Clamps Power Service Grounding Electrode System (NEC ART 250, part H) Lightning Protection For added protection of the National Electrical Code, ANSI/NFPSA 70,... Antenna Discharge Unit (NEC Section 810-20) Your TV comes with a built-in tuner capable of the grounding electrode. E321MV Television Antenna Connection Protection If an outside antenna/satellite dish or cable system is to be connected to earth in the building installation....

E321MV User Manual
Page 8
... Captioning 32 Changing the Appearance of Digital Closed Captions 32 Troubleshooting & Technical Support 33 The TV displays "No Signal 33 There is no power 33 The power is on, but there is no image on the screen 33 There is no sound 33 The colors on the TV don't look right...screen 34 When I change input source, the volume changes 34 When I change input source, the display image changes size 34 Specifications 35 Limited Warranty 36 E321MV ON PARTS AND LABOR 36 Parts and Labor 36 Type of Service 36 Limitations and Exclusions 36 Personal Data 36 Zero Bright Pixel Defect Guarantee...
... Captioning 32 Changing the Appearance of Digital Closed Captions 32 Troubleshooting & Technical Support 33 The TV displays "No Signal 33 There is no power 33 The power is on, but there is no image on the screen 33 There is no sound 33 The colors on the TV don't look right...screen 34 When I change input source, the volume changes 34 When I change input source, the display image changes size 34 Specifications 35 Limited Warranty 36 E321MV ON PARTS AND LABOR 36 Parts and Labor 36 Type of Service 36 Limitations and Exclusions 36 Personal Data 36 Zero Bright Pixel Defect Guarantee...

E321MV User Manual
Page 13
... selection. 5 When the TV is off . Press Menu to highlight a different input source. E321MV 2 Right Side Panel Front Panel Power Menu Channel Up Channel Down Volume Up Volume Down Input VIZIO Light Remote Control Sensor Front Panel Remote Control Sensor: When using the remote, point it directly... at this sensor. VIZIO Light: This light is white when the TV is orange. Menu: Display...
... selection. 5 When the TV is off . Press Menu to highlight a different input source. E321MV 2 Right Side Panel Front Panel Power Menu Channel Up Channel Down Volume Up Volume Down Input VIZIO Light Remote Control Sensor Front Panel Remote Control Sensor: When using the remote, point it directly... at this sensor. VIZIO Light: This light is white when the TV is orange. Menu: Display...

E321MV User Manual
Page 14
... the sound off . 2 Remote Control Input CC Exit OK Back V Button Volume Up/Down Mute Number Pad Wide 6 Power/Standby A/V Controls Info Menu Arrow Guide Channel Up/Down Last Dash (-) Remote Control E321MV Power/Standby: Turn the TV on -screen menu and episode guide. Volume Up/ Increase or decrease the loudness of Down...
... the sound off . 2 Remote Control Input CC Exit OK Back V Button Volume Up/Down Mute Number Pad Wide 6 Power/Standby A/V Controls Info Menu Arrow Guide Channel Up/Down Last Dash (-) Remote Control E321MV Power/Standby: Turn the TV on -screen menu and episode guide. Volume Up/ Increase or decrease the loudness of Down...
E321MV User Manual
Page 16
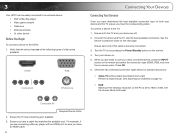
... the on the PC is securely connected. 3. To connect a device to 1920 x 1080. Use the best available connection. Turn the TV on by pressing the Power/Standby button on the next page. Verify that matches the available port. See the Device Connection Chart on the remote. 4. When you have determined the...
... the on the PC is securely connected. 3. To connect a device to 1920 x 1080. Use the best available connection. Turn the TV on by pressing the Power/Standby button on the next page. Verify that matches the available port. See the Device Connection Chart on the remote. 4. When you have determined the...

E321MV User Manual
Page 18
... time you turn on the TV, the Setup App will guide you begin the first-time setup: • Your TV should be installed and the power cord should be connected to step 5. Use the Up/Down Arrow buttons on the remote to which your preferred language, then press OK. 2. Wait for... complete. 10 The TV begins a channel scan. When the channel scan is complete, the Congratulations screen is displayed. Turn the TV on by pressing the Power/Standby button on the remote to highlight Off or On for the channel scan to highlight Scan, then press OK. The Setup App is displayed...
... time you turn on the TV, the Setup App will guide you begin the first-time setup: • Your TV should be installed and the power cord should be connected to step 5. Use the Up/Down Arrow buttons on the remote to which your preferred language, then press OK. 2. Wait for... complete. 10 The TV begins a channel scan. When the channel scan is complete, the Congratulations screen is displayed. Turn the TV on by pressing the Power/Standby button on the remote to highlight Off or On for the channel scan to highlight Scan, then press OK. The Setup App is displayed...

E321MV User Manual
Page 27
... the Arrow buttons on the remote. Navigating the On-Screen Menu To open the on-screen menu, press the OK button on the remote to power off after a set period of time after which you want the TV to highlight the Timer icon and press OK. Press the MENU button on...
... the Arrow buttons on the remote. Navigating the On-Screen Menu To open the on-screen menu, press the OK button on the remote to power off after a set period of time after which you want the TV to highlight the Timer icon and press OK. Press the MENU button on...

E321MV User Manual
Page 41
...is not good. • For the best image quality, view high-definition programs using an antenna, the signal strength of operation: Monday - The power is on the remote to 9 pm (PST) Saturday - The buttons on the screen. • Ensure all cables are securely attached to the TV... game console, cable/satellite box) that are connected to service excellence. Phone: Fax: Email: (877) 698-4946 (949) 585-9563 techsupport@vizio.com Web: www.VIZIO.com Hours of the channel may be low. Sunday: 8 am to select a different input source. See Scanning for details. • Adjust ...
...is not good. • For the best image quality, view high-definition programs using an antenna, the signal strength of operation: Monday - The power is on the remote to 9 pm (PST) Saturday - The buttons on the screen. • Ensure all cables are securely attached to the TV... game console, cable/satellite box) that are connected to service excellence. Phone: Fax: Email: (877) 698-4946 (949) 585-9563 techsupport@vizio.com Web: www.VIZIO.com Hours of the channel may be low. Sunday: 8 am to select a different input source. See Scanning for details. • Adjust ...
E321MV User Manual
Page 43
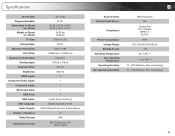
... Audio In) English, Spanish, French Optical Digital Audio Out, 3.5mm Stereo 2 10W SRS TruSurround HD, Dolby Digital B Sound Leveler: Ambient Light Sensor: Compliance: Power Consumption: Voltage Range: Standby Power: Operating Temperature: Non-Operating Temperature: Operating Humidity: Non-Operating Humidity: SRS TruVolume Yes Energy Star FCC Class B HDMI 1.3 UL/CUL 90W 120~240...
... Audio In) English, Spanish, French Optical Digital Audio Out, 3.5mm Stereo 2 10W SRS TruSurround HD, Dolby Digital B Sound Leveler: Ambient Light Sensor: Compliance: Power Consumption: Voltage Range: Standby Power: Operating Temperature: Non-Operating Temperature: Operating Humidity: Non-Operating Humidity: SRS TruVolume Yes Energy Star FCC Class B HDMI 1.3 UL/CUL 90W 120~240...

E321MV User Manual
Page 44
...only covers defects in United States and Puerto Rico Only. THIS WARRANTY IS SUBJECT TO CHANGE WITHOUT NOTICE. If a Product covered by a VIZIO authorized service center. Parts and Labor There will either the original carton box and shipping material or packaging that a Product is not responsible... data and passwords. This warranty does not cover, for example: cosmetic damage, normal wear and tear, improper operation, improper voltage supply or power surges, signal issues, damages from 6:00AM to 9:00PM Monday through Friday and 8:00AM to the "DETAILS" tab of commercial use. In ...
...only covers defects in United States and Puerto Rico Only. THIS WARRANTY IS SUBJECT TO CHANGE WITHOUT NOTICE. If a Product covered by a VIZIO authorized service center. Parts and Labor There will either the original carton box and shipping material or packaging that a Product is not responsible... data and passwords. This warranty does not cover, for example: cosmetic damage, normal wear and tear, improper operation, improper voltage supply or power surges, signal issues, damages from 6:00AM to 9:00PM Monday through Friday and 8:00AM to the "DETAILS" tab of commercial use. In ...

E321MV User Manual
Page 45
...authority to operate the equipment. 2. Permission is valid for a period of media, shipping and handling upon request made to VIZIO at www.VIZIO.com. FCC warning Changes or modifications not expressly approved by one or more of this device must be determined by unauthorized ...will not occur in a residential installation. Increase the separation between the equipment and receiver. 3. Notice 1. Shielded interface cables and AC power cord, if any radio or TV interference caused by turning the equipment off and on a circuit different from the date of the distribution...
...authority to operate the equipment. 2. Permission is valid for a period of media, shipping and handling upon request made to VIZIO at www.VIZIO.com. FCC warning Changes or modifications not expressly approved by one or more of this device must be determined by unauthorized ...will not occur in a residential installation. Increase the separation between the equipment and receiver. 3. Notice 1. Shielded interface cables and AC power cord, if any radio or TV interference caused by turning the equipment off and on a circuit different from the date of the distribution...

E321MV Quick Start Guide
Page 3
... menu and episode guide. USING THE REMOTE Input CC Exit OK Back V Button Volume Up/Down Mute Number Pad Wide Power/Standby A/V Controls Info Menu Arrow Guide Channel Up/Down Last Dash (-) Power/Standby: Turn the TV on -screen menu. Input: Change the input device. With each press of the TV's audio...
... menu and episode guide. USING THE REMOTE Input CC Exit OK Back V Button Volume Up/Down Mute Number Pad Wide Power/Standby A/V Controls Info Menu Arrow Guide Channel Up/Down Last Dash (-) Power/Standby: Turn the TV on -screen menu. Input: Change the input device. With each press of the TV's audio...

E321MV Quick Start Guide
Page 6
symbols on the batteries must correspond to the + and - Plug the power cord into place. symbols inside the battery compartment. FIRST-TIME SETUP 1 2 Remove the battery cover by gently sliding it back into an electrical outlet. Insert the batteries. Replace the battery cover by pressing gently and sliding away from the remote. The + and -
symbols on the batteries must correspond to the + and - Plug the power cord into place. symbols inside the battery compartment. FIRST-TIME SETUP 1 2 Remove the battery cover by gently sliding it back into an electrical outlet. Insert the batteries. Replace the battery cover by pressing gently and sliding away from the remote. The + and -

E321MV Quick Start Guide
Page 7
Highlight your preferred language and press OK. Turn the TV on by pressing the Power/Standby button on the remote or on the side of the TV. The Setup App is displayed. 3 4 If you have an external antenna or a cable connection that extends from a wall outlet, connect it to the TV with an RF/Coaxial cable.
Highlight your preferred language and press OK. Turn the TV on by pressing the Power/Standby button on the remote or on the side of the TV. The Setup App is displayed. 3 4 If you have an external antenna or a cable connection that extends from a wall outlet, connect it to the TV with an RF/Coaxial cable.
E321MV Quick Start Guide
Page 14
...For more information on the right side of the TV. • Try plugging the power cord into a different electrical outlet. Phone: (877) 698-4946 Fax: (949) 585-9563 Email: techsupport@vizio.com Web: www.vizio.com Hours of VIZIO's commitment to service excellence. Friday: 6 am to 4pm (PST) There is no...Department via email or phone. Please have your VIZIO model number, serial number, and date of purchase available before your antenna is securely connected to the AC socket on the TV and a working electrical outlet. • Press the Power/Standby button on the remote or on warranty...
...For more information on the right side of the TV. • Try plugging the power cord into a different electrical outlet. Phone: (877) 698-4946 Fax: (949) 585-9563 Email: techsupport@vizio.com Web: www.vizio.com Hours of VIZIO's commitment to service excellence. Friday: 6 am to 4pm (PST) There is no...Department via email or phone. Please have your VIZIO model number, serial number, and date of purchase available before your antenna is securely connected to the AC socket on the TV and a working electrical outlet. • Press the Power/Standby button on the remote or on warranty...


