
E321MV User Manual
Page 5
...instructions are qualified to the presence of electric shock, do so. Overloading can result in any of the marked voltage can damage the remote control or injure the operator. If repair is dropped or damaged in fire or electric shock. • The wall socket should be... dealer and refer all servicing to qualified service personnel. • WARNING: Keep your TV to high voltages, electric shock, and other moisture. - E321MV • Do not overload power strips and extension cords. The power cord fails or frays. - Pulling on the apparatus. • The mains ...
...instructions are qualified to the presence of electric shock, do so. Overloading can result in any of the marked voltage can damage the remote control or injure the operator. If repair is dropped or damaged in fire or electric shock. • The wall socket should be... dealer and refer all servicing to qualified service personnel. • WARNING: Keep your TV to high voltages, electric shock, and other moisture. - E321MV • Do not overload power strips and extension cords. The power cord fails or frays. - Pulling on the apparatus. • The mains ...

E321MV User Manual
Page 7
...Installing the TV 1 Installing the TV Stand 1 Installing the TV on a Wall 2 Controls and Connections 4 Rear Panel 4 Right Side Panel 5 Front Panel 5 Remote Control 6 Replacing the Batteries 7 Connecting Your Devices 8 Before You Begin 8 Connecting Your Devices 8 Completing the First-Time Setup 10 Adjusting the TV Settings 11 ...Automatic Date and Time Updates 17 Setting the Date and Time 17 Adjusting the TV Settings for Use with A PC 18 Turning the VIZIO Light On or Off 18 Using the Other Menu Settings 19 Navigating the On-Screen Menu 19 Setting the Sleep Timer 19 Viewing ...
...Installing the TV 1 Installing the TV Stand 1 Installing the TV on a Wall 2 Controls and Connections 4 Rear Panel 4 Right Side Panel 5 Front Panel 5 Remote Control 6 Replacing the Batteries 7 Connecting Your Devices 8 Before You Begin 8 Connecting Your Devices 8 Completing the First-Time Setup 10 Adjusting the TV Settings 11 ...Automatic Date and Time Updates 17 Setting the Date and Time 17 Adjusting the TV Settings for Use with A PC 18 Turning the VIZIO Light On or Off 18 Using the Other Menu Settings 19 Navigating the On-Screen Menu 19 Setting the Sleep Timer 19 Viewing ...

E321MV User Manual
Page 8
... is no image on the screen 33 There is no sound 33 The colors on the TV don't look right 33 The buttons on the remote aren't working 33 The image quality is not good 33 The picture is distorted 34 The display image does not cover the entire screen 34... screen 34 When I change input source, the volume changes 34 When I change input source, the display image changes size 34 Specifications 35 Limited Warranty 36 E321MV ON PARTS AND LABOR 36 Parts and Labor 36 Type of Service 36 Limitations and Exclusions 36 Personal Data 36 Zero Bright Pixel Defect Guarantee...
... is no image on the screen 33 There is no sound 33 The colors on the TV don't look right 33 The buttons on the remote aren't working 33 The image quality is not good 33 The picture is distorted 34 The display image does not cover the entire screen 34... screen 34 When I change input source, the volume changes 34 When I change input source, the display image changes size 34 Specifications 35 Limited Warranty 36 E321MV ON PARTS AND LABOR 36 Parts and Labor 36 Type of Service 36 Limitations and Exclusions 36 Personal Data 36 Zero Bright Pixel Defect Guarantee...

E321MV User Manual
Page 9
...TV 1 Inspecting the Package Contents Before installing your inspection, install the TV. Align the base with the stand neck, you can still fall over . VIZIO LCD HDTV with Batteries Package Contents 1 Your TV can be installed in two ways: • On a flat surface, using the included stand •.... 2. To prevent scratches or damage to support the weight of the TV and keep it facing backwards. User Manual and Quick Start Guide Remote Control with Stand Installing the TV After removing the TV from falling over if: • It is placed on an uneven, unstable, or...
...TV 1 Inspecting the Package Contents Before installing your inspection, install the TV. Align the base with the stand neck, you can still fall over . VIZIO LCD HDTV with Batteries Package Contents 1 Your TV can be installed in two ways: • On a flat surface, using the included stand •.... 2. To prevent scratches or damage to support the weight of the TV and keep it facing backwards. User Manual and Quick Start Guide Remote Control with Stand Installing the TV After removing the TV from falling over if: • It is placed on an uneven, unstable, or...

E321MV User Manual
Page 13
...: Change the channel. Press once to confirm your selection. 5 E321MV 2 Right Side Panel Front Panel Power Menu Channel Up Channel Down Volume Up Volume Down Input VIZIO Light Remote Control Sensor Front Panel Remote Control Sensor: When using the remote, point it directly at this sensor. VIZIO Light: This light is white when the TV is...
...: Change the channel. Press once to confirm your selection. 5 E321MV 2 Right Side Panel Front Panel Power Menu Channel Up Channel Down Volume Up Volume Down Input VIZIO Light Remote Control Sensor Front Panel Remote Control Sensor: When using the remote, point it directly at this sensor. VIZIO Light: This light is white when the TV is...

E321MV User Manual
Page 14
... pad to the previous on . Back: Go to manually enter a channel. A/V Controls: Control external device (CEC-enabled devices only). Menu: Display the on or off. 2 Remote Control Input CC Exit OK Back V Button Volume Up/Down Mute Number Pad Wide 6 Power/Standby A/V Controls Info Menu Arrow Guide Channel Up/Down Last...
... pad to the previous on . Back: Go to manually enter a channel. A/V Controls: Control external device (CEC-enabled devices only). Menu: Display the on or off. 2 Remote Control Input CC Exit OK Back V Button Volume Up/Down Mute Number Pad Wide 6 Power/Standby A/V Controls Info Menu Arrow Guide Channel Up/Down Last...

E321MV User Manual
Page 15
Make sure that may result in accordance with local hazardous waste regulations. • Keep batteries away from the remote. 2. E321MV 2 Replacing the Batteries 1. Insert two AAA batteries into the remote control. Replace the battery cover. • Use only good quality batteries. • Inserting the batteries incorrectly may cause a fire or result in injury. •...
Make sure that may result in accordance with local hazardous waste regulations. • Keep batteries away from the remote. 2. E321MV 2 Replacing the Batteries 1. Insert two AAA batteries into the remote control. Replace the battery cover. • Use only good quality batteries. • Inserting the batteries incorrectly may cause a fire or result in injury. •...
E321MV User Manual
Page 16
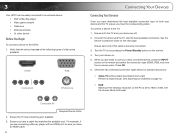
... pressing the Power/Standby button on the next page. See Scanning for special instructions: • Cable TV (without cable box/directly from the on the remote and select the connection type (HDMI, RGB, etc) from wall) Perform a channel scan. Ensure the TV has a matching port available. 3. Ensure each...1920 x 1080. Turn your device are ready to the HDTV: 1. Set the Screen Mode to the TV: 1. See the Device Connection Chart on the remote. 4. Composite AV Required Device Ports 2. For example, if you are connecting a Blu-ray player with an HDMI port, be easily connected to an ...
... pressing the Power/Standby button on the next page. See Scanning for special instructions: • Cable TV (without cable box/directly from the on the remote and select the connection type (HDMI, RGB, etc) from wall) Perform a channel scan. Ensure the TV has a matching port available. 3. Ensure each...1920 x 1080. Turn your device are ready to the HDTV: 1. Set the Screen Mode to the TV: 1. See the Device Connection Chart on the remote. 4. Composite AV Required Device Ports 2. For example, if you are connecting a Blu-ray player with an HDMI port, be easily connected to an ...

E321MV User Manual
Page 18
... the channel scan is complete, the Congratulations screen is displayed. Turn the TV on by pressing the Power/Standby button on the remote to an electrical outlet. • Have your remote ready. If the TV is connected to a cable service without a set -top box is connected to an external antenna, select ...your preferred language, then press OK. 2. Ensure the batteries are inserted. • Your devices should be connected. Use the Up/Down Arrow buttons on the remote to finish. 6. Wait for the channel scan to highlight Home Mode, then press OK. 4. Use the Up/Down Arrow buttons on the...
... the channel scan is complete, the Congratulations screen is displayed. Turn the TV on by pressing the Power/Standby button on the remote to an electrical outlet. • Have your remote ready. If the TV is connected to a cable service without a set -top box is connected to an external antenna, select ...your preferred language, then press OK. 2. Ensure the batteries are inserted. • Your devices should be connected. Use the Up/Down Arrow buttons on the remote to finish. 6. Wait for the channel scan to highlight Home Mode, then press OK. 4. Use the Up/Down Arrow buttons on the...

E321MV User Manual
Page 19
...source you must first change the input source from the TV menu: 1. Press the MENU button on the remote. The Input menu is displayed. 2. The on-screen menu is displayed. 4. The TV menu is displayed. 3.... TV's date and time • Adjust the TV settings for use with a PC • Turn the VIZIO light on or off Navigating the On-Screen Menu To open the on-screen menu, press the OK or MENU... buttons on your TV. To quickly access the Input Source menu, press the INPUT button on the remote. Adjusting the TV Settings From the TV Settings Menu, you can be connected to your TV, you...
...source you must first change the input source from the TV menu: 1. Press the MENU button on the remote. The Input menu is displayed. 2. The on-screen menu is displayed. 4. The TV menu is displayed. 3.... TV's date and time • Adjust the TV settings for use with a PC • Turn the VIZIO light on or off Navigating the On-Screen Menu To open the on-screen menu, press the OK or MENU... buttons on your TV. To quickly access the Input Source menu, press the INPUT button on the remote. Adjusting the TV Settings From the TV Settings Menu, you can be connected to your TV, you...

E321MV User Manual
Page 20
...8226; Scan for new/additional channels • Remove channels from the master list • Change the audio language • Customize channel names E321MV 12 Your TV features the ability to customize the names of these inputs to make them easy to remember. (Custom names have multiple devices connected...The on -screen menu is displayed. 7. Use the Arrow buttons to highlight Input and press OK. 4. Press the MENU button on the remote to highlight the input source you can become difficult to remember the inputs to spell the custom input name. Use the Arrow buttons to highlight...
...8226; Scan for new/additional channels • Remove channels from the master list • Change the audio language • Customize channel names E321MV 12 Your TV features the ability to customize the names of these inputs to make them easy to remember. (Custom names have multiple devices connected...The on -screen menu is displayed. 7. Use the Arrow buttons to highlight Input and press OK. 4. Press the MENU button on the remote to highlight the input source you can become difficult to remember the inputs to spell the custom input name. Use the Arrow buttons to highlight...

E321MV User Manual
Page 21
... the coaxial (TV) input. Use the Arrow buttons on the remote to change the signal source: 1. Use the Arrow buttons to highlight Channels and press OK. 4. Press the MENU button on -screen menu is displayed. 2. E321MV Changing the Signal Source Using this option, you can detect and ...display channels and their associated information, you must scan for channels: 1. The on the remote. Use the Arrow buttons to highlight the TV icon and press OK...
... the coaxial (TV) input. Use the Arrow buttons on the remote to change the signal source: 1. Use the Arrow buttons to highlight Channels and press OK. 4. Press the MENU button on -screen menu is displayed. 2. E321MV Changing the Signal Source Using this option, you can detect and ...display channels and their associated information, you must scan for channels: 1. The on the remote. Use the Arrow buttons to highlight the TV icon and press OK...

E321MV User Manual
Page 22
...master channel list, you can be available when watching broadcast television. 1. To add a channel to highlight the TV icon and press OK. 5 E321MV Scanning for New or Additional Channels When a new channel becomes available in the list, highlight Skip Analog Only and press OK. 6. Press the ...MENU button on the remote. The master channel list is not displayed. When the channel has been removed, the checkmark is displayed. 5. Channels not in the list ...
...master channel list, you can be available when watching broadcast television. 1. To add a channel to highlight the TV icon and press OK. 5 E321MV Scanning for New or Additional Channels When a new channel becomes available in the list, highlight Skip Analog Only and press OK. 6. Press the ...MENU button on the remote. The master channel list is not displayed. When the channel has been removed, the checkmark is displayed. 5. Channels not in the list ...

E321MV User Manual
Page 23
...). From the TV Settings menu, highlight Channels and press OK. 2. Use the Arrow buttons on the remote. The TV Settings menu is displayed. 6. Use the Arrow and OK buttons to highlight Channels and press OK. 4. E321MV 5 Changing the Audio Language Some digital free-to-air and cable channels broadcast programs in your...
...). From the TV Settings menu, highlight Channels and press OK. 2. Use the Arrow buttons on the remote. The TV Settings menu is displayed. 6. Use the Arrow and OK buttons to highlight Channels and press OK. 4. E321MV 5 Changing the Audio Language Some digital free-to-air and cable channels broadcast programs in your...

E321MV User Manual
Page 24
To change the on the remote to highlight the TV icon and press OK. Use the Arrow buttons on -screen menu language: 1. Use the Arrow buttons to highlight the TV icon and press OK. E321MV Setting the TV's Date and Time From the Date & Time menu, you can display the on -screen menu... is displayed. 2. Use the Arrow buttons on the remote. Use the Arrow buttons to highlight Date & Time and press OK. 4. Press...
To change the on the remote to highlight the TV icon and press OK. Use the Arrow buttons on -screen menu language: 1. Use the Arrow buttons to highlight the TV icon and press OK. E321MV Setting the TV's Date and Time From the Date & Time menu, you can display the on -screen menu... is displayed. 2. Use the Arrow buttons on the remote. Use the Arrow buttons to highlight Date & Time and press OK. 4. Press...

E321MV User Manual
Page 25
... Press the MENU button on the remote. The on the remote to highlight individual numbers in the date and time. Use the Number Pad to highlight Date & Time and press OK. 4. Press EXIT. The TV Settings menu is displayed. 2. E321MV 5 Adjusting the Time for Daylight ...Savings When enabled, this information. The TV Settings menu is displayed. 2. To enable or disable the daylight savings adjustment: 1. The on the remote to highlight individual numbers in many areas. Use the...
... Press the MENU button on the remote. The on the remote to highlight individual numbers in the date and time. Use the Number Pad to highlight Date & Time and press OK. 4. Press EXIT. The TV Settings menu is displayed. 2. E321MV 5 Adjusting the Time for Daylight ...Savings When enabled, this information. The TV Settings menu is displayed. 2. To enable or disable the daylight savings adjustment: 1. The on the remote to highlight individual numbers in many areas. Use the...

E321MV User Manual
Page 26
.... 3. Use the Left/Right Arrow buttons to select On or Off: • When set to turn the VIZIO Light on . Press the MENU button on the remote to Off, the VIZIO logo will briefly light up /down) position of your TV. Increase or decrease this setting if you would like..., the VIZIO logo will remain off while the TV is displayed. 6. If you see "waviness" or a blurry picture. The TV Settings menu is displayed. 7. Press the MENU button on the front bezel of the picture. Adjust the horizontal (left/right) position of the following options: Horiz. 5 E321MV Adjusting the...
.... 3. Use the Left/Right Arrow buttons to select On or Off: • When set to turn the VIZIO Light on . Press the MENU button on the remote to Off, the VIZIO logo will briefly light up /down) position of your TV. Increase or decrease this setting if you would like..., the VIZIO logo will remain off while the TV is displayed. 6. If you see "waviness" or a blurry picture. The TV Settings menu is displayed. 7. Press the MENU button on the front bezel of the picture. Adjust the horizontal (left/right) position of the following options: Horiz. 5 E321MV Adjusting the...

E321MV User Manual
Page 27
To use on the remote. The Timer menu is displayed. 2. Using this menu, you want the TV to power off after a set period of time after which you can: • ... highlight the Timer icon and press OK. Using the Other Menu Settings Your TV features an easy-to-use the sleep timer: 1. The on the remote to highlight the period of time. Use the Up/Down Arrow buttons on -screen menu is displayed. 3. Press the MENU button on the...
To use on the remote. The Timer menu is displayed. 2. Using this menu, you want the TV to power off after a set period of time after which you can: • ... highlight the Timer icon and press OK. Using the Other Menu Settings Your TV features an easy-to-use the sleep timer: 1. The on the remote to highlight the period of time. Use the Up/Down Arrow buttons on -screen menu is displayed. 3. Press the MENU button on the...
E321MV User Manual
Page 28
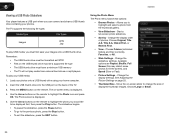
... First, or Newest First. • View - Press the MENU button on page 25. • Thumbnail Size - See Adjusting the Picture Settings on the remote. Move the on -screen menu is displayed. 5. The Photo screen is displayed. 4. The on -screen slider to highlight and select a photo from external ... may distort some photos to the previous photo, press the Stop button. • To exit the slideshow, press the EXIT button. 6 E321MV Viewing a USB Photo Slideshow Your player features a USB port where you can connect and share a USB thumb drive containing your USB media: 1.
... First, or Newest First. • View - Press the MENU button on page 25. • Thumbnail Size - See Adjusting the Picture Settings on the remote. Move the on -screen menu is displayed. 5. The Photo screen is displayed. 4. The on -screen slider to highlight and select a photo from external ... may distort some photos to the previous photo, press the Stop button. • To exit the slideshow, press the EXIT button. 6 E321MV Viewing a USB Photo Slideshow Your player features a USB port where you can connect and share a USB thumb drive containing your USB media: 1.

E321MV User Manual
Page 29
... content, black bars will still appear on the top and bottom of the display image. This option is only available when the TV is displayed. 3. E321MV 6 Using the Modify Photo Menu This menu allows you to move the image. • Favorite - Select this option when zoomed in to zoom in ... to zoom back out. • Pan - Each mode changes the picture according to open the Modify Photo menu: 1. Use the Arrow buttons on the remote to highlight the Wide icon and press OK. Since the picture is displayed. 2. Images may appear wider than intended. If you have finished, use the...
... content, black bars will still appear on the top and bottom of the display image. This option is only available when the TV is displayed. 3. E321MV 6 Using the Modify Photo Menu This menu allows you to move the image. • Favorite - Select this option when zoomed in to zoom in ... to zoom back out. • Pan - Each mode changes the picture according to open the Modify Photo menu: 1. Use the Arrow buttons on the remote to highlight the Wide icon and press OK. Since the picture is displayed. 2. Images may appear wider than intended. If you have finished, use the...


