Download
Page 1
...your network and get the best video streaming experience available. Try switching the setting to a lower quality to eliminate interruptions in this FAQ will help you determine the best way to set up your area. 2. Your VIZIO smart device may need to function properly. (Check the app's documentation ...for more information.) I find out? Video Streaming FAQs Your smart VIZIO devices allow you to stream TV, movies, and games ...
...your network and get the best video streaming experience available. Try switching the setting to a lower quality to eliminate interruptions in this FAQ will help you determine the best way to set up your area. 2. Your VIZIO smart device may need to function properly. (Check the app's documentation ...for more information.) I find out? Video Streaming FAQs Your smart VIZIO devices allow you to stream TV, movies, and games ...
Download
Page 2
...recommended) as they may cause interference with your router for more information.) • Move your Internet connection supports. Select the Privacy and Settings tab. 5. If you have a fast Internet connection with your router for more information.) • Move your router to maximize your ...only]). Sign into your router away from metal fixtures or fish tanks. Scroll down to www.netflix.com. 2. Allow 30 minutes for settings to www.hulu.com. 2. Click on Your account & Help. 4. For improved streaming quality, we recommend WPA2 if supported. (See...
...recommended) as they may cause interference with your router for more information.) • Move your Internet connection supports. Select the Privacy and Settings tab. 5. If you have a fast Internet connection with your router for more information.) • Move your router to maximize your ...only]). Sign into your router away from metal fixtures or fish tanks. Scroll down to www.netflix.com. 2. Allow 30 minutes for settings to www.hulu.com. 2. Click on Your account & Help. 4. For improved streaming quality, we recommend WPA2 if supported. (See...

Download
Page 2
...DTS Studio Sound, DTS TruSurround, and DTS TruVolume are trademarks of HDMI Licensing LLC. Changing the factory default picture settings or enabling other features will increase power consumption that could exceed the limits necessary to qualify for ENERGY STAR in the "...factory default" setting and this is the setting in which power savings will be achieved. All Rights Reserved. Manufactured under license from Dolby Laboratories. Manufactured under license...
...DTS Studio Sound, DTS TruSurround, and DTS TruVolume are trademarks of HDMI Licensing LLC. Changing the factory default picture settings or enabling other features will increase power consumption that could exceed the limits necessary to qualify for ENERGY STAR in the "...factory default" setting and this is the setting in which power savings will be achieved. All Rights Reserved. Manufactured under license from Dolby Laboratories. Manufactured under license...

Download
Page 7
...Size and Position 22 Adjusting the Color Temperature 22 Adjusting the Advanced Picture Settings 23 Resetting the Picture Settings 24 Adjusting the Audio Settings 25 Resetting the Audio Settings 26 Activating the Sleep Timer 26 Setting the Auto Power Off Feature 27 Using the Network Connection Menu 27 ...Connecting to a Wireless Network 27 Changing the Manual Setup Settings 28 Connecting to a Hidden Network 28 Testing Your Network Connection 29 Setting Up the Tuner 29 Selecting a Tuner Input 30 Scanning for Channels 30 Adding New Channels ...
...Size and Position 22 Adjusting the Color Temperature 22 Adjusting the Advanced Picture Settings 23 Resetting the Picture Settings 24 Adjusting the Audio Settings 25 Resetting the Audio Settings 26 Activating the Sleep Timer 26 Setting the Auto Power Off Feature 27 Using the Network Connection Menu 27 ...Connecting to a Wireless Network 27 Changing the Manual Setup Settings 28 Connecting to a Hidden Network 28 Testing Your Network Connection 29 Setting Up the Tuner 29 Selecting a Tuner Input 30 Scanning for Channels 30 Adding New Channels ...
Download
Page 8
... Fullscreen V.I .A. Plus Apps Window 49 Fullscreen V.I .A. Plus)....... 48 Using the V.I .A. Resetting the Content Locks 38 Changing the On-Screen Menu Language 38 Setting the Time Zone 39 Adjusting the CEC Settings 39 Turning the Power Indicator On or Off 40 Using the Reset & Admin Menu 40 Resetting the TV... Default Settings 41 Using the Guided Setup Menu 42 Using Guided Setup 42 Using the Info Window 43 Using the USB Media Player 44 Using the USB Media Player 44 Preparing Your USB Drive to the My Apps Tab 51 Deleting an App from the TV 44 Using VIZIO Internet ...
... Fullscreen V.I .A. Plus Apps Window 49 Fullscreen V.I .A. Plus)....... 48 Using the V.I .A. Resetting the Content Locks 38 Changing the On-Screen Menu Language 38 Setting the Time Zone 39 Adjusting the CEC Settings 39 Turning the Power Indicator On or Off 40 Using the Reset & Admin Menu 40 Resetting the TV... Default Settings 41 Using the Guided Setup Menu 42 Using Guided Setup 42 Using the Info Window 43 Using the USB Media Player 44 Using the USB Media Player 44 Preparing Your USB Drive to the My Apps Tab 51 Deleting an App from the TV 44 Using VIZIO Internet ...

Download
Page 18
Connect the appropriate cable (not included) to display output from most devices. 1. Connecting Your Devices Connecting A Device Your TV can be subject to change. Set the TV's input to match the connection you used (HDMI-1, HDMI-2, etc.). 3 Cable/Satellite Box DVD/Blu-ray Player Game Console HDMI CABLE BEST • ...
Connect the appropriate cable (not included) to display output from most devices. 1. Connecting Your Devices Connecting A Device Your TV can be subject to change. Set the TV's input to match the connection you used (HDMI-1, HDMI-2, etc.). 3 Cable/Satellite Box DVD/Blu-ray Player Game Console HDMI CABLE BEST • ...
Download
Page 25
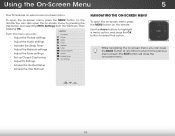
... you can : VIZIO TV Settings • Adjust the Picture settings • Adjust the Audio settings Picture Audio Timers • Activate the Sleep Timer • Adjust the Network settings • Adjust the Tuner settings Network Tuner CC Closed Captions System • Set up Closed Captioning • Adjust TV Settings Guided Setup User ...the User Manual Navigating the On-Screen Menu To open the on the remote. Input Wide CC Sleep Timer Picture Audio Network Settings Help 19 The EXIT button will close the on -screen menu, you can press the BACK button at any time to...
... you can : VIZIO TV Settings • Adjust the Picture settings • Adjust the Audio settings Picture Audio Timers • Activate the Sleep Timer • Adjust the Network settings • Adjust the Tuner settings Network Tuner CC Closed Captions System • Set up Closed Captioning • Adjust TV Settings Guided Setup User ...the User Manual Navigating the On-Screen Menu To open the on the remote. Input Wide CC Sleep Timer Picture Audio Network Settings Help 19 The EXIT button will close the on -screen menu, you can press the BACK button at any time to...
Download
Page 26
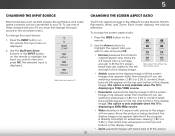
... when the TV is displaying a 720p/1080i source. • Panoramic expands the display image to fill the screen. Wide Wide Zoom Zoom Note: Aspect ratio settings may appear distorted. 5 Changing the Input Source Changing the Screen Aspect Ratio External devices such as DVD players, Blu-ray Players, and video game consoles...
... when the TV is displaying a 720p/1080i source. • Panoramic expands the display image to fill the screen. Wide Wide Zoom Zoom Note: Aspect ratio settings may appear distorted. 5 Changing the Input Source Changing the Screen Aspect Ratio External devices such as DVD players, Blu-ray Players, and video game consoles...
Download
Page 27
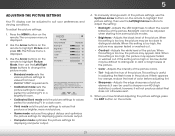
...® requirements. To manually change each of the picture settings, use the Left/Right Arrow buttons to change the picture mode: VIZIO Picture Picture Mode Backlight Brightness Contrast Color Tint Sharpness Standard - + 50 - + 50 - + 50 - + 50 - +0 - +0 More • Standard mode sets the various picture settings to values that produce a brighter, more vivid picture. •...
...® requirements. To manually change each of the picture settings, use the Left/Right Arrow buttons to change the picture mode: VIZIO Picture Picture Mode Backlight Brightness Contrast Color Tint Sharpness Standard - + 50 - + 50 - + 50 - + 50 - +0 - +0 More • Standard mode sets the various picture settings to values that produce a brighter, more vivid picture. •...

Download
Page 28
...as a PC NetworkmoSenttiintogsr. Help • Normal is optimized for use the Arrow buttons on the remote to manually change the setting: • Horiz. VIZIO Size & Position Horiz. Position - - Position - When you wish to adjust, then press the Left/ Right Arrow ... • Vertical Position - Wide Zoom Normal Panoramic 2. Red/Green/Blue Gain - Adjusts the degree of contrast of the color temperature settings: VIZIO Color Temperature Color Temperature Red Gain - - To adjust the color temperature: 1. a blue-hued • Computer optimizes the picture for ...
...as a PC NetworkmoSenttiintogsr. Help • Normal is optimized for use the Arrow buttons on the remote to manually change the setting: • Horiz. VIZIO Size & Position Horiz. Position - - Position - When you wish to adjust, then press the Left/ Right Arrow ... • Vertical Position - Wide Zoom Normal Panoramic 2. Red/Green/Blue Gain - Adjusts the degree of contrast of the color temperature settings: VIZIO Color Temperature Color Temperature Red Gain - - To adjust the color temperature: 1. a blue-hued • Computer optimizes the picture for ...

Download
Page 29
...Select Off, Low, Medium, or High. • Backlight Control - The adjustment is displayed. Use the Arrow buttons to highlight the setting you want to reset the color temperatures to highlight Advanced Picture, and then press OK. Diminishes artifacts in the image caused by the ...content on the remote to the factory default settings, highlight Reset Color Temperature, highlight Reset, and then press OK. 5. VIZIO Advanced Picture Black Detail Backlight Control Reduce Signal Noise Reduce Block Noise Film Mode Medium On Low ...
...Select Off, Low, Medium, or High. • Backlight Control - The adjustment is displayed. Use the Arrow buttons to highlight the setting you want to reset the color temperatures to highlight Advanced Picture, and then press OK. Diminishes artifacts in the image caused by the ...content on the remote to the factory default settings, highlight Reset Color Temperature, highlight Reset, and then press OK. 5. VIZIO Advanced Picture Black Detail Backlight Control Reduce Signal Noise Reduce Block Noise Film Mode Medium On Low ...
Download
Page 30
When you have finished adjusting the Advanced Picture Settings, press the EXIT button on the remote. 24 4. Highlight RESET and press OK. 4. From the Picture menu, use the Arrow buttons to restore factory default picture settings." 3. The TV displays,"Select Reset to highlight Advanced Picture, and then press OK. 2. Use the Arrow buttons to the factory default settings: 1. Press the EXIT button on the remote. 5 Resetting the Picture Settings To reset all of the picture settings to highlight Reset Picture Mode, then press OK.
When you have finished adjusting the Advanced Picture Settings, press the EXIT button on the remote. 24 4. Highlight RESET and press OK. 4. From the Picture menu, use the Arrow buttons to restore factory default picture settings." 3. The TV displays,"Select Reset to highlight Advanced Picture, and then press OK. 2. Use the Arrow buttons to the factory default settings: 1. Press the EXIT button on the remote. 5 Resetting the Picture Settings To reset all of the picture settings to highlight Reset Picture Mode, then press OK.
Download
Page 31
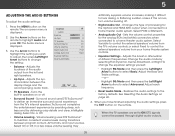
... change the equalizer settings yourself: • Sleep Timer Highlight EQ Mode and then press the Left/Right PAicrtruorew bAuudttioons to highlight Audio and press OK. The Audio menu is displayed. 2. VIZIO Audio Balance - Adjusts the synchronization between program content, AV ...formats, and input sources. Use the Arrow buttons to Digital Audio Out PCM highlight the setting you have finished adjusting the audio settings, press the EXIT button on ...
... change the equalizer settings yourself: • Sleep Timer Highlight EQ Mode and then press the Left/Right PAicrtruorew bAuudttioons to highlight Audio and press OK. The Audio menu is displayed. 2. VIZIO Audio Balance - Adjusts the synchronization between program content, AV ...formats, and input sources. Use the Arrow buttons to Digital Audio Out PCM highlight the setting you have finished adjusting the audio settings, press the EXIT button on ...
Download
Page 32
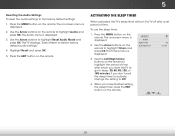
... menu is displayed. 3. Activating the Sleep Timer When activated, the TV's sleep timer will turn the TV off after which you have finished setting the sleep timer, press the EXIT button on the remote to Off. 4. Press the EXIT button on the remote. Use the Left/Right Arrow...displayed. 2. 5 Resetting the Audio Settings To reset the audio settings to highlight Timers and press OK. Press the MENU button on -screen menu is displayed. 2. The on the remote. Use the Arrow buttons to sleep: 30, 60, 90, 120, or 180 minutes. VIZIO Timers Sleep Timer Auto Power Off Off...
... menu is displayed. 3. Activating the Sleep Timer When activated, the TV's sleep timer will turn the TV off after which you have finished setting the sleep timer, press the EXIT button on the remote to Off. 4. Press the EXIT button on the remote. Use the Left/Right Arrow...displayed. 2. 5 Resetting the Audio Settings To reset the audio settings to highlight Timers and press OK. Press the MENU button on -screen menu is displayed. 2. The on the remote. Use the Arrow buttons to sleep: 30, 60, 90, 120, or 180 minutes. VIZIO Timers Sleep Timer Auto Power Off Off...
Download
Page 33
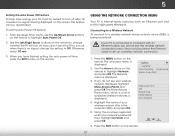
..., featuring both an Ethernet port and built-in high-speed Wireless-N. Highlight the name of available wireless networks, is displayed. 4. VIZIO Network Wired Connection Disconnected Wireless Access Points More Access Points WPS Manual Setup Hidden Network Test Connection 6. Use the Left/Right Arrow buttons...broadcast: If your wireless network displayed, highlight More Access Points and press OK. If you have finished setting the auto power off . The on the remote to change the setting to set the Auto Power Off feature: 1. The More Access Points menu, which is a list of your ...
..., featuring both an Ethernet port and built-in high-speed Wireless-N. Highlight the name of available wireless networks, is displayed. 4. VIZIO Network Wired Connection Disconnected Wireless Access Points More Access Points WPS Manual Setup Hidden Network Test Connection 6. Use the Left/Right Arrow buttons...broadcast: If your wireless network displayed, highlight More Access Points and press OK. If you have finished setting the auto power off . The on the remote to change the setting to set the Auto Power Off feature: 1. The More Access Points menu, which is a list of your ...
Download
Page 34
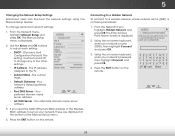
... menu, highlight Manual Setup and VIZIO press OK. DHCP Off 2. DNS Server Alt. DNS Server - The Enter Access Point Name screen is displayed. Exit 2D 3D 3. abc def ghi j k l mn o p q r s t u v wx y z 0 123456789 .@# .com Space Sleep Timer Picture Audio Network Settings Help 28 Use the Arrow and... to an access point with a hidden SSID. DNS Server - Using the on the remote. VIZIO Enter Access Point Name Enter your network, these are displayed at the bottom of the other settings. • IP Address - To change any of the Manual Setup menu. 4. Press the ...
... menu, highlight Manual Setup and VIZIO press OK. DHCP Off 2. DNS Server Alt. DNS Server - The Enter Access Point Name screen is displayed. Exit 2D 3D 3. abc def ghi j k l mn o p q r s t u v wx y z 0 123456789 .@# .com Space Sleep Timer Picture Audio Network Settings Help 28 Use the Arrow and... to an access point with a hidden SSID. DNS Server - Using the on the remote. VIZIO Enter Access Point Name Enter your network, these are displayed at the bottom of the other settings. • IP Address - To change any of the Manual Setup menu. 4. Press the ...

Download
Page 35
Testing Your Network Connection To test your network connection. 3. Press the EXIT button on the remote. 5 Setting Up the Tuner You can use the TV's Tuner menu to: • Select a Tuner Input • Perform an Auto Channel Scan • Perform a ...Partial Channel Scan • Manually Add Channels • Select channels to skip • Select Analog MTS modes • Select Digital Languages VIZIO Tuner Tuner Mode Auto Channel Scan Partial Channel Search Add Analog Channel Skip Channel Analog Audio Digital Language Antenna Stereo English 29 The Test Connection...
Testing Your Network Connection To test your network connection. 3. Press the EXIT button on the remote. 5 Setting Up the Tuner You can use the TV's Tuner menu to: • Select a Tuner Input • Perform an Auto Channel Scan • Perform a ...Partial Channel Scan • Manually Add Channels • Select channels to skip • Select Analog MTS modes • Select Digital Languages VIZIO Tuner Tuner Mode Auto Channel Scan Partial Channel Search Add Analog Channel Skip Channel Analog Audio Digital Language Antenna Stereo English 29 The Test Connection...

Download
Page 36
.... 1. The Tuner Mode menu displays. 2. Scanning for channels. The partial channel search begins. 6. ABC Input Wide CC Sleep Timer Picture Audio Network Settings Help 30 To add a range of channels or add a new analog channel. Use the Number Pad on the remote to backspace. 5 Selecting a Tuner...want to end the scan. (Use the Left Arrow button to add a new range of new channels: 1. Highlight Done and press OK. 3. VIZIO Channel Scan Channels Found Digital: 0 Analog: 19 18% Complete Cancel If the channel scan is 100% complete. Highlight From Channel and enter the ...
.... 1. The Tuner Mode menu displays. 2. Scanning for channels. The partial channel search begins. 6. ABC Input Wide CC Sleep Timer Picture Audio Network Settings Help 30 To add a range of channels or add a new analog channel. Use the Number Pad on the remote to backspace. 5 Selecting a Tuner...want to end the scan. (Use the Left Arrow button to add a new range of new channels: 1. Highlight Done and press OK. 3. VIZIO Channel Scan Channels Found Digital: 0 Analog: 19 18% Complete Cancel If the channel scan is 100% complete. Highlight From Channel and enter the ...

Download
Page 38
...your preferred language: English, Français, or Español. Press OK. 3. Press OK. 3. Press the EXIT button on the remote. VIZIO Analog Audio Stereo SAP Mono To use the Analog Audio feature: 1. SAP allows you to listen to broadcasts in the language you to listen to...secondary audio programming), or Mono. Wide Zoom Normal Panoramic Exit 2D 3D ABC Input Wide CC VIZIO Digital Language English Français Español Sleep Timer Picture Audio Network Settings Help 32 The Analog Audio feature only works when the program being viewed is being broadcast ...
...your preferred language: English, Français, or Español. Press OK. 3. Press OK. 3. Press the EXIT button on the remote. VIZIO Analog Audio Stereo SAP Mono To use the Analog Audio feature: 1. SAP allows you to listen to broadcasts in the language you to listen to...secondary audio programming), or Mono. Wide Zoom Normal Panoramic Exit 2D 3D ABC Input Wide CC VIZIO Digital Language English Français Español Sleep Timer Picture Audio Network Settings Help 32 The Analog Audio feature only works when the program being viewed is being broadcast ...
Download
Page 39
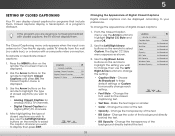
...buttons on the remote to select Custom. ChAaudnioge the color of the text. • BG Color - Ne•tworkBGSetOtinpgsaciHtyelp- VIZIO Digital CC Style Caption Style Custom Font Style As Broadcast Text Size As Broadcast Color As Broadcast Opacity As Broadcast BG Color... to highlight Digital CC Style and press OK. 2. From the Closed Caption menu, use the Left/ WiRdeightZoAomrrowNborumattl onPasntooramcichange the setting: BG Opacity Window Color Window Opacity As Broadcast As Broadcast As Broadcast • Caption Style - Press the MENU button ...
...buttons on the remote to select Custom. ChAaudnioge the color of the text. • BG Color - Ne•tworkBGSetOtinpgsaciHtyelp- VIZIO Digital CC Style Caption Style Custom Font Style As Broadcast Text Size As Broadcast Color As Broadcast Opacity As Broadcast BG Color... to highlight Digital CC Style and press OK. 2. From the Closed Caption menu, use the Left/ WiRdeightZoAomrrowNborumattl onPasntooramcichange the setting: BG Opacity Window Color Window Opacity As Broadcast As Broadcast As Broadcast • Caption Style - Press the MENU button ...


