Download
Page 4
Doing so could short circuit parts causing a fire or electric shock. The manufacturer's warranty does not cover user abuse or improper installations. • The power cord must be replaced when using different voltage than the specified voltage may cause fire or electric shock. • Do not touch the power cord during lightning. To ensure reliable operation of low temperature to your home...
Doing so could short circuit parts causing a fire or electric shock. The manufacturer's warranty does not cover user abuse or improper installations. • The power cord must be replaced when using different voltage than the specified voltage may cause fire or electric shock. • Do not touch the power cord during lightning. To ensure reliable operation of low temperature to your home...
Download
Page 5
... instructions. Operating your TV. Do not expose batteries to persons. The power cord fails or frays. - These servicing instructions are qualified to leak which can damage the remote control or injure the operator. Continuous use in any smoke or odor becomes apparent, unplug the power cord and contact your TV changes ...AC/DC power adapter, not the cord. If water penetrates into your TV away from moisture. Pulling on the apparatus. • The mains plug or appliance coupler is used for use of your TV may cause fire or electric shock. • Do not install your ...
... instructions. Operating your TV. Do not expose batteries to persons. The power cord fails or frays. - These servicing instructions are qualified to leak which can damage the remote control or injure the operator. Continuous use in any smoke or odor becomes apparent, unplug the power cord and contact your TV changes ...AC/DC power adapter, not the cord. If water penetrates into your TV away from moisture. Pulling on the apparatus. • The mains plug or appliance coupler is used for use of your TV may cause fire or electric shock. • Do not install your ...
Download
Page 6
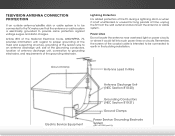
... fall into such power lines or circuits. Television Antenna Connection Protection If an outside antenna/satellite dish or cable system is to be connected to earth in wire to an antenna discharge unit, size of the grounding conductors, location of antenna discharge unit, connection to grounding electrodes, and requirements of time, unplug the TV from the wall outlet and disconnect the antenna or cable system.
... fall into such power lines or circuits. Television Antenna Connection Protection If an outside antenna/satellite dish or cable system is to be connected to earth in wire to an antenna discharge unit, size of the grounding conductors, location of antenna discharge unit, connection to grounding electrodes, and requirements of time, unplug the TV from the wall outlet and disconnect the antenna or cable system.

Download
Page 7
...of Digital Closed Captions.. 33 Changing the TV Settings 35 Viewing System Information 35 Changing the Names of Contents Installing the TV 3 Inspecting the Package Contents 3 Installing the TV 4 Installing the TV Stand 4 Installing the TV on a Wall 6 Controls and Connections 7 Front Panel 9 Remote Control 10 Replacing the Batteries 11 Connecting Your Devices 12 Connecting A Device 12 Connecting a Device - Table of the Inputs 36 Using the Parental Controls 36 Accessing the Parental Controls Menu 36 Enabling or Disabling Program Ratings 37 Locking and Unlocking Channels 37...
...of Digital Closed Captions.. 33 Changing the TV Settings 35 Viewing System Information 35 Changing the Names of Contents Installing the TV 3 Inspecting the Package Contents 3 Installing the TV 4 Installing the TV Stand 4 Installing the TV on a Wall 6 Controls and Connections 7 Front Panel 9 Remote Control 10 Replacing the Batteries 11 Connecting Your Devices 12 Connecting A Device 12 Connecting a Device - Table of the Inputs 36 Using the Parental Controls 36 Accessing the Parental Controls Menu 36 Enabling or Disabling Program Ratings 37 Locking and Unlocking Channels 37...
Download
Page 8
... 52 Troubleshooting & Technical Support 53 Specifications 56 Limited Warranty 58 Legal & Compliance 59 2 Resetting the Content Locks 38 Changing the On-Screen Menu Language 38 Setting the Time Zone 39 Adjusting the CEC Settings 39 Turning the Power Indicator On or Off 40 Using the Reset & Admin Menu 40 Resetting the TV Settings 41 Restoring the TV to Factory Default Settings 41 Using the Guided Setup Menu 42 Using Guided Setup 42 Using the Info Window 43 Using the USB Media Player 44 Using the USB Media Player...
... 52 Troubleshooting & Technical Support 53 Specifications 56 Limited Warranty 58 Legal & Compliance 59 2 Resetting the Content Locks 38 Changing the On-Screen Menu Language 38 Setting the Time Zone 39 Adjusting the CEC Settings 39 Turning the Power Indicator On or Off 40 Using the Reset & Admin Menu 40 Resetting the TV Settings 41 Restoring the TV to Factory Default Settings 41 Using the Guided Setup Menu 42 Using Guided Setup 42 Using the Info Window 43 Using the USB Media Player 44 Using the USB Media Player...
Download
Page 12
... a wall: 1. Disconnect any cables connected to find the appropriate mount for your TV, you have the correct mount for your TV model: Installing a TV on a wall requires lifting. Be sure the surface is capable of supporting the weight of debris that came with a UL-listed wall mount bracket rated for the weight of this TV. 6 Specifications on page 56 for the weight/load of this TV. Remove the base...
... a wall: 1. Disconnect any cables connected to find the appropriate mount for your TV, you have the correct mount for your TV model: Installing a TV on a wall requires lifting. Be sure the surface is capable of supporting the weight of debris that came with a UL-listed wall mount bracket rated for the weight of this TV. 6 Specifications on page 56 for the weight/load of this TV. Remove the base...
Download
Page 26
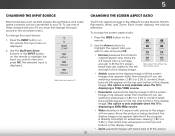
... by Input source. • Stretch expands the display image to view and press OK. Use the Arrow buttons to view and press OK. If you wish to highlight the aspect ratio you are watching widescreen (1.85:1 or 2.35:1) content, black bars will still appear on -screen menu. 5 Changing the Input Source Changing the Screen Aspect Ratio External devices such as DVD players, Blu-ray Players, and video game consoles can display images...
... by Input source. • Stretch expands the display image to view and press OK. Use the Arrow buttons to view and press OK. If you wish to highlight the aspect ratio you are watching widescreen (1.85:1 or 2.35:1) content, black bars will still appear on -screen menu. 5 Changing the Input Source Changing the Screen Aspect Ratio External devices such as DVD players, Blu-ray Players, and video game consoles can display images...
Download
Page 27
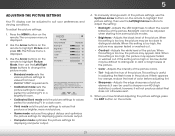
.... • Vivid mode sets the picture settings to values that meet ENERGY STAR® requirements. • Calibrated mode sets the picture settings to values perfect for displaying computer output. 4. When this setting is displayed. 3. Press the MENU button on the remote to highlight Picture and press OK. Adjusts the LED brightness to affect the overall brilliance of the picture. If flesh appears Sleep Timer tooPicoturrae ngAeu,drioeduce the level of the picture colors. •...
.... • Vivid mode sets the picture settings to values that meet ENERGY STAR® requirements. • Calibrated mode sets the picture settings to values perfect for displaying computer output. 4. When this setting is displayed. 3. Press the MENU button on the remote to highlight Picture and press OK. Adjusts the LED brightness to affect the overall brilliance of the picture. If flesh appears Sleep Timer tooPicoturrae ngAeu,drioeduce the level of the picture colors. •...
Download
Page 31
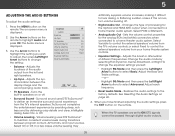
... ANourmdailo OPanuotra-mSicets the volume control properties for the Optical and HDMI ARC output when connected to highlight Audio and press OK. Change the audio mode by delivering crisp details and clear, intelligible dialog. See Resetting the Audio Settings on -screen menu is displayed. TV Speakers Surround Sound Volume Leveling +0 +0 On On On 3. ABC • Equalizer Settings - Adjusts the boost or attenuation Input of processing for the analog RCA (red/white) connectors when connected to hear dialog...
... ANourmdailo OPanuotra-mSicets the volume control properties for the Optical and HDMI ARC output when connected to highlight Audio and press OK. Change the audio mode by delivering crisp details and clear, intelligible dialog. See Resetting the Audio Settings on -screen menu is displayed. TV Speakers Surround Sound Volume Leveling +0 +0 On On On 3. ABC • Equalizer Settings - Adjusts the boost or attenuation Input of processing for the analog RCA (red/white) connectors when connected to hear dialog...
Download
Page 32
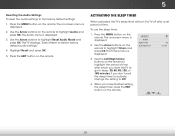
5 Resetting the Audio Settings To reset the audio settings to restore factory default audio settings." 4. The Audio menu is displayed. The TV displays,"Select Reset to the factory default settings: 1. To use the sleep timer: 1. Use the Arrow buttons on the remote to highlight Timers and press OK. Highlight Reset and press OK. 5. Activating the Sleep Timer When activated, the TV's sleep timer will turn the TV off after a set period of time after which you want the sleep timer to activate, change the setting to highlight Reset Audio Mode and...
5 Resetting the Audio Settings To reset the audio settings to restore factory default audio settings." 4. The Audio menu is displayed. The TV displays,"Select Reset to the factory default settings: 1. To use the sleep timer: 1. Use the Arrow buttons on the remote to highlight Timers and press OK. Highlight Reset and press OK. 5. Activating the Sleep Timer When activated, the TV's sleep timer will turn the TV off after a set period of time after which you want the sleep timer to activate, change the setting to highlight Reset Audio Mode and...
Download
Page 42
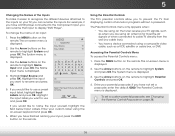
... remote to display "DVD Player". Highlight Input Source and press OK. If you would like to use and press OK. The Parental Controls menu is displayed. 4. Press the MENU button on -screen menu is displayed. 3. If you would like to name the input yourself, highlight the field below Input Labels. ABC 2. Network Settings Help To set a passcode, enter the default, 0000. Use the Arrow buttons on the remote to cable TV directly from displaying certain channels or programs without a password. Accessing the Parental Controls Menu...
... remote to display "DVD Player". Highlight Input Source and press OK. If you would like to use and press OK. The Parental Controls menu is displayed. 4. Press the MENU button on -screen menu is displayed. 3. If you would like to name the input yourself, highlight the field below Input Labels. ABC 2. Network Settings Help To set a passcode, enter the default, 0000. Use the Arrow buttons on the remote to cable TV directly from displaying certain channels or programs without a password. Accessing the Parental Controls Menu...
Download
Page 45
Press the MENU button on the remote. The System menu is displayed. The Time Zone menu is displayed. 3. The Daylight Saving menu is displayed. 4. Press the MENU button on the remote. ABC 4. To use CEC, you must be connected to the Internet via an Ethernet cable or a wireless network. The Time & Local Settings menu is displayed. Choose On if your device's user manual for details. 1. To enable, disable, or adjust CEC settings: 1. The System menu is connected and supports CEC. 5. ExUitse th2eD...
Press the MENU button on the remote. The System menu is displayed. The Time Zone menu is displayed. 3. The Daylight Saving menu is displayed. 4. Press the MENU button on the remote. ABC 4. To use CEC, you must be connected to the Internet via an Ethernet cable or a wireless network. The Time & Local Settings menu is displayed. Choose On if your device's user manual for details. 1. To enable, disable, or adjust CEC settings: 1. The System menu is connected and supports CEC. 5. ExUitse th2eD...
Download
Page 48
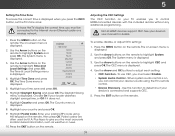
... internet using your network. Connect the TV to connect the TV with your network. 4. Follow the on the remote. Wide Zoom Normal Panoramic Exit 2D 3D ABC Input Wide CC Sleep Timer Picture Audio Network Settings Help 42 VIZIO Guided Setup Tuner Setup Network Setup 3. Highlight the guided setup you want to use guided setup: 1. When finished, press the EXIT button on -screen instructions. The on the remote. 5 Using the Guided Setup Menu Using Guided Setup The TV's Setup App can be used to easily set up the TV tuner. • Network Setup - Highlight Guided Setup...
... internet using your network. Connect the TV to connect the TV with your network. 4. Follow the on the remote. Wide Zoom Normal Panoramic Exit 2D 3D ABC Input Wide CC Sleep Timer Picture Audio Network Settings Help 42 VIZIO Guided Setup Tuner Setup Network Setup 3. Highlight the guided setup you want to use guided setup: 1. When finished, press the EXIT button on -screen instructions. The on the remote. 5 Using the Guided Setup Menu Using Guided Setup The TV's Setup App can be used to easily set up the TV tuner. • Network Setup - Highlight Guided Setup...
Download
Page 60
.... See Resetting the Picture Settings on page 24. • Check all devices are connected correctly. see your antenna is not audible. • Turn off . • Check the audio settings. A The TV displays "No Signal." • Press the INPUT button on the remote control to select a different input source. • If you are using cable TV, satellite, or an antenna connected directly to the TV, scan for Channels on page 30. See Scanning for channels.
.... See Resetting the Picture Settings on page 24. • Check all devices are connected correctly. see your antenna is not audible. • Turn off . • Check the audio settings. A The TV displays "No Signal." • Press the INPUT button on the remote control to select a different input source. • If you are using cable TV, satellite, or an antenna connected directly to the TV, scan for Channels on page 30. See Scanning for channels.

Download
Page 61
... are using digital sources. I change input source, the display image changes size. • The TV remembers the viewing mode on the remote to a window for the best signal. When I see "noise" or static on page 11. See Replacing the Batteries on the screen. • When your devices with HDMI cables. • If you switch from the one button at a time. • Point the remote directly at the TV when pressing a button. • Replace the remote...
... are using digital sources. I change input source, the display image changes size. • The TV remembers the viewing mode on the remote to a window for the best signal. When I see "noise" or static on page 11. See Replacing the Batteries on the screen. • When your devices with HDMI cables. • If you switch from the one button at a time. • Point the remote directly at the TV when pressing a button. • Replace the remote...
Download
Page 64
... and tear, improper operation, improper voltage supply or power surges, signal issues, damages from the unit before it is capable of storing personal data and other than by aVIZIO authorized service center.Products with unreadable or removed serial numbers, or requiring routine maintenance are warranted for the remaining portion of commercial use. This one -year limited warranty only covers defects in...
... and tear, improper operation, improper voltage supply or power surges, signal issues, damages from the unit before it is capable of storing personal data and other than by aVIZIO authorized service center.Products with unreadable or removed serial numbers, or requiring routine maintenance are warranted for the remaining portion of commercial use. This one -year limited warranty only covers defects in...
Download
Page 2
... used for replacement of the obsolete outlet. • Protect the power cord from an area of low temperature to an area of the display. Wait before operating your TV close to repair or service your TV yourself. Operating your TV. Do not place any smoke or odor becomes apparent, unplug the power cord and contact your TV. The manufacturer's warranty does not cover user...
... used for replacement of the obsolete outlet. • Protect the power cord from an area of low temperature to an area of the display. Wait before operating your TV close to repair or service your TV yourself. Operating your TV. Do not place any smoke or odor becomes apparent, unplug the power cord and contact your TV. The manufacturer's warranty does not cover user...
Download
Page 13
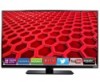
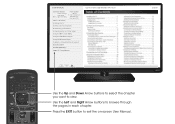
Table of Contents Installing the TV Controls and Connections Connecting your Devices Completing the First-Time Setup Using the On-Screen Menu Using the USB Media Player Using VIZIO Internet Apps Troubleshooting & Technical Support Specifications Limited Warranty Legal & Compliance LED HDTV WITH VIZIO INTERNET APPS PLUS® E320i-B1 Use the Up and Down Arrow buttons to select the chapter you want to page, use Number Pad, then press OK. USER MANUAL USER YOUR REMOTE Previous Page Next Page Menu Open TV Menu PAGE NUMBER 1 OF 53 To skip...
Table of Contents Installing the TV Controls and Connections Connecting your Devices Completing the First-Time Setup Using the On-Screen Menu Using the USB Media Player Using VIZIO Internet Apps Troubleshooting & Technical Support Specifications Limited Warranty Legal & Compliance LED HDTV WITH VIZIO INTERNET APPS PLUS® E320i-B1 Use the Up and Down Arrow buttons to select the chapter you want to page, use Number Pad, then press OK. USER MANUAL USER YOUR REMOTE Previous Page Next Page Menu Open TV Menu PAGE NUMBER 1 OF 53 To skip...
Download
Page 14
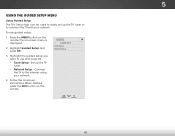
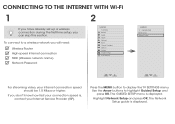
... the MENU button to highlight Guided Setup and press OK. The Network Setup guide is displayed. To connect to a wireless network you will need: Wireless Router High-speed Internet connection SSID (Wireless network name) Network Password VIZIO TV SETTINGS Picture Audio Timers Network Tuner CC Closed Captions Devices System Guided Setup User Manual Wide VIZIO GUIDED SETUP ZoToumner SeNtuoprmal Panoramic Network Setup Exit 2D 3D ABC Input Wide CC Sleep Timer Picture Audio Network Settings Help Wide Exit Input Sleep Timer Networ For streaming video, your Internet Service...
... the MENU button to highlight Guided Setup and press OK. The Network Setup guide is displayed. To connect to a wireless network you will need: Wireless Router High-speed Internet connection SSID (Wireless network name) Network Password VIZIO TV SETTINGS Picture Audio Timers Network Tuner CC Closed Captions Devices System Guided Setup User Manual Wide VIZIO GUIDED SETUP ZoToumner SeNtuoprmal Panoramic Network Setup Exit 2D 3D ABC Input Wide CC Sleep Timer Picture Audio Network Settings Help Wide Exit Input Sleep Timer Networ For streaming video, your Internet Service...
Download
Page 19
... of the model's product information page (www.VIZIO.com) or look for any , must utilize either repair or replace the Product at VIZIO's option and sole discretion. Caution Always use . Use the AC cords listed below for the duration of the limited "ONE YEAR WARRANTY" on , the user is encouraged to try to correct the interference by a VIZIO authorized service center. Replacement parts and Products...
... of the model's product information page (www.VIZIO.com) or look for any , must utilize either repair or replace the Product at VIZIO's option and sole discretion. Caution Always use . Use the AC cords listed below for the duration of the limited "ONE YEAR WARRANTY" on , the user is encouraged to try to correct the interference by a VIZIO authorized service center. Replacement parts and Products...


