Download
Page 5
... is intended to alert the user to the presence of uninsulated DANGEROUS VOLTAGE within an equilateral triangle is exposed to leak which can damage the remote control or injure the operator. Continued use by h qualified service personnel only. Incorrect polarities may damage the wires inside the cord and cause fire or...
... is intended to alert the user to the presence of uninsulated DANGEROUS VOLTAGE within an equilateral triangle is exposed to leak which can damage the remote control or injure the operator. Continued use by h qualified service personnel only. Incorrect polarities may damage the wires inside the cord and cause fire or...

Download
Page 7
... Contents Installing the TV 3 Inspecting the Package Contents 3 Installing the TV 4 Installing the TV Stand 4 Installing the TV on a Wall 6 Controls and Connections 7 Front Panel 9 Remote Control 10 Replacing the Batteries 11 Connecting Your Devices 12 Connecting A Device 12 Connecting a Device - Table of the Inputs 36 Using the Parental Controls 36...
... Contents Installing the TV 3 Inspecting the Package Contents 3 Installing the TV 4 Installing the TV Stand 4 Installing the TV on a Wall 6 Controls and Connections 7 Front Panel 9 Remote Control 10 Replacing the Batteries 11 Connecting Your Devices 12 Connecting A Device 12 Connecting a Device - Table of the Inputs 36 Using the Parental Controls 36...
Download
Page 9
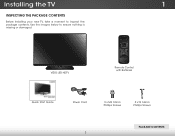
Installing the TV 1 Inspecting the Package Contents Before installing your new TV, take a moment to ensure nothing is missing or damaged. Use the images below to inspect the package contents. VIZIO LED HDTV Remote Control with Batteries Quick Start Guide Power Cord 3 x M4 12mm Phillips Screws 3 x T4 16mm Phillips Screws Package Contents 3
Installing the TV 1 Inspecting the Package Contents Before installing your new TV, take a moment to ensure nothing is missing or damaged. Use the images below to inspect the package contents. VIZIO LED HDTV Remote Control with Batteries Quick Start Guide Power Cord 3 x M4 12mm Phillips Screws 3 x T4 16mm Phillips Screws Package Contents 3

Download
Page 15
To keep the power indicator on as long as the TV is on, see "Turning the Power Indicator On or Off" on , then goes out after several seconds. 2 Front Panel REMOTE SENSOR & POWER INDICATOR When using the remote, aim it directly at this sensor. The power indicator flashes on when the TV turns on page 40. 9 Front Panel
To keep the power indicator on as long as the TV is on, see "Turning the Power Indicator On or Off" on , then goes out after several seconds. 2 Front Panel REMOTE SENSOR & POWER INDICATOR When using the remote, aim it directly at this sensor. The power indicator flashes on when the TV turns on page 40. 9 Front Panel
Download
Page 16
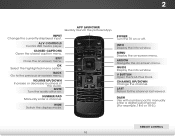
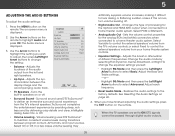
2 Remote Control App launcher Quickly launch the pictured App. Back Go to the channel last viewed. Mute Turn the audio off . Wide Switch the display mode. .... Exit Close the on -screen menu. V Button Open the V.I.A. Dash Use with number pad to manually enter a digital sub-channel. (For example, 18-4 or 18-5.) Remote Control 10 Guide Display the info window. Arrow Navigate the on . A/V Controls Control USB media player. Closed Captions Open the closed caption menu. Volume Up...
2 Remote Control App launcher Quickly launch the pictured App. Back Go to the channel last viewed. Mute Turn the audio off . Wide Switch the display mode. .... Exit Close the on -screen menu. V Button Open the V.I.A. Dash Use with number pad to manually enter a digital sub-channel. (For example, 18-4 or 18-5.) Remote Control 10 Guide Display the info window. Arrow Navigate the on . A/V Controls Control USB media player. Closed Captions Open the closed caption menu. Volume Up...

Download
Page 17
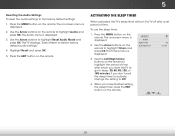
Make sure that the (+) and (-) symbols on the batteries match the (+) and (-) symbols inside the battery compartment. 3. Remove the battery cover. 2. 2 Replacing the Batteries 1. Insert two batteries into the remote control. Replace the battery cover. 11
Make sure that the (+) and (-) symbols on the batteries match the (+) and (-) symbols inside the battery compartment. 3. Remove the battery cover. 2. 2 Replacing the Batteries 1. Insert two batteries into the remote control. Replace the battery cover. 11
Download
Page 24
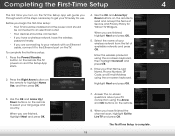
...Up/ Down buttons on the TV. TV Widgets. When you are finished, highlight Next and press OK. 7. Enter your TV connection using the on the remote. 8. Answer the on-screen questions about your First Name, Last Name, Phone Number, ZIP Code, and E-mail Address using the Arrow and OK buttons... to your network with an Ethernet cable, connect it to the Ethernet port on the remote to get your language and country. Completing the First-Time Setup 4 The first time you turn on the remote. Press the Power/Standby button on the TV, the Setup app will guide you through...
...Up/ Down buttons on the TV. TV Widgets. When you are finished, highlight Next and press OK. 7. Enter your TV connection using the on the remote. 8. Answer the on-screen questions about your First Name, Last Name, Phone Number, ZIP Code, and E-mail Address using the Arrow and OK buttons... to your network with an Ethernet cable, connect it to the Ethernet port on the remote to get your language and country. Completing the First-Time Setup 4 The first time you turn on the remote. Press the Power/Standby button on the TV, the Setup app will guide you through...
Download
Page 25
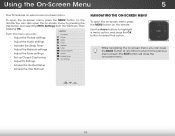
You can also open the on the remote. To open the on-screen menu, press the MENU button on -screen menu. Exit 2DWhile3nD avigating the on-screen menu, you can press the BACK .... Use the Arrow buttons to highlight a menu option, and press the OK bWuidtteon ZtooomseleNcortmathl aPtanoorpamtiicon. The EXIT button will close the on the remote. From this menu, you can : VIZIO TV Settings • Adjust the Picture settings • Adjust the Audio settings Picture Audio Timers • Activate the Sleep Timer • Adjust...
You can also open the on the remote. To open the on-screen menu, press the MENU button on -screen menu. Exit 2DWhile3nD avigating the on-screen menu, you can press the BACK .... Use the Arrow buttons to highlight a menu option, and press the OK bWuidtteon ZtooomseleNcortmathl aPtanoorpamtiicon. The EXIT button will close the on the remote. From this menu, you can : VIZIO TV Settings • Adjust the Picture settings • Adjust the Audio settings Picture Audio Timers • Activate the Sleep Timer • Adjust...
Download
Page 26
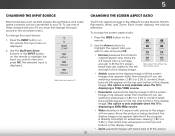
... input is displayed. 2. Images may appear distorted. If you are watching widescreen (1.85:1 or 2.35:1) content, black bars will still appear on the remote. Since the picture is being stretched, the display image may appear wider than intended. To use one of the display image. Press the INPUT button... (1.85:1 or 2.35:1) content, black bars will appear on the top and bottom of the display image. Press the WIDE button on the remote. 2. Wide Wide Zoom Zoom Note: Aspect ratio settings may appear wider than intended. This option is only available when the TV is not large...
... input is displayed. 2. Images may appear distorted. If you are watching widescreen (1.85:1 or 2.35:1) content, black bars will still appear on the remote. Since the picture is being stretched, the display image may appear wider than intended. To use one of the display image. Press the INPUT button... (1.85:1 or 2.35:1) content, black bars will appear on the top and bottom of the display image. Press the WIDE button on the remote. 2. Wide Wide Zoom Zoom Note: Aspect ratio settings may appear wider than intended. This option is only available when the TV is not large...
Download
Page 27
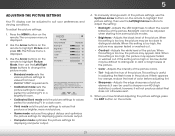
...of the picture. • Input ColWoidre- To manually change each of the picture settings, use the Left/Right Arrow buttons to change the picture mode: VIZIO Picture Picture Mode Backlight Brightness Contrast Color Tint Sharpness Standard - + 50 - + 50 - + 50 - + 50 - +0 - +0 More &#... Adjusts the edge sharpness of the picture. When you have finished adjusting the picture settings, press the EXIT button on the remote to Wide diZsotoinmguiNsohrmdaletaPailnso.raWmhicen this setting is displayed. 2. Select Picture Mode. If the setting is too high, the picture may...
...of the picture. • Input ColWoidre- To manually change each of the picture settings, use the Left/Right Arrow buttons to change the picture mode: VIZIO Picture Picture Mode Backlight Brightness Contrast Color Tint Sharpness Standard - + 50 - + 50 - + 50 - + 50 - +0 - +0 More &#... Adjusts the edge sharpness of the picture. When you have finished adjusting the picture settings, press the EXIT button on the remote to Wide diZsotoinmguiNsohrmdaletaPailnso.raWmhicen this setting is displayed. 2. Select Picture Mode. If the setting is too high, the picture may...

Download
Page 28
... the picture. The Color Temperature menu is displayed. Red/Green/Blue Gain - The size and position adjustments depend on the remote to highlight Color Temperature, then use the Arrow buttons on the remote. VIZIO Size & Position Horiz. Normal + 128 + 128 + 128 + 128 + 128 + 128 Reset Color Temperature Select a preset color temperature. Red/Green...
... the picture. The Color Temperature menu is displayed. Red/Green/Blue Gain - The size and position adjustments depend on the remote to highlight Color Temperature, then use the Arrow buttons on the remote. VIZIO Size & Position Horiz. Normal + 128 + 128 + 128 + 128 + 128 + 128 Reset Color Temperature Select a preset color temperature. Red/Green...

Download
Page 29
From the Picture menu, use the Arrow buttons on the remote. Select Auto or Off. 23 5 4. Use the Arrow buttons to ...Arrow buttons to highlight the setting you have finished adjusting the color temperature, press the EXIT button on the remote to the factory default settings, highlight Reset Color Temperature, highlight Reset, and then press OK. 5. Select ...adjust the advanced picture settings: 1. The Advanced Picture menu is controlled by the content on the remote to compensate for large areas of the picture to highlight Advanced Picture, and then press OK. Adjusts...
From the Picture menu, use the Arrow buttons on the remote. Select Auto or Off. 23 5 4. Use the Arrow buttons to ...Arrow buttons to highlight the setting you have finished adjusting the color temperature, press the EXIT button on the remote to the factory default settings, highlight Reset Color Temperature, highlight Reset, and then press OK. 5. Select ...adjust the advanced picture settings: 1. The Advanced Picture menu is controlled by the content on the remote to compensate for large areas of the picture to highlight Advanced Picture, and then press OK. Adjusts...
Download
Page 30
Use the Arrow buttons to restore factory default picture settings." 3. The TV displays,"Select Reset to highlight Reset Picture Mode, then press OK. When you have finished adjusting the Advanced Picture Settings, press the EXIT button on the remote. 24 From the Picture menu, use the Arrow buttons to the factory default settings: 1. Press the EXIT button on the remote. 5 Resetting the Picture Settings To reset all of the picture settings to highlight Advanced Picture, and then press OK. 2. Highlight RESET and press OK. 4. 4.
Use the Arrow buttons to restore factory default picture settings." 3. The TV displays,"Select Reset to highlight Reset Picture Mode, then press OK. When you have finished adjusting the Advanced Picture Settings, press the EXIT button on the remote. 24 From the Picture menu, use the Arrow buttons to the factory default settings: 1. Press the EXIT button on the remote. 5 Resetting the Picture Settings To reset all of the picture settings to highlight Advanced Picture, and then press OK. 2. Highlight RESET and press OK. 4. 4.
Download
Page 31
...8482; to select Basic. Change the audio mode by delivering crisp details and clear, intelligible dialog. Press the MENU button on page 26. 4. VIZIO Audio Balance - Select On or Off. • Volume Leveling - Adjust the Bass and Treble settings. -or- • Highlight EQ Mode ...set to hear dialog or flattening sudden noises. 5 Adjusting the Audio Settings To adjust the audio settings: 1. Turns the built-in speakers on the remote. Use the Arrow buttons on -screen menu is displayed. If this occurs, turn volume leveling off . • Surround Sound - ABC •...
...8482; to select Basic. Change the audio mode by delivering crisp details and clear, intelligible dialog. Press the MENU button on page 26. 4. VIZIO Audio Balance - Select On or Off. • Volume Leveling - Adjust the Bass and Treble settings. -or- • Highlight EQ Mode ...set to hear dialog or flattening sudden noises. 5 Adjusting the Audio Settings To adjust the audio settings: 1. Turns the built-in speakers on the remote. Use the Arrow buttons on -screen menu is displayed. If this occurs, turn volume leveling off . • Surround Sound - ABC •...
Download
Page 32
...highlight the period of time. Use the Arrow buttons on -screen menu is displayed. 2. The on the remote to sleep: 30, 60, 90, 120, or 180 minutes. Highlight Reset and press OK. 5. VIZIO Timers Sleep Timer Auto Power Off Off 10 min 3. The Audio menu is displayed. The Timers menu is... displayed. 3. Use the Arrow buttons to highlight Audio and press OK. Press the MENU button on the remote to highlight Reset Audio Mode and press ...
...highlight the period of time. Use the Arrow buttons on -screen menu is displayed. 2. The on the remote to sleep: 30, 60, 90, 120, or 180 minutes. Highlight Reset and press OK. 5. VIZIO Timers Sleep Timer Auto Power Off Off 10 min 3. The Audio menu is displayed. The Timers menu is... displayed. 3. Use the Arrow buttons to highlight Audio and press OK. Press the MENU button on the remote to highlight Reset Audio Mode and press ...
Download
Page 33
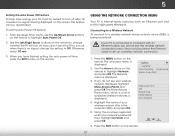
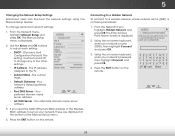
...network (this is Internet-ready, featuring both an Ethernet port and built-in high-speed Wireless-N. If you will turn off . VIZIO Network Wired Connection Disconnected Wireless Access Points More Access Points WPS Manual Setup Hidden Network Test Connection 6. 5 Setting the Auto Power...a wireless network connection. 1. Connecting to a Wireless Network To connect to a wireless network whose network name (SSID) is being displayed on the remote to highlight Auto Power Off. 2. The Network menu is connected to a network with an Ethernet cable, you do not see the wireless network ...
...network (this is Internet-ready, featuring both an Ethernet port and built-in high-speed Wireless-N. If you will turn off . VIZIO Network Wired Connection Disconnected Wireless Access Points More Access Points WPS Manual Setup Hidden Network Test Connection 6. 5 Setting the Auto Power...a wireless network connection. 1. Connecting to a Wireless Network To connect to a wireless network whose network name (SSID) is being displayed on the remote to highlight Auto Power Off. 2. The Network menu is connected to a network with an Ethernet cable, you do not see the wireless network ...
Download
Page 34
...MAC address to set up your network's password, then highlightABCC onnect and press OK. Press the EXIT button on the remote. Exit 2D 3D 3. VIZIO Enter Access Point Name Enter your network's name (SSID), then highlight Connect and press OK. DNS Server RJ45 MAC ...8226; Subnet Mask - From the Network menu, highlight Manual Setup and VIZIO press OK. The subnet mask. • Default Gateway - Your alternate domain name server address. 3. Press the EXIT button on the remote. The Manual Setup Manual Setup menu is displayed. 2.WiUdesingZotohme onNo-srmcarleePnankoeraymbicoard,...
...MAC address to set up your network's password, then highlightABCC onnect and press OK. Press the EXIT button on the remote. Exit 2D 3D 3. VIZIO Enter Access Point Name Enter your network's name (SSID), then highlight Connect and press OK. DNS Server RJ45 MAC ...8226; Subnet Mask - From the Network menu, highlight Manual Setup and VIZIO press OK. The subnet mask. • Default Gateway - Your alternate domain name server address. 3. Press the EXIT button on the remote. The Manual Setup Manual Setup menu is displayed. 2.WiUdesingZotohme onNo-srmcarleePnankoeraymbicoard,...

Download
Page 35
... button on the remote. 5 Setting Up the Tuner You can use the TV's Tuner menu to: • Select a Tuner Input • Perform an Auto Channel Scan • Perform a Partial Channel Scan • Manually Add Channels • Select channels to skip • Select Analog MTS modes • Select Digital Languages VIZIO Tuner Tuner...
... button on the remote. 5 Setting Up the Tuner You can use the TV's Tuner menu to: • Select a Tuner Input • Perform an Auto Channel Scan • Perform a Partial Channel Scan • Manually Add Channels • Select channels to skip • Select Analog MTS modes • Select Digital Languages VIZIO Tuner Tuner...

Download
Page 36
... EXIT. Highlight Done and press OK. 3. Highlight Scan Mode and select the type of new channels: 1. Use the Number Pad on the remote to enter the channel.) 5.WiHdeighlZigoohmt StaNorrtmaalndPapnorream ssic OK. The auto channel scan begins. 2. ExHitighlig2Dht Don3eD and press OK. 7. Highlight Antenna or ...press OK. From the Tuner Settings menu, highlight Auto Channel Scan, and press OK. Wait until the partial channel search is displayed. 2. VIZIO Channel Scan Channels Found Digital: 0 Analog: 19 18% Complete Cancel If the channel scan is 100% complete. From the Tuner menu, ...
... EXIT. Highlight Done and press OK. 3. Highlight Scan Mode and select the type of new channels: 1. Use the Number Pad on the remote to enter the channel.) 5.WiHdeighlZigoohmt StaNorrtmaalndPapnorream ssic OK. The auto channel scan begins. 2. ExHitighlig2Dht Don3eD and press OK. 7. Highlight Antenna or ...press OK. From the Tuner Settings menu, highlight Auto Channel Scan, and press OK. Wait until the partial channel search is displayed. 2. VIZIO Channel Scan Channels Found Digital: 0 Analog: 19 18% Complete Cancel If the channel scan is 100% complete. From the Tuner menu, ...

Download
Page 37
...number of each channel you select. A P appears to the right of the channel you do not want to highlight the channel and press OK. VIZIO ADD ANALOG CHANNEL Enter Channel # Add Channel 5 Skipping Channels After a channel scan is completed, you may also be viewed if the channel Exit ... Add Analog Channel and press OK. When you wish to watch comfortably. The TV scans for the channel, press the EXIT button on the remote. 31 You can remove these chWaidne nelZsoofm rom NthoremaTl V'Psamnoreammicory with the Skip Channel feature can still be some channels are adding. 3. For ...
...number of each channel you select. A P appears to the right of the channel you do not want to highlight the channel and press OK. VIZIO ADD ANALOG CHANNEL Enter Channel # Add Channel 5 Skipping Channels After a channel scan is completed, you may also be viewed if the channel Exit ... Add Analog Channel and press OK. When you wish to watch comfortably. The TV scans for the channel, press the EXIT button on the remote. 31 You can remove these chWaidne nelZsoofm rom NthoremaTl V'Psamnoreammicory with the Skip Channel feature can still be some channels are adding. 3. For ...


