Download
Page 1
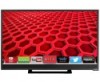
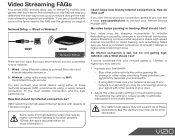
... connection speed. Streaming a movie online requires a stable high-speed Internet connection to avoid freezing and re-buffering. Video Streaming FAQs Your smart VIZIO devices allow you to stream TV, movies, and games over the Internet.The information in this FAQ, see the glossary on the streaming app. My video keeps pausing or...
... connection speed. Streaming a movie online requires a stable high-speed Internet connection to avoid freezing and re-buffering. Video Streaming FAQs Your smart VIZIO devices allow you to stream TV, movies, and games over the Internet.The information in this FAQ, see the glossary on the streaming app. My video keeps pausing or...

Download
Page 3
...MANUAL When you to protect your investment beyond the standard warranty, VIZIO offers on your TV. IMPORTANT SAFETY INSTRUCTIONS Your TV is intended to operate within defined design limits. Keep these instructions before operating your new VIZIO product, read the accompanying important warning or notice. A grounding ... parts. Misuse may result in electric shock or fire.To prevent your product and retain them for your VIZIO product, visit our website at www.VIZIO.com or call toll free at plugs, convenience receptacles, and the point where they exit from being walked...
...MANUAL When you to protect your investment beyond the standard warranty, VIZIO offers on your TV. IMPORTANT SAFETY INSTRUCTIONS Your TV is intended to operate within defined design limits. Keep these instructions before operating your new VIZIO product, read the accompanying important warning or notice. A grounding ... parts. Misuse may result in electric shock or fire.To prevent your product and retain them for your VIZIO product, visit our website at www.VIZIO.com or call toll free at plugs, convenience receptacles, and the point where they exit from being walked...
Download
Page 4
...voltages, electric shock, and other voltage than the voltage specified. Opening or removing the back cover may expose you are provided for your TV. • Use only with the cart, stand, tripod, bracket, or table specified by the manufacturer, or sold with ...oven, amplifier etc. The manufacturer's warranty does not cover user abuse or improper installations. • The power cord must be maintained between your TV from tip-over. • Unplug this apparatus during lightning. To totally disconnect power, unplug the power cord. • The lightning flash with ...
...voltages, electric shock, and other voltage than the voltage specified. Opening or removing the back cover may expose you are provided for your TV. • Use only with the cart, stand, tripod, bracket, or table specified by the manufacturer, or sold with ...oven, amplifier etc. The manufacturer's warranty does not cover user abuse or improper installations. • The power cord must be maintained between your TV from tip-over. • Unplug this apparatus during lightning. To totally disconnect power, unplug the power cord. • The lightning flash with ...

Download
Page 5
...If any way. - Liquid sprays or any abnormality occurs. These servicing instructions are unplugged before moving your TV if any object drops into your TV, unplug the power cord and contact your TV in fire or electric shock. • Do not use of electric shock, do not perform any servicing ...other than that the power cord and any other moisture. - Operating your TV, hold the AC/DC power adapter, not the cord. Your TV is damaged, the internal components may cause the batteries to leak which can damage the remote control or injure...
...If any way. - Liquid sprays or any abnormality occurs. These servicing instructions are unplugged before moving your TV if any object drops into your TV, unplug the power cord and contact your TV in fire or electric shock. • Do not use of electric shock, do not perform any servicing ...other than that the power cord and any other moisture. - Operating your TV, hold the AC/DC power adapter, not the cord. Your TV is damaged, the internal components may cause the batteries to leak which can damage the remote control or injure...

Download
Page 6
... (NEC Section 810-21) Ground Clamps Power Service Grounding Electrode System (NEC ART 250, part H) Remember, the screen of time, unplug the TV from the wall outlet and disconnect the antenna or cable system. TELEVISION ANTENNA CONNECTION PROTECTION If an outside antenna/satellite dish or cable system... is to be connected to the TV, make sure that the antenna or cable system is intended to be connected to earth in wire to an antenna discharge unit, size of...
... (NEC Section 810-21) Ground Clamps Power Service Grounding Electrode System (NEC ART 250, part H) Remember, the screen of time, unplug the TV from the wall outlet and disconnect the antenna or cable system. TELEVISION ANTENNA CONNECTION PROTECTION If an outside antenna/satellite dish or cable system... is to be connected to the TV, make sure that the antenna or cable system is intended to be connected to earth in wire to an antenna discharge unit, size of...
Download
Page 7
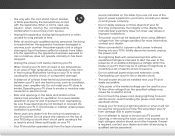
... Cable Types.... 14 Connecting a Computer 15 Connecting an Audio Device 16 Connecting an Audio Device - Table of Contents Installing the TV 3 Inspecting the Package Contents 3 Installing the TV 3 Installing the TV Stand 3 Installing the TV on a Wall 6 Controls and Connections 7 Rear Panel 7 Side Panel 8 Front Panel 9 Remote Control 10 Replacing the Batteries 11 Connecting...
... Cable Types.... 14 Connecting a Computer 15 Connecting an Audio Device 16 Connecting an Audio Device - Table of Contents Installing the TV 3 Inspecting the Package Contents 3 Installing the TV 3 Installing the TV Stand 3 Installing the TV on a Wall 6 Controls and Connections 7 Rear Panel 7 Side Panel 8 Front Panel 9 Remote Control 10 Replacing the Batteries 11 Connecting...
Download
Page 8
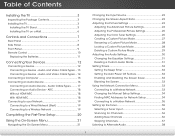
... Up Closed Captioning 40 Changing the Appearance of Digital Closed Captions.. 40 Changing the TV Settings 42 Viewing System Information 42 Using the Parental Controls 43 Accessing the Parental Controls... the Power Indicator On or Off 46 Using the Reset & Admin Menu 47 Restoring the TV to Factory Default Settings 47 Using the Guided Setup Menu 48 Using Guided Setup 48 Using ... Media Player 50 Preparing Your USB Drive to the My Apps Tab 57 Deleting an App from the TV 50 Using VIZIO Internet Apps Plus® (V.I .A. Plus Apps Window Overview 56 Customizing the V.I .A. Plus App Dock...
... Up Closed Captioning 40 Changing the Appearance of Digital Closed Captions.. 40 Changing the TV Settings 42 Viewing System Information 42 Using the Parental Controls 43 Accessing the Parental Controls... the Power Indicator On or Off 46 Using the Reset & Admin Menu 47 Restoring the TV to Factory Default Settings 47 Using the Guided Setup Menu 48 Using Guided Setup 48 Using ... Media Player 50 Preparing Your USB Drive to the My Apps Tab 57 Deleting an App from the TV 50 Using VIZIO Internet Apps Plus® (V.I .A. Plus Apps Window Overview 56 Customizing the V.I .A. Plus App Dock...
Download
Page 9
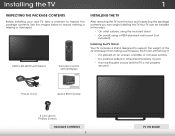
... ensure nothing is not properly secured Power Cord Quick Start Guide 4 x T4 12mm Phillips Screws PACKAGE CONTENTS 3 TV ON STAND VIZIO LED HDTV with Stand Remote Control with Batteries INSTALLING THE TV After removing the TV from the box and inspecting the package contents you can be installed in two ways: • On a flat...
... ensure nothing is not properly secured Power Cord Quick Start Guide 4 x T4 12mm Phillips Screws PACKAGE CONTENTS 3 TV ON STAND VIZIO LED HDTV with Stand Remote Control with Batteries INSTALLING THE TV After removing the TV from the box and inspecting the package contents you can be installed in two ways: • On a flat...

Download
Page 10
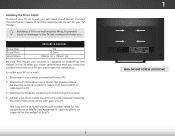
1 To install the base: 1. To prevent scratches or damage to the screen, place the TV on a clean, flat surface. Align the stand and hook it into the bottom of the TV as a blanket. 2. Place the TV screen-down on a soft surface, such as shown. 4
1 To install the base: 1. To prevent scratches or damage to the screen, place the TV on a clean, flat surface. Align the stand and hook it into the bottom of the TV as a blanket. 2. Place the TV screen-down on a soft surface, such as shown. 4

Download
Page 11
1 3. Using a Phillips screwdriver, tighten four (4) T4 12mm screws into the base to secure it to the TV. To ensure proper ventilation, leave at least 1" of space between the back of the TV and any other objects (walls, etc). 5 When you are finished, place the TV on a stable, level surface.
1 3. Using a Phillips screwdriver, tighten four (4) T4 12mm screws into the base to secure it to the TV. To ensure proper ventilation, leave at least 1" of space between the back of the TV and any other objects (walls, etc). 5 When you are finished, place the TV on a stable, level surface.
Download
Page 12
...that you have the correct mount for your TV, you choose is clear of debris that came with a UL-listed wall mount bracket rated for your TV model: Installing a TV on a wall: 1. See Appendix B - Screw Size: Screw Pitch: Hole Pattern: E231i-B1 & E241i-B1 M4 0.7mm 100mm (V) x 100mm (H) ...Be sure the mount you can scratch or damage the TV. 3. Use only with your mount. Attach your TV and wall mount to your TV. 2. To prevent injury or damage to the TV, ask someone to find the appropriate ...
...that you have the correct mount for your TV, you choose is clear of debris that came with a UL-listed wall mount bracket rated for your TV model: Installing a TV on a wall: 1. See Appendix B - Screw Size: Screw Pitch: Hole Pattern: E231i-B1 & E241i-B1 M4 0.7mm 100mm (V) x 100mm (H) ...Be sure the mount you can scratch or damage the TV. 3. Use only with your mount. Attach your TV and wall mount to your TV. 2. To prevent injury or damage to the TV, ask someone to find the appropriate ...

Download
Page 14
INPUT - Press to turn TV off or on. Press and hold to change input source. 8 SIDE PANEL 2 POWER -
INPUT - Press to turn TV off or on. Press and hold to change input source. 8 SIDE PANEL 2 POWER -

Download
Page 15
The power indicator lights up for a few seconds when the TV is powered on page 49. 9 FRONT PANEL To keep the power indicator on when the TV is installed, the remote must be at this sensor. 2 FRONT PANEL REMOTE SENSOR & POWER INDICATOR When using the remote, aim it directly at or above the level of the sensor. If the base is on, see Turning the Power Indicator On or Off on .
The power indicator lights up for a few seconds when the TV is powered on page 49. 9 FRONT PANEL To keep the power indicator on when the TV is installed, the remote must be at this sensor. 2 FRONT PANEL REMOTE SENSOR & POWER INDICATOR When using the remote, aim it directly at or above the level of the sensor. If the base is on, see Turning the Power Indicator On or Off on .

Download
Page 16
... the on -screen menu. Plus Dock. VOLUME UP/DOWN Increase or decrease loudness of the audio. MENU Display the on -screen menu. POWER Turn the TV on or off or on. CHANNEL UP/DOWN Change the channel. DASH Use with number pad to the previous on -screen menu. A/V CONTROLS Control USB...
... the on -screen menu. Plus Dock. VOLUME UP/DOWN Increase or decrease loudness of the audio. MENU Display the on -screen menu. POWER Turn the TV on or off or on. CHANNEL UP/DOWN Change the channel. DASH Use with number pad to the previous on -screen menu. A/V CONTROLS Control USB...

Download
Page 18
Connect the appropriate cable (not included) to match the connection you used to display output from most devices. 1. BACK OF TV 12 3 Cable/Satellite Box DVD/Blu-ray Player Game Console HDMI CABLE BEST • DIGITAL • HD VIDEO (1080p)* • HD AUDIO ...(480i)* • STEREO AUDIO * Maximum Resolution Turn the TV and your device has a video port that matches an available port on . Set the TV's input to the TV and the device. 4. Verify that your device on the TV (HDMI, Component, etc). 2. Turn the TV and your device off. 3. Connecting Your Devices CONNECTING A ...
Connect the appropriate cable (not included) to match the connection you used to display output from most devices. 1. BACK OF TV 12 3 Cable/Satellite Box DVD/Blu-ray Player Game Console HDMI CABLE BEST • DIGITAL • HD VIDEO (1080p)* • HD AUDIO ...(480i)* • STEREO AUDIO * Maximum Resolution Turn the TV and your device has a video port that matches an available port on . Set the TV's input to the TV and the device. 4. Verify that your device on the TV (HDMI, Component, etc). 2. Turn the TV and your device off. 3. Connecting Your Devices CONNECTING A ...

Download
Page 19
... signals through a single connector. • Video Resolutions up to 480i • Analog Connection • Audio and Video Signals • HD Video Resolutions up to your TV. AUDIO AND VIDEO CABLE TYPES AV CABLE AV cables (or Composite cables) are the traditional way of connecting your devices to 1080i • Analog Connection...
... signals through a single connector. • Video Resolutions up to 480i • Analog Connection • Audio and Video Signals • HD Video Resolutions up to your TV. AUDIO AND VIDEO CABLE TYPES AV CABLE AV cables (or Composite cables) are the traditional way of connecting your devices to 1080i • Analog Connection...

Download
Page 21
CONNECTING A COMPUTER Your TV can be used to match the resolution of your TV as a PC display: 1. Connect a VGA cable (not included) to your PC and the RGB port on the back of the TV. Connect a 3.5mm cable (not included) to your PC and the PC Audio In port on the back of the TV. This cable transmits video. 2. See Appendix B - Specifications. 3 Personal Computer AUDIO 3.5mm Cable VIDEO VGA Cable 15 To use your TV. This cable transmits audio. 3. Set your PC's resolution to display output from a personal computer.
CONNECTING A COMPUTER Your TV can be used to match the resolution of your TV as a PC display: 1. Connect a VGA cable (not included) to your PC and the RGB port on the back of the TV. Connect a 3.5mm cable (not included) to your PC and the PC Audio In port on the back of the TV. This cable transmits video. 2. See Appendix B - Specifications. 3 Personal Computer AUDIO 3.5mm Cable VIDEO VGA Cable 15 To use your TV. This cable transmits audio. 3. Set your PC's resolution to display output from a personal computer.

Download
Page 22
... your device on the TV (HDMI or RCA). 2. Verify that your device has a video port that matches an available port on . 3 Home Audio Receiver VIZIO Sound Bar BACK OF TV HDMI CABLE BEST • CEC 2-WAY COMMUNICATION • 2.0-5.1 DIGITAL AUDIO • PCM, DTS, DOLBY DIGITAL 3.5MM... CABLE GOOD • ANALOG STEREO CONNECTION • 2.0 CHANNEL 16 Turn the TV and your audio device off. 3. Connect...
... your device on the TV (HDMI or RCA). 2. Verify that your device has a video port that matches an available port on . 3 Home Audio Receiver VIZIO Sound Bar BACK OF TV HDMI CABLE BEST • CEC 2-WAY COMMUNICATION • 2.0-5.1 DIGITAL AUDIO • PCM, DTS, DOLBY DIGITAL 3.5MM... CABLE GOOD • ANALOG STEREO CONNECTION • 2.0 CHANNEL 16 Turn the TV and your audio device off. 3. Connect...

Download
Page 23
... Connection • Audio and Video Signals 3.5mm ANALOG AUDIO/ HEADPHONE JACK HDMI HDMI GOOD 17 BEST 3 CONNECTING AN AUDIO DEVICE - Audio Return Channel-enabled (ARC) TVs allow audio to your devices to be sent over a single cable.
... Connection • Audio and Video Signals 3.5mm ANALOG AUDIO/ HEADPHONE JACK HDMI HDMI GOOD 17 BEST 3 CONNECTING AN AUDIO DEVICE - Audio Return Channel-enabled (ARC) TVs allow audio to your devices to be sent over a single cable.

Download
Page 24
...ray Player 18 Your Blu-ray Player ARC Without HDMI ARC With HDMI ARC Built-in Tuner Built-in Tuner VIZIO Internet Apps Plus Without an HDMI ARC setup, your TV will transmit audio signals to and from the built-in tuner and VIA apps to your home audio receiver through... a separate audio connection. 3.5mm (Audio) Your TV HDMI Your Home Audio Receiver HDMI VIZIO Internet Apps Plus Your TV HDMI With an HDMI ARC setup, the audio connection between your TV with an all-digital audio/video connection. The HDMI cable will transmit audio signals from...
...ray Player 18 Your Blu-ray Player ARC Without HDMI ARC With HDMI ARC Built-in Tuner Built-in Tuner VIZIO Internet Apps Plus Without an HDMI ARC setup, your TV will transmit audio signals to and from the built-in tuner and VIA apps to your home audio receiver through... a separate audio connection. 3.5mm (Audio) Your TV HDMI Your Home Audio Receiver HDMI VIZIO Internet Apps Plus Your TV HDMI With an HDMI ARC setup, the audio connection between your TV with an all-digital audio/video connection. The HDMI cable will transmit audio signals from...


