Download
Page 1
...requires a stable high-speed Internet connection to eliminate interruptions in the video stream. What should my Internet connection be connected to : 1. Your VIZIO smart device may need to your connection speed is 1.5mbps or higher, you are two ways that your Internet Service Provider (ISP). See ...the device's user manual for the most reliable connection and the best performance. Try switching the setting to a lower quality to avoid freezing and re-buffering. ...
...requires a stable high-speed Internet connection to eliminate interruptions in the video stream. What should my Internet connection be connected to : 1. Your VIZIO smart device may need to your connection speed is 1.5mbps or higher, you are two ways that your Internet Service Provider (ISP). See ...the device's user manual for the most reliable connection and the best performance. Try switching the setting to a lower quality to avoid freezing and re-buffering. ...

Download
Page 3
...instructions. • Keep these instructions in electric shock or fire.To prevent your VIZIO product at (877) 878-4946. WHEN READING THIS MANUAL When you to protect your investment beyond the standard warranty, VIZIO offers on-site extended warranty service plans. Install in accordance with one wider than... reference. • To reduce the risk of important operating instructions. To purchase an extended warranty service plan, visit www.VIZIO.com. If the provided plug does not fit into your outlet, consult an electrician for your TV. Welcome THANK YOU ...
...instructions. • Keep these instructions in electric shock or fire.To prevent your VIZIO product at (877) 878-4946. WHEN READING THIS MANUAL When you to protect your investment beyond the standard warranty, VIZIO offers on-site extended warranty service plans. Install in accordance with one wider than... reference. • To reduce the risk of important operating instructions. To purchase an extended warranty service plan, visit www.VIZIO.com. If the provided plug does not fit into your outlet, consult an electrician for your TV. Welcome THANK YOU ...
Download
Page 7
... 32 Enabling and Disabling the Screen Saver 32 Blanking the Screen 33 Using the Network Connection Menu 33 Connecting to a Wireless Network 33 Changing the Manual Setup Settings 34 Finding MAC Addresses for Network Setup 34 Connecting to a Hidden Network 35 Setting Up the Tuner 35 Selecting a Tuner Input 36 Scanning...
... 32 Enabling and Disabling the Screen Saver 32 Blanking the Screen 33 Using the Network Connection Menu 33 Connecting to a Wireless Network 33 Changing the Manual Setup Settings 34 Finding MAC Addresses for Network Setup 34 Connecting to a Hidden Network 35 Setting Up the Tuner 35 Selecting a Tuner Input 36 Scanning...

Download
Page 16
... mode. ARROW Navigate the on -screen menu. V BUTTON Open the V.I.A. DASH Use with number pad to the channel last viewed. Plus Dock. LAST Return to manually enter a digital sub-channel. (For example, 18-4 or 18-5.) REMOTE CONTROL 10 INPUT Change the currently-displayed input. MENU Display the on -screen menu. CHANNEL.... CLOSED CAPTIONS Open the closed caption menu. OK Select the highlighted menu option. VOLUME UP/DOWN Increase or decrease loudness of the audio. NUMBER PAD Manually enter a channel. GUIDE Display the info window.
... mode. ARROW Navigate the on -screen menu. V BUTTON Open the V.I.A. DASH Use with number pad to the channel last viewed. Plus Dock. LAST Return to manually enter a digital sub-channel. (For example, 18-4 or 18-5.) REMOTE CONTROL 10 INPUT Change the currently-displayed input. MENU Display the on -screen menu. CHANNEL.... CLOSED CAPTIONS Open the closed caption menu. OK Select the highlighted menu option. VOLUME UP/DOWN Increase or decrease loudness of the audio. NUMBER PAD Manually enter a channel. GUIDE Display the info window.

Download
Page 28
... Captioning • Name Inputs • Adjust TV settings • Access the Guided Setup • Access the User Manual VIZIO TV SETTINGS Picture Audio Timers Network Tuner CC Closed Captions Devices System Guided Setup User Manual NAVIGATING THE ON-SCREEN MENU To open the on the remote. Wide Zoom Normal Panoramic While navigating the...
... Captioning • Name Inputs • Adjust TV settings • Access the Guided Setup • Access the User Manual VIZIO TV SETTINGS Picture Audio Timers Network Tuner CC Closed Captions Devices System Guided Setup User Manual NAVIGATING THE ON-SCREEN MENU To open the on the remote. Wide Zoom Normal Panoramic While navigating the...
Download
Page 31
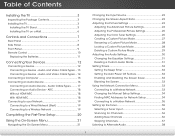
... Timer Tint - To reduce video delay (lag) when gaming, use the Left/Right Arrow buttons to values that does not otherwise exist. 5. To manually change the picture mode: VIZIO PICTURE Picture Mode Backlight - Adjusts the LED brightness to distinguish in a dark room. • Vivid mode sets the picture settings to adjust the...
... Timer Tint - To reduce video delay (lag) when gaming, use the Left/Right Arrow buttons to values that does not otherwise exist. 5. To manually change the picture mode: VIZIO PICTURE Picture Mode Backlight - Adjusts the LED brightness to distinguish in a dark room. • Vivid mode sets the picture settings to adjust the...

Download
Page 33
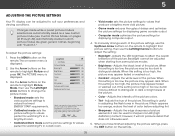
...color bar, flat, and ramp test patterns. Adjusting the Color Tuner Settings The Color Tuner settings allow you to change the setting: VIZIO PROFESSIONAL PICTURE Color Tuner Rename Picture Mode Create Picture Mode Lock Picture Mode Delete Picture Mode • Color Tuner - To adjust the... HSB color settings: 1. From the PROFESSIONAL PICTURE menu, use the Arrow buttons to manually calibrate the TV. The PROFESSIONAL PICTURE menu is displayed. Create a custom picture mode. • Lock Picture Mode - Inputs assigned to that ...
...color bar, flat, and ramp test patterns. Adjusting the Color Tuner Settings The Color Tuner settings allow you to change the setting: VIZIO PROFESSIONAL PICTURE Color Tuner Rename Picture Mode Create Picture Mode Lock Picture Mode Delete Picture Mode • Color Tuner - To adjust the... HSB color settings: 1. From the PROFESSIONAL PICTURE menu, use the Arrow buttons to manually calibrate the TV. The PROFESSIONAL PICTURE menu is displayed. Create a custom picture mode. • Lock Picture Mode - Inputs assigned to that ...

Download
Page 36
.... 3. Selecting a color immediately shows that color ramp. -or- The CREATE PICTURE MODE menu is created automatically whenever picture settings are finished, press the EXIT button. VIZIO CREATE PICTURE MODE Custom1_ abc def ghi j k l mn o p q r s t u v wx y z 0 123456789 .@# .com Space Done 4. Use the Left/Right ...video sources. • Custom picture modes can have up to enter a name for the ramp test pattern. To create a custom picture mode manually: 1. From the PROFESSIONAL PICTURE menu, use the Arrow buttons to highlight Off. 3. To hide the Ramp Test Pattern, use when it was...
.... 3. Selecting a color immediately shows that color ramp. -or- The CREATE PICTURE MODE menu is created automatically whenever picture settings are finished, press the EXIT button. VIZIO CREATE PICTURE MODE Custom1_ abc def ghi j k l mn o p q r s t u v wx y z 0 123456789 .@# .com Space Done 4. Use the Left/Right ...video sources. • Custom picture modes can have up to enter a name for the ramp test pattern. To create a custom picture mode manually: 1. From the PROFESSIONAL PICTURE menu, use the Arrow buttons to highlight Off. 3. To hide the Ramp Test Pattern, use when it was...

Download
Page 42
... your wireless network displayed, highlight More Access Points and press OK. From the NETWORK menu, highlight Manual Setup and VIZIO press OK. To change the settings manually, use the Arrow buttons on the remote. 36 The IP address assigned to adjust each setting: .... Your alternate domain name server 4. DNS Server Alt. VIZIO NETWORK Wired Connection Disconnected Wireless Access Points More Access Points WPS Manual Setup Hidden Network Test Connection 6. Network Settings Help 5. Changing the Manual Setup Settings Advanced users can fine-tune the network settings using...
... your wireless network displayed, highlight More Access Points and press OK. From the NETWORK menu, highlight Manual Setup and VIZIO press OK. To change the settings manually, use the Arrow buttons on the remote. 36 The IP address assigned to adjust each setting: .... Your alternate domain name server 4. DNS Server Alt. VIZIO NETWORK Wired Connection Disconnected Wireless Access Points More Access Points WPS Manual Setup Hidden Network Test Connection 6. Network Settings Help 5. Changing the Manual Setup Settings Advanced users can fine-tune the network settings using...

Download
Page 43
This is used to connect to a wireless network whose network name (SSID) is not being broadcast: 1. VIZIO ENTER ACCESS POINT NAME Enter your network connection. 3. To find the TV's MAC address: 1. Find the MAC address for the TV at the bottom of ... the connection method, network name, signal strength, and download speed of the list. Press the EXIT button on the remote. From the NETWORK menu, highlight Manual Setup and press OK. The Wireless (WiFi) MAC address may be needed to connect your TV to enter the TV's MAC address in use are...
This is used to connect to a wireless network whose network name (SSID) is not being broadcast: 1. VIZIO ENTER ACCESS POINT NAME Enter your network connection. 3. To find the TV's MAC address: 1. Find the MAC address for the TV at the bottom of ... the connection method, network name, signal strength, and download speed of the list. Press the EXIT button on the remote. From the NETWORK menu, highlight Manual Setup and press OK. The Wireless (WiFi) MAC address may be needed to connect your TV to enter the TV's MAC address in use are...

Download
Page 44
... Cancel 3. To perform an Auto Channel Scan: VIZIO 1. 5 SETTING UP THE TUNER You can use the TV's Tuner menu to: • Select a Tuner Input • Perform an Auto Channel Scan • Perform a Partial Channel Scan • Manually Add Channels • Select channels to skip &#...8226; Select Analog MTS modes • Select Digital Languages VIZIO TUNER Tuner Mode Auto Channel Scan Partial Channel Search Add Analog Channel Skip Channel Analog ...
... Cancel 3. To perform an Auto Channel Scan: VIZIO 1. 5 SETTING UP THE TUNER You can use the TV's Tuner menu to: • Select a Tuner Input • Perform an Auto Channel Scan • Perform a Partial Channel Scan • Manually Add Channels • Select channels to skip &#...8226; Select Analog MTS modes • Select Digital Languages VIZIO TUNER Tuner Mode Auto Channel Scan Partial Channel Search Add Analog Channel Skip Channel Analog ...
Download
Page 48
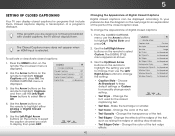
...the text. • Text Opacity - If the program you are viewing is displayed. 2. Press the MENU button on the remote to select On or Off. 4. VIZIO CLOSED CAPTIONS Closed Captions Off Analog Closed Captions CC1 Digital Closed Captions CS1 Digital Style As Broadcast 3. Closed captions display a transcription of digital closed captions...the Up/Down Arrow buttons on the remote to display, then press EXIT. From the CLOSED CAPTIONS menu, use the Left/ Right Arrow buttons to manually change , then use the Arrow buttons to highlight Closed Captions and press OK.
...the text. • Text Opacity - If the program you are viewing is displayed. 2. Press the MENU button on the remote to select On or Off. 4. VIZIO CLOSED CAPTIONS Closed Captions Off Analog Closed Captions CC1 Digital Closed Captions CS1 Digital Style As Broadcast 3. Closed captions display a transcription of digital closed captions...the Up/Down Arrow buttons on the remote to display, then press EXIT. From the CLOSED CAPTIONS menu, use the Left/ Right Arrow buttons to manually change , then use the Arrow buttons to highlight Closed Captions and press OK.

Download
Page 55
... on the front of your TV normally does not glow when the TV is displayed. 2. The on the remote to determine if your device's user manual for details. Not all HDMI devices support CEC. Use this setting if you must select Enable. • System Audio Control -
... on the front of your TV normally does not glow when the TV is displayed. 2. The on the remote to determine if your device's user manual for details. Not all HDMI devices support CEC. Use this setting if you must select Enable. • System Audio Control -

Download
Page 68
... the Audio Settings on page 33. • Ensure the speakers are set to On. • Ensure no image on page 33. Ensure your device's user manual for Channels on page 38. See Adjusting the Audio Settings on the screen. • Ensure all devices are securely attached. 62
... the Audio Settings on page 33. • Ensure the speakers are set to On. • Ensure no image on page 33. Ensure your device's user manual for Channels on page 38. See Adjusting the Audio Settings on the screen. • Ensure all devices are securely attached. 62

Download
Page 5
... the display mode. MENU Display the on -screen menu. GUIDE Display the info window. MUTE Turn the audio off . NUMBER PAD Manually enter a channel. V BUTTON Open the VIZIO Internet Apps Plus® dock. LAST Return to the previous on-screen menu. POWER Turn TV on or off or on -screen ...menu. BACK Go to the channel last viewed. DASH Use with number pad to manually enter a digital sub-channel. (For example, 18-4 or...
... the display mode. MENU Display the on -screen menu. GUIDE Display the info window. MUTE Turn the audio off . NUMBER PAD Manually enter a channel. V BUTTON Open the VIZIO Internet Apps Plus® dock. LAST Return to the previous on-screen menu. POWER Turn TV on or off or on -screen ...menu. BACK Go to the channel last viewed. DASH Use with number pad to manually enter a digital sub-channel. (For example, 18-4 or...

Download
Page 12
Highlight User Manual and press OK. VIEWING THE ON-SCREEN USER MANUAL 1 2 MENU Button VIZIO TV SETTINGS Picture Audio Timers Network Tuner CC Closed Captions Devices System Guided Setup User Manual Wide Zoom Normal Panoramic Exit 2D 3D ABC User Input Wide CC Manual Sleep Timer Picture Audio Network Settings Help Press the MENU button on the Remote Control to display the TV SETTINGS menu.
Highlight User Manual and press OK. VIEWING THE ON-SCREEN USER MANUAL 1 2 MENU Button VIZIO TV SETTINGS Picture Audio Timers Network Tuner CC Closed Captions Devices System Guided Setup User Manual Wide Zoom Normal Panoramic Exit 2D 3D ABC User Input Wide CC Manual Sleep Timer Picture Audio Network Settings Help Press the MENU button on the Remote Control to display the TV SETTINGS menu.

Download
Page 13
USER MANUAL USE YOUR REMOTE Previous Page Next Page Menu Open TV Menu PAGE NUMBER 1 OF 53 To skip to browse through the pages in each chapter. ... Connecting your Devices Completing the First-Time Setup Using the On-Screen Menu Using the USB Media Player Using VIZIO Internet Apps Troubleshooting & Technical Support Specifications Limited Warranty Legal & Compliance LCD HDTV WITH VIZIO INTERNET APPS® Use the Up and Down Arrow buttons to select the chapter you want to exit...
USER MANUAL USE YOUR REMOTE Previous Page Next Page Menu Open TV Menu PAGE NUMBER 1 OF 53 To skip to browse through the pages in each chapter. ... Connecting your Devices Completing the First-Time Setup Using the On-Screen Menu Using the USB Media Player Using VIZIO Internet Apps Troubleshooting & Technical Support Specifications Limited Warranty Legal & Compliance LCD HDTV WITH VIZIO INTERNET APPS® Use the Up and Down Arrow buttons to select the chapter you want to exit...
Download
Page 14
... a wireless network you will need: Wireless Router High-speed Internet connection SSID (Wireless network name) Network Password VIZIO TV SETTINGS Picture Audio Timers Network Tuner CC Closed Captions Devices System Guided Setup User Manual Wide VIZIO GUIDED SETUP ZoToumner SeNtuoprmal Panoramic Network Setup Exit 2D 3D ABC Input Wide CC Sleep Timer Picture...
... a wireless network you will need: Wireless Router High-speed Internet connection SSID (Wireless network name) Network Password VIZIO TV SETTINGS Picture Audio Timers Network Tuner CC Closed Captions Devices System Guided Setup User Manual Wide VIZIO GUIDED SETUP ZoToumner SeNtuoprmal Panoramic Network Setup Exit 2D 3D ABC Input Wide CC Sleep Timer Picture...

Download
Page 15
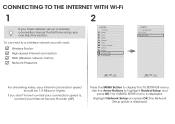
For more information, see your SSID, you will need to your network, check your router placement. If you are broadcasting at 2.4GHz. It should be in a place with minimal structural interference like walls or large metal objects, and away from any other devices that are having trouble connecting to enter it manually. Using the on-screen keyboard, enter your wireless network (this is the network's SSID) and press OK. 3 Highlight the name of your network's password, then highlight Connect and press OK. If you do not see the TV's User Manual.
For more information, see your SSID, you will need to your network, check your router placement. If you are broadcasting at 2.4GHz. It should be in a place with minimal structural interference like walls or large metal objects, and away from any other devices that are having trouble connecting to enter it manually. Using the on-screen keyboard, enter your wireless network (this is the network's SSID) and press OK. 3 Highlight the name of your network's password, then highlight Connect and press OK. If you do not see the TV's User Manual.

