Download
Page 5
... the cord and cause fire or electric shock. Do not expose batteries to do so. Your TV is exposed to leak which can damage the remote control or injure the operator. If any object drops into your dealer immediately. The performance of your TV in accordance with arrowhead symbol within the...
... the cord and cause fire or electric shock. Do not expose batteries to do so. Your TV is exposed to leak which can damage the remote control or injure the operator. If any object drops into your dealer immediately. The performance of your TV in accordance with arrowhead symbol within the...

Download
Page 7
... 3 Inspecting the Package Contents 3 Installing the TV 3 Installing the TV Stand 3 Installing the TV on a Wall 6 Controls and Connections 7 Rear Panel 7 Side Panel 8 Front Panel 9 Remote Control 10 Replacing the Batteries 11 Connecting Your Devices 12 Connecting A Device 12 Connecting a Device -
... 3 Inspecting the Package Contents 3 Installing the TV 3 Installing the TV Stand 3 Installing the TV on a Wall 6 Controls and Connections 7 Rear Panel 7 Side Panel 8 Front Panel 9 Remote Control 10 Replacing the Batteries 11 Connecting Your Devices 12 Connecting A Device 12 Connecting a Device -
Download
Page 9
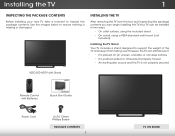
Remote Control with Stand INPUT EXIT BACK OK VOL VOL 1 2 4 5 7 8 WIDE 0 MENU GUIDE CH CH 3 6 9 - INSTALLING THE TV After removing the TV from falling over if: &#... can still fall over . Installing the TV 1 INSPECTING THE PACKAGE CONTENTS Before installing your new TV, take a moment to ensure nothing is not properly secured VIZIO LED HDTV with Batteries Quick Start Guide Power Cord 4 x T4 12mm Phillips Screw PACKAGE CONTENTS 3 TV ON STAND However, the TV can begin installing the...
Remote Control with Stand INPUT EXIT BACK OK VOL VOL 1 2 4 5 7 8 WIDE 0 MENU GUIDE CH CH 3 6 9 - INSTALLING THE TV After removing the TV from falling over if: &#... can still fall over . Installing the TV 1 INSPECTING THE PACKAGE CONTENTS Before installing your new TV, take a moment to ensure nothing is not properly secured VIZIO LED HDTV with Batteries Quick Start Guide Power Cord 4 x T4 12mm Phillips Screw PACKAGE CONTENTS 3 TV ON STAND However, the TV can begin installing the...

Download
Page 15
To keep the power indicator on as long as the TV is on, see Turning the Power Indicator On or Off on , then goes out after several seconds. The power indicator flashes on when the TV turns on page 37. 9 FRONT PANEL 2 FRONT PANEL REMOTE SENSOR & POWER INDICATOR When using the remote, aim it directly at this sensor.
To keep the power indicator on as long as the TV is on, see Turning the Power Indicator On or Off on , then goes out after several seconds. The power indicator flashes on when the TV turns on page 37. 9 FRONT PANEL 2 FRONT PANEL REMOTE SENSOR & POWER INDICATOR When using the remote, aim it directly at this sensor.

Download
Page 16
... VOL VOL 1 2 4 5 7 8 WIDE 0 MENU GUIDE CH CH 3 6 9 - GUIDE Display the info window. LAST Return to manually enter a digital sub-channel. (For example, 18-4 or 18-5.) REMOTE CONTROL 10 POWER Turn TV on or off or on. BACK Go to the previous on -screen menu. CHANNEL UP/DOWN Change the channel. EXIT...
... VOL VOL 1 2 4 5 7 8 WIDE 0 MENU GUIDE CH CH 3 6 9 - GUIDE Display the info window. LAST Return to manually enter a digital sub-channel. (For example, 18-4 or 18-5.) REMOTE CONTROL 10 POWER Turn TV on or off or on. BACK Go to the previous on -screen menu. CHANNEL UP/DOWN Change the channel. EXIT...

Download
Page 17
Make sure that the (+) and (-) symbols on the batteries match the (+) and (-) symbols inside the battery compartment. 3. Insert two batteries into the remote control. Replace the battery cover. 11 Remove the battery cover. 2. 2 Replacing the Batteries 1.
Make sure that the (+) and (-) symbols on the batteries match the (+) and (-) symbols inside the battery compartment. 3. Insert two batteries into the remote control. Replace the battery cover. 11 Remove the battery cover. 2. 2 Replacing the Batteries 1.
Download
Page 25
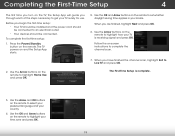
...VOL Choose your time zone and press OK. Magasin. Store Mode Home Mode 1 2 3 4 5 6 7 8 9 WIDE 0 - 5. Use the Arrow buttons on the remote to set whether daylight saving time applies in your TV ready for in -home use . Select Home Use for in -store display. VOL Seleccione "Home... an electrical outlet. • Your devices should be connected. To complete the first-time setup: 1. The TV powers on the remote. Follow the on the remote to complete the channel scan. 7. CH Select Store Demo for use . INPUT EXIT MENU OK BACK GUIDE 2. Before you are ...
...VOL Choose your time zone and press OK. Magasin. Store Mode Home Mode 1 2 3 4 5 6 7 8 9 WIDE 0 - 5. Use the Arrow buttons on the remote to set whether daylight saving time applies in your TV ready for in -home use . Select Home Use for in -store display. VOL Seleccione "Home... an electrical outlet. • Your devices should be connected. To complete the first-time setup: 1. The TV powers on the remote. Follow the on the remote to complete the channel scan. 7. CH Select Store Demo for use . INPUT EXIT MENU OK BACK GUIDE 2. Before you are ...
Download
Page 26
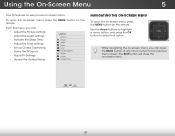
...to the previous menu screen. Input Wide CC Sleep Timer Picture Audio Network Settings Help 20 Wide Zoom Normal Panoramic While navigating the on the remote. Use the Arrow buttons to highlight a menu option, and press the OK button to -use on-screen menu. The EXIT button will ... Adjust the Tuner settings • Set up Closed Captioning • Name the TV Inputs • Adjust TV Settings • Access the Guided Setup VIZIO SETTINGS Picture Audio Timers Tuner CC Closed Captions Devices System Guided Setup NAVIGATING THE ON-SCREEN MENU To open the on-screen menu, press the...
...to the previous menu screen. Input Wide CC Sleep Timer Picture Audio Network Settings Help 20 Wide Zoom Normal Panoramic While navigating the on the remote. Use the Arrow buttons to highlight a menu option, and press the OK button to -use on-screen menu. The EXIT button will ... Adjust the Tuner settings • Set up Closed Captioning • Name the TV Inputs • Adjust TV Settings • Access the Guided Setup VIZIO SETTINGS Picture Audio Timers Tuner CC Closed Captions Devices System Guided Setup NAVIGATING THE ON-SCREEN MENU To open the on-screen menu, press the...
Download
Page 27
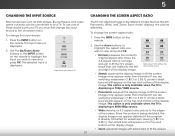
... the picture is displaying a 720p/1080i source. • Panoramic expands the display image to view and press OK. Press the INPUT button on the remote. 2. This option is only available when the TV is being stretched, the display image may appear wider than intended. To use one of the display... top and bottom of the display image. Each mode displays the picture differently. To change the input device: 1. Press the WIDE button on the remote. Since the 4:3 aspect ratio is not large enough to fill the TV's screen, black bars are added to the left and right of these ...
... the picture is displaying a 720p/1080i source. • Panoramic expands the display image to view and press OK. Press the INPUT button on the remote. 2. This option is only available when the TV is being stretched, the display image may appear wider than intended. To use one of the display... top and bottom of the display image. Each mode displays the picture differently. To change the input device: 1. Press the WIDE button on the remote. Since the 4:3 aspect ratio is not large enough to fill the TV's screen, black bars are added to the left and right of these ...
Download
Page 28
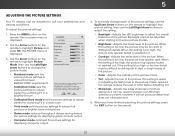
...to highlight Picture and press OK. Sharpness - Standard picture mode meets ENERGY STAR® requirements. Use the Arrow buttons on the remote. 22 Adjusts the LED brightness to change each of color before adjusting tint. • Sharpness - Exit 2D 3D • ...in the picture. To manually change the picture mode: VIZIO PICTURE Picture Mode Backlight - To adjust the picture settings: 1. Press the MENU button on the remote to adjust the setting: • Backlight - The on the remote to highlight that does not otherwise exist. 5. Tint ...
...to highlight Picture and press OK. Sharpness - Standard picture mode meets ENERGY STAR® requirements. Use the Arrow buttons on the remote. 22 Adjusts the LED brightness to change each of color before adjusting tint. • Sharpness - Exit 2D 3D • ...in the picture. To manually change the picture mode: VIZIO PICTURE Picture Mode Backlight - To adjust the picture settings: 1. Press the MENU button on the remote to adjust the setting: • Backlight - The on the remote to highlight that does not otherwise exist. 5. Tint ...
Download
Page 29
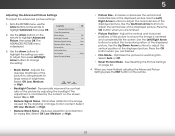
... Picture Size 3. Adjust the vertical and horizontal positions of the displayed picture. Use the Arrow buttons on the Black Detail Off remote to adjust the vertical position of image motion content. Select Off, Low, Medium, or High. • Picture Size -...8226; Backlight Control - Increase or decrease the vertical and horizontal size of the picture to VIZIO highlight Advanced, then press OK. See Resetting the Picture Settings on the remote to ensure the image is displayed. STliWm eeehpr enPyicotuurehavAeudfiionished adjusting the Advanced Picture Settings, press ...
... Picture Size 3. Adjust the vertical and horizontal positions of the displayed picture. Use the Arrow buttons on the Black Detail Off remote to adjust the vertical position of image motion content. Select Off, Low, Medium, or High. • Picture Size -...8226; Backlight Control - Increase or decrease the vertical and horizontal size of the picture to VIZIO highlight Advanced, then press OK. See Resetting the Picture Settings on the remote to ensure the image is displayed. STliWm eeehpr enPyicotuurehavAeudfiionished adjusting the Advanced Picture Settings, press ...
Download
Page 30
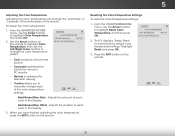
... the Arrow buttons on the remote to highlight Color Temperature, then use the Left/Right Arrow buttons to manually change the "warmness" or "coolness" of the white areas of the color temperature settings: Red/Green/Blue Gain - When you to change the color temperature preset: VIZIO COLOR TEMPERATURE Color Temperature Normal Reset...
... the Arrow buttons on the remote to highlight Color Temperature, then use the Left/Right Arrow buttons to manually change the "warmness" or "coolness" of the white areas of the color temperature settings: Red/Green/Blue Gain - When you to change the color temperature preset: VIZIO COLOR TEMPERATURE Color Temperature Normal Reset...
Download
Page 31
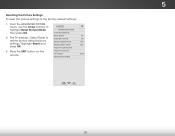
VIZIO ADVANCED PICTURE Color Temperature Black Detail Off 2. Highlight Reset and Reduce Block Noise Low press OK. Adjust Picture Position 3. Resetting the Picture Settings To reset ... Panoramic Exit 2D 3D ABC Input Wide CC Sleep Timer Picture Audio Network Settings Help 5 25 Press the EXIT button on the Adjust Picture Size remote. From the ADVANCED PICTURE menu, use the Arrow buttons to highlight Reset Picture Mode, then press OK.
VIZIO ADVANCED PICTURE Color Temperature Black Detail Off 2. Highlight Reset and Reduce Block Noise Low press OK. Adjust Picture Position 3. Resetting the Picture Settings To reset ... Panoramic Exit 2D 3D ABC Input Wide CC Sleep Timer Picture Audio Network Settings Help 5 25 Press the EXIT button on the Adjust Picture Size remote. From the ADVANCED PICTURE menu, use the Arrow buttons to highlight Reset Picture Mode, then press OK.
Download
Page 32
...- Adjusts the loudness of different frequencies. Exit 2D 3D • Reset Audio Mode - See Resetting the Audio Settings on the remote. Use the Arrow buttons to highlight the setting you wish to adjust, then press Left/Right Arrow buttons to deliver an immersive ...AUDIO SETTINGS To adjust the audio settings: 1. Press the MENU button on the remote to the factory defaults. The on or off . • Balance - Use the Arrow buttons on the remote. VIZIO AUDIO TV Speakers Surround Sound Volume Leveling Balance - TruSurround completes the entertainment experience by...
...- Adjusts the loudness of different frequencies. Exit 2D 3D • Reset Audio Mode - See Resetting the Audio Settings on the remote. Use the Arrow buttons to highlight the setting you wish to adjust, then press Left/Right Arrow buttons to deliver an immersive ...AUDIO SETTINGS To adjust the audio settings: 1. Press the MENU button on the remote to the factory defaults. The on or off . • Balance - Use the Arrow buttons on the remote. VIZIO AUDIO TV Speakers Surround Sound Volume Leveling Balance - TruSurround completes the entertainment experience by...
Download
Page 33
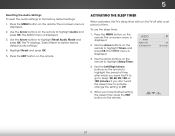
... time. The AUDIO menu is displayed. Press the MENU button on the remote. Press the EXIT button on the remote. Use the Arrow buttons on the remote. To use the sleep timer: 1. Highlight Reset and press OK. 5. The TIMERS menu is displayed. 3. VIZIO TIMERS Sleep Timer Auto Power Off Off 10 minutes 3. 5 Resetting the...
... time. The AUDIO menu is displayed. Press the MENU button on the remote. Press the EXIT button on the remote. Use the Arrow buttons on the remote. To use the sleep timer: 1. Highlight Reset and press OK. 5. The TIMERS menu is displayed. 3. VIZIO TIMERS Sleep Timer Auto Power Off Off 10 minutes 3. 5 Resetting the...
Download
Page 34
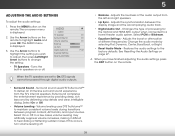
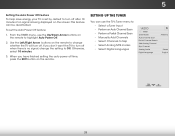
This feature can use the Up/Down Arrow buttons on the remote. From the TIMER menu, use the TV's Tuner menu to: • Select a Tuner Input • Perform an Auto Channel Scan • Perform a Partial Channel Scan &#... setting the auto power off time, press the EXIT button on the remote to turn off when there is being displayed on the remote to change the setting to Skip • Select Analog MTS modes • Select Digital Languages VIZIO TUNER Tuner Mode Auto Channel Scan Partial Channel Search Add Analog Channel Skip...
This feature can use the Up/Down Arrow buttons on the remote. From the TIMER menu, use the TV's Tuner menu to: • Select a Tuner Input • Perform an Auto Channel Scan • Perform a Partial Channel Scan &#... setting the auto power off time, press the EXIT button on the remote to turn off when there is being displayed on the remote to change the setting to Skip • Select Analog MTS modes • Select Digital Languages VIZIO TUNER Tuner Mode Auto Channel Scan Partial Channel Search Add Analog Channel Skip...
Download
Page 35
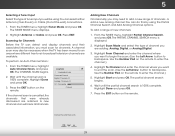
A channel scan may need to -air broadcast television channels are retained. VIZIO CHANNEL SCAN Channels Found Digital Channels: 0 Analog Channels: 0 13% Complete Cancel If the channel scan is 100% complete. A new channel scan will be necessary when ... the scan. (Use the Left Arrow button to enter the channel.) Wide Zoom Normal Panoramic 5. The partial channel search begins. 6. Press the EXITAbBCutton on the remote to backspace. Input Wide CC Sleep Timer Picture Audio Network Settings Help 29 From the TUNER menu, highlight Tuner Mode and press OK. Adding New...
A channel scan may need to -air broadcast television channels are retained. VIZIO CHANNEL SCAN Channels Found Digital Channels: 0 Analog Channels: 0 13% Complete Cancel If the channel scan is 100% complete. A new channel scan will be necessary when ... the scan. (Use the Left Arrow button to enter the channel.) Wide Zoom Normal Panoramic 5. The partial channel search begins. 6. Press the EXITAbBCutton on the remote to backspace. Input Wide CC Sleep Timer Picture Audio Network Settings Help 29 From the TUNER menu, highlight Tuner Mode and press OK. Adding New...
Download
Page 36
...There may find that have selected all of the channel you wish to view. See Locking and Unlocking ABC Channels on the remote to highlight the channel and press OK. A P appears to the right of each channel you wish NettwoorrkemSeottvineg,s useHeltphe Up/Down... the TV is completed, you have been removed with the Skip Channel feature. Channels that some channels you select. Input Wide CC To remove a channel: 1. VIZIO SKIP CHANNEL 1 Test 0 1 Test 1 P 1-2 Test 2 P 2 Test 3 2-2 Test 4 P 2-3 Test 5 3. For each channel you do not want to completely block a...
...There may find that have selected all of the channel you wish to view. See Locking and Unlocking ABC Channels on the remote to highlight the channel and press OK. A P appears to the right of each channel you wish NettwoorrkemSeottvineg,s useHeltphe Up/Down... the TV is completed, you have been removed with the Skip Channel feature. Channels that some channels you select. Input Wide CC To remove a channel: 1. VIZIO SKIP CHANNEL 1 Test 0 1 Test 1 P 1-2 Test 2 P 2 Test 3 2-2 Test 4 P 2-3 Test 5 3. For each channel you do not want to completely block a...
Download
Page 37
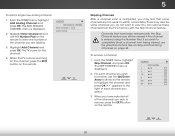
.... 3. From the TUNER menu, highlight Analog Audio and press OK. The ANALOG AUDIO menu is displayed. 2. Press the EXIT button on the remote. The DIGITAL LANGUAGE menu is displayed. 2. The Analog Audio and Digital Language features only works when the program being viewed is being broadcast in ...or Français. Wide Zoom Normal Panoramic Exit 2D 3D ABC Input Wide CC VIZIO DIGITAL LANGUAGE English Español Français Sleep Timer Picture Audio Network Settings Help 31 VIZIO ANALOG AUDIO Stereo SAP Mono To use the Analog Audio feature: 1. 5 Changing the ...
.... 3. From the TUNER menu, highlight Analog Audio and press OK. The ANALOG AUDIO menu is displayed. 2. Press the EXIT button on the remote. The DIGITAL LANGUAGE menu is displayed. 2. The Analog Audio and Digital Language features only works when the program being viewed is being broadcast in ...or Français. Wide Zoom Normal Panoramic Exit 2D 3D ABC Input Wide CC VIZIO DIGITAL LANGUAGE English Español Français Sleep Timer Picture Audio Network Settings Help 31 VIZIO ANALOG AUDIO Stereo SAP Mono To use the Analog Audio feature: 1. 5 Changing the ...
Download
Page 38
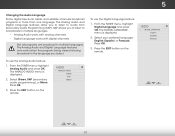
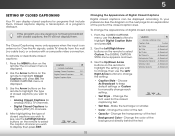
...of a program's dialogue. Closed captions display a transcription of the text. • Opacity - Press the MENU button on the remote to display, then press EXIT. Changing the Appearance of closed captions you wish Witdoe chZaoonmge, tNhoremnal usPaenotrham eicLeft/ Right Arrow buttons...closed captions you are viewing is displayed. If the program you wish to manualAlyBCchange each setting. • Input TexWt idSetyle C- VIZIO CLOSED CAPTIONS Analog Closed Captions Digital Closed Captions Digital Caption Style CC1 CS1 3. Change the transparency of the text. •...
...of a program's dialogue. Closed captions display a transcription of the text. • Opacity - Press the MENU button on the remote to display, then press EXIT. Changing the Appearance of closed captions you wish Witdoe chZaoonmge, tNhoremnal usPaenotrham eicLeft/ Right Arrow buttons...closed captions you are viewing is displayed. If the program you wish to manualAlyBCchange each setting. • Input TexWt idSetyle C- VIZIO CLOSED CAPTIONS Analog Closed Captions Digital Closed Captions Digital Caption Style CC1 CS1 3. Change the transparency of the text. •...


