User Guide
Page 5
... apparatus shall not be exposed to dripping or splashing and no objects fill with instructions. Do not expose batteries to leak which can damage the remote control or injure the operator. Your TV is dropped or damaged in the operating instructions unless you to high voltages, electric shock, and other than that...
... apparatus shall not be exposed to dripping or splashing and no objects fill with instructions. Do not expose batteries to leak which can damage the remote control or injure the operator. Your TV is dropped or damaged in the operating instructions unless you to high voltages, electric shock, and other than that...

User Guide
Page 8
... TV Stand 3 Installing the Base 4 Removing the Base 4 Installing the TV on a Wall 5 Controls and Connections 6 Rear Panel (E191VA & E221VA 6 Rear Panel (E261VA 7 Side Panel 8 Front Panel 9 Remote Control 10 Replacing the Batteries 11 Connecting Your Devices 12 Connecting A Device (E191VA & E221VA 12 Connecting A Device (E261VA 13 Connecting A PC 14 Completing the First-Time Setup...
... TV Stand 3 Installing the Base 4 Removing the Base 4 Installing the TV on a Wall 5 Controls and Connections 6 Rear Panel (E191VA & E221VA 6 Rear Panel (E261VA 7 Side Panel 8 Front Panel 9 Remote Control 10 Replacing the Batteries 11 Connecting Your Devices 12 Connecting A Device (E191VA & E221VA 12 Connecting A Device (E261VA 13 Connecting A PC 14 Completing the First-Time Setup...
User Guide
Page 10
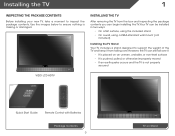
..., using a VESA-standard wall mount (not included) Installing the TV Stand Your TV includes a stand designed to ensure nothing is not properly secured VIZIO LCD HDTV Quick Start Guide Remote Control with Batteries Package Contents 3 TV on an uneven, unstable, or non-level surface • It is pushed, pulled, or otherwise improperly moved...
..., using a VESA-standard wall mount (not included) Installing the TV Stand Your TV includes a stand designed to ensure nothing is not properly secured VIZIO LCD HDTV Quick Start Guide Remote Control with Batteries Package Contents 3 TV on an uneven, unstable, or non-level surface • It is pushed, pulled, or otherwise improperly moved...
User Guide
Page 17
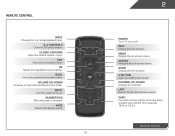
... the on -screen menu. Back Go to manually enter a digital sub-channel. (For example, 18-4 or 18-5.) Remote Control Number Pad Manually enter a channel. WIDE Switch the display mode. 10 2 Power Turn TV on . Remote Control Input Change the currently-displayed input. Guide Display the info window. Ok Select the highlighted menu option. Mute.... Dash Use with number pad to the previous on -screen menu. Last Return to the channel last viewed. Closed Captions Open the closed caption menu. A/V Controls Control USB photo viewer.
... the on -screen menu. Back Go to manually enter a digital sub-channel. (For example, 18-4 or 18-5.) Remote Control Number Pad Manually enter a channel. WIDE Switch the display mode. 10 2 Power Turn TV on . Remote Control Input Change the currently-displayed input. Guide Display the info window. Ok Select the highlighted menu option. Mute.... Dash Use with number pad to the previous on -screen menu. Last Return to the channel last viewed. Closed Captions Open the closed caption menu. A/V Controls Control USB photo viewer.

User Guide
Page 18
Make sure that may cause a fire or result in injury. • Dispose of old or dead batteries in cracking or leakage that the (+) and (-) symbols on the batteries match the (+) and (-) symbols inside the battery compartment. 3. Insert two batteries into the remote control. Replace the battery cover. • Use only good quality batteries. • Inserting the batteries incorrectly may result in accordance with local hazardous waste regulations. • Keep batteries away from children and pets. 11 2 Replacing Batteries Replacing the Batteries 1. Remove the battery cover. 2.
Make sure that may cause a fire or result in injury. • Dispose of old or dead batteries in cracking or leakage that the (+) and (-) symbols on the batteries match the (+) and (-) symbols inside the battery compartment. 3. Insert two batteries into the remote control. Replace the battery cover. • Use only good quality batteries. • Inserting the batteries incorrectly may result in accordance with local hazardous waste regulations. • Keep batteries away from children and pets. 11 2 Replacing Batteries Replacing the Batteries 1. Remove the battery cover. 2.
User Guide
Page 40
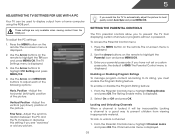
... the synchronization between the PC and the TV. To access the Parental Control menu: 1. The on the remote. The Parental Control menu is displayed. 33 Use the Arrow buttons on the remote. Fine Tune - Press the MENU button on the remote to display output from viewing inappropriate material. To lock or unlock a ...Parental icon and press MENU/OK. 3. To enable or disable the Program Rating feature: 1. The on the remote to prevent the TV from the RGB port. From the Parental Controls menu, highlight Rating Enable and press OK. Select On or Off and press OK. From the Parental...
... the synchronization between the PC and the TV. To access the Parental Control menu: 1. The on the remote. The Parental Control menu is displayed. 33 Use the Arrow buttons on the remote. Fine Tune - Press the MENU button on the remote to display output from viewing inappropriate material. To lock or unlock a ...Parental icon and press MENU/OK. 3. To enable or disable the Program Rating feature: 1. The on the remote to prevent the TV from the RGB port. From the Parental Controls menu, highlight Rating Enable and press OK. Select On or Off and press OK. From the Parental...
User Guide
Page 41
...the Lock icon appears locked. In the New Pin field, use the Number Pad on the remote to re-enter your new 4-digit parental control passcode. 4. Press the EXIT button on the remote to enter your new parental control passcode and save it in a secure location. 5. The TV displays, "Are you sure ...use the Up/Down and Left/Right Arrow buttons on the remote to prevent children from being viewed. Changing the Parental Control Passcode If you use the parental controls, you want to block or unblock, use the Arrow buttons on the remote to adjust and press OK: USA - The channel is not...
...the Lock icon appears locked. In the New Pin field, use the Number Pad on the remote to re-enter your new 4-digit parental control passcode. 4. Press the EXIT button on the remote to enter your new parental control passcode and save it in a secure location. 5. The TV displays, "Are you sure ...use the Up/Down and Left/Right Arrow buttons on the remote to prevent children from being viewed. Changing the Parental Control Passcode If you use the parental controls, you want to block or unblock, use the Arrow buttons on the remote to adjust and press OK: USA - The channel is not...
User Guide
Page 42
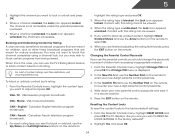
See your TV enables you must select Enable. • System Audio Control - Use the Arrow buttons on the remote. Use this function to determine if your device's audio using the TV's remote control. • Device Discovery - Press the EXIT button on the remote to highlight the Settings icon and press OK. When you can use CEC...
See your TV enables you must select Enable. • System Audio Control - Use the Arrow buttons on the remote. Use this function to determine if your device's audio using the TV's remote control. • Device Discovery - Press the EXIT button on the remote to highlight the Settings icon and press OK. When you can use CEC...

User Guide
Page 44
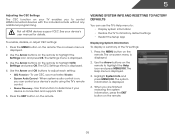
... Load your photos onto a USB thumb drive using your thumb drive is already inserted, continue with step 3. 3. The on the remote. The Photo screen is displayed. 4. Press the MENU button on -screen menu is displayed. 5. Remember: • The USB ... home computer. 2. To go to the TV 1. Insert the USB thumb drive into the USB port on the remote to highlight the Photo icon and press MENU/OK. Use the Arrow buttons on the left side of the TV...TV and play your USB media: 1. Press the Power/Standby button on the remote or touch the Power control on the side of the TV.
... Load your photos onto a USB thumb drive using your thumb drive is already inserted, continue with step 3. 3. The on the remote. The Photo screen is displayed. 4. Press the MENU button on -screen menu is displayed. 5. Remember: • The USB ... home computer. 2. To go to the TV 1. Insert the USB thumb drive into the USB port on the remote to highlight the Photo icon and press MENU/OK. Use the Arrow buttons on the left side of the TV...TV and play your USB media: 1. Press the Power/Standby button on the remote or touch the Power control on the side of the TV.

User Guide
Page 45
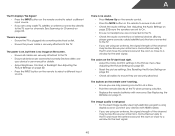
... selected folder. 6 Current Folder Displays the folder path. You can browse between files using the Arrow and OK buttons on the remote. 01/01 Photo Pause Press the Pause button on the remote control if you would like to return to the previous screen. Next Next Press the Play button on the... remote control if you would like to start the Photo Slideshow. 38 Previous EXIT Exit Previous Press the Stop button on the remote control if you would like to pause the Photo Slideshow. Exit Press the Exit button ...
... selected folder. 6 Current Folder Displays the folder path. You can browse between files using the Arrow and OK buttons on the remote. 01/01 Photo Pause Press the Pause button on the remote control if you would like to return to the previous screen. Next Next Press the Play button on the... remote control if you would like to start the Photo Slideshow. 38 Previous EXIT Exit Previous Press the Stop button on the remote control if you would like to pause the Photo Slideshow. Exit Press the Exit button ...
User Guide
Page 47
.... The image quality is no sound. • Press Volume Up on the remote control. • Press the MUTE button on the remote to ensure mute is connected securely to the TV and move the antenna around ... you are using an antenna, the signal strength of the channel may be low. The buttons on the remote aren't working electrical outlet. • Ensure the power cable is connected securely to the TV and move...TV displays "No Signal." • Press the INPUT button on the remote control to select a different input source. • If you are only pressing one button at a time. • ...
.... The image quality is no sound. • Press Volume Up on the remote control. • Press the MUTE button on the remote to ensure mute is connected securely to the TV and move the antenna around ... you are using an antenna, the signal strength of the channel may be low. The buttons on the remote aren't working electrical outlet. • Ensure the power cable is connected securely to the TV and move...TV displays "No Signal." • Press the INPUT button on the remote control to select a different input source. • If you are only pressing one button at a time. • ...
Quick Start Guide
Page 2
... install your TV close to smoke or moisture may be operated only from the apparatus. • Only use your TV cabinet. Overloading can damage the remote control or injure the operator. Liquid sprays or any smoke or odor becomes apparent, unplug the power cord and contact your TV. Do not defeat the...
... install your TV close to smoke or moisture may be operated only from the apparatus. • Only use your TV cabinet. Overloading can damage the remote control or injure the operator. Liquid sprays or any smoke or odor becomes apparent, unplug the power cord and contact your TV. Do not defeat the...

Quick Start Guide
Page 4
DOWNLOAD THE FULL USER MANUAL AT VIZIO.COM/SUPPORT PACKAGE CONTENTS LED LCD HDTV Remote Control with Batteries This Quick Start Guide HELP VIZIO REDUCE PAPER WASTE.
DOWNLOAD THE FULL USER MANUAL AT VIZIO.COM/SUPPORT PACKAGE CONTENTS LED LCD HDTV Remote Control with Batteries This Quick Start Guide HELP VIZIO REDUCE PAPER WASTE.

Quick Start Guide
Page 5
...TV on -screen menu. INFO Display the info window. V BUTTON Open the USB photo viewer. DASH Use with number pad to the channel last viewed. A/V CONTROLS Control USB media player. VOLUME UP/DOWN Increase or decrease loudness of the audio. GUIDE Display the info window. EXIT Close the on or off or... the on -screen menu. NUMBER PAD Manually enter a channel. LAST Return to manually enter a digital sub-channel. (For example, 18-4 or 18-5.) USING THE REMOTE INPUT Change the currently-displayed input. CHANNEL UP/DOWN Change the channel. WIDE Switch the display mode.
...TV on -screen menu. INFO Display the info window. V BUTTON Open the USB photo viewer. DASH Use with number pad to the channel last viewed. A/V CONTROLS Control USB media player. VOLUME UP/DOWN Increase or decrease loudness of the audio. GUIDE Display the info window. EXIT Close the on or off or... the on -screen menu. NUMBER PAD Manually enter a channel. LAST Return to manually enter a digital sub-channel. (For example, 18-4 or 18-5.) USING THE REMOTE INPUT Change the currently-displayed input. CHANNEL UP/DOWN Change the channel. WIDE Switch the display mode.


