
User Manual English
Page 2
... the Custom Audio Mode 32 Changing the DLNA Name of Digital Closed Captions 39 Deleting an App from the TV 49 Using VIZIO Internet Apps Plus® (V.I.A. ARC 17 Connecting to Your Network 18 Changing the Manual Setup Settings 34 Finding MAC Addresses for Network Setup...Changing the Input Source 22 Renaming Devices on a Wall 9 Front Panel 10 Enabling the Screen Saver 33 Blanking the Screen 33 Restoring the TV to Factory Default Settings 47 Enabling and Disabling Smart Interactivity 47 Rear Panel 11 Remote Control Front 12 Using the Network Connection Menu 34 Connecting...
... the Custom Audio Mode 32 Changing the DLNA Name of Digital Closed Captions 39 Deleting an App from the TV 49 Using VIZIO Internet Apps Plus® (V.I.A. ARC 17 Connecting to Your Network 18 Changing the Manual Setup Settings 34 Finding MAC Addresses for Network Setup...Changing the Input Source 22 Renaming Devices on a Wall 9 Front Panel 10 Enabling the Screen Saver 33 Blanking the Screen 33 Restoring the TV to Factory Default Settings 47 Enabling and Disabling Smart Interactivity 47 Rear Panel 11 Remote Control Front 12 Using the Network Connection Menu 34 Connecting...

User Manual English
Page 3
...Slots and openings in electric shock or fire. A polarized plug has two blades with the apparatus. Wait before cleaning your TV from the type of at www.VIZIO.com. Doing so could short circuit parts causing a fire or electric shock. To get the most out of low temperature ...component damage. • A distance of power source indicated on your TV to your TV. Do not install your TV close to protect your investment beyond the standard warranty, VIZIO offers on your VIZIO product, visit our website at www.VIZIO.com or call toll free at plugs, convenience receptacles, and the ...
...Slots and openings in electric shock or fire. A polarized plug has two blades with the apparatus. Wait before cleaning your TV from the type of at www.VIZIO.com. Doing so could short circuit parts causing a fire or electric shock. To get the most out of low temperature ...component damage. • A distance of power source indicated on your TV to your TV. Do not install your TV close to protect your investment beyond the standard warranty, VIZIO offers on your VIZIO product, visit our website at www.VIZIO.com or call toll free at plugs, convenience receptacles, and the ...

User Manual English
Page 4
... on the power cord may expose you are unplugged before • WARNING: Exposure to qualified service personnel. • WARNING: Keep your TV. Ensure that the presence of uninsulated DANGEROUS VOLTAGE within the humidity. This will not be of sufficient magnitude to hearing without any of age...may result in a location safely out of the reach of children. • The American Academy of Pediatrics discourages television viewing for moving your TV away from damage due to power surges. • Do not attempt to hang onto the product. • Do not touch the power ...
... on the power cord may expose you are unplugged before • WARNING: Exposure to qualified service personnel. • WARNING: Keep your TV. Ensure that the presence of uninsulated DANGEROUS VOLTAGE within the humidity. This will not be of sufficient magnitude to hearing without any of age...may result in a location safely out of the reach of children. • The American Academy of Pediatrics discourages television viewing for moving your TV away from damage due to power surges. • Do not attempt to hang onto the product. • Do not touch the power ...

User Manual English
Page 5
... and supporting structure, grounding of the lead-in the building installation. Remember, the screen of the coaxial cable is intended to be connected to the TV, make sure that the antenna or cable system is left unattended or unused for long periods of time, unplug the... TV from the wall outlet and disconnect the antenna or cable system. Lightning Protection For added protection of the TV during a lightning storm or when it could fall into such power lines or circuits. Power Lines...
... and supporting structure, grounding of the lead-in the building installation. Remember, the screen of the coaxial cable is intended to be connected to the TV, make sure that the antenna or cable system is left unattended or unused for long periods of time, unplug the... TV from the wall outlet and disconnect the antenna or cable system. Lightning Protection For added protection of the TV during a lightning storm or when it could fall into such power lines or circuits. Power Lines...
User Manual English
Page 7
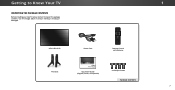
Quick Start Guide ( English, French, and Spanish) 4 x Phillips Screws PACKAGE CONTENTS 7 Use the images below to inspect the package contents. VIZIO LED HDTV Power Cord Remote Control with Batteries TV Stands VIZIO INSTALLATION GUIDE D60-D3 and D70-D3 Please read this guide before using the product. Getting to Know Your TV 1 INSPECTING THE PACKAGE CONTENTS Before installing your new TV, take a moment to ensure nothing is missing or damaged.
Quick Start Guide ( English, French, and Spanish) 4 x Phillips Screws PACKAGE CONTENTS 7 Use the images below to inspect the package contents. VIZIO LED HDTV Power Cord Remote Control with Batteries TV Stands VIZIO INSTALLATION GUIDE D60-D3 and D70-D3 Please read this guide before using the product. Getting to Know Your TV 1 INSPECTING THE PACKAGE CONTENTS Before installing your new TV, take a moment to ensure nothing is missing or damaged.

User Manual English
Page 8
...uneven, unstable, or non-level surface • It is pushed, pulled, or otherwise improperly moved • If an earthquake occurs and the TV is not properly secured To install the stands: It is for illustrative purposes only and may vary, depending on the model. 8 To prevent scratches...installed in the base installation. Insert the screws into the base of the TV and tighten them using a VESA-standard wall mount (not included) Installing the TV Stand Your TV includes a stand designed to the screen, place the TV on a clean, flat surface. Note: The image shown here is ...
...uneven, unstable, or non-level surface • It is pushed, pulled, or otherwise improperly moved • If an earthquake occurs and the TV is not properly secured To install the stands: It is for illustrative purposes only and may vary, depending on the model. 8 To prevent scratches...installed in the base installation. Insert the screws into the base of the TV and tighten them using a VESA-standard wall mount (not included) Installing the TV Stand Your TV includes a stand designed to the screen, place the TV on a clean, flat surface. Note: The image shown here is ...

User Manual English
Page 9
...to help you will need a wall mount. Place the TV face-down on a wall, you . To prevent injury or damage to the TV, ask someone to find the appropriate mount for the weight/load of debris that came with your mount. D60-D3 D70-D3 Screw Size: M6 Hole Pattern: 400mm (V) x 400mm... (H) Weight w/o Stand: 41.47 lbs M6 400mm (V) x 400mm (H) 56.49 lbs Be sure the mount you may want to your TV. 2. To install your TV model: Installing a TV on a wall: 1. Use only with right...
...to help you will need a wall mount. Place the TV face-down on a wall, you . To prevent injury or damage to the TV, ask someone to find the appropriate mount for the weight/load of debris that came with your mount. D60-D3 D70-D3 Screw Size: M6 Hole Pattern: 400mm (V) x 400mm... (H) Weight w/o Stand: 41.47 lbs M6 400mm (V) x 400mm (H) 56.49 lbs Be sure the mount you may want to your TV. 2. To install your TV model: Installing a TV on a wall: 1. Use only with right...

User Manual English
Page 10
To keep the power indicator on as long as the TV is on, see Turning the Power Indicator On or Off on , then goes out after several seconds. The power indicator flashes on when the TV turns on page 46. 1 REMOTE SENSOR & POWER INDICATOR When using the remote, aim it directly at this sensor. FRONT PANEL 10
To keep the power indicator on as long as the TV is on, see Turning the Power Indicator On or Off on , then goes out after several seconds. The power indicator flashes on when the TV turns on page 46. 1 REMOTE SENSOR & POWER INDICATOR When using the remote, aim it directly at this sensor. FRONT PANEL 10

User Manual English
Page 12
...the (+) and (-) symbols on -screen menu. VOLUME UP/DOWN Increase or decrease loudness of the audio. INFO Display the info window. V BUTTON Open the VIZIO Internet Apps Plus® (V.I.A. LAST Return to manually enter a digital sub-channel. (For example, 18-4 or 18-5.) 1 Replacing the Batteries 1. A/V ...the arrow markings and sliding out. 2. Remove the battery cover by pressing down on -screen menu. Replace the battery cover. POWER Turn TV On or Off. APP LAUNCHER Quickly launch the pictured App. PIC Opens the Picture Mode menu. GUIDE Display the info window. OK ...
...the (+) and (-) symbols on -screen menu. VOLUME UP/DOWN Increase or decrease loudness of the audio. INFO Display the info window. V BUTTON Open the VIZIO Internet Apps Plus® (V.I.A. LAST Return to manually enter a digital sub-channel. (For example, 18-4 or 18-5.) 1 Replacing the Batteries 1. A/V ...the arrow markings and sliding out. 2. Remove the battery cover by pressing down on -screen menu. Replace the battery cover. POWER Turn TV On or Off. APP LAUNCHER Quickly launch the pictured App. PIC Opens the Picture Mode menu. GUIDE Display the info window. OK ...

User Manual English
Page 13
Connect the appropriate cable (not included) to change. Turn the TV and your device on the TV (HDMI, Component, etc.). 2. Turn the TV and your device has a video port that matches an available port on . Set the TV's input to match the connection you used to display output from most devices. 1. The actual number of... AUDIO AV CABLE GOOD • ANALOG • SD VIDEO (480i)1 • STEREO AUDIO 13 Verify that your device off. 3. Connecting Your Devices CONNECTING A DEVICE Your TV can be subject to the...
Connect the appropriate cable (not included) to change. Turn the TV and your device on the TV (HDMI, Component, etc.). 2. Turn the TV and your device has a video port that matches an available port on . Set the TV's input to match the connection you used to display output from most devices. 1. The actual number of... AUDIO AV CABLE GOOD • ANALOG • SD VIDEO (480i)1 • STEREO AUDIO 13 Verify that your device off. 3. Connecting Your Devices CONNECTING A DEVICE Your TV can be subject to the...

User Manual English
Page 14
... cables are delivered with color information split up three different ways over the red and white connectors. Colors are the traditional way of connecting your TV. HDMI-connected devices have the ability to automatically adjust themselves for video (separated into Red, Blue and Green signals) and the left and right audio...; Analog Connection • Audio and Video Signals HDMI CABLE HDMI is sent over three connectors for optimal viewing. • HD Video Resolutions up to your TV.
... cables are delivered with color information split up three different ways over the red and white connectors. Colors are the traditional way of connecting your TV. HDMI-connected devices have the ability to automatically adjust themselves for video (separated into Red, Blue and Green signals) and the left and right audio...; Analog Connection • Audio and Video Signals HDMI CABLE HDMI is sent over three connectors for optimal viewing. • HD Video Resolutions up to your TV.

User Manual English
Page 15
CONNECTING AN AUDIO DEVICE Your TV can output sound to the TV and the device. 4. Turn the TV and your device has an audio port that your device on the model. 2 VIZIO Sound Bar RCA CABLE GOOD • ANALOG STEREO CONNECTION • 2.0 CHANNEL OPTICAL/SPDIF CABLE BETTER • PCM STREAM • DOLBY DIGITAL 5.1 CHANNEL... the appropriate cable (not included) to an audio device, such as a receiver or sound bar. 1. Verify that matches an available port on the TV (Optical, RCA, or HDMI). 2. The actual number of ports and their locations may be subject to change. Turn the...
CONNECTING AN AUDIO DEVICE Your TV can output sound to the TV and the device. 4. Turn the TV and your device has an audio port that your device on the model. 2 VIZIO Sound Bar RCA CABLE GOOD • ANALOG STEREO CONNECTION • 2.0 CHANNEL OPTICAL/SPDIF CABLE BETTER • PCM STREAM • DOLBY DIGITAL 5.1 CHANNEL... the appropriate cable (not included) to an audio device, such as a receiver or sound bar. 1. Verify that matches an available port on the TV (Optical, RCA, or HDMI). 2. The actual number of ports and their locations may be subject to change. Turn the...

User Manual English
Page 16
... Video Signals HDMI HDMI GOOD BETTER BEST 16 Audio signals are the traditional way of light through a single HDMI cable. Audio Return Channel-enabled (ARC) TVs allow audio to your audio device. CONNECTING AN AUDIO DEVICE - AUDIO CABLE TYPES RCA CABLE RCA cables (or Composite cables) are sent over an already...
... Video Signals HDMI HDMI GOOD BETTER BEST 16 Audio signals are the traditional way of light through a single HDMI cable. Audio Return Channel-enabled (ARC) TVs allow audio to your audio device. CONNECTING AN AUDIO DEVICE - AUDIO CABLE TYPES RCA CABLE RCA cables (or Composite cables) are sent over an already...

User Manual English
Page 17
... HDMI Cable Your Blu-Ray Player 2 With HDMI ARC With an HDMI ARC setup, the audio connection between your TV with an all-digital audio/video connection. Built-In Tuner Your TV VIZIO Internet Apps Plus® HDMI Cable Your Home Audio Receiver HDMI Cable Your Blu-Ray Player 17 ARC Without HDMI... ARC Without an HDMI ARC setup, your TV will transmit audio signal to and from the built-in tuner and VIA...
... HDMI Cable Your Blu-Ray Player 2 With HDMI ARC With an HDMI ARC setup, the audio connection between your TV with an all-digital audio/video connection. Built-In Tuner Your TV VIZIO Internet Apps Plus® HDMI Cable Your Home Audio Receiver HDMI Cable Your Blu-Ray Player 17 ARC Without HDMI... ARC Without an HDMI ARC setup, your TV will transmit audio signal to and from the built-in tuner and VIA...

User Manual English
Page 18
... high-speed wireless signal (802.11n recommended). 2. The actual number of the TV. Use the Guided Network Setup to configure the TV. See Using Guided Setup on the model. 18 2 CONNECTING TO YOUR NETWORK Your TV is for illustrative purposes only and may vary, depending on page 48. See ... on the back of ports and their locations may be connected to your router and to change. Use the Guided Network Setup to configure the TV. Ethernet Cable Router / Modem Note: The image shown here is Internet-ready. Connecting to a Wireless Network 1. It can be subject to ...
... high-speed wireless signal (802.11n recommended). 2. The actual number of the TV. Use the Guided Network Setup to configure the TV. See Using Guided Setup on the model. 18 2 CONNECTING TO YOUR NETWORK Your TV is for illustrative purposes only and may vary, depending on page 48. See ... on the back of ports and their locations may be connected to your router and to change. Use the Guided Network Setup to configure the TV. Ethernet Cable Router / Modem Note: The image shown here is Internet-ready. Connecting to a Wireless Network 1. It can be subject to ...

User Manual English
Page 19
... Use and press OK. 3 3 Use the Arrow buttons on the remote to highlight your language of the steps necessary to get your TV ready for in -store display. The TV powers on and the Setup App starts. 2 Choose your country, and then press OK. 19 To complete the first-time setup: 1 Press... the Power button on the remote. Before you begin the first-time setup: • Your TV should be installed and the power cord should be connected to an electrical outlet. • Your devices should be connected. • If you have a wireless...
... Use and press OK. 3 3 Use the Arrow buttons on the remote to highlight your language of the steps necessary to get your TV ready for in -store display. The TV powers on and the Setup App starts. 2 Choose your country, and then press OK. 19 To complete the first-time setup: 1 Press... the Power button on the remote. Before you begin the first-time setup: • Your TV should be installed and the power cord should be connected to an electrical outlet. • Your devices should be connected. • If you have a wireless...

User Manual English
Page 21
...use the Arrow and OK buttons on the remote to . Note: Number of ports may differ by TV. If the TV Signal channel scan screen appears, the TV will appear. When you connect the TV directly to scan for channels, which takes several minutes. Use the arrow buttons on the remote to highlight... your TV source is complete. 3 21 9 10 Use the Arrow buttons on the remote to highlight Begin Scan and press...
...use the Arrow and OK buttons on the remote to . Note: Number of ports may differ by TV. If the TV Signal channel scan screen appears, the TV will appear. When you connect the TV directly to scan for channels, which takes several minutes. Use the arrow buttons on the remote to highlight... your TV source is complete. 3 21 9 10 Use the Arrow buttons on the remote to highlight Begin Scan and press...

User Manual English
Page 22
... press OK. CHANGING THE INPUT SOURCE External devices such as DVD players, Blu-ray Players, and video game consoles can be connected to your TV, you can : • Adjust the Picture settings • Adjust the Audio settings • Setting the Sleep Timers • Adjust the...8226; Adjust the Channel settings • Set up Closed Captioning • Name Inputs • Adjust TV settings • Access the Guided Setup • View the User Manual VIZIO TV SETTINGS Picture Audio Timers Network Channels CC Closed Captions Devices System Guided Setup User Manual NAVIGATING THE ON-SCREEN...
... press OK. CHANGING THE INPUT SOURCE External devices such as DVD players, Blu-ray Players, and video game consoles can be connected to your TV, you can : • Adjust the Picture settings • Adjust the Audio settings • Setting the Sleep Timers • Adjust the...8226; Adjust the Channel settings • Set up Closed Captioning • Name Inputs • Adjust TV settings • Access the Guided Setup • View the User Manual VIZIO TV SETTINGS Picture Audio Timers Network Channels CC Closed Captions Devices System Guided Setup User Manual NAVIGATING THE ON-SCREEN...

User Manual English
Page 23
... Normal, Panoramic, Wide, and Zoom. A 720p image will still appear on the top and bottom of the image is not large enough to fill the TV's screen, black bars are watching widescreen (1.85:1 or 2.35:1) content with black bars to view and press OK. • Normal preserves the content's ...original aspect ratio and size. • Standard Definition (480i and 480p-old TV programs) - If you wish to fit the screen. Not available. • 720p and 720i HD - The center of the display image. • Standard ...
... Normal, Panoramic, Wide, and Zoom. A 720p image will still appear on the top and bottom of the image is not large enough to fill the TV's screen, black bars are watching widescreen (1.85:1 or 2.35:1) content with black bars to view and press OK. • Normal preserves the content's ...original aspect ratio and size. • Standard Definition (480i and 480p-old TV programs) - If you wish to fit the screen. Not available. • 720p and 720i HD - The center of the display image. • Standard ...

User Manual English
Page 25
...Mode, then use the Left/Right Arrow buttons to distinguish details. Color - Tint - Adjusts the LED brightness to values ideal for watching TV in a brightly-lit room. • Calibrated Dark mode sets the picture settings to affect the overall brilliance of the picture settings, use ... low, the picture may appear dark. When you 've changes to sharpen non-HD (high definition) content; To adjust the picture settings: 1. VIZIO PICTURE Picture Mode Auto Brightness Control Backlight - Select Off, Low, Medium, or Exit High2D. 3D • Backlight - Adjusts the hue of color...
...Mode, then use the Left/Right Arrow buttons to distinguish details. Color - Tint - Adjusts the LED brightness to values ideal for watching TV in a brightly-lit room. • Calibrated Dark mode sets the picture settings to affect the overall brilliance of the picture settings, use ... low, the picture may appear dark. When you 've changes to sharpen non-HD (high definition) content; To adjust the picture settings: 1. VIZIO PICTURE Picture Mode Auto Brightness Control Backlight - Select Off, Low, Medium, or Exit High2D. 3D • Backlight - Adjusts the hue of color...


