
Download
Page 5
... no objects filled with instructions. When your dealer immediately. The power cord fails or frays. - Your TV is exposed to leak which can damage the remote control or injure the operator. To reduce the risk of electric shock, do so. h• The lightning flash with arrowhead symbol within an equilateral triangle...
... no objects filled with instructions. When your dealer immediately. The power cord fails or frays. - Your TV is exposed to leak which can damage the remote control or injure the operator. To reduce the risk of electric shock, do so. h• The lightning flash with arrowhead symbol within an equilateral triangle...

Download
Page 7
... 38 Adjusting the CEC Settings 39 1 Table of Digital Closed Captions.. 32 Renaming Devices on a Wall 6 Controls and Connections 7 Rear Panel 7 Side Panel 8 Front Panel 9 Remote Control 10 Replacing the Batteries 11 Connecting Your Devices 12 Connecting A Device 12 Connecting a Device - Audio Cable Types.......... 16 Connecting an Audio Device - Audio and...
... 38 Adjusting the CEC Settings 39 1 Table of Digital Closed Captions.. 32 Renaming Devices on a Wall 6 Controls and Connections 7 Rear Panel 7 Side Panel 8 Front Panel 9 Remote Control 10 Replacing the Batteries 11 Connecting Your Devices 12 Connecting A Device 12 Connecting a Device - Audio Cable Types.......... 16 Connecting an Audio Device - Audio and...

Download
Page 9
Use the images below to inspect the package contents. Remote Control with Batteries 1 Quick Start Guide Power Cord 1 x M4 14mm Phillips Screw 3 1 x T4 30mm Phillips Screws PACKAGE CONTENTS VIZIO LED HDTV INPUT EXIT BACK OK VOL VOL 1 2 4 5 7 8 WIDE 0 MENU GUIDE CH CH 3 6 9 - Installing the TV INSPECTING THE PACKAGE CONTENTS Before installing your new TV, take a moment to ensure nothing is missing or damaged.
Use the images below to inspect the package contents. Remote Control with Batteries 1 Quick Start Guide Power Cord 1 x M4 14mm Phillips Screw 3 1 x T4 30mm Phillips Screws PACKAGE CONTENTS VIZIO LED HDTV INPUT EXIT BACK OK VOL VOL 1 2 4 5 7 8 WIDE 0 MENU GUIDE CH CH 3 6 9 - Installing the TV INSPECTING THE PACKAGE CONTENTS Before installing your new TV, take a moment to ensure nothing is missing or damaged.

Download
Page 15
To keep the power indicator on as long as the TV is on, see Turning the Power Indicator On or Off on , then goes out after several seconds. 2 FRONT PANEL REMOTE SENSOR & POWER INDICATOR When using the remote, aim it directly at this sensor. The power indicator flashes on when the TV turns on page 39. 9 FRONT PANEL
To keep the power indicator on as long as the TV is on, see Turning the Power Indicator On or Off on , then goes out after several seconds. 2 FRONT PANEL REMOTE SENSOR & POWER INDICATOR When using the remote, aim it directly at this sensor. The power indicator flashes on when the TV turns on page 39. 9 FRONT PANEL
Download
Page 16
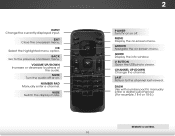
... to the previous on -screen menu. NUMBER PAD Manually enter a channel. LAST Return to manually enter a digital sub-channel. (For example, 18-4 or 18-5.) REMOTE CONTROL 10 REMOTE CONTROL INPUT Change the currently-displayed input. V BUTTON Open the USB photo viewer. CHANNEL UP/DOWN Change the channel. POWER Turn TV on or...
... to the previous on -screen menu. NUMBER PAD Manually enter a channel. LAST Return to manually enter a digital sub-channel. (For example, 18-4 or 18-5.) REMOTE CONTROL 10 REMOTE CONTROL INPUT Change the currently-displayed input. V BUTTON Open the USB photo viewer. CHANNEL UP/DOWN Change the channel. POWER Turn TV on or...

Download
Page 17
Insert two batteries into the remote control. Replace the battery cover. 11 Make sure that the (+) and (-) symbols on the batteries match the (+) and (-) symbols inside the battery compartment. 3. 2 Replacing the Batteries 1. Remove the battery cover. 2.
Insert two batteries into the remote control. Replace the battery cover. 11 Make sure that the (+) and (-) symbols on the batteries match the (+) and (-) symbols inside the battery compartment. 3. 2 Replacing the Batteries 1. Remove the battery cover. 2.

Download
Page 24
...; If you are finished, "Your VIZIO TV is complete. 4 3. Before you begin the first-time setup: • Your TV should be installed and the power cord should be connected to an electrical outlet. • Your devices should be displayed. 2. Use the Arrow buttons on the remote to highlight your TV signal connection...
...; If you are finished, "Your VIZIO TV is complete. 4 3. Before you begin the first-time setup: • Your TV should be installed and the power cord should be connected to an electrical outlet. • Your devices should be displayed. 2. Use the Arrow buttons on the remote to highlight your TV signal connection...

Download
Page 25
... Adjust the Tuner settings • Set up Closed Captioning • Name the TV Inputs • Adjust TV Settings • Access the Guided Setup VIZIO SETTINGS Picture Audio Timers Tuner CC Closed Captions Devices System Guided Setup NAVIGATING THE ON-SCREEN MENU To open the on-screen menu, press the...Arrow buttons to highlight a menu option, and press the OK button to -use on-screen menu. The EXIT button will close the on the remote. Input Wide CC Sleep Timer Picture Audio Network Settings Help 19 Using the On-Screen Menu 5 Your TV features an easy-to select that ...
... Adjust the Tuner settings • Set up Closed Captioning • Name the TV Inputs • Adjust TV Settings • Access the Guided Setup VIZIO SETTINGS Picture Audio Timers Tuner CC Closed Captions Devices System Guided Setup NAVIGATING THE ON-SCREEN MENU To open the on-screen menu, press the...Arrow buttons to highlight a menu option, and press the OK button to -use on-screen menu. The EXIT button will close the on the remote. Input Wide CC Sleep Timer Picture Audio Network Settings Help 19 Using the On-Screen Menu 5 Your TV features an easy-to select that ...

Download
Page 26
...COMP Note: Inputs may vary by Input source. • Stretch expands the display image to fill the screen. Press the WIDE button on the remote. If you are watching widescreen (1.85:1 or 2.35:1) content, black bars will still appear on -screen menu. This option is only available .... Since the picture is not large enough to make your TV. To change the screen aspect ratio: 1. Press the INPUT button on the remote. 2. Normal Panoramic Normal Stretch Wide Wide Zoom Zoom Note: Aspect ratio settings may appear distorted. Since the 4:3 aspect ratio is being stretched,...
...COMP Note: Inputs may vary by Input source. • Stretch expands the display image to fill the screen. Press the WIDE button on the remote. If you are watching widescreen (1.85:1 or 2.35:1) content, black bars will still appear on -screen menu. This option is only available .... Since the picture is not large enough to make your TV. To change the screen aspect ratio: 1. Press the INPUT button on the remote. 2. Normal Panoramic Normal Stretch Wide Wide Zoom Zoom Note: Aspect ratio settings may appear distorted. Since the 4:3 aspect ratio is being stretched,...
Download
Page 27
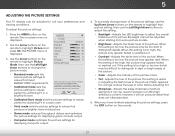
... mode optimizes the picture settings for watching TV in dark or bright areas of the picture settings, use the Up/Down Arrow buttons on the remote to highlight Picture Mode, then use Calibrated mode. Tint - Wide Zoom Normal Panoramic • Brightness - HItelcpan be adjusted to suit your preferences and viewing conditions... hue of the picture. Adjusts the edge sharpness of the picture. Adjusts the black level of picture NetworkeleSemttinegns ts. To manually change the picture mode: VIZIO PICTURE Picture Mode Backlight -
... mode optimizes the picture settings for watching TV in dark or bright areas of the picture settings, use the Up/Down Arrow buttons on the remote to highlight Picture Mode, then use Calibrated mode. Tint - Wide Zoom Normal Panoramic • Brightness - HItelcpan be adjusted to suit your preferences and viewing conditions... hue of the picture. Adjusts the edge sharpness of the picture. Adjusts the black level of picture NetworkeleSemttinegns ts. To manually change the picture mode: VIZIO PICTURE Picture Mode Backlight -

Download
Page 28
...Picture Position - Adjust the vertical and horizontal positions of the displayed picture. Wide See Adjusting the Color Reset Picture Mode Temperature on the remote to compensate for large areas of the displayed picture. From the PICTURE menu, use the Arrow buttons on page 23. • Black... Detail - Adjusts the average brightness of the picture to VIZIO highlight Advanced Picture, then ADVANCED PICTURE press OK.The ADVANCED PICTURE Color Temperature menu is centered and completely fills the screen. Increase ...
...Picture Position - Adjust the vertical and horizontal positions of the displayed picture. Wide See Adjusting the Color Reset Picture Mode Temperature on the remote to compensate for large areas of the displayed picture. From the PICTURE menu, use the Arrow buttons on page 23. • Black... Detail - Adjusts the average brightness of the picture to VIZIO highlight Advanced Picture, then ADVANCED PICTURE press OK.The ADVANCED PICTURE Color Temperature menu is centered and completely fills the screen. Increase ...
Download
Page 29
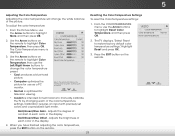
... Settings To reset the Color Temperature settings: 1. Wide Zoom Normal Panoramic 2. Exit 2D 3D 3. Press the EXIT button on the remote to manually calibrate the TV by modifying the red, green, and blue gains and offsets. • Normal is optimized for television viewing... press OK. The TV displays, "Select Reset to highlight More, and then press OK. 2. VIZIO COLOR TEMPERATURE Color Temperature Red Gain - - ABC VIZIO COLOR TEMPERATURE Color Temperature Normal Reset Color Temperature Input Wide CC Sleep Timer Picture Audio Network Settings Help...
... Settings To reset the Color Temperature settings: 1. Wide Zoom Normal Panoramic 2. Exit 2D 3D 3. Press the EXIT button on the remote to manually calibrate the TV by modifying the red, green, and blue gains and offsets. • Normal is optimized for television viewing... press OK. The TV displays, "Select Reset to highlight More, and then press OK. 2. VIZIO COLOR TEMPERATURE Color Temperature Red Gain - - ABC VIZIO COLOR TEMPERATURE Color Temperature Normal Reset Color Temperature Input Wide CC Sleep Timer Picture Audio Network Settings Help...

Download
Page 30
... for the currently-selected input, such as antenna or HDMI-1. 1. Press the EXIT button on the Picture Size Film Mode Auto remote. Reset Picture Mode Wide Zoom Normal Panoramic Exit 2D 3D ABC Input Wide CC Sleep Timer Picture Audio Network Settings Help 5 24... Color Temperature Black Detail Off 2. Resetting the Picture Settings To reset the picture settings to VIZIO highlight Reset Picture Mode, ADVANCED PICTURE then press OK. The TV displays, "Select Reset to Backlight Control On restore factory default ...
... for the currently-selected input, such as antenna or HDMI-1. 1. Press the EXIT button on the Picture Size Film Mode Auto remote. Reset Picture Mode Wide Zoom Normal Panoramic Exit 2D 3D ABC Input Wide CC Sleep Timer Picture Audio Network Settings Help 5 24... Color Temperature Black Detail Off 2. Resetting the Picture Settings To reset the picture settings to VIZIO highlight Reset Picture Mode, ADVANCED PICTURE then press OK. The TV displays, "Select Reset to Backlight Control On restore factory default ...

Download
Page 31
... be passed through digital audio outputs. • Surround Sound - 5 ADJUSTING THE AUDIO SETTINGS To adjust the audio settings: 1. VIZIO AUDIO TV Speakers Surround Sound Volume Leveling Balance - The on or off . • Balance - Digital Audio Out Analog Audio Out... Adjusts the boost or attenuation of different frequencies using either preset or custom settings. See Resetting the Audio Settings on the remote. Select Input VarWiaidbe le toCCcontrol the external device's volume from your home theater system controls. • Sleep Timer EqPuicatulriezer ASueditotings...
... be passed through digital audio outputs. • Surround Sound - 5 ADJUSTING THE AUDIO SETTINGS To adjust the audio settings: 1. VIZIO AUDIO TV Speakers Surround Sound Volume Leveling Balance - The on or off . • Balance - Digital Audio Out Analog Audio Out... Adjusts the boost or attenuation of different frequencies using either preset or custom settings. See Resetting the Audio Settings on the remote. Select Input VarWiaidbe le toCCcontrol the external device's volume from your home theater system controls. • Sleep Timer EqPuicatulriezer ASueditotings...

Download
Page 32
... buttons to the factory default settings: 1. Resetting the Audio Settings To reset the audio settings to select an audio mode. The on the remote to highlight Audio and press OK. Use the Arrow buttons on -screen menu is displayed. 2. The TV displays,"Select Reset to reflect the... audio settings." 4. Press the MENU button on -screen menu is displayed. 2. The AUDIO menu is displayed. 3. The on the remote. Use the Arrow buttons on the remote. The AUDIO menu is displayed. 2. 5 Changing the Equalizer Settings The graphic equalizer has several pre-set audio mode: 1. Press the...
... buttons to the factory default settings: 1. Resetting the Audio Settings To reset the audio settings to select an audio mode. The on the remote to highlight Audio and press OK. Use the Arrow buttons on -screen menu is displayed. 2. The TV displays,"Select Reset to reflect the... audio settings." 4. Press the MENU button on -screen menu is displayed. 2. The AUDIO menu is displayed. 3. The on the remote. Use the Arrow buttons on the remote. The AUDIO menu is displayed. 2. 5 Changing the Equalizer Settings The graphic equalizer has several pre-set audio mode: 1. Press the...

Download
Page 33
...a set period of time. 1. Otherwise, Wisdee lecZtoo1m0 mNinorumtael s.Panoramic 3. When you have finished setting the sleep timer, press the EXIT button on the remote. VIZIO TIMERS Sleep Timer Auto Power Off Off 10 minutes 3. Exit 2D 3D ABC Input Wide CC Sleep Timer Picture Audio Network Settings Help 27 The... on the remote. If you don't want the TV to go to sleep. This feature can be deactivated. If you don't want the TV to turn...
...a set period of time. 1. Otherwise, Wisdee lecZtoo1m0 mNinorumtael s.Panoramic 3. When you have finished setting the sleep timer, press the EXIT button on the remote. VIZIO TIMERS Sleep Timer Auto Power Off Off 10 minutes 3. Exit 2D 3D ABC Input Wide CC Sleep Timer Picture Audio Network Settings Help 27 The... on the remote. If you don't want the TV to go to sleep. This feature can be deactivated. If you don't want the TV to turn...
Download
Page 34
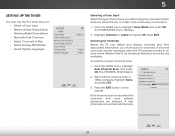
... the channel scan is cancelled,the channels that were already discovered are available. Highlight Done Neatwnordk pSerettisnsgsOKH.elp 3. Press the EXIT button on the remote. 5 SETTING UP THE TUNER You can use the TV's Tuner menu to: • Select a Tuner Input • Perform an Auto...Add Analog Channel Skip Channel Analog Audio Digital Language Antenna Stereo English Selecting a Tuner Input Select the type of -the-wall) connections. 1. VIZIO CHANNEL SCAN Channels Found Digital Channels: 0 Analog Channels: 0 13% Complete Cancel If the channel scan is 100% complete. From the TUNER...
... the channel scan is cancelled,the channels that were already discovered are available. Highlight Done Neatwnordk pSerettisnsgsOKH.elp 3. Press the EXIT button on the remote. 5 SETTING UP THE TUNER You can use the TV's Tuner menu to: • Select a Tuner Input • Perform an Auto...Add Analog Channel Skip Channel Analog Audio Digital Language Antenna Stereo English Selecting a Tuner Input Select the type of -the-wall) connections. 1. VIZIO CHANNEL SCAN Channels Found Digital Channels: 0 Analog Channels: 0 13% Complete Cancel If the channel scan is 100% complete. From the TUNER...

Download
Page 35
...channel you want to begin the scan. (Use the Left Arrow button to backspace. Use the Number Pad on the remote. Press the EXIT button on the remote to enter the channel.) 5. Highlight To Channel and enter the channel where you are adding: Analog, Digital, or ...Analog/Digital. 3. To add a single new analog channel: 1. From the TUNER menu, highlight Add Analog Channel and press OK. Highlight Add Channel and press OK. The partial channel search begins. 6. VIZIO...
...channel you want to begin the scan. (Use the Left Arrow button to backspace. Use the Number Pad on the remote. Press the EXIT button on the remote to enter the channel.) 5. Highlight To Channel and enter the channel where you are adding: Analog, Digital, or ...Analog/Digital. 3. To add a single new analog channel: 1. From the TUNER menu, highlight Add Analog Channel and press OK. Highlight Add Channel and press OK. The partial channel search begins. 6. VIZIO...

Download
Page 36
... not want to view. There may find that have selected all of each channel you wish to remove, press the EXIT button on the remote. You can still be some channels are too weak to watch comfortably. A P appears to the right of the channels you wish to ...remove, use the parental controls. VIZIO SKIP CHANNEL 1 Test 0 1 Test 1 P 1-2 Test 2 P 2 Test 3 2-2 Test 4 P 2-3 Test 5 Wide Zoom Normal Panoramic Exit 2D 3D ABC Input Wide CC Sleep Timer...
... not want to view. There may find that have selected all of each channel you wish to remove, press the EXIT button on the remote. You can still be some channels are too weak to watch comfortably. A P appears to the right of the channels you wish to ...remove, use the parental controls. VIZIO SKIP CHANNEL 1 Test 0 1 Test 1 P 1-2 Test 2 P 2 Test 3 2-2 Test 4 P 2-3 Test 5 Wide Zoom Normal Panoramic Exit 2D 3D ABC Input Wide CC Sleep Timer...

Download
Page 37
... (SAP). Select Stereo, SAP (secondary audio programming), or Mono. From the Tuner menu, highlight Digital Language and press OK. VIZIO DIGITAL LANGUAGE English Español Français Exit 2D 3D ABC Input Wide CC Sleep Timer Picture Audio Network Settings Help... 31 Press OK. 3. Select your preferred language: English, Español, or Français. Press OK. 3.WiPderessZtohome EXNIoTrmbaul ttoPannooranmicthe remote. 5 LISTENING TO ALTERNATE AUDIO Changing the Analog Audio Language Some analog over -the-air (free), cable, and satellite channels broadcast programs ...
... (SAP). Select Stereo, SAP (secondary audio programming), or Mono. From the Tuner menu, highlight Digital Language and press OK. VIZIO DIGITAL LANGUAGE English Español Français Exit 2D 3D ABC Input Wide CC Sleep Timer Picture Audio Network Settings Help... 31 Press OK. 3. Select your preferred language: English, Español, or Français. Press OK. 3.WiPderessZtohome EXNIoTrmbaul ttoPannooranmicthe remote. 5 LISTENING TO ALTERNATE AUDIO Changing the Analog Audio Language Some analog over -the-air (free), cable, and satellite channels broadcast programs ...


