User Manual English
Page 2
... Disabling Program Ratings 39 Locking and Unlocking Channels 39 Blocking and Unblocking Content by Rating 40 Changing the Parental Control PIN 40 Resetting the Content Locks 40 Changing the View Mode Settings 41 Changing the Screen Aspect Ratio 41 Adjusting the CEC Settings 42 Turning the Power Indicator On or Off 42 Using the Reset & Admin Menu 43 Restoring the TV to Factory Default Settings 43 Using the Guided Setup Menu 44 Using the Info Window 44 Changing the Equalizer Settings 29 Using the USB Media Player...
... Disabling Program Ratings 39 Locking and Unlocking Channels 39 Blocking and Unblocking Content by Rating 40 Changing the Parental Control PIN 40 Resetting the Content Locks 40 Changing the View Mode Settings 41 Changing the Screen Aspect Ratio 41 Adjusting the CEC Settings 42 Turning the Power Indicator On or Off 42 Using the Reset & Admin Menu 43 Restoring the TV to Factory Default Settings 43 Using the Guided Setup Menu 44 Using the Info Window 44 Changing the Equalizer Settings 29 Using the USB Media Player...
User Manual English
Page 5
... Power Service Grounding Electrode System (NEC ART 250, part H) v Article 810 of the National Electrical Code, ANSI/NFPSA 70, provides information with regard to proper grounding of the mast and supporting structure, grounding of the lead-in the building installation. Remember, the screen of the coaxial cable is left unattended or unused for long periods of antenna discharge unit, connection...
... Power Service Grounding Electrode System (NEC ART 250, part H) v Article 810 of the National Electrical Code, ANSI/NFPSA 70, provides information with regard to proper grounding of the mast and supporting structure, grounding of the lead-in the building installation. Remember, the screen of the coaxial cable is left unattended or unused for long periods of antenna discharge unit, connection...
User Manual English
Page 7
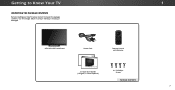
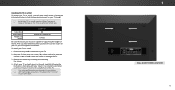
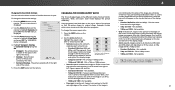
VIZIO LED HDTV with Batteries 2 x Quick Start Guides (1 English, 1 French-Spanish) 4 x T4 Phillips Screws PACKAGE CONTENTS 1 7 Getting to Know Your TV INSPECTING THE PACKAGE CONTENTS Before installing your new TV, take a moment to ensure nothing is missing or damaged. Use the images below to inspect the package contents. Remote Control with Stand Power Cord INPUT EXIT BACK OK VOL VOL 1 2 4 5 7 8 WIDE 0 MENU GUIDE CH CH 3 6 9 -
VIZIO LED HDTV with Batteries 2 x Quick Start Guides (1 English, 1 French-Spanish) 4 x T4 Phillips Screws PACKAGE CONTENTS 1 7 Getting to Know Your TV INSPECTING THE PACKAGE CONTENTS Before installing your new TV, take a moment to ensure nothing is missing or damaged. Use the images below to inspect the package contents. Remote Control with Stand Power Cord INPUT EXIT BACK OK VOL VOL 1 2 4 5 7 8 WIDE 0 MENU GUIDE CH CH 3 6 9 -
User Manual English
Page 9
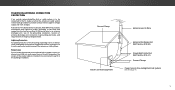
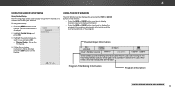
... the correct mount for your TV. 2. D28hn-D1 Screw Size: Hole Pattern: Weight w/o Stand: M4 100mm (V) x 100mm (H) 8.54 lbs Be sure the mount you . To install your TV on a clean, flat, stable surface. Use only with right-angle connectors. Disconnect any cables connected to help you choose is clear of debris that can begin the installation. Be sure the surface is capable of supporting the weight of this...
... the correct mount for your TV. 2. D28hn-D1 Screw Size: Hole Pattern: Weight w/o Stand: M4 100mm (V) x 100mm (H) 8.54 lbs Be sure the mount you . To install your TV on a clean, flat, stable surface. Use only with right-angle connectors. Disconnect any cables connected to help you choose is clear of debris that can begin the installation. Be sure the surface is capable of supporting the weight of this...
User Manual English
Page 21
... ON-SCREEN MENU To open the on-screen menu, press the MENU button on -screen menu. The EXIT button will close the on the remote. The Input menu is displayed. CHANGING THE INPUT SOURCE External devices such as DVD players, Blu-ray Players, and video game consoles can : • Adjust the Picture settings • Adjust the Audio settings • Setting the Sleep Timers • Adjust the Channel settings • Set up Closed Captioning • Name Inputs • Adjust TV settings • Access the Guided Setup VIZIO TV SETTINGS Picture Audio Timers Channels CC Closed Captions Devices...
... ON-SCREEN MENU To open the on-screen menu, press the MENU button on -screen menu. The EXIT button will close the on the remote. The Input menu is displayed. CHANGING THE INPUT SOURCE External devices such as DVD players, Blu-ray Players, and video game consoles can : • Adjust the Picture settings • Adjust the Audio settings • Setting the Sleep Timers • Adjust the Channel settings • Set up Closed Captioning • Name Inputs • Adjust TV settings • Access the Guided Setup VIZIO TV SETTINGS Picture Audio Timers Channels CC Closed Captions Devices...
User Manual English
Page 23
... a brighter, more vivid picture. • Game mode reduces throughput delays and optimizes the picture settings for displaying game console output. • Computer mode optimizes the picture settings for watching TV in dark or bright areas of the picture settings, use the Up/ Down Arrow buttons on -screen menu is too high, the picture may be difficult to distinguish details. VIZIO PICTURE Picture Mode Auto Brightness Control Backlight - Color - Tint - Adjusts the black level of color before adjusting tint. •...
... a brighter, more vivid picture. • Game mode reduces throughput delays and optimizes the picture settings for displaying game console output. • Computer mode optimizes the picture settings for watching TV in dark or bright areas of the picture settings, use the Up/ Down Arrow buttons on -screen menu is too high, the picture may be difficult to distinguish details. VIZIO PICTURE Picture Mode Auto Brightness Control Backlight - Color - Tint - Adjusts the black level of color before adjusting tint. •...
User Manual English
Page 25
... HDMI input. To lock all custom picture modes. Save 4. Press the EXIT button to exit the menu screens. * Not available on HDMI input 5. † Only available on customized preset modes. ‡ Only available on your rIenpmutote cWoidne trol tCoC enter a name for various viewing conditions and video sources. • Changes made while on any desired changes to factory default values. Network Settings Help Wide Zoom Exit 2D Input Wide Sleep Timer Pictur Network Setting 25 The PICTURE MODE EDIT menu...
... HDMI input. To lock all custom picture modes. Save 4. Press the EXIT button to exit the menu screens. * Not available on HDMI input 5. † Only available on customized preset modes. ‡ Only available on your rIenpmutote cWoidne trol tCoC enter a name for various viewing conditions and video sources. • Changes made while on any desired changes to factory default values. Network Settings Help Wide Zoom Exit 2D Input Wide Sleep Timer Pictur Network Setting 25 The PICTURE MODE EDIT menu...
User Manual English
Page 29
... Delete Audio Mode On On On +0 +0 PCM Fixed When the TV speakers are controlling the volume with more than two channels (3.0, 5.0, or 5.1, for audio with ABC the TV's volume controls, or select Fixed if an external audio device (sound bar or AV receiver) will control the volume. Select On or Off. Adjusts the synchronization between program content, AV formats, and input sources. Sets the volume control properties for the frequency. 7. Press the MENU button on the remote. Use the...
... Delete Audio Mode On On On +0 +0 PCM Fixed When the TV speakers are controlling the volume with more than two channels (3.0, 5.0, or 5.1, for audio with ABC the TV's volume controls, or select Fixed if an external audio device (sound bar or AV receiver) will control the volume. Select On or Off. Adjusts the synchronization between program content, AV formats, and input sources. Sets the volume control properties for the frequency. 7. Press the MENU button on the remote. Use the...
User Manual English
Page 32
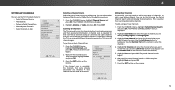
...: Analog, Digital, or Analog/Digital. 3. If the channel scan is required for free over-the-air channels (using an antenna) and cable channels from an out-of-theAB-Cwall connection (without a cable box). You can do this by using . The PARTIAL CHANNEL SEARCH menu is 100% complete. Use the Number Pad on the remote. Highlight Done and press OK. 7. Scanning for Channels The TV may need to scan for chaInnpnuet ls aWgiadien. From the CHANNELS menu, SThlim...
...: Analog, Digital, or Analog/Digital. 3. If the channel scan is required for free over-the-air channels (using an antenna) and cable channels from an out-of-theAB-Cwall connection (without a cable box). You can do this by using . The PARTIAL CHANNEL SEARCH menu is 100% complete. Use the Number Pad on the remote. Highlight Done and press OK. 7. Scanning for Channels The TV may need to scan for chaInnpnuet ls aWgiadien. From the CHANNELS menu, SThlim...
User Manual English
Page 35
... Broadcast Large Green As Broadcast As Broadcast 3. Ne•tworTk exSetttiEndgsgesHe- As Broadcast Black As Broadcast Red As Broadcast • Text Color - The Closed Captions menu does not appear when an HDMI input is displayed. To change each Input settWinidge. Change the font used for the closed captions: 1. Change the color of the closed captioning box. • Window Opacity - WWidehenZyooomu areNosrmaatlisfPieandorwamitich the appearance of the closed captions, press the EXIT button on the remote to...
... Broadcast Large Green As Broadcast As Broadcast 3. Ne•tworTk exSetttiEndgsgesHe- As Broadcast Black As Broadcast Red As Broadcast • Text Color - The Closed Captions menu does not appear when an HDMI input is displayed. To change each Input settWinidge. Change the font used for the closed captions: 1. Change the color of the closed captioning box. • Window Opacity - WWidehenZyooomu areNosrmaatlisfPieandorwamitich the appearance of the closed captions, press the EXIT button on the remote to...
User Manual English
Page 39
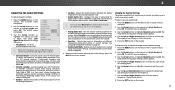
... have a device connected using the tuner to receive your TV signals, such as a VCR, satellite or cable box, or DVR. The SYSTEM menu is Standard Time, or Auto to prevent children from displaying certain channels or programs without a password. Use the Arrow buttons on the remote to prevent the TV from viewing inappropriate material. If you must enable the Program Rating feature. To set a custom parental passcode, see Changing the Parental Control PIN on...
... have a device connected using the tuner to receive your TV signals, such as a VCR, satellite or cable box, or DVR. The SYSTEM menu is Standard Time, or Auto to prevent children from displaying certain channels or programs without a password. Use the Arrow buttons on the remote to prevent the TV from viewing inappropriate material. If you must enable the Program Rating feature. To set a custom parental passcode, see Changing the Parental Control PIN on...
User Manual English
Page 41
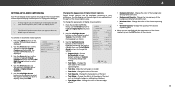
... black bars will still appear on the remote to left and right sides of the picture covered by Input source. • 720p and 720i HD - The on HDMI-5. • Standard Definition - VIZIO VIEW MODE Viewport Overlay Centered Overlay 3. The entire picture is already formatted for any video content on -screen menu is open. Press the EXIT button on the remote. Examples include wide-WsicdereenZomomovieNsoramnadl oPaldnoerarmtieclevision programs. To change...
... black bars will still appear on the remote to left and right sides of the picture covered by Input source. • 720p and 720i HD - The on HDMI-5. • Standard Definition - VIZIO VIEW MODE Viewport Overlay Centered Overlay 3. The entire picture is already formatted for any video content on -screen menu is open. Press the EXIT button on the remote. Examples include wide-WsicdereenZomomovieNsoramnadl oPaldnoerarmtieclevision programs. To change...
User Manual English
Page 44
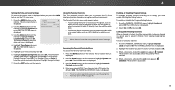
VIZIO GUIDED SETUP Channel Setup 3. When finished, press the EXIT button on the way? Who knows what he'll encounter on the remote. The on -screen instructions. 4 USING THE GUIDED SETUP MENU Using Guided Setup The TV's Setup App can be used to easily set up the TV channel. 4. To use and press OK: • Channel Setup - Highlight the guided setup you want to discover that his pals. Follow the on -screen menu is displayed. 2. Highlight Guided Setup and press OK...
VIZIO GUIDED SETUP Channel Setup 3. When finished, press the EXIT button on the way? Who knows what he'll encounter on the remote. The on -screen instructions. 4 USING THE GUIDED SETUP MENU Using Guided Setup The TV's Setup App can be used to easily set up the TV channel. 4. To use and press OK: • Channel Setup - Highlight the guided setup you want to discover that his pals. Follow the on -screen menu is displayed. 2. Highlight Guided Setup and press OK...
User Manual English
Page 49
... the remote control. • Press the MUTE button on . VIZIO recommends selecting Calibrated. • Check all cables to ensure they are inherent to the TV. • Ensure all cables are securely attached to this type of product and do not constitute a defective product. 49 See Scanning for the best signal. See Adjusting the Picture Settings on the remote to change the screen mode. Ensure your device's user manual for channels. The display...
... the remote control. • Press the MUTE button on . VIZIO recommends selecting Calibrated. • Check all cables to ensure they are inherent to the TV. • Ensure all cables are securely attached to this type of product and do not constitute a defective product. 49 See Scanning for the best signal. See Adjusting the Picture Settings on the remote to change the screen mode. Ensure your device's user manual for channels. The display...

User Manual English
Page 53
... AND CONDUCTED BY A SINGLE ARBITRATOR APPOINTED Zero Bright Pixel Defect Guarantee (Displays Only) Types of the original warranty or for service center, but in -home. Since this warranty, you . To obtain warranty service, contact VIZIO Technical Support via email at which point VIZIO additional help and troubleshooting. tear; (c) improper operation; (d) improper voltage supply or power surges; requiring routine maintenance; If you return a product to the...
... AND CONDUCTED BY A SINGLE ARBITRATOR APPOINTED Zero Bright Pixel Defect Guarantee (Displays Only) Types of the original warranty or for service center, but in -home. Since this warranty, you . To obtain warranty service, contact VIZIO Technical Support via email at which point VIZIO additional help and troubleshooting. tear; (c) improper operation; (d) improper voltage supply or power surges; requiring routine maintenance; If you return a product to the...
Quickstart Guide English
Page 2
..., amplifier etc. Changing the factory default picture settings or enabling other cables are provided for replacement of the marked voltage can damage the remote control or injure the operator. Never spill liquids on your TV. • Your TV should be installed near any heat source, such as vases, shall be of sufficient magnitude to an area of power source indicated on the power cord may function...
..., amplifier etc. Changing the factory default picture settings or enabling other cables are provided for replacement of the marked voltage can damage the remote control or injure the operator. Never spill liquids on your TV. • Your TV should be installed near any heat source, such as vases, shall be of sufficient magnitude to an area of power source indicated on the power cord may function...
Quickstart Guide English
Page 3
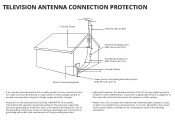
... wire to an antenna discharge unit, size of the grounding conductors, location of antenna discharge unit, connection to grounding electrodes, and requirements of the grounding electrode. • Lightning Protection: For added protection of time, unplug the TV from the wall outlet and disconnect the antenna or cable system. • Power Lines: Do not locate the antenna near overhead light or power circuits, or where...
... wire to an antenna discharge unit, size of the grounding conductors, location of antenna discharge unit, connection to grounding electrodes, and requirements of the grounding electrode. • Lightning Protection: For added protection of time, unplug the TV from the wall outlet and disconnect the antenna or cable system. • Power Lines: Do not locate the antenna near overhead light or power circuits, or where...
Quickstart Guide English
Page 14
... displays "No Signal." • Verify that all of your settings will be lost. Verify that all devices connected to the TV are black/ • Some television channels add black bars to the picture. gray bars on the • Press the WIDE button on the remote and use the Arrow buttons to select the input to which your connected device's User Guide to adjust device video settings. Remember that the TV Speakers setting...
... displays "No Signal." • Verify that all of your settings will be lost. Verify that all devices connected to the TV are black/ • Some television channels add black bars to the picture. gray bars on the • Press the WIDE button on the remote and use the Arrow buttons to select the input to which your connected device's User Guide to adjust device video settings. Remember that the TV Speakers setting...
Quickstart Guide English
Page 20
... product purchases. Replacement parts may qualify for a warranty against "zero bright pixel" defects for additional help and troubleshooting. In-home service is serviced, regardless of protection. What This Warranty Does Not Cover This warranty does not cover: (a) cosmetic damage; (b) normal wear and tear; (c) improper operation; (d) improper voltage supply or power surges; (e) signal issues; (f) damage from an authorized retailer in connection with unreadable or removed serial numbers; (k) products requiring...
... product purchases. Replacement parts may qualify for a warranty against "zero bright pixel" defects for additional help and troubleshooting. In-home service is serviced, regardless of protection. What This Warranty Does Not Cover This warranty does not cover: (a) cosmetic damage; (b) normal wear and tear; (c) improper operation; (d) improper voltage supply or power surges; (e) signal issues; (f) damage from an authorized retailer in connection with unreadable or removed serial numbers; (k) products requiring...
Quickstart Guide English
Page 22
... WARRANTY SERVICE. You will be located in Mexico at the time of the product. Recovery and reinstallation of purchase. In-home service is within the service network, at www.vizio.mx, look for the "zero bright pixel" guarantee on the terms set forth below for additional help and troubleshooting. Changes to obtain parts, components, supplies and accessories, you purchased the VIZIO product. Check www.vizio.mx for parts...
... WARRANTY SERVICE. You will be located in Mexico at the time of the product. Recovery and reinstallation of purchase. In-home service is within the service network, at www.vizio.mx, look for the "zero bright pixel" guarantee on the terms set forth below for additional help and troubleshooting. Changes to obtain parts, components, supplies and accessories, you purchased the VIZIO product. Check www.vizio.mx for parts...


