

User Manual English
Page 2
... 26 Setting Up Closed Captioning 27 Changing the Appearance of Digital Closed Captions 27 Renaming Devices on the Input Menu 29 Changing the TV Settings 30 Viewing System Information 30 Changing the On-Screen Menu Language 30 Setting the Time and Local Settings 31 Using the Parental... Info Window 36 Using the USB Media Player 37 Preparing Your USB Drive to the My Apps Tab 44 Deleting an App from the TV 37 Using VIZIO Internet Apps Plus® (V.I .A. Apps Window 42 Fullscreen V.I .A. Plus 41 Using the Fullscreen V.I .A. Plus Apps Window Overview 43 Customizing the V.I .A....
... 26 Setting Up Closed Captioning 27 Changing the Appearance of Digital Closed Captions 27 Renaming Devices on the Input Menu 29 Changing the TV Settings 30 Viewing System Information 30 Changing the On-Screen Menu Language 30 Setting the Time and Local Settings 31 Using the Parental... Info Window 36 Using the USB Media Player 37 Preparing Your USB Drive to the My Apps Tab 44 Deleting an App from the TV 37 Using VIZIO Internet Apps Plus® (V.I .A. Apps Window 42 Fullscreen V.I .A. Plus 41 Using the Fullscreen V.I .A. Plus Apps Window Overview 43 Customizing the V.I .A....

User Manual English
Page 3
... plug is designed and manufactured to ensure there are provided for replacement of your TV. WHEN READING THIS MANUAL When you register your VIZIO product at (877) 698-4946. To prevent your TV from tip-over. • Unplug this symbol, please read the accompanying helpful ... Slots and openings in the housing. Never spill liquids on your TV. • Your TV should be operated only from overheating, be observed for future reference. Safety & Certification THANK YOU FOR CHOOSING VIZIO And congratulations on your TV cabinet. Doing so could short circuit parts causing a fire or...
... plug is designed and manufactured to ensure there are provided for replacement of your TV. WHEN READING THIS MANUAL When you register your VIZIO product at (877) 698-4946. To prevent your TV from tip-over. • Unplug this symbol, please read the accompanying helpful ... Slots and openings in the housing. Never spill liquids on your TV. • Your TV should be operated only from overheating, be observed for future reference. Safety & Certification THANK YOU FOR CHOOSING VIZIO And congratulations on your TV cabinet. Doing so could short circuit parts causing a fire or...
User Manual English
Page 4
... ears may damage the wires inside of the following occurs, contact the dealer: - moving your readily operable. Do not expose your TV. The performance of un-isolated, dangerous voltage within the product's enclosure that contained in fire or electric shock. The manufacturer's or odor...product. • Do not touch the power cord during electrical storms. • Unplug your dealer. If any other cables are for your TV. - TV yourself. • CAUTION - For more information, is dropped and the housing is damaged, the internal electric shock, do so. Liquid ...
... ears may damage the wires inside of the following occurs, contact the dealer: - moving your readily operable. Do not expose your TV. The performance of un-isolated, dangerous voltage within the product's enclosure that contained in fire or electric shock. The manufacturer's or odor...product. • Do not touch the power cord during electrical storms. • Unplug your dealer. If any other cables are for your TV. - TV yourself. • CAUTION - For more information, is dropped and the housing is damaged, the internal electric shock, do so. Liquid ...

User Manual English
Page 5
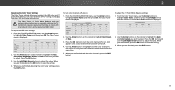
... (NEC Section 810-21) Ground Clamps Power Service Grounding Electrode System (NEC ART 250, part H) v Lightning Protection For added protection of the TV during a lightning storm or when it could fall into such power lines or circuits. Power Lines Do not locate the antenna near overhead light or... of the grounding electrode. Remember, the screen of the coaxial cable is left unattended or unused for long periods of time, unplug the TV from the wall outlet and disconnect the antenna or cable system. Article 810 of the National Electrical Code, ANSI/NFPSA 70, provides information with...
... (NEC Section 810-21) Ground Clamps Power Service Grounding Electrode System (NEC ART 250, part H) v Lightning Protection For added protection of the TV during a lightning storm or when it could fall into such power lines or circuits. Power Lines Do not locate the antenna near overhead light or... of the grounding electrode. Remember, the screen of the coaxial cable is left unattended or unused for long periods of time, unplug the TV from the wall outlet and disconnect the antenna or cable system. Article 810 of the National Electrical Code, ANSI/NFPSA 70, provides information with...
User Manual English
Page 7
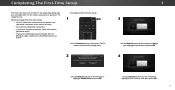
...Demo" pour la Démo en Magasin. To complete the first-time setup: 1 Press the Power button on the TV. Store Demo Home Use Use the Arrow buttons on the remote to highlight Home Use and press OK. 1 3 Use...Arrow buttons on the remote to highlight your language of the steps necessary to get your TV ready for use . Seleccione "Home Use" para Modo de Casa o "Store Demo" para Demostración en la Tienda... starts. 2 Choose your mode. Completing The First-Time Setup The first time you turn on the TV, the Setup App will guide you are connecting to your network with an Ethernet cable, connect it ...
...Demo" pour la Démo en Magasin. To complete the first-time setup: 1 Press the Power button on the TV. Store Demo Home Use Use the Arrow buttons on the remote to highlight Home Use and press OK. 1 3 Use...Arrow buttons on the remote to highlight your language of the steps necessary to get your TV ready for use . Seleccione "Home Use" para Modo de Casa o "Store Demo" para Demostración en la Tienda... starts. 2 Choose your mode. Completing The First-Time Setup The first time you turn on the TV, the Setup App will guide you are connecting to your network with an Ethernet cable, connect it ...
User Manual English
Page 9
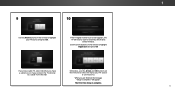
... Otherwise, use the Arrow and OK buttons on the remote to scan for channels, which takes several minutes. will need to select the input your TV source and press OK. 9 10 Use the Arrow buttons on the remote to highlight Begin Scan and press OK. Note: Number of ports may differ... by TV. The First-Time Setup is connected to a cable from the wall. Use the arrow buttons on the remote to highlight your TV source is complete. 1 9 If the TV Signal channel scan screen appears, the TV will appear. When you connect the...
... Otherwise, use the Arrow and OK buttons on the remote to scan for channels, which takes several minutes. will need to select the input your TV source and press OK. 9 10 Use the Arrow buttons on the remote to highlight Begin Scan and press OK. Note: Number of ports may differ... by TV. The First-Time Setup is connected to a cable from the wall. Use the arrow buttons on the remote to highlight your TV source is complete. 1 9 If the TV Signal channel scan screen appears, the TV will appear. When you connect the...

User Manual English
Page 10
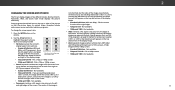
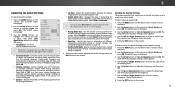
...8226; Adjust the Channel settings • Set up Closed Captioning • Name Inputs • Adjust TV settings • Access the Guided Setup • View the User Manual VIZIO TV SETTINGS Picture Audio Timers Network Channels CC Closed Captions Devices System Guided Setup User Manual NAVIGATING THE ON-SCREEN... MENU To open the on-screen menu, press the MENU button on model D50-D1 You can change the input source: ...
...8226; Adjust the Channel settings • Set up Closed Captioning • Name Inputs • Adjust TV settings • Access the Guided Setup • View the User Manual VIZIO TV SETTINGS Picture Audio Timers Network Channels CC Closed Captions Devices System Guided Setup User Manual NAVIGATING THE ON-SCREEN... MENU To open the on-screen menu, press the MENU button on model D50-D1 You can change the input source: ...
User Manual English
Page 11
...include wide-screen movies and older television programs. To change the screen aspect ratio: 1. Since the 4:3 aspect ratio is not large enough to fill the TV's screen, black bars are watching widescreen (1.85:1 or 2.35:1) content with black bars to fit the screen. Not available. • 720p and ...from right to view and press OK. • Normal preserves the content's original aspect ratio and size. • Standard Definition (480i and 480p-old TV programs) - Not available. • 720p and 720i HD - If you wish to left and right of the image are watching widescreen 1.85:1 content...
...include wide-screen movies and older television programs. To change the screen aspect ratio: 1. Since the 4:3 aspect ratio is not large enough to fill the TV's screen, black bars are watching widescreen (1.85:1 or 2.35:1) content with black bars to fit the screen. Not available. • 720p and ...from right to view and press OK. • Normal preserves the content's original aspect ratio and size. • Standard Definition (480i and 480p-old TV programs) - Not available. • 720p and 720i HD - If you wish to left and right of the image are watching widescreen 1.85:1 content...

User Manual English
Page 13
...Audio out. • Contrast - This setting is displayed. 2. Adjusts the edge sharpness of the picture. 2 ADJUSTING THE PICTURE SETTINGS Your TV display can be used to sharpen non-HD (high definition) content; Press the MENU button on page 15). The on-screen menu is...or bright areas of tAhBCe picture. The PICTURE menu is too high, the picture may be difficult to values that does not otherwise exist. 5. VIZIO PICTURE Picture Mode Auto Brightness Control Backlight - Brightness - Color - Sharpness - When this setting is displayed. 3. however, it will not produce ...
...Audio out. • Contrast - This setting is displayed. 2. Adjusts the edge sharpness of the picture. 2 ADJUSTING THE PICTURE SETTINGS Your TV display can be used to sharpen non-HD (high definition) content; Press the MENU button on page 15). The on-screen menu is...or bright areas of tAhBCe picture. The PICTURE menu is too high, the picture may be difficult to values that does not otherwise exist. 5. VIZIO PICTURE Picture Mode Auto Brightness Control Backlight - Brightness - Color - Sharpness - When this setting is displayed. 3. however, it will not produce ...
User Manual English
Page 17
... remote to highlight Red, Green, or Blue. 3. Use the Arrow buttons on : 1. From the Color Tuner menu, use the Arrow buttons to manually calibrate the TV. Use the Arrow buttons on . From the COLOR CALIBRATION menu, use the Arrow buttons to highlight Color Tuner, and then press the Left/Right Arrow...
... remote to highlight Red, Green, or Blue. 3. Use the Arrow buttons on : 1. From the Color Tuner menu, use the Arrow buttons to manually calibrate the TV. Use the Arrow buttons on . From the COLOR CALIBRATION menu, use the Arrow buttons to highlight Color Tuner, and then press the Left/Right Arrow...
User Manual English
Page 19
...; Surround Sound - Digital Audio Out Analog Audio Out Equalizer Delete Audio Mode On On On +0 +0 PCM Fixed When the TV speakers are controlling the volume with more than two channels (3.0, 5.0, or 5.1, for the RCA connector when connected to deliver an...the accompanying audio track. • Digital Audio Out - Adjusts the synchronization between program content, AV formats, and input sources. VIZIO AUDIO TV Speakers Surround Sound Volume Leveling Balance - Changing the Equalizer Settings The graphic equalizer has several pre-set audio mode: 1. Select ...
...; Surround Sound - Digital Audio Out Analog Audio Out Equalizer Delete Audio Mode On On On +0 +0 PCM Fixed When the TV speakers are controlling the volume with more than two channels (3.0, 5.0, or 5.1, for the RCA connector when connected to deliver an...the accompanying audio track. • Digital Audio Out - Adjusts the synchronization between program content, AV formats, and input sources. VIZIO AUDIO TV Speakers Surround Sound Volume Leveling Balance - Changing the Equalizer Settings The graphic equalizer has several pre-set audio mode: 1. Select ...
User Manual English
Page 20
The TV displays, "To delete the user created custom audio mode, select the Delete button." 4. Use the Arrow buttons to highlight Audio and press OK. Press the EXIT button on the remote to highlight Delete Audio Mode and press OK. Deleting the Custom Audio Mode To delete the custom audio mode that has been created: 1. The on the remote. Use the Arrow buttons on the remote. 2 20 Highlight Delete and press OK. 5. The AUDIO menu is displayed. 2. Press the MENU button on -screen menu is displayed. 3.
The TV displays, "To delete the user created custom audio mode, select the Delete button." 4. Use the Arrow buttons to highlight Audio and press OK. Press the EXIT button on the remote to highlight Delete Audio Mode and press OK. Deleting the Custom Audio Mode To delete the custom audio mode that has been created: 1. The on the remote. Use the Arrow buttons on the remote. 2 20 Highlight Delete and press OK. 5. The AUDIO menu is displayed. 2. Press the MENU button on -screen menu is displayed. 3.
User Manual English
Page 21
...EXIT button on -screen content or static content when audio is streaming, the backlight is no on the remote. To blank the screen: 1. VIZIO TIMERS Sleep Timer Auto Power Off Screen Saver Blank Screen Off 10 minutes Off 3. When you have finished setting the sleep timer, press the ... energy. WUidsee thZoeom Left/NRorimgahl t PAarnroroawmicbuttons on -screen menu is set the Auto Power Off feature: 1. This feature helps save energy, your TV is displayed. 2. To Exit the Screen Saver Press any button other than the Volume and Mute buttons on the remote. The on the remote to...
...EXIT button on -screen content or static content when audio is streaming, the backlight is no on the remote. To blank the screen: 1. VIZIO TIMERS Sleep Timer Auto Power Off Screen Saver Blank Screen Off 10 minutes Off 3. When you have finished setting the sleep timer, press the ... energy. WUidsee thZoeom Left/NRorimgahl t PAarnroroawmicbuttons on -screen menu is set the Auto Power Off feature: 1. This feature helps save energy, your TV is displayed. 2. To Exit the Screen Saver Press any button other than the Volume and Mute buttons on the remote. The on the remote to...

User Manual English
Page 22
...: If your network's password, then highlight Connect and press OK. Press the MENU button on -screeen keyboard, enter your TV is connected to a network with WiFi. The NETWORK menu is displayed. 2. VIZIO NETWORK Wired Connection Disconnected Wireless Access Points More Access Points WPS Manual Setup Hidden Network Test Connection 6. DHCP Off 2. ricDetuNsrseS...
...: If your network's password, then highlight Connect and press OK. Press the MENU button on -screeen keyboard, enter your TV is connected to a network with WiFi. The NETWORK menu is displayed. 2. VIZIO NETWORK Wired Connection Disconnected Wireless Access Points More Access Points WPS Manual Setup Hidden Network Test Connection 6. DHCP Off 2. ricDetuNsrseS...

User Manual English
Page 24
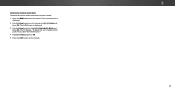
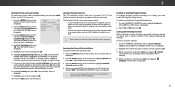
2 SETTING UP CHANNELS You can use the TV's Channels menu to: • Select a Channel Source • Find Channels • Perform a Partial Channel Scan • Manually Add Channels • Select channels to skip VIZIO CHANNELS Channels not searched Channel Source Find Channel Partial Channel Search Add ...Channel Search, and press OK. You can do this by using . VIZIO FIND CHANNELS Channels Found Digital: 0 Analog: 19 18% Complete Cancel 3. Moving the TV to an area with different channels requires the TV to scan for channels before it can select either Antenna (Over-the-air...
2 SETTING UP CHANNELS You can use the TV's Channels menu to: • Select a Channel Source • Find Channels • Perform a Partial Channel Scan • Manually Add Channels • Select channels to skip VIZIO CHANNELS Channels not searched Channel Source Find Channel Partial Channel Search Add ...Channel Search, and press OK. You can do this by using . VIZIO FIND CHANNELS Channels Found Digital: 0 Analog: 19 18% Complete Cancel 3. Moving the TV to an area with different channels requires the TV to scan for channels before it can select either Antenna (Over-the-air...

User Manual English
Page 25
...with the Skip Channel feature can remove these channels froWmidethe ZToVom's meNomrmoarl y wPaintohram thice Skip Channel feature. The TV scans for the channel, press the EXIT button on the remote. There may find that have selected all ...remote to view. From the CHANNELS menu, SThplim erieegeprhslsigOPhicKttu.SreTkhipeACSudKhiIoaPnCnHeAl,NaNndEL menu is displayed. 2. VIZIO SKIP CHANNEL 1 Test 0 1 Test 1 P 1-2 Test 2 P 2 Test 3 2-2 Test 4 P 2-3 Test 5 3. VIZIO ADD ANALOG CHANNEL Enter Channel Add Channel Skipping Channels After a channel scan is done scanning for...
...with the Skip Channel feature can remove these channels froWmidethe ZToVom's meNomrmoarl y wPaintohram thice Skip Channel feature. The TV scans for the channel, press the EXIT button on the remote. There may find that have selected all ...remote to view. From the CHANNELS menu, SThplim erieegeprhslsigOPhicKttu.SreTkhipeACSudKhiIoaPnCnHeAl,NaNndEL menu is displayed. 2. VIZIO SKIP CHANNEL 1 Test 0 1 Test 1 P 1-2 Test 2 P 2 Test 3 2-2 Test 4 P 2-3 Test 5 3. VIZIO ADD ANALOG CHANNEL Enter Channel Add Channel Skipping Channels After a channel scan is done scanning for...

User Manual English
Page 26
...From the CHANNELS menu, highlight Digital Language and press OK. The ANALOG AUDIO menu is displayed. 2. VIZIO ANALOG AUDIO Stereo SAP Mono Wide Zoom Normal Panoramic Exit 2D 3D ABC Input Wide CC VIZIO DIGITAL LANGUAGE English Español Français Sleep Timer Picture Audio Network Settings Help Wide Zoom Normal... programming), or Mono. From the CHANNELS menu, highlight Analog Audio and press OK. LISTENING TO ALTERNATE AUDIO To use the Analog Audio feature: 1. The TV's Analog Audio feature allows you to listen to audio in SAP. Press OK. 3. Press OK. 3.
...From the CHANNELS menu, highlight Digital Language and press OK. The ANALOG AUDIO menu is displayed. 2. VIZIO ANALOG AUDIO Stereo SAP Mono Wide Zoom Normal Panoramic Exit 2D 3D ABC Input Wide CC VIZIO DIGITAL LANGUAGE English Español Français Sleep Timer Picture Audio Network Settings Help Wide Zoom Normal... programming), or Mono. From the CHANNELS menu, highlight Analog Audio and press OK. LISTENING TO ALTERNATE AUDIO To use the Analog Audio feature: 1. The TV's Analog Audio feature allows you to listen to audio in SAP. Press OK. 3. Press OK. 3.

User Manual English
Page 27
...See the diagram on the remote to highlight Closed Captions and then use the Arrow buttons to highlight Digital Style and press OK. 2. VIZIO DIGITAL STYLE Caption Style Text Style Text Size Text Color Text Opacity Text Edges Custom As Broadcast Large Green As Broadcast As Broadcast 3. Changing...- As Broadcast Black As Broadcast Red As Broadcast • Text Color - lpChange the effects at the edges of the closed captions, the TV will not display them . Exit 2D 3D ABC Input Wide CC Sleep Timer Picture Audio Network Settings Help 27 To activate or deactivate closed ...
...See the diagram on the remote to highlight Closed Captions and then use the Arrow buttons to highlight Digital Style and press OK. 2. VIZIO DIGITAL STYLE Caption Style Text Style Text Size Text Color Text Opacity Text Edges Custom As Broadcast Large Green As Broadcast As Broadcast 3. Changing...- As Broadcast Black As Broadcast Red As Broadcast • Text Color - lpChange the effects at the edges of the closed captions, the TV will not display them . Exit 2D 3D ABC Input Wide CC Sleep Timer Picture Audio Network Settings Help 27 To activate or deactivate closed ...

User Manual English
Page 30
...system information, press the EXIT button on the remote to highlight Menu Language and press OK. Use the Arrow buttons on the remote. VIZIO MENU LANGUAGE English Español Français 3. The on-screen menu is displayed. The SYSTEM menu is displayed. 2. To... the on-screen menu language • Set time zone and local settings • Set up administrative controls VIZIO SYSTEM System Information Menu Language Time & Local Settings Parental Controls View Mode Wide TV Name CEC Power Indicator Reset & Admin English Overlay VIZIOTV Off View status information for the...
...system information, press the EXIT button on the remote to highlight Menu Language and press OK. Use the Arrow buttons on the remote. VIZIO MENU LANGUAGE English Español Français 3. The on-screen menu is displayed. The SYSTEM menu is displayed. 2. To... the on-screen menu language • Set time zone and local settings • Set up administrative controls VIZIO SYSTEM System Information Menu Language Time & Local Settings Parental Controls View Mode Wide TV Name CEC Power Indicator Reset & Admin English Overlay VIZIOTV Off View status information for the...
User Manual English
Page 31
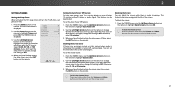
... to highlight System and press OK. From the PARENTAL CONTROLS menu, highlight Locks and press OK. When a channel is displayed. 9. VIZIO June 11, 2015 11:48AM Time Zone Pacific (-8) Daylight Savings Time Auto Zip Code 12345 Country USA 3. The TIME ZONE menu is...control settings. Use the Arrow buttons on the remote. Enabling or Disabling Program Ratings To manage program content according to prevent the TV from viewing inappropriate material. Locking a channel is entered. 4. Highlight Time Zone and press OK. AccSTelim eseepsr ingPitchtuere Audio Parental ...
... to highlight System and press OK. From the PARENTAL CONTROLS menu, highlight Locks and press OK. When a channel is displayed. 9. VIZIO June 11, 2015 11:48AM Time Zone Pacific (-8) Daylight Savings Time Auto Zip Code 12345 Country USA 3. The TIME ZONE menu is...control settings. Use the Arrow buttons on the remote. Enabling or Disabling Program Ratings To manage program content according to prevent the TV from viewing inappropriate material. Locking a channel is entered. 4. Highlight Time Zone and press OK. AccSTelim eseepsr ingPitchtuere Audio Parental ...


