

User Manual English
Page 2
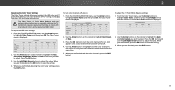
... Off Feature 21 Enabling the Screen Saver 21 Blanking the Screen 21 Using the Network Connection Menu 22 Connecting to a Wireless Network 22 Changing the Manual Setup Settings 22 Finding MAC Addresses for Network Setup 22 Connecting to a Hidden Network 23 Setting Up Channels 24 Selecting a Channel Source 24 Scanning for... 36 Using the USB Media Player 37 Preparing Your USB Drive to the My Apps Tab 44 Deleting an App from the TV 37 Using VIZIO Internet Apps Plus® (V.I .A. Plus 41 Using the Fullscreen V.I .A.
... Off Feature 21 Enabling the Screen Saver 21 Blanking the Screen 21 Using the Network Connection Menu 22 Connecting to a Wireless Network 22 Changing the Manual Setup Settings 22 Finding MAC Addresses for Network Setup 22 Connecting to a Hidden Network 23 Setting Up Channels 24 Selecting a Channel Source 24 Scanning for... 36 Using the USB Media Player 37 Preparing Your USB Drive to the My Apps Tab 44 Deleting an App from the TV 37 Using VIZIO Internet Apps Plus® (V.I .A. Plus 41 Using the Fullscreen V.I .A.

User Manual English
Page 3
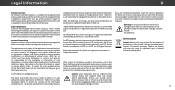
... produce heat. • Do not defeat the safety purpose of important operating instructions. To purchase an extended warranty service plan, visit www.VIZIO.com. Wait before cleaning your TV. • When moving the cart/apparatus combination to avoid injury from tip-over. • Unplug ... a fire or electric shock. Safety & Certification THANK YOU FOR CHOOSING VIZIO And congratulations on the top of power supplied to your home, consult your dealer or local power company. WHEN READING THIS MANUAL When you see this symbol, please read the accompanying important warning or ...
... produce heat. • Do not defeat the safety purpose of important operating instructions. To purchase an extended warranty service plan, visit www.VIZIO.com. Wait before cleaning your TV. • When moving the cart/apparatus combination to avoid injury from tip-over. • Unplug ... a fire or electric shock. Safety & Certification THANK YOU FOR CHOOSING VIZIO And congratulations on the top of power supplied to your home, consult your dealer or local power company. WHEN READING THIS MANUAL When you see this symbol, please read the accompanying important warning or ...

User Manual English
Page 10
... displayed. 2. See Renaming Devices on the Input Menu on the remote. To open the on-screen menu, press the MENU button on model D50-D1 You can be connected to recognize. Use the Up/Down Arrow buttons or the INPUT button on -screen menu by TV. TV COMP HDMI-1 HDMI... • Name Inputs • Adjust TV settings • Access the Guided Setup • View the User Manual VIZIO TV SETTINGS Picture Audio Timers Network Channels CC Closed Captions Devices System Guided Setup User Manual NAVIGATING THE ON-SCREEN MENU To open the on-screen menu, press the MENU button on page 29...
... displayed. 2. See Renaming Devices on the Input Menu on the remote. To open the on-screen menu, press the MENU button on model D50-D1 You can be connected to recognize. Use the Up/Down Arrow buttons or the INPUT button on -screen menu by TV. TV COMP HDMI-1 HDMI... • Name Inputs • Adjust TV settings • Access the Guided Setup • View the User Manual VIZIO TV SETTINGS Picture Audio Timers Network Channels CC Closed Captions Devices System Guided Setup User Manual NAVIGATING THE ON-SCREEN MENU To open the on-screen menu, press the MENU button on page 29...

User Manual English
Page 13
... menu is too high, the picture may appear faded or washed NetworokutS.eItftinthgse seHtetlipng is displayed. 3. VIZIO PICTURE Picture Mode Auto Brightness Control Backlight - Adjusts the black level of the picture colors. • Tint - Color - To manually change each of the picture. • Color - Adjusts the intensity of the picture. Backlight cannot...
... menu is too high, the picture may appear faded or washed NetworokutS.eItftinthgse seHtetlipng is displayed. 3. VIZIO PICTURE Picture Mode Auto Brightness Control Backlight - Adjusts the black level of the picture colors. • Tint - Color - To manually change each of the picture. • Color - Adjusts the intensity of the picture. Backlight cannot...
User Manual English
Page 17
.... From the Color Tuner menu, use the Arrow buttons to highlight Red, Green, or Blue. 3. Press the OK button and use the Arrow buttons to manually calibrate the TV. 2 Adjusting the Color Tuner Settings The Color Tuner settings allow technicians to highlight Color Tuner, and then press OK. To adjust the...
.... From the Color Tuner menu, use the Arrow buttons to highlight Red, Green, or Blue. 3. Press the OK button and use the Arrow buttons to manually calibrate the TV. 2 Adjusting the Color Tuner Settings The Color Tuner settings allow technicians to highlight Color Tuner, and then press OK. To adjust the...

User Manual English
Page 22
... 5) cable. • Wireless MAC - The on the remote. The NETWORK menu is displayed. 2. From the NETWORK menu, highlight Manual Setup and VIZIO press OK. The subnet Exit mas2kD. 3D IP Address Subnet Mask Default Gateway Pref. Server Audio - To find the TV's MAC ...to set up your router may be needed to set up a wireless network connection. 1. VIZIO NETWORK Wired Connection Disconnected Wireless Access Points More Access Points WPS Manual Setup Hidden Network Test Connection 6. DNS Server Alt. ricDetuNsrseS. The Ethernet or RJ45 MAC address...
... 5) cable. • Wireless MAC - The on the remote. The NETWORK menu is displayed. 2. From the NETWORK menu, highlight Manual Setup and VIZIO press OK. The subnet Exit mas2kD. 3D IP Address Subnet Mask Default Gateway Pref. Server Audio - To find the TV's MAC ...to set up your router may be needed to set up a wireless network connection. 1. VIZIO NETWORK Wired Connection Disconnected Wireless Access Points More Access Points WPS Manual Setup Hidden Network Test Connection 6. DNS Server Alt. ricDetuNsrseS. The Ethernet or RJ45 MAC address...

User Manual English
Page 24
...TV's Channels menu to: • Select a Channel Source • Find Channels • Perform a Partial Channel Scan • Manually Add Channels • Select channels to scan for channels before it can do this by using an antenna) and cable channels from... 4. Press EXIT. Highlight Done and press OK. 7. IPnpruetss thWeideEXIT ACbBCuC tton on the remote. CC To perform an Auto Channel Scan: VIZIO 1. From the CHANNELS menu, SThlim eiegeprhligPhicttuFreindACuhdioannels, and press OK. This is 100% complete. EWxitait un2tDil the p3ADaBCrtial channel search is quicker than...
...TV's Channels menu to: • Select a Channel Source • Find Channels • Perform a Partial Channel Scan • Manually Add Channels • Select channels to scan for channels before it can do this by using an antenna) and cable channels from... 4. Press EXIT. Highlight Done and press OK. 7. IPnpruetss thWeideEXIT ACbBCuC tton on the remote. CC To perform an Auto Channel Scan: VIZIO 1. From the CHANNELS menu, SThlim eiegeprhligPhicttuFreindACuhdioannels, and press OK. This is 100% complete. EWxitait un2tDil the p3ADaBCrtial channel search is quicker than...

User Manual English
Page 27
... to change the appearance of the closed captioning box. • Window Opacity - Use the Left/Right Arrow buttons on the remote to manually change the setting: Text Edges Color Background Color Background Opacity Window Color Window Opacity •Exit Cap2tDion St3yDle - Choose As Broadcast to keep.... Use the Left/Right Arrow buttons on the remote. To change , then use the Left/ Right Arrow buttons to your preference. VIZIO DIGITAL STYLE Caption Style Text Style Text Size Text Color Text Opacity Text Edges Custom As Broadcast Large Green As Broadcast As Broadcast 3. ...
... to change the appearance of the closed captioning box. • Window Opacity - Use the Left/Right Arrow buttons on the remote to manually change the setting: Text Edges Color Background Color Background Opacity Window Color Window Opacity •Exit Cap2tDion St3yDle - Choose As Broadcast to keep.... Use the Left/Right Arrow buttons on the remote. To change , then use the Left/ Right Arrow buttons to your preference. VIZIO DIGITAL STYLE Caption Style Text Style Text Size Text Color Text Opacity Text Edges Custom As Broadcast Large Green As Broadcast As Broadcast 3. ...
User Manual English
Page 34
... press OK. • CEC - Use the Arrow buttons on the remote. Use the Arrow buttons on the remote to highlight TV Name and press OK. VIZIO TV NAME VIZIOTV_ abc def ghi j k l mn o p q r s t u v wx y z 0 123456789 .@# .cäoêmí Space OK Cancel 4. Use the Arrow buttons on... the remote to highlight System and press OK. Highligh CEC and press OK. Using CEC, your device's user manual for details. The SYSTEM menu is displayed. 3. The SYSTEM menu is displayed. 5Ne. 2 Changing the DLNA Name of your audio device, select...
... press OK. • CEC - Use the Arrow buttons on the remote. Use the Arrow buttons on the remote to highlight TV Name and press OK. VIZIO TV NAME VIZIOTV_ abc def ghi j k l mn o p q r s t u v wx y z 0 123456789 .@# .cäoêmí Space OK Cancel 4. Use the Arrow buttons on... the remote to highlight System and press OK. Highligh CEC and press OK. Using CEC, your device's user manual for details. The SYSTEM menu is displayed. 3. The SYSTEM menu is displayed. 5Ne. 2 Changing the DLNA Name of your audio device, select...

User Manual English
Page 48
... all cables to the TV and move the antenna around the room or close the App, then open the App. • Reboot your device's user manual for Channels on the remote control to select a different input source. • If you are securely attached to a window for channels. Plus Apps are using...; If you are using an antenna, the signal strength of the TV to turn it back on page 13. • Select a pre-set picture mode. VIZIO recommends selecting Calibrated. • Check all cables are always dark. • Your HD TV is connected to the TV, scan for the best signal. Connect...
... all cables to the TV and move the antenna around the room or close the App, then open the App. • Reboot your device's user manual for Channels on the remote control to select a different input source. • If you are securely attached to a window for channels. Plus Apps are using...; If you are using an antenna, the signal strength of the TV to turn it back on page 13. • Select a pre-set picture mode. VIZIO recommends selecting Calibrated. • Check all cables are always dark. • Your HD TV is connected to the TV, scan for the best signal. Connect...

User Manual English
Page 53
...the United States, the When you return a product to supply a purchase receipt (j) products with VIZIO's user guides VIZIO's Responsibilities UNLESS YOU HAVE BROUGHT AN ELIGIBLE CLAIM IN SMALL CLAIMS and manuals. To Displays that a product is within the warranty period. All other than by the American... Arbitration Association, at 877 MY VIZIO (877-698-4946). VIZIO is subject to This warranty does not cover: (a) cosmetic ...
...the United States, the When you return a product to supply a purchase receipt (j) products with VIZIO's user guides VIZIO's Responsibilities UNLESS YOU HAVE BROUGHT AN ELIGIBLE CLAIM IN SMALL CLAIMS and manuals. To Displays that a product is within the warranty period. All other than by the American... Arbitration Association, at 877 MY VIZIO (877-698-4946). VIZIO is subject to This warranty does not cover: (a) cosmetic ...
User Manual English
Page 55
... obtaining warranty service, you always clear all applicable user data and downloaded applications. How to resolve the issue informally with VIZIO's user guides and manuals. In-home service is not available. Mexico S. with VIZIO. Recovery What to the and reinstallation of the original warranty or for additional help and troubleshooting. If you feel...
... obtaining warranty service, you always clear all applicable user data and downloaded applications. How to resolve the issue informally with VIZIO's user guides and manuals. In-home service is not available. Mexico S. with VIZIO. Recovery What to the and reinstallation of the original warranty or for additional help and troubleshooting. If you feel...
User Manual English
Page 57
VIZIO has no control over third party applications or content and assumes no responsibility for the availability or interruption of this Quick Start Guide and the associated User Manual, go to http://www.vizio.com. Additional third party terms, conditions and restrictions apply. To review the... most updated version of such applications or content. VIZIO, the VIZIO logo, the V logo, and other product information ...
VIZIO has no control over third party applications or content and assumes no responsibility for the availability or interruption of this Quick Start Guide and the associated User Manual, go to http://www.vizio.com. Additional third party terms, conditions and restrictions apply. To review the... most updated version of such applications or content. VIZIO, the VIZIO logo, the V logo, and other product information ...
Quickstart Guide English
Page 6
vi Table of contents Package contents 7 This is your remote 8 Inserting and replacing batteries 9 Installing the TV stands 10 First-Time setup 12 Connecting to the Internet with Wi-Fi 16 Getting Started with VIZIO Internet Apps Plus 18 Viewing the on-screen user manual 20 Wall-mounting the TV 21 Additional connections 22 Connecting a computer 22 Connecting an audio device 24 Legal information 29 Regulatory information 30 Limited warranty 32 English -
vi Table of contents Package contents 7 This is your remote 8 Inserting and replacing batteries 9 Installing the TV stands 10 First-Time setup 12 Connecting to the Internet with Wi-Fi 16 Getting Started with VIZIO Internet Apps Plus 18 Viewing the on-screen user manual 20 Wall-mounting the TV 21 Additional connections 22 Connecting a computer 22 Connecting an audio device 24 Legal information 29 Regulatory information 30 Limited warranty 32 English -
Quickstart Guide English
Page 8
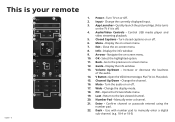
...- Close the on or off. 17. Info - Select the highlighted option. 11. Guide - Display the info window. 13. Volume Up/Down - Open the VIZIO Internet Apps Plus® (V.I.A. Plus) dock. 15. Mute - Turn the audio on -screen menu. 8. Opens the Picture Mode menu. 19. Enter - This... is off) 4. Change the currently displayed input. 3. App Launcher - Display the on or Off. 2. Input - OK - Back - Wide - Return to manually enter a digital sub-channel. (e.g. 18-4 or 18-5) Use with number pad to the last viewed channel. 20. Turn TV on -screen menu. 7. Arrows - ...
...- Close the on or off. 17. Info - Select the highlighted option. 11. Guide - Display the info window. 13. Volume Up/Down - Open the VIZIO Internet Apps Plus® (V.I.A. Plus) dock. 15. Mute - Turn the audio on -screen menu. 8. Opens the Picture Mode menu. 19. Enter - This... is off) 4. Change the currently displayed input. 3. App Launcher - Display the on or Off. 2. Input - OK - Back - Wide - Return to manually enter a digital sub-channel. (e.g. 18-4 or 18-5) Use with number pad to the last viewed channel. 20. Turn TV on -screen menu. 7. Arrows - ...

Quickstart Guide English
Page 16
The GUIDED SETUP menu is displayed. The Network Setup guide is displayed. Highlight Network Setup and press OK. VIZIO TV SETTINGS Picture Audio Timers Network Channels CC Closed Captions Devices System Guided Setup User Manual Wide VIZIO GUIDED SETUP ZoCohmannelNSoetrumpal Panoramic Network Setup Exit 2D 3D ABC Input Wide CC Sleep Timer Picture Audio...
The GUIDED SETUP menu is displayed. The Network Setup guide is displayed. Highlight Network Setup and press OK. VIZIO TV SETTINGS Picture Audio Timers Network Channels CC Closed Captions Devices System Guided Setup User Manual Wide VIZIO GUIDED SETUP ZoCohmannelNSoetrumpal Panoramic Network Setup Exit 2D 3D ABC Input Wide CC Sleep Timer Picture Audio...
Quickstart Guide English
Page 17
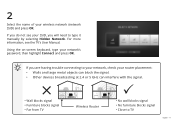
... • Furniture blocks signal • Far from TV Wireless Router P • No wall blocks signal • No furniture blocks signal • Close to type it manually by selecting Hidden Network. If you do not see the TV's User...
... • Furniture blocks signal • Far from TV Wireless Router P • No wall blocks signal • No furniture blocks signal • Close to type it manually by selecting Hidden Network. If you do not see the TV's User...

Quickstart Guide English
Page 20
English - 20 Use the Arrow and OK buttons to exit the on -screen user manual: • Use the Up and Down arrow buttons to select the chapter you want to view. • Use the Left and Right arrow buttons to browse through the pages in each chapter. • Press the EXIT button to highlight User Manual and press OK. To navigate the on -screen User Manual. Press the MENU button on -screen user manual: 1. Viewing the on-screen user manual To view the on the remote control to display the TV SETTINGS Menu. 2.
English - 20 Use the Arrow and OK buttons to exit the on -screen user manual: • Use the Up and Down arrow buttons to select the chapter you want to view. • Use the Left and Right arrow buttons to browse through the pages in each chapter. • Press the EXIT button to highlight User Manual and press OK. To navigate the on -screen User Manual. Press the MENU button on -screen user manual: 1. Viewing the on-screen user manual To view the on the remote control to display the TV SETTINGS Menu. 2.
Quickstart Guide English
Page 23
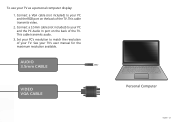
AUDIO 3.5mm CABLE VIDEO VGA CABLE Personal Computer English - 23 Connect a 3.5mm cable (not included) to your TV. To use your TV's user manual for the maximum resolution available. Set your PC's resolution to your PC and the RGB port on the back of your PC and the PC Audio In port on the back of the TV. Connect a VGA cable (not included) to match the resolution of the TV. This cable transmits audio. 3. See your TV as a personal computer display: 1. This cable transmits video. 2.
AUDIO 3.5mm CABLE VIDEO VGA CABLE Personal Computer English - 23 Connect a 3.5mm cable (not included) to your TV. To use your TV's user manual for the maximum resolution available. Set your PC's resolution to your PC and the RGB port on the back of your PC and the PC Audio In port on the back of the TV. Connect a VGA cable (not included) to match the resolution of the TV. This cable transmits audio. 3. See your TV as a personal computer display: 1. This cable transmits video. 2.

Quickstart Guide English
Page 26
... no sound. • Press the VOLUME UP button on -screen menu has guided setup. The Setup App will turn it now. Use your device's user manual for help. Help Topics How do I .A. See your audio device's remote to your router/modem and TV. • Turn off . • Press MENU > Audio. The...
... no sound. • Press the VOLUME UP button on -screen menu has guided setup. The Setup App will turn it now. Use your device's user manual for help. Help Topics How do I .A. See your audio device's remote to your router/modem and TV. • Turn off . • Press MENU > Audio. The...

