
User Manual English
Page 3
...8226; Only use this symbol, please read the accompanying important warning or notice. To purchase an extended warranty service plan, visit www.VIZIO.com. When you see this apparatus during the standard warranty period. Read the following instructions should be sure these instructions. • Heed.... • Refer all instructions. • Do not use attachments/accessories specified by the manufacturer. • Use only with the cart, stand, tripod, bracket, or table specified by the manufacturer, or sold with dry cloth. • Do not block any heat sources such as...
...8226; Only use this symbol, please read the accompanying important warning or notice. To purchase an extended warranty service plan, visit www.VIZIO.com. When you see this apparatus during the standard warranty period. Read the following instructions should be sure these instructions. • Heed.... • Refer all instructions. • Do not use attachments/accessories specified by the manufacturer. • Use only with the cart, stand, tripod, bracket, or table specified by the manufacturer, or sold with dry cloth. • Do not block any heat sources such as...

User Manual English
Page 50
... Dimensions w/ Stand: w/o Stand: Weight w/ Stand: w/o Stand: LCD Backlight: Active LED Zones: Refresh Rate: Clear Action: Maximum Resolution: Contrast Ratio: Pixel Pitch: Viewing Angle: HDMI Inputs: Component Video Inputs: Composite Inputs: RF Antenna Input: USB Port: Ethernet: Audio Outputs: OSD Language: Ambient Light Sensor: D24-D1 24" ... French, Spanish Yes Remote Control Model: Certifications: Voltage Range: Power Consumption: Standby Power: Zero Bright Pixel Guarantee: B D24-D1 XRT122 UL, cUL, FCC ID Class B, ICES-003, BETs-7, ATSC, ES 7.0, NRCan, Dolby Digital Plus 120 V @ 60 Hz 36.7 W
... Dimensions w/ Stand: w/o Stand: Weight w/ Stand: w/o Stand: LCD Backlight: Active LED Zones: Refresh Rate: Clear Action: Maximum Resolution: Contrast Ratio: Pixel Pitch: Viewing Angle: HDMI Inputs: Component Video Inputs: Composite Inputs: RF Antenna Input: USB Port: Ethernet: Audio Outputs: OSD Language: Ambient Light Sensor: D24-D1 24" ... French, Spanish Yes Remote Control Model: Certifications: Voltage Range: Power Consumption: Standby Power: Zero Bright Pixel Guarantee: B D24-D1 XRT122 UL, cUL, FCC ID Class B, ICES-003, BETs-7, ATSC, ES 7.0, NRCan, Dolby Digital Plus 120 V @ 60 Hz 36.7 W

User Manual English
Page 51
...: Dimensions w/ Stand: w/o Stand: Weight w/ Stand: w/o Stand: LCD Backlight: Active LED Zones: Refresh Rate: Maximum Resolution: Dynamic Contrast Ratio: Pixel Pitch: Viewing Angle: HDMI Inputs: Component Video Inputs: Composite Inputs: RF Antenna Input: USB Port: Ethernet: Audio Outputs: OSD Language: Ambient Light Sensor: D28h-D1 28" (71..., French, Spanish Yes Remote Control Model: Certifications: Voltage Range: Power Consumption: Standby Power: Zero Bright Pixel Guarantee: B D28h-D1 XRT122 UL, cUL, FCC ID Class B, ICES-003, BETs-7, ATSC, ES 7.0, NRCan, Dolby Digital Plus 120 V @ 60 Hz 24W
...: Dimensions w/ Stand: w/o Stand: Weight w/ Stand: w/o Stand: LCD Backlight: Active LED Zones: Refresh Rate: Maximum Resolution: Dynamic Contrast Ratio: Pixel Pitch: Viewing Angle: HDMI Inputs: Component Video Inputs: Composite Inputs: RF Antenna Input: USB Port: Ethernet: Audio Outputs: OSD Language: Ambient Light Sensor: D28h-D1 28" (71..., French, Spanish Yes Remote Control Model: Certifications: Voltage Range: Power Consumption: Standby Power: Zero Bright Pixel Guarantee: B D28h-D1 XRT122 UL, cUL, FCC ID Class B, ICES-003, BETs-7, ATSC, ES 7.0, NRCan, Dolby Digital Plus 120 V @ 60 Hz 24W
Quickstart Guide English
Page 2
... magnitude to constitute a risk of the cabinet are provided for the installation, use attachments/accessories specified by the manufacturer. • Use only with the cart, stand, tripod, bracket, or table specified by the manufacturer, or sold with dry cloth. • Do not block any heat source, such as a radiator, heater, oven...
... magnitude to constitute a risk of the cabinet are provided for the installation, use attachments/accessories specified by the manufacturer. • Use only with the cart, stand, tripod, bracket, or table specified by the manufacturer, or sold with dry cloth. • Do not block any heat source, such as a radiator, heater, oven...

Quickstart Guide English
Page 6
vi Table of contents Package contents 7 This is your remote 8 Inserting and replacing batteries 9 Installing the TV stands 10 First-Time setup 12 Connecting to the Internet with Wi-Fi 16 Getting Started with VIZIO Internet Apps Plus 18 Viewing the on-screen user manual 20 Wall-mounting the TV 21 Additional connections 22 Connecting a computer 22 Connecting an audio device 24 Legal information 29 Regulatory information 30 Limited warranty 32 English -
vi Table of contents Package contents 7 This is your remote 8 Inserting and replacing batteries 9 Installing the TV stands 10 First-Time setup 12 Connecting to the Internet with Wi-Fi 16 Getting Started with VIZIO Internet Apps Plus 18 Viewing the on-screen user manual 20 Wall-mounting the TV 21 Additional connections 22 Connecting a computer 22 Connecting an audio device 24 Legal information 29 Regulatory information 30 Limited warranty 32 English -

Quickstart Guide English
Page 7
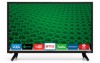
Multi-Language Quick Start Guide Power Cable Display Stands 4 x Phillips Screws (For D24-D1) 4 x Phillips Screws (For D28h-D1) Basic Remote w/Batteries English - 7 Package contents VIZIO LED HDTV VIZIO INSTALLATION GUIDE D24-D1 & D28h-D1 Please read this guide before using the product.
Multi-Language Quick Start Guide Power Cable Display Stands 4 x Phillips Screws (For D24-D1) 4 x Phillips Screws (For D28h-D1) Basic Remote w/Batteries English - 7 Package contents VIZIO LED HDTV VIZIO INSTALLATION GUIDE D24-D1 & D28h-D1 Please read this guide before using the product.
Quickstart Guide English
Page 10
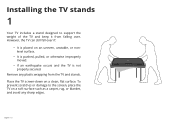
... any sharp edges. To prevent scratches or damage to support the weight of the TV and keep it from the TV and stands. Installing the TV stands 1 Your TV includes a stand designed to the screen, place the TV on a soft surface such as a carpet, rug, or blanket, and avoid any plastic wrapping from...
... any sharp edges. To prevent scratches or damage to support the weight of the TV and keep it from the TV and stands. Installing the TV stands 1 Your TV includes a stand designed to the screen, place the TV on a soft surface such as a carpet, rug, or blanket, and avoid any plastic wrapping from...

Quickstart Guide English
Page 11
2 Insert the stands into the base of ports and their locations may be subject to the TV by inserting and tightening the two (2) included Phillips screws. The actual number of the TV. Secure each stand to change. Note: The image shown here is for illustrative purposes only and may vary, depending on a stable, level surface. English - 11 To ensure proper ventilation, leave at least 1" of space between the back of the TV and any other objects, like walls. When you are finished, place the TV on the model.
2 Insert the stands into the base of ports and their locations may be subject to the TV by inserting and tightening the two (2) included Phillips screws. The actual number of the TV. Secure each stand to change. Note: The image shown here is for illustrative purposes only and may vary, depending on a stable, level surface. English - 11 To ensure proper ventilation, leave at least 1" of space between the back of the TV and any other objects, like walls. When you are finished, place the TV on the model.

Quickstart Guide English
Page 21
... the instructions that came with a UL-listed wall mount bracket rated for illustrative purposes only and may vary, depending on the model. Remove the stands by loosening and removing the screws. 4. After you have determined that can begin the installation. Use only with your mount. Attach your TV and... the TV To mount your TV on a wall, you choose is capable of supporting the weight of the TV. Screw Size: Hole Pattern: Weight w/o Stand: D24-D1 D28h-D1 M4 100 mm (V) x 100 mm (H) 7.48 lbs 9.04 lbs Be sure the mount you will need a wall mount. Place the TV face-down...
... the instructions that came with a UL-listed wall mount bracket rated for illustrative purposes only and may vary, depending on the model. Remove the stands by loosening and removing the screws. 4. After you have determined that can begin the installation. Use only with your mount. Attach your TV and... the TV To mount your TV on a wall, you choose is capable of supporting the weight of the TV. Screw Size: Hole Pattern: Weight w/o Stand: D24-D1 D28h-D1 M4 100 mm (V) x 100 mm (H) 7.48 lbs 9.04 lbs Be sure the mount you will need a wall mount. Place the TV face-down...


