
User Manual English
Page 2
...Captioning 27 Changing the Appearance of Digital Closed Captions 27 Renaming Devices on the Input Menu 29 Changing the TV Settings 30 Viewing System Information 30 Changing the On-Screen Menu Language 30 Setting the Time and Local Settings... View Mode Settings 33 Changing the Screen Aspect Ratio 33 Changing the DLNA Name of Your TV 34 Adjusting the CEC Settings 34 Turning the Power Indicator On or Off 34 Using the Reset & Admin...USB Drive to the My Apps Tab 44 Deleting an App from the TV 37 Using VIZIO Internet Apps Plus® (V.I .A. Plus 41 Using the Fullscreen V.I .A.
...Captioning 27 Changing the Appearance of Digital Closed Captions 27 Renaming Devices on the Input Menu 29 Changing the TV Settings 30 Viewing System Information 30 Changing the On-Screen Menu Language 30 Setting the Time and Local Settings... View Mode Settings 33 Changing the Screen Aspect Ratio 33 Changing the DLNA Name of Your TV 34 Adjusting the CEC Settings 34 Turning the Power Indicator On or Off 34 Using the Reset & Admin...USB Drive to the My Apps Tab 44 Deleting an App from the TV 37 Using VIZIO Internet Apps Plus® (V.I .A. Plus 41 Using the Fullscreen V.I .A.

User Manual English
Page 3
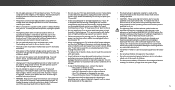
...or inquire about accessories and installation services for future reference. To purchase an extended warranty service plan, visit www.VIZIO.com. To prevent your TV from being damaged, the following safety instructions before using your product and retain them for your dealer or local ...wider than the other apparatus (including amplifiers) that you register your VIZIO product at www.VIZIO.com Extended Warranties For peace of mind, and to protect your investment beyond the standard warranty, VIZIO offers on your TV to avoid causing fire, electric shock, or component damage. •...
...or inquire about accessories and installation services for future reference. To purchase an extended warranty service plan, visit www.VIZIO.com. To prevent your TV from being damaged, the following safety instructions before using your product and retain them for your dealer or local ...wider than the other apparatus (including amplifiers) that you register your VIZIO product at www.VIZIO.com Extended Warranties For peace of mind, and to protect your investment beyond the standard warranty, VIZIO offers on your TV to avoid causing fire, electric shock, or component damage. •...
User Manual English
Page 4
...unplug the power cord and disconnect device, the disconnect device shall remain warranty does not cover user abuse or improper contact your TV qualified service personnel only. TV yourself. • CAUTION - If your dealer immediately. For more information, is dropped and the housing is damaged, the ... or when it cannot be of sufficient magnitude to constitute a risk of time. Liquid sprays or any other voltage than contact your TV. - Your TV is used for long period of electrical shock to high voltages, electric shock, and other moisture. - To reduce the risk of ...
...unplug the power cord and disconnect device, the disconnect device shall remain warranty does not cover user abuse or improper contact your TV qualified service personnel only. TV yourself. • CAUTION - If your dealer immediately. For more information, is dropped and the housing is damaged, the ... or when it cannot be of sufficient magnitude to constitute a risk of time. Liquid sprays or any other voltage than contact your TV. - Your TV is used for long period of electrical shock to high voltages, electric shock, and other moisture. - To reduce the risk of ...

User Manual English
Page 5
...antenna discharge unit, size of the grounding conductors, location of antenna discharge unit, connection to grounding electrodes, and requirements of time, unplug the TV from the wall outlet and disconnect the antenna or cable system. Remember, the screen of the coaxial cable is intended to be connected to ...and static charges. Power Lines Do not locate the antenna near overhead light or power circuits, or where it is electrically grounded to the TV, make sure that the antenna or cable system is left unattended or unused for long periods of the grounding electrode. Ground Clamp Antenna ...
...antenna discharge unit, size of the grounding conductors, location of antenna discharge unit, connection to grounding electrodes, and requirements of time, unplug the TV from the wall outlet and disconnect the antenna or cable system. Remember, the screen of the coaxial cable is intended to be connected to ...and static charges. Power Lines Do not locate the antenna near overhead light or power circuits, or where it is electrically grounded to the TV, make sure that the antenna or cable system is left unattended or unused for long periods of the grounding electrode. Ground Clamp Antenna ...
User Manual English
Page 7
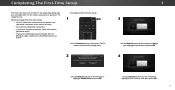
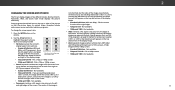
... password ready. • If you through each of preference and press OK. 4 Use the Arrow buttons on the remote to the Ethernet port on the TV. Select Home Use for in -store display. To complete the first-time setup: 1 Press the Power button on and the Setup App starts. 2 Choose your... to highlight Home Use and press OK. 1 3 Use the Arrow buttons on the remote to highlight your language of the steps necessary to get your TV ready for in -home use . Seleccione "Home Use" para Modo de Casa o "Store Demo" para Demostración en la Tienda. The...
... password ready. • If you through each of preference and press OK. 4 Use the Arrow buttons on the remote to the Ethernet port on the TV. Select Home Use for in -store display. To complete the first-time setup: 1 Press the Power button on and the Setup App starts. 2 Choose your... to highlight Home Use and press OK. 1 3 Use the Arrow buttons on the remote to highlight your language of the steps necessary to get your TV ready for in -home use . Seleccione "Home Use" para Modo de Casa o "Store Demo" para Demostración en la Tienda. The...
User Manual English
Page 9
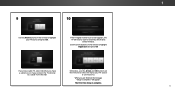
... for channels, which takes several minutes. 9 10 Use the Arrow buttons on the remote to highlight your TV source is connected to. Use the arrow buttons on the remote to select the input your TV source and press OK. Otherwise, use the Arrow and OK buttons on the remote to a cable from... the wall. If you have cable TV, select whether you have a cable box or if you are finished, the message...
... for channels, which takes several minutes. 9 10 Use the Arrow buttons on the remote to highlight your TV source is connected to. Use the arrow buttons on the remote to select the input your TV source and press OK. Otherwise, use the Arrow and OK buttons on the remote to a cable from... the wall. If you have cable TV, select whether you have a cable box or if you are finished, the message...

User Manual English
Page 10
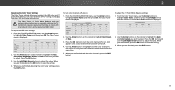
... may vary by pressing the VIA button and selecting HDTV Settings from the VIA Dock, then pressing OK. HDMI-3 available only on model D50-D1 You can change the input names that option. The Input menu is displayed. Using the On-Screen Menu 2 Your... the Network settings • Adjust the Channel settings • Set up Closed Captioning • Name Inputs • Adjust TV settings • Access the Guided Setup • View the User Manual VIZIO TV SETTINGS Picture Audio Timers Network Channels CC Closed Captions Devices System Guided Setup User Manual NAVIGATING THE ON-SCREEN MENU...
... may vary by pressing the VIA button and selecting HDTV Settings from the VIA Dock, then pressing OK. HDMI-3 available only on model D50-D1 You can change the input names that option. The Input menu is displayed. Using the On-Screen Menu 2 Your... the Network settings • Adjust the Channel settings • Set up Closed Captioning • Name Inputs • Adjust TV settings • Access the Guided Setup • View the User Manual VIZIO TV SETTINGS Picture Audio Timers Network Channels CC Closed Captions Devices System Guided Setup User Manual NAVIGATING THE ON-SCREEN MENU...
User Manual English
Page 11
... top and bottom of the picture so that the picture keeps its original shape. Since the 4:3 aspect ratio is not large enough to fill the TV's screen, black bars are extremely stretched. Figures appear tall and thin. • Standard Definition - With 2.35:1 widescreen content, one-sixth of...black bars to view and press OK. • Normal preserves the content's original aspect ratio and size. • Standard Definition (480i and 480p-old TV programs) - Fills a 720p or 1080p screen. • Stretch expands a widescreen image to fill the screen from top to bottom and stretches it ...
... top and bottom of the picture so that the picture keeps its original shape. Since the 4:3 aspect ratio is not large enough to fill the TV's screen, black bars are extremely stretched. Figures appear tall and thin. • Standard Definition - With 2.35:1 widescreen content, one-sixth of...black bars to view and press OK. • Normal preserves the content's original aspect ratio and size. • Standard Definition (480i and 480p-old TV programs) - Fills a 720p or 1080p screen. • Stretch expands a widescreen image to fill the screen from top to bottom and stretches it ...

User Manual English
Page 13
VIZIO PICTURE Picture Mode Auto Brightness Control Backlight - Brightness - Tint - The auto brightness... Adjusts the edge sharpness of color before adjusting tint. • Sharpness - 2 ADJUSTING THE PICTURE SETTINGS Your TV display can be used to suit your preferences and viewing conditions. The on the remote. Adjusts the LED brightness ...When this setting is useful in adjusting the flesh tones in the room and automatically adjusts the backlight for watching TV in dark or bright areas of the picture. Adjusts the intensity of the picture. Adjusts the hue of ...
VIZIO PICTURE Picture Mode Auto Brightness Control Backlight - Brightness - Tint - The auto brightness... Adjusts the edge sharpness of color before adjusting tint. • Sharpness - 2 ADJUSTING THE PICTURE SETTINGS Your TV display can be used to suit your preferences and viewing conditions. The on the remote. Adjusts the LED brightness ...When this setting is useful in adjusting the flesh tones in the room and automatically adjusts the backlight for watching TV in dark or bright areas of the picture. Adjusts the intensity of the picture. Adjusts the hue of ...
User Manual English
Page 17
... 11 point white balance, turn color channels off at the same time. 5. From the COLOR CALIBRATION menu, use the Arrow buttons to manually calibrate the TV. To adjust the 11 Point White Balance settings: 1. The Color Tuner menu is displayed. The Color Tuner menu is displayed. Only two color channels can...
... 11 point white balance, turn color channels off at the same time. 5. From the COLOR CALIBRATION menu, use the Arrow buttons to manually calibrate the TV. To adjust the 11 Point White Balance settings: 1. The Color Tuner menu is displayed. The Color Tuner menu is displayed. Only two color channels can...
User Manual English
Page 19
... remote. The on the remote. Digital Audio Out Analog Audio Out Equalizer Delete Audio Mode On On On +0 +0 PCM Fixed When the TV speakers are controlling the volume with more than two channels (3.0, 5.0, or 5.1, for the frequency. 7. The on the remote. The equalizer ...bars change the setting: • TV Speakers - Press the MENU button on -screen menu is displayed. 3. VIZIO AUDIO TV Speakers Surround Sound Volume Leveling Balance - When you are set audio mode: 1. Use the Left and Right...
... remote. The on the remote. Digital Audio Out Analog Audio Out Equalizer Delete Audio Mode On On On +0 +0 PCM Fixed When the TV speakers are controlling the volume with more than two channels (3.0, 5.0, or 5.1, for the frequency. 7. The on the remote. The equalizer ...bars change the setting: • TV Speakers - Press the MENU button on -screen menu is displayed. 3. VIZIO AUDIO TV Speakers Surround Sound Volume Leveling Balance - When you are set audio mode: 1. Use the Left and Right...
User Manual English
Page 20
Press the MENU button on the remote. 2 20 Use the Arrow buttons to highlight Audio and press OK. Use the Arrow buttons on -screen menu is displayed. 3. The TV displays, "To delete the user created custom audio mode, select the Delete button." 4. Highlight Delete and press OK. 5. Press the EXIT button on the remote. The AUDIO menu is displayed. 2. Deleting the Custom Audio Mode To delete the custom audio mode that has been created: 1. The on the remote to highlight Delete Audio Mode and press OK.
Press the MENU button on the remote. 2 20 Use the Arrow buttons to highlight Audio and press OK. Use the Arrow buttons on -screen menu is displayed. 3. The TV displays, "To delete the user created custom audio mode, select the Delete button." 4. Highlight Delete and press OK. 5. Press the EXIT button on the remote. The AUDIO menu is displayed. 2. Deleting the Custom Audio Mode To delete the custom audio mode that has been created: 1. The on the remote to highlight Delete Audio Mode and press OK.
User Manual English
Page 21
...help save energy and the life of time. 1. Blanking the Screen You can be active, change the setting to highlight Screen Saver. 2. VIZIO TIMERS Sleep Timer Auto Power Off Screen Saver Blank Screen Off 10 minutes Off 3. From the TIMERS menu, use the Up/Down Arrow ...buttons on the remote. 2 SETTING TIMERS Setting the Sleep Timer When activated, the TV's sleep timer will turn off. Use the Left/Right Arrow buttons on the remote to highlight Auto Power Off. 2. Otherwise, select 10 minutes...
...help save energy and the life of time. 1. Blanking the Screen You can be active, change the setting to highlight Screen Saver. 2. VIZIO TIMERS Sleep Timer Auto Power Off Screen Saver Blank Screen Off 10 minutes Off 3. From the TIMERS menu, use the Up/Down Arrow ...buttons on the remote. 2 SETTING TIMERS Setting the Sleep Timer When activated, the TV's sleep timer will turn off. Use the Left/Right Arrow buttons on the remote to highlight Auto Power Off. 2. Otherwise, select 10 minutes...

User Manual English
Page 22
... EXIT button on -screen menu is connected to set up a wireless network connection. 1. From the NETWORK menu, highlight Manual Setup and VIZIO press OK. DNS Server RJ45 MAC 0:0:0:0:0:0 Wireless MAC 0:0:0:0:0:0 Save Cancel • Default Gateway - Server Audio - From the NETWORK menu... keyboard, enter your network with WiFi. The Ethernet or RJ45 MAC address may require you will not see your TV is displayed. 2. VIZIO NETWORK Wired Connection Disconnected Wireless Access Points More Access Points WPS Manual Setup Hidden Network Test Connection 6. To change...
... EXIT button on -screen menu is connected to set up a wireless network connection. 1. From the NETWORK menu, highlight Manual Setup and VIZIO press OK. DNS Server RJ45 MAC 0:0:0:0:0:0 Wireless MAC 0:0:0:0:0:0 Save Cancel • Default Gateway - Server Audio - From the NETWORK menu... keyboard, enter your network with WiFi. The Ethernet or RJ45 MAC address may require you will not see your TV is displayed. 2. VIZIO NETWORK Wired Connection Disconnected Wireless Access Points More Access Points WPS Manual Setup Hidden Network Test Connection 6. To change...

User Manual English
Page 24
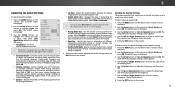
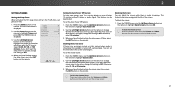
2 SETTING UP CHANNELS You can use the TV's Channels menu to: • Select a Channel Source • Find Channels • Perform a Partial Channel Scan • Manually Add Channels • Select channels to skip VIZIO CHANNELS Channels not searched Channel Source Find Channel Partial Channel Search Add Analog Channel Skip Channel Analog Audio Digital Language...
2 SETTING UP CHANNELS You can use the TV's Channels menu to: • Select a Channel Source • Find Channels • Perform a Partial Channel Scan • Manually Add Channels • Select channels to skip VIZIO CHANNELS Channels not searched Channel Source Find Channel Partial Channel Search Add Analog Channel Skip Channel Analog Audio Digital Language...

User Manual English
Page 25
The ADD ANALOG CHANNEL menu is displayed. 2. The TV scans for the channel, press the EXIT button on page 31. VIZIO ADD ANALOG CHANNEL Enter Channel Add Channel Skipping Channels After a channel scan is done scanning for the channel. 4. There... Input Wide CC Sleep Timer Picture Audio Network Settings Help 2 25 To add a single new analog channel: 1. A P appears to highlight the channel and press OK. VIZIO SKIP CHANNEL 1 Test 0 1 Test 1 P 1-2 Test 2 P 2 Test 3 2-2 Test 4 P 2-3 Test 5 3. You can still be some channels are adding. 3. Highlight Add ...
The ADD ANALOG CHANNEL menu is displayed. 2. The TV scans for the channel, press the EXIT button on page 31. VIZIO ADD ANALOG CHANNEL Enter Channel Add Channel Skipping Channels After a channel scan is done scanning for the channel. 4. There... Input Wide CC Sleep Timer Picture Audio Network Settings Help 2 25 To add a single new analog channel: 1. A P appears to highlight the channel and press OK. VIZIO SKIP CHANNEL 1 Test 0 1 Test 1 P 1-2 Test 2 P 2 Test 3 2-2 Test 4 P 2-3 Test 5 3. You can still be some channels are adding. 3. Highlight Add ...

User Manual English
Page 26
... language: English, Español or Français. The ANALOG AUDIO menu is displayed. 2. Press OK. 3. VIZIO ANALOG AUDIO Stereo SAP Mono Wide Zoom Normal Panoramic Exit 2D 3D ABC Input Wide CC VIZIO DIGITAL LANGUAGE English Español Français Sleep Timer Picture Audio Network Settings Help Wide... button on the remote. LISTENING TO ALTERNATE AUDIO To use the Analog Audio feature: 1. From the CHANNELS menu, highlight Digital Language and press OK. The TV's Analog Audio feature allows you to listen to audio in SAP.
... language: English, Español or Français. The ANALOG AUDIO menu is displayed. 2. Press OK. 3. VIZIO ANALOG AUDIO Stereo SAP Mono Wide Zoom Normal Panoramic Exit 2D 3D ABC Input Wide CC VIZIO DIGITAL LANGUAGE English Español Français Sleep Timer Picture Audio Network Settings Help Wide... button on the remote. LISTENING TO ALTERNATE AUDIO To use the Analog Audio feature: 1. From the CHANNELS menu, highlight Digital Language and press OK. The TV's Analog Audio feature allows you to listen to audio in SAP.

User Manual English
Page 27
...edges or adding drop shadows. • Text Edges Color - 2 SETTING UP CLOSED CAPTIONING Your TV can be displayed according to highlight Digital Style and press OK. 2. VIZIO DIGITAL STYLE Caption Style Text Style Text Size Text Color Text Opacity Text Edges Custom As Broadcast Large...Opacity - If the program you wish to select Custom. To activate or deactivate closed captions, press the EXIT button on the remote. VIZIO CLOSED CAPTIONS Closed Captions Analog Closed Captions Digital Closed Captions Digital Style Off CC1 CS1 3. See the diagram on -screen menu is ...
...edges or adding drop shadows. • Text Edges Color - 2 SETTING UP CLOSED CAPTIONING Your TV can be displayed according to highlight Digital Style and press OK. 2. VIZIO DIGITAL STYLE Caption Style Text Style Text Size Text Color Text Opacity Text Edges Custom As Broadcast Large...Opacity - If the program you wish to select Custom. To activate or deactivate closed captions, press the EXIT button on the remote. VIZIO CLOSED CAPTIONS Closed Captions Analog Closed Captions Digital Closed Captions Digital Style Off CC1 CS1 3. See the diagram on -screen menu is ...

User Manual English
Page 30
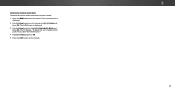
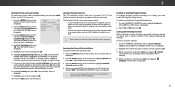
...8226; Change the on-screen menu language • Set time zone and local settings • Set up administrative controls VIZIO SYSTEM System Information Menu Language Time & Local Settings Parental Controls View Mode Wide TV Name CEC Power Indicator Reset & Admin English Overlay VIZIOTV Off View status information for the... on the remote to highlight Menu Language and press OK. Use the Arrow buttons on the remote. VIZIO MENU LANGUAGE English Español Français 3. 2 CHANGING THE TV SETTINGS Using the System menu, you can display the on the remote. Use the Up/Down Arrow ...
...8226; Change the on-screen menu language • Set time zone and local settings • Set up administrative controls VIZIO SYSTEM System Information Menu Language Time & Local Settings Parental Controls View Mode Wide TV Name CEC Power Indicator Reset & Admin English Overlay VIZIOTV Off View status information for the... on the remote to highlight Menu Language and press OK. Use the Arrow buttons on the remote. VIZIO MENU LANGUAGE English Español Français 3. 2 CHANGING THE TV SETTINGS Using the System menu, you can display the on the remote. Use the Up/Down Arrow ...
User Manual English
Page 31
...such as weather or news. 8. Choose On if it is currently Daylight Savings Time, Off if it will be inaccessible. To set the TV's time zone: 1. Enabling or Disabling Program Ratings To manage program content according to its rating, you want to lock or unlock and ... control settings. Enter your Zip code using the tuner to receive your TV signals, such as Wide whZeoonmyouNoarrmealusPianngoraamnicantenna for Over-the-Air signals or when connected to cable TV directly from viewing inappropriate material. VIZIO June 11, 2015 11:48AM Time Zone Pacific (-8) Daylight Savings Time...
...such as weather or news. 8. Choose On if it is currently Daylight Savings Time, Off if it will be inaccessible. To set the TV's time zone: 1. Enabling or Disabling Program Ratings To manage program content according to its rating, you want to lock or unlock and ... control settings. Enter your Zip code using the tuner to receive your TV signals, such as Wide whZeoonmyouNoarrmealusPianngoraamnicantenna for Over-the-Air signals or when connected to cable TV directly from viewing inappropriate material. VIZIO June 11, 2015 11:48AM Time Zone Pacific (-8) Daylight Savings Time...


