
Camera Manual
Page 6
... the battery into your digital camera. These settings can be prompted to select a language for the first time the camera will take you select "No" and decide to leave the camera setup, the camera will be set to continue with the initial camera setup. Select "Yes" to continue or "No" to the computer. A charge light will turn on the LCD display. A message will appear: "Continue with the USB cable either to the AC adapter or...
... the battery into your digital camera. These settings can be prompted to select a language for the first time the camera will take you select "No" and decide to leave the camera setup, the camera will be set to continue with the initial camera setup. Select "Yes" to continue or "No" to the computer. A charge light will turn on the LCD display. A message will appear: "Continue with the USB cable either to the AC adapter or...

Camera Manual
Page 8
... Camera Modes Your camera has different modes for the Photo Capture mode, press the SET button while in the Photo Capture mode. To take a video, aim your camera‟s memory card. To access the various menus for the various camera functions. A red record indicator will appear on your camera. Playback Mode (Photos & Videos) Use this mode to start the record. After turning on your camera as desired and press the Shutter button to view and manage the photos and videos on the LCD screen while record is powered ON. Photo Capture Mode Use...
... Camera Modes Your camera has different modes for the Photo Capture mode, press the SET button while in the Photo Capture mode. To take a video, aim your camera‟s memory card. To access the various menus for the various camera functions. A red record indicator will appear on your camera. Playback Mode (Photos & Videos) Use this mode to start the record. After turning on your camera as desired and press the Shutter button to view and manage the photos and videos on the LCD screen while record is powered ON. Photo Capture Mode Use...

Camera Manual
Page 9
... fps), 320X240 pixels (30 fps) File Format JPEG/AVI Internal Memory 1 Test Photo Use Only External Memory SD Card (up to 32GB) LCD Display 2.4 Inch TFT Lens Focus Length f=6.0-18mm F3.0-5.5 Zoom 4X Digital Zoom Exposure -3.0EV ~ +3.0EV White Balance Auto, Daylight, Cloudy, Fluorescent , Incandescent ISO Scene Flash Auto / 100 / 200 / 400 Auto / Scenery / Portrait / Night Scenery / Night Portrait / High Sensitivity / Sport / Beach / Party Auto/Force/Red Eye Reduction/Off Print Photos Yes Self-Timer 2, 5 or 10 second delay Anti...
... fps), 320X240 pixels (30 fps) File Format JPEG/AVI Internal Memory 1 Test Photo Use Only External Memory SD Card (up to 32GB) LCD Display 2.4 Inch TFT Lens Focus Length f=6.0-18mm F3.0-5.5 Zoom 4X Digital Zoom Exposure -3.0EV ~ +3.0EV White Balance Auto, Daylight, Cloudy, Fluorescent , Incandescent ISO Scene Flash Auto / 100 / 200 / 400 Auto / Scenery / Portrait / Night Scenery / Night Portrait / High Sensitivity / Sport / Beach / Party Auto/Force/Red Eye Reduction/Off Print Photos Yes Self-Timer 2, 5 or 10 second delay Anti...

Camera Manual
Page 11
... LCD screen are the best default settings so that you have been inserted properly into your camera is first powered ON, the Photo Capture Mode will power off your camera after a specific period of time that appear on , you can press the Power button again at any point to turn your digital camera. The Auto Power Off settings can begin to view the photos and videos you can be in the Video/Photo Capture Mode menu. Changing Camera Mode Your camera...
... LCD screen are the best default settings so that you have been inserted properly into your camera is first powered ON, the Photo Capture Mode will power off your camera after a specific period of time that appear on , you can press the Power button again at any point to turn your digital camera. The Auto Power Off settings can begin to view the photos and videos you can be in the Video/Photo Capture Mode menu. Changing Camera Mode Your camera...

Camera Manual
Page 13
... also capture your digital camera. Note: HD is available for Photo Capture mode only and not for Video Capture Mode. The camera automatically opens to the Photo Capture Mode. 2) The camera icon will appear on the top right corner of the LCD screen. 4) Use the LCD display on the top left corner of the LCD. 3) The amount of the camera to capture and save your photo to the memory card. 7) You can be...
... also capture your digital camera. Note: HD is available for Photo Capture mode only and not for Video Capture Mode. The camera automatically opens to the Photo Capture Mode. 2) The camera icon will appear on the top right corner of the LCD screen. 4) Use the LCD display on the top left corner of the LCD. 3) The amount of the camera to capture and save your photo to the memory card. 7) You can be...
Camera Manual
Page 14
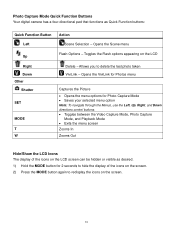
... Shutter SET MODE T W Delete - Allows you to delete the last photo taken ViviLink - Photo Capture Mode Quick Function Buttons Your digital camera has a four-directional pad that functions as desired. 1) Hold the MODE button for Photo Capture Mode Saves your selected menu option Note: To navigate through the Menus, use the Left, Up, Right, and Down directions control buttons. Toggles between the Video Capture Mode, Photo Capture Mode, and Playback Mode Exits the menu screen Zooms In Zooms Out Hide/Show the LCD Icons...
... Shutter SET MODE T W Delete - Allows you to delete the last photo taken ViviLink - Photo Capture Mode Quick Function Buttons Your digital camera has a four-directional pad that functions as desired. 1) Hold the MODE button for Photo Capture Mode Saves your selected menu option Note: To navigate through the Menus, use the Left, Up, Right, and Down directions control buttons. Toggles between the Video Capture Mode, Photo Capture Mode, and Playback Mode Exits the menu screen Zooms In Zooms Out Hide/Show the LCD Icons...
Camera Manual
Page 17
... take up more of the images taken by your selection will display on the LCD screen. 9) Remember that this setting will appear on the selected item. 6) Press the LEFT or RIGHT button to select the next menu item. 7) Press the MODE button to exit the menu and return to your previous mode. 8) An icon reflecting your camera until you manually change the setting or restore the camera‟s default factory settings...
... take up more of the images taken by your selection will display on the LCD screen. 9) Remember that this setting will appear on the selected item. 6) Press the LEFT or RIGHT button to select the next menu item. 7) Press the MODE button to exit the menu and return to your previous mode. 8) An icon reflecting your camera until you manually change the setting or restore the camera‟s default factory settings...
Camera Manual
Page 18
... mode. 8) An icon reflecting your selection will display on the LCD screen. 9) Remember that the camera‟s Shutter button is an optimal feature if you don‟t just want to take up more memory on your camera. 1) Press the SET button to open the menus for the current mode. 2) Press the LEFT or RIGHT direction control buttons to scroll and select the Image Quality menu. 3) Press the UP or DOWN direction control buttons...
... mode. 8) An icon reflecting your selection will display on the LCD screen. 9) Remember that the camera‟s Shutter button is an optimal feature if you don‟t just want to take up more memory on your camera. 1) Press the SET button to open the menus for the current mode. 2) Press the LEFT or RIGHT direction control buttons to scroll and select the Image Quality menu. 3) Press the UP or DOWN direction control buttons...
Camera Manual
Page 20
... of the picture as the basis for balancing the other colors and focus in Macro mode. The Macro option is meant to ensure that the color and focus of the subject`s head. 1) Press the SET button to open the menus for at least 20% (1 / 5th) of the subject(s) you start using your selection will display on the LCD screen. 9) Remember that this setting will not work if the camera is...
... of the picture as the basis for balancing the other colors and focus in Macro mode. The Macro option is meant to ensure that the color and focus of the subject`s head. 1) Press the SET button to open the menus for at least 20% (1 / 5th) of the subject(s) you start using your selection will display on the LCD screen. 9) Remember that this setting will not work if the camera is...

Camera Manual
Page 21
... MODE button to exit the menu and return to your previous mode. 8) An icon reflecting your camera and assists you manually change the setting or restore the camera‟s default factory settings. 20 When Macro is set to „On‟. Smile Capture will be facing the camera and must be saved by default when you start using your camera until the green square(s) appears around the subject`s face. The face of the picture...
... MODE button to exit the menu and return to your previous mode. 8) An icon reflecting your camera and assists you manually change the setting or restore the camera‟s default factory settings. 20 When Macro is set to „On‟. Smile Capture will be facing the camera and must be saved by default when you start using your camera until the green square(s) appears around the subject`s face. The face of the picture...
Camera Manual
Page 22
... or RIGHT direction control buttons to scroll and select the Macro menu. 3) Press the UP or DOWN direction control buttons to scroll through the menu options. 4) Press the SET button to select and save the desired option. 5) A selected option icon will display on the type of light source in the images that this setting will appear on the LCD. White Balance Menu The White Balance feature allows your camera to your previous mode. 8) An icon reflecting...
... or RIGHT direction control buttons to scroll and select the Macro menu. 3) Press the UP or DOWN direction control buttons to scroll through the menu options. 4) Press the SET button to select and save the desired option. 5) A selected option icon will display on the type of light source in the images that this setting will appear on the LCD. White Balance Menu The White Balance feature allows your camera to your previous mode. 8) An icon reflecting...
Camera Manual
Page 30
... menu to view the Firmware version on your camera until you would like to delete individual images, use the Format Memory Card menu to begin the format. Keep in the camera‟s Playback mode. 1) Press the SET button to open the menus for the current mode. 2) Press the LEFT or RIGHT direction control buttons to scroll and select the Firmware menu. 3) The "Default Setting" is currently on your camera or to reset your camera settings to the Factory Default Settings. 1) Press the SET button to open...
... menu to view the Firmware version on your camera until you would like to delete individual images, use the Format Memory Card menu to begin the format. Keep in the camera‟s Playback mode. 1) Press the SET button to open the menus for the current mode. 2) Press the LEFT or RIGHT direction control buttons to scroll and select the Firmware menu. 3) The "Default Setting" is currently on your camera or to reset your camera settings to the Factory Default Settings. 1) Press the SET button to open...

Camera Manual
Page 31
... mode with the digital camera settings set to the Factory Default Settings. 7) If you would like to exit the format, select „No‟ and press the SET button. Use the UP / DOWN / LEFT / RIGHT direction buttons to navigate around the photo. 30 The settings will be reset. If you do not, the next time your camera is recommended to select your system Language, Date/Time and ViviLink for Photos and Videos. Viewing Photos on Your Camera...
... mode with the digital camera settings set to the Factory Default Settings. 7) If you would like to exit the format, select „No‟ and press the SET button. Use the UP / DOWN / LEFT / RIGHT direction buttons to navigate around the photo. 30 The settings will be reset. If you do not, the next time your camera is recommended to select your system Language, Date/Time and ViviLink for Photos and Videos. Viewing Photos on Your Camera...

Camera Manual
Page 32
..., Right, and Down directions control buttons. 31 Photo Playback Mode Quick Function Buttons Your digital camera has a four-directional pad that functions as a Slide Show with 3, 5 or 10 second intervals (to view by using the Thumbnail View. Quick Function Button Left Up Right Down Other W/Zoom out SET Action Displays the PREVIOUS image Views all the Photos as Quick Function buttons. The images on your camera will be displayed in the Thumbnail View. 3) Use the UP / DOWN / LEFT / RIGHT direction buttons to scroll and select...
..., Right, and Down directions control buttons. 31 Photo Playback Mode Quick Function Buttons Your digital camera has a four-directional pad that functions as a Slide Show with 3, 5 or 10 second intervals (to view by using the Thumbnail View. Quick Function Button Left Up Right Down Other W/Zoom out SET Action Displays the PREVIOUS image Views all the Photos as Quick Function buttons. The images on your camera will be displayed in the Thumbnail View. 3) Use the UP / DOWN / LEFT / RIGHT direction buttons to scroll and select...

Camera Manual
Page 33
... press the SET button to confirm. and press SET button. Photo Playback Mode Menus The following are the menus that appear in your camera‟s Photo Playback Mode: Delete Menu While in the Playback Mode, you can delete pictures from your SD Memory card, select „Delete All Images‟ and press the SET button. If you would like to proceed with deleting all the images (videos and photos) you have saved on your camera using the Delete menu. 1) View the photo you...
... press the SET button to confirm. and press SET button. Photo Playback Mode Menus The following are the menus that appear in your camera‟s Photo Playback Mode: Delete Menu While in the Playback Mode, you can delete pictures from your SD Memory card, select „Delete All Images‟ and press the SET button. If you would like to proceed with deleting all the images (videos and photos) you have saved on your camera using the Delete menu. 1) View the photo you...

Camera Manual
Page 49
... MODE button to exit the menu and return to delete individual images, use the Format Memory Card menu to a frequency that this setting will permanently delete all of the content at one time. If you would like to your previous mode. 8) Remember that does not match your country‟s electric current, you manually change the setting or restore the camera‟s default factory settings. Format Memory Card Menu You can use the delete menu in mind that formatting the memory card...
... MODE button to exit the menu and return to delete individual images, use the Format Memory Card menu to a frequency that this setting will permanently delete all of the content at one time. If you would like to your previous mode. 8) Remember that does not match your country‟s electric current, you manually change the setting or restore the camera‟s default factory settings. Format Memory Card Menu You can use the delete menu in mind that formatting the memory card...

Camera Manual
Page 50
The memory card will be completely formatted. If you do not, the next time your system Language, Date/Time and ViviLink for the current mode. 2) Press the LEFT or RIGHT direction control buttons to scroll and select the Firmware menu. 3) The "Default Setting" is recommended to select your camera is powered on your camera or to reset your camera settings to the Factory Default Settings. 1) Press the SET button to begin. You will be asked to confirm...
The memory card will be completely formatted. If you do not, the next time your system Language, Date/Time and ViviLink for the current mode. 2) Press the LEFT or RIGHT direction control buttons to scroll and select the Firmware menu. 3) The "Default Setting" is recommended to select your camera is powered on your camera or to reset your camera settings to the Factory Default Settings. 1) Press the SET button to begin. You will be asked to confirm...
Camera Manual
Page 51
... playing all the icons on your selected video: Press the Shutter button to START playing the video. Press the Shutter button again to PAUSE the video and to continue playing and pausing as needed. While the Video is full size you wish to view by default. The images on your camera will appear in Photo Capture mode by using the Thumbnail View. Thumbnail View Easily navigate and select the image you can use the direction buttons...
... playing all the icons on your selected video: Press the Shutter button to START playing the video. Press the Shutter button again to PAUSE the video and to continue playing and pausing as needed. While the Video is full size you wish to view by default. The images on your camera will appear in Photo Capture mode by using the Thumbnail View. Thumbnail View Easily navigate and select the image you can use the direction buttons...
Camera Manual
Page 56
... Image Manager" installer create the folder to where the program will have internet access, the "Choose your language" window opens, choose your language and click "Next" to open the application. 13) On Macintosh: Click the "Quit" button when the installation is complete. Connecting the Camera to the Computer 1) Use the USB cable that came with your camera to connect your camera to your computer. 2) Power the camera ON. 3) The first time...
... Image Manager" installer create the folder to where the program will have internet access, the "Choose your language" window opens, choose your language and click "Next" to open the application. 13) On Macintosh: Click the "Quit" button when the installation is complete. Connecting the Camera to the Computer 1) Use the USB cable that came with your camera to connect your camera to your computer. 2) Power the camera ON. 3) The first time...

Camera Manual
Page 61
... camera powers off before the camera powers off nothing will answer your local toll free number. This camera requires an SD card for ? If the photos are looking for normal use. The images were also deleted from there. You can be uploaded quickly before you are saved to the SD memory card then all the photos should appear. What do I do I make sure I recover images that you would like to take...
... camera powers off before the camera powers off nothing will answer your local toll free number. This camera requires an SD card for ? If the photos are looking for normal use. The images were also deleted from there. You can be uploaded quickly before you are saved to the SD memory card then all the photos should appear. What do I do I make sure I recover images that you would like to take...


