
Camera Manual
Page 2
... ...3 INTRODUCTION ...3 TRANSFERRING YOUR PHOTOS FROM THE CAMERA TO AN IPAD ...4 USING THE VIVITAR MOBILE EXPERIENCE APPLICATION...7 Part 2: ViviCam i7 Digital Camera ...17 INTRODUCTION ...17 WHAT'S INCLUDED...18 PARTS OF THE CAMERA ...19 INITIAL CAMERA SETUP ...20 MAIN CAMERA MODES ...25 CAMERA TECHNICAL SPECIFICATIONS ...26 SYSTEM REQUIREMENTS...27 POWERING THE CAMERA ON/OFF ...28 CHANGING CAMERA MODE ...29 NAVIGATING THE MENUS ...30...
... ...3 INTRODUCTION ...3 TRANSFERRING YOUR PHOTOS FROM THE CAMERA TO AN IPAD ...4 USING THE VIVITAR MOBILE EXPERIENCE APPLICATION...7 Part 2: ViviCam i7 Digital Camera ...17 INTRODUCTION ...17 WHAT'S INCLUDED...18 PARTS OF THE CAMERA ...19 INITIAL CAMERA SETUP ...20 MAIN CAMERA MODES ...25 CAMERA TECHNICAL SPECIFICATIONS ...26 SYSTEM REQUIREMENTS...27 POWERING THE CAMERA ON/OFF ...28 CHANGING CAMERA MODE ...29 NAVIGATING THE MENUS ...30...
Camera Manual
Page 3
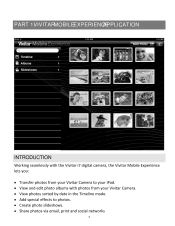
View photos sorted by date in the Timeline mode. Share photos via email, print and social networks 3 View and edit photo albums with the Vivitar i7 digital camera, the Vivitar Mobile Experience lets you Transfer photos from your Vivitar Camera. Add special effects to your iPad. Create photo slideshows. PART 1: VIVITARMOBILEEXPERIENCE APPLICATION INTRODUCTION Working seamlessly with photos from your Vivitar Camera to photos.
View photos sorted by date in the Timeline mode. Share photos via email, print and social networks 3 View and edit photo albums with the Vivitar i7 digital camera, the Vivitar Mobile Experience lets you Transfer photos from your Vivitar Camera. Add special effects to your iPad. Create photo slideshows. PART 1: VIVITARMOBILEEXPERIENCE APPLICATION INTRODUCTION Working seamlessly with photos from your Vivitar Camera to photos.

Camera Manual
Page 17
Important: After installing, your camera. PART2: VIVICAMi7 DIGITAL CAMERA ViviCam i7 INTRODUCTION Thank you need to be purchased separately. 17 NOTE : Your camera needs an SD Memory card (up to 32GB) for purchasing this manual carefully first in order to take quality digital photos is included with your must format the SD Memory Card before first use . Everything you for normal use by selecting the "Format Memory Card" camera menu option. Please read this digital camera. SD Memory cards are not included and need to get the most out of your digital camera.
Important: After installing, your camera. PART2: VIVICAMi7 DIGITAL CAMERA ViviCam i7 INTRODUCTION Thank you need to be purchased separately. 17 NOTE : Your camera needs an SD Memory card (up to 32GB) for purchasing this manual carefully first in order to take quality digital photos is included with your must format the SD Memory Card before first use . Everything you for normal use by selecting the "Format Memory Card" camera menu option. Please read this digital camera. SD Memory cards are not included and need to get the most out of your digital camera.
Camera Manual
Page 18
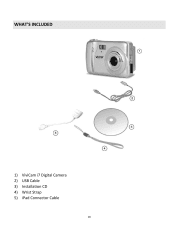
WHAT'S INCLUDED 1) 2) 3) 4) 5) ViviCam i7 Digital Camera USB Cable Installation CD Wrist Strap iPad Connector Cable 18
WHAT'S INCLUDED 1) 2) 3) 4) 5) ViviCam i7 Digital Camera USB Cable Installation CD Wrist Strap iPad Connector Cable 18

Camera Manual
Page 19
PARTS OF THE CAMERA 1) 2) 3) 4) 5) 6) 7) 8) 9) 10) 11) Power Button Shutter Button LCD Screen W / Zoom Out T / Zoom In LED Light MODE Button SET (Menu / OK) Button Scene / Left Button Flash / Up / Slide Show Button Delete / Right Button 12) 13) 14) 15) 16) 17) 18) 19) 20) 21) 22) 23) ViviLink / Down Button Speaker Flash Digital Lens SD Memory Card Slot USB Port MACRO Switch Battery Compartment Tripod Mount Wrist Strap Connector Microphone Self-Timer LED Indicator 19
PARTS OF THE CAMERA 1) 2) 3) 4) 5) 6) 7) 8) 9) 10) 11) Power Button Shutter Button LCD Screen W / Zoom Out T / Zoom In LED Light MODE Button SET (Menu / OK) Button Scene / Left Button Flash / Up / Slide Show Button Delete / Right Button 12) 13) 14) 15) 16) 17) 18) 19) 20) 21) 22) 23) ViviLink / Down Button Speaker Flash Digital Lens SD Memory Card Slot USB Port MACRO Switch Battery Compartment Tripod Mount Wrist Strap Connector Microphone Self-Timer LED Indicator 19

Camera Manual
Page 20
Batteries not included. See illustration above. NOTE : Remove the batteries from the camera when not in use for an extended period. Do not mix alkaline and non-alkaline batteries. Rechargeable batteries not recommended. &#... When the battery power is low the battery icon turns red and the camera will automatically turn off a few seconds later. INITIAL CAMERA SETUP INSTALLING THE BATTER IES Make sure the batteries have been inserted properly into your digital camera, according to the polarity shown inside the battery compartment. Alkaline batteries are ...
Batteries not included. See illustration above. NOTE : Remove the batteries from the camera when not in use for an extended period. Do not mix alkaline and non-alkaline batteries. Rechargeable batteries not recommended. &#... When the battery power is low the battery icon turns red and the camera will automatically turn off a few seconds later. INITIAL CAMERA SETUP INSTALLING THE BATTER IES Make sure the batteries have been inserted properly into your digital camera, according to the polarity shown inside the battery compartment. Alkaline batteries are ...

Camera Manual
Page 25
... the Photo Capture mode. The picture will appear on your camera as desired. Video Capture Mode Use this mode to capture videos with your digital camera. Photo Capture Mode Use this mode to capture pictures with your camera. To access the various menus for photos and videos, press... the SET button while in progress. To take a picture, aim your camera after the camera has been powered ON. After...
... the Photo Capture mode. The picture will appear on your camera as desired. Video Capture Mode Use this mode to capture videos with your digital camera. Photo Capture Mode Use this mode to capture pictures with your camera. To access the various menus for photos and videos, press... the SET button while in progress. To take a picture, aim your camera after the camera has been powered ON. After...

Camera Manual
Page 26
CAMERA TECHNICALCIFICATIONS SPE Image Sensor CMOS Sensor 3072 x 2304 (7M) / 2048 x 1536 (3M) / Image Resolution 1920 x 1080 (2MHD) / 640 x 480 (VGA) File Format JPEG (Photo) Internal Memory 1 Test Photo Use Only External Memory SD Memory Card (up to 32GB) LCD Display 1.8 Inch Preview Screen Lens f=7.0 mm F3.0 Zoom 4X Digital Zoom Exposure -3.0EV...
CAMERA TECHNICALCIFICATIONS SPE Image Sensor CMOS Sensor 3072 x 2304 (7M) / 2048 x 1536 (3M) / Image Resolution 1920 x 1080 (2MHD) / 640 x 480 (VGA) File Format JPEG (Photo) Internal Memory 1 Test Photo Use Only External Memory SD Memory Card (up to 32GB) LCD Display 1.8 Inch Preview Screen Lens f=7.0 mm F3.0 Zoom 4X Digital Zoom Exposure -3.0EV...

Camera Manual
Page 28
... not included) Please see Initial CameraSetupfor more information. NOTE : Your digital camera also has an Auto Power Off feature that will power off completely. POWERING THE CAMERA OFF While the camera is left idle. POWERING THE CAMERA ON Press the Power button to turn your camera. (SD card up to 32GB - The Auto Power Off settings...
... not included) Please see Initial CameraSetupfor more information. NOTE : Your digital camera also has an Auto Power Off feature that will power off completely. POWERING THE CAMERA OFF While the camera is left idle. POWERING THE CAMERA ON Press the Power button to turn your camera. (SD card up to 32GB - The Auto Power Off settings...

Camera Manual
Page 31
... to capture pictures with your subject up to the camera's internal memory (limit one photo) or SD memory card. NOTE : After each photo is taken, the photo counter on the top right of the LCD screen shows how many photos can magnify your digital camera. You can be saved to 4 times using the... digital zoom. NOTE : The actual shape of the Micro SD Memory Card. This depends on the selected image resolution setting and the...
... to capture pictures with your subject up to the camera's internal memory (limit one photo) or SD memory card. NOTE : After each photo is taken, the photo counter on the top right of the LCD screen shows how many photos can magnify your digital camera. You can be saved to 4 times using the... digital zoom. NOTE : The actual shape of the Micro SD Memory Card. This depends on the selected image resolution setting and the...

Camera Manual
Page 32
... Out 32 Toggles the Flash options appearing on the LCD Delete - Opens the Scene menu Up Flash Options - PHOTO CAPTURE MODE UICK Q FUNCTION BUTTON S Your digital camera has a four-directional pad that functions as Quick Function buttons: Button Left Function Scene Selection -
... Out 32 Toggles the Flash options appearing on the LCD Delete - Opens the Scene menu Up Flash Options - PHOTO CAPTURE MODE UICK Q FUNCTION BUTTON S Your digital camera has a four-directional pad that functions as Quick Function buttons: Button Left Function Scene Selection -

Camera Manual
Page 47
...(Factory Default Settings) Menu Use this menu to view the Firmware version on , you do not, the next time your camera is selected. 4) Press the SET button to reset the camera to the factory default settings. 5) You will be asked to confirm the resetting to the factory default settings. 6) Select...and return to the previous mode without resetting to the default settings. 7) Select "Yes" and press the SET button to proceed with the digital camera settings set to the Factory Default Settings. You will then automatically exit the menu and return to open the menus for Photos and Videos. NOTE...
...(Factory Default Settings) Menu Use this menu to view the Firmware version on , you do not, the next time your camera is selected. 4) Press the SET button to reset the camera to the factory default settings. 5) You will be asked to confirm the resetting to the factory default settings. 6) Select...and return to the previous mode without resetting to the default settings. 7) Select "Yes" and press the SET button to proceed with the digital camera settings set to the Factory Default Settings. You will then automatically exit the menu and return to open the menus for Photos and Videos. NOTE...

Camera Manual
Page 49
All the images on your camera will be displayed in the Thumbnail View: press the UP / DOWN / LEFT / RIGHT direction buttons 49 PH OTO P LAYBACK MODE QUICK UNCTION F BUTTONS Your digital camera has a four-directional pad that functions as a Slide Show with 3, 5 or 10 second ...intervals. Displays the NEXT image - The images on your camera will appear in the Thumbnail View. 2) Use the UP / DOWN / LEFT ...
All the images on your camera will be displayed in the Thumbnail View: press the UP / DOWN / LEFT / RIGHT direction buttons 49 PH OTO P LAYBACK MODE QUICK UNCTION F BUTTONS Your digital camera has a four-directional pad that functions as a Slide Show with 3, 5 or 10 second ...intervals. Displays the NEXT image - The images on your camera will appear in the Thumbnail View. 2) Use the UP / DOWN / LEFT ...

Camera Manual
Page 56
... While in Photo Capture Mode. NOTE : The actual shape of the camera to START the video capture. 4) You will see a red icon at the scene you to capture videos with your subject up to 4 times using the digital zoom. VIDEO CAPTURE MODE The Video Capture Mode allows you would like ...to capture. 2) Press the T/Zoom Inand W/Zoom Out buttons to access the Video Capture Mode. The following Digital Zoom Indicator appears on the right side of the LCD screen: 3) Press the Shutter button on the top of these buttons may vary per camera model. You can magnify your digital camera.
... While in Photo Capture Mode. NOTE : The actual shape of the camera to START the video capture. 4) You will see a red icon at the scene you to capture videos with your subject up to 4 times using the digital zoom. VIDEO CAPTURE MODE The Video Capture Mode allows you would like ...to capture. 2) Press the T/Zoom Inand W/Zoom Out buttons to access the Video Capture Mode. The following Digital Zoom Indicator appears on the right side of the LCD screen: 3) Press the Shutter button on the top of these buttons may vary per camera model. You can magnify your digital camera.

Camera Manual
Page 57
... well as Quick Function buttons. Quick Function Button Function Scene Selection - Opens the Scene menu Left Light Exposure - VIDEO CAPTURE MODE QUICK FUNCTION BUTTONS Your digital camera has a four-directional pad that functions as previously captured videos ViviLink -
... well as Quick Function buttons. Quick Function Button Function Scene Selection - Opens the Scene menu Left Light Exposure - VIDEO CAPTURE MODE QUICK FUNCTION BUTTONS Your digital camera has a four-directional pad that functions as previously captured videos ViviLink -

Camera Manual
Page 67
... menu. NOTE : After RESETTING to the Factory Default Settings. If you would like to proceed with the digital camera settings set to the default settings, it is selected. Press the SET button to reset the camera to the previous mode. 2) 3) 4) 5) 6) 7) Press the LEFT or RIGHT direction control button to the factory default settings...
... menu. NOTE : After RESETTING to the Factory Default Settings. If you would like to proceed with the digital camera settings set to the default settings, it is selected. Press the SET button to reset the camera to the previous mode. 2) 3) 4) 5) 6) 7) Press the LEFT or RIGHT direction control button to the factory default settings...

Camera Manual
Page 69
...FUNCTION BUTTO NS Your digital camera has a four-directional pad that functions as Quick Function buttons. Quick Function Button Left Function Displays the PREVIOUS image Up STOPS a playing video Right Down Displays the NEXT image ViviLink - Opens the ViviLink for Videos menu 69 The images on your camera will appear in ...can use the direction buttons to scroll and select images from the thumbnails. 1) Press the W/Zoom Out button 2) All the images on your camera will be displayed in a 3 X 3 matrix where you wish to view. 4) Press the SET button to view by using the Thumbnail View.
...FUNCTION BUTTO NS Your digital camera has a four-directional pad that functions as Quick Function buttons. Quick Function Button Left Function Displays the PREVIOUS image Up STOPS a playing video Right Down Displays the NEXT image ViviLink - Opens the ViviLink for Videos menu 69 The images on your camera will appear in ...can use the direction buttons to scroll and select images from the thumbnails. 1) Press the W/Zoom Out button 2) All the images on your camera will be displayed in a 3 X 3 matrix where you wish to view. 4) Press the SET button to view by using the Thumbnail View.

