
Warranty
Page 1
This warranty shall not extend to any defects in this product which result from accident, abuse, misuse, failure to operate the product in accordance with relevant instructions, neglect, immersion in material and workmanship for a period of one ...repair or replace the product at no charge for parts or labor. Limited One Year Warranty Vivitar warrants this quality product to be free of defects in or exposure to chemicals or liquids, extremes of climate, fungus, excessive wear and tear/cosmetic damage and defects resulting from the purchase, use or inability to use this product even if Vivitar...
This warranty shall not extend to any defects in this product which result from accident, abuse, misuse, failure to operate the product in accordance with relevant instructions, neglect, immersion in material and workmanship for a period of one ...repair or replace the product at no charge for parts or labor. Limited One Year Warranty Vivitar warrants this quality product to be free of defects in or exposure to chemicals or liquids, extremes of climate, fungus, excessive wear and tear/cosmetic damage and defects resulting from the purchase, use or inability to use this product even if Vivitar...
Warranty
Page 2
... product will answer your problem. For phone support in the US please call 1-800-592-9541, in package: a) Evidence of date and place of your local toll free number. -2- STEP 2. STEP 3. For more information visit our website www.vivitar.com TECHNICAL SUPPORT support team ...else, please visit www.vivitar.com for your sales receipt). WHAT TO DO WHEN SERVICE IS NEEDED STEP 1. Package the product and relevant accessories carefully, using ample padding materials and a sturdy mailing container to : (in the U.S.): Vivitar Attn: Technical Support 195 Carter Drive Edison NJ...
... product will answer your problem. For phone support in the US please call 1-800-592-9541, in package: a) Evidence of date and place of your local toll free number. -2- STEP 2. STEP 3. For more information visit our website www.vivitar.com TECHNICAL SUPPORT support team ...else, please visit www.vivitar.com for your sales receipt). WHAT TO DO WHEN SERVICE IS NEEDED STEP 1. Package the product and relevant accessories carefully, using ample padding materials and a sturdy mailing container to : (in the U.S.): Vivitar Attn: Technical Support 195 Carter Drive Edison NJ...
Manual
Page 2
.... This warranty shall not extend to any defects in this product which result from accident, abuse, misuse, failure to operate the product in accordance with relevant instructions, neglect, immersion in material and workmanship for parts or labor. Limited One Year Warranty Vivitar warrants this quality product to be free of defects in or exposure to chemicals or liquids...
.... This warranty shall not extend to any defects in this product which result from accident, abuse, misuse, failure to operate the product in accordance with relevant instructions, neglect, immersion in material and workmanship for parts or labor. Limited One Year Warranty Vivitar warrants this quality product to be free of defects in or exposure to chemicals or liquids...
Manual
Page 3
... WHEN SERVICE IS NEEDED STEP 1. In the event the product is a result in the UK call from country and State to call 0800 917 4831. You can nd manuals, software and FAQ's at www.vivitar.com. If you shipping prepaid. c) When possible, a sample evidencing the problem. STEP 3. For more information visit our website www.vivitar.com TECHNICAL SUPPORT...
... WHEN SERVICE IS NEEDED STEP 1. In the event the product is a result in the UK call from country and State to call 0800 917 4831. You can nd manuals, software and FAQ's at www.vivitar.com. If you shipping prepaid. c) When possible, a sample evidencing the problem. STEP 3. For more information visit our website www.vivitar.com TECHNICAL SUPPORT...
Manual
Page 4
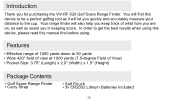
... and accurately measure your distance to get the best results when using this device, please read this manual first before using. Introduction Thank you for purchasing the VIV-RF-520 Golf Score Range Finder. In order to the cup. Features • Effective range of 1000 yards down to 50 yards • Wide 420'' field of view at 1000 yards...
... and accurately measure your distance to get the best results when using this device, please read this manual first before using. Introduction Thank you for purchasing the VIV-RF-520 Golf Score Range Finder. In order to the cup. Features • Effective range of 1000 yards down to 50 yards • Wide 420'' field of view at 1000 yards...
Manual
Page 5
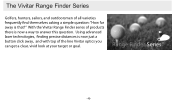
Using advanced button click away, and with top of the line Vivitar optics you can get a clear, vivid look at your target or goal. Range Finder Series™ -4- With the Vivitar Range Finder series of products there is that?" The Vivitar Range Finder Series Golfers, hunters, sailors, and outdoorsmen of all varieties away is now a way to answer this question.
Using advanced button click away, and with top of the line Vivitar optics you can get a clear, vivid look at your target or goal. Range Finder Series™ -4- With the Vivitar Range Finder series of products there is that?" The Vivitar Range Finder Series Golfers, hunters, sailors, and outdoorsmen of all varieties away is now a way to answer this question.
Manual
Page 6
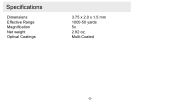
Multi-Coated -5- Specifications Dimensions Effective Range Magnification Net weight Optical Coatings 3.75 x 2.0 x 1.5 mm 1000-50 yards 5x 2.82 oz.
Multi-Coated -5- Specifications Dimensions Effective Range Magnification Net weight Optical Coatings 3.75 x 2.0 x 1.5 mm 1000-50 yards 5x 2.82 oz.

Manual
Page 7
Battery box cover 4. Mode button 7 2. Eyepiece 5. Counter 6. Objective lens 1 3 4 5 6 -6- On/adjust button 3. Counter button 7. A Quick Look at Your Device 2 1.
Battery box cover 4. Mode button 7 2. Eyepiece 5. Counter 6. Objective lens 1 3 4 5 6 -6- On/adjust button 3. Counter button 7. A Quick Look at Your Device 2 1.
Manual
Page 8
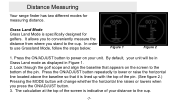
...order to power on the screen to conveniently measure the distance from where you press the ON/ADJUST button. 3. Press the ON/ADJUST button to use Grassland Mode, follow the steps below: Figure 1 Figure 2 1. Press the ON/ADJUST button repeatedly to lower or raise the horizontal line located...2. Look through the golf scope and align the baseline that it is lined up with the top of the pin. Grass Land Mode Grass Land Mode is indicative of the screen is specifically designed for measuring distance. Distance Measuring Your range finder has two different modes for golfers. The ...
...order to power on the screen to conveniently measure the distance from where you press the ON/ADJUST button. 3. Press the ON/ADJUST button to use Grassland Mode, follow the steps below: Figure 1 Figure 2 1. Press the ON/ADJUST button repeatedly to lower or raise the horizontal line located...2. Look through the golf scope and align the baseline that it is lined up with the top of the pin. Grass Land Mode Grass Land Mode is indicative of the screen is specifically designed for measuring distance. Distance Measuring Your range finder has two different modes for golfers. The ...

Manual
Page 9
... to the next digit. 3. Your range finder will be measured in the same units as in Common Mode, follow the steps below: Figure 3 Figure 4 1. Just enter the height of your distance to an object that is not on your device in fgure 4. The distance should be displayed ...your desired target first, and the range finder will calculate the distance between you and the target. The distance will automatically power off after 60 seconds if left idle. -8- Enter the height of the target, the use your unit. Press the ON/ADJUST button to raise or lower the horizontal line...
... to the next digit. 3. Your range finder will be measured in the same units as in Common Mode, follow the steps below: Figure 3 Figure 4 1. Just enter the height of your distance to an object that is not on your device in fgure 4. The distance should be displayed ...your desired target first, and the range finder will calculate the distance between you and the target. The distance will automatically power off after 60 seconds if left idle. -8- Enter the height of the target, the use your unit. Press the ON/ADJUST button to raise or lower the horizontal line...
Manual
Page 10
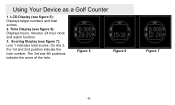
Scoring Display (see figure 5): Displays target numbers and total scores. 2. The 3rd and 4th positions indicate the score of the hole. Figure 5 Figure 6 Figure 7 -9- Using Your Device as a Golf Counter 1. LCD Display (see figure 7): Line 1 indicates total scores. On line 2, the 1st and 2nd position indicate the hole number. Time Display (see figure 6): Displays hours, minutes. 24 hour clock and watch function. 3.
Scoring Display (see figure 5): Displays target numbers and total scores. 2. The 3rd and 4th positions indicate the score of the hole. Figure 5 Figure 6 Figure 7 -9- Using Your Device as a Golf Counter 1. LCD Display (see figure 7): Line 1 indicates total scores. On line 2, the 1st and 2nd position indicate the hole number. Time Display (see figure 6): Displays hours, minutes. 24 hour clock and watch function. 3.

Manual
Page 11
Counter Button Functions MODE Button: switches functions, switches between times and scoring. SET/NEXT Button: Can be used for setting the time UP Button: Used to add 1 to scores and times BACK/CLEAR BUTTON: When pressed and held, will reset all scores ad times to zero. -10-
Counter Button Functions MODE Button: switches functions, switches between times and scoring. SET/NEXT Button: Can be used for setting the time UP Button: Used to add 1 to scores and times BACK/CLEAR BUTTON: When pressed and held, will reset all scores ad times to zero. -10-


