
Warranty
Page 1
During the period, Vivitar will repair or replace the product at no charge for a period of one year from the date of purchase. This warranty shall not extend to any defects in this product which result from accident, ... limitation of incidental or consequential damages, so the above limitation or exclusion may apply to use this product even if Vivitar has been advised of such damages. Limited One Year Warranty Vivitar warrants this quality product to be free of defects in or exposure to chemicals or liquids, extremes of climate, fungus...
During the period, Vivitar will repair or replace the product at no charge for a period of one year from the date of purchase. This warranty shall not extend to any defects in this product which result from accident, ... limitation of incidental or consequential damages, so the above limitation or exclusion may apply to use this product even if Vivitar has been advised of such damages. Limited One Year Warranty Vivitar warrants this quality product to be free of defects in or exposure to chemicals or liquids, extremes of climate, fungus...
Warranty
Page 2
STEP 2. Include in wear and tear, Vivitar may levy a handling charge for the from anywhere else, please visit www.vivitar.com for example, a copy of your sales receipt). In the event the product is a result in package: a) Evidence of date and place of ...original purchase (for your questions. Package the product and relevant accessories carefully, using ample padding materials and a sturdy mailing container to : (in the U.S.): Vivitar Attn: Technical Support 195 Carter Drive Edison NJ 08817 (in the U.K.) Sakar UK 2D Siskin Parkway East CV3 4PE, UK When service is complete, the...
STEP 2. Include in wear and tear, Vivitar may levy a handling charge for the from anywhere else, please visit www.vivitar.com for example, a copy of your sales receipt). In the event the product is a result in package: a) Evidence of date and place of ...original purchase (for your questions. Package the product and relevant accessories carefully, using ample padding materials and a sturdy mailing container to : (in the U.S.): Vivitar Attn: Technical Support 195 Carter Drive Edison NJ 08817 (in the U.K.) Sakar UK 2D Siskin Parkway East CV3 4PE, UK When service is complete, the...
Camera Manual
Page 5
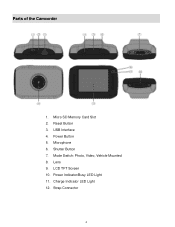
Reset Button 3. Microphone 6. Shutter Button 7. LCD TFT Screen 10. Power Indicator/Busy LED Light 11. Mode Switch: Photo, Video, Vehicle Mounted 8. Parts of the Camcorder 1. Micro SD Memory Card Slot 2. Lens 9. Power Button 5. USB Interface 4. Strap Connector 4 Charge Indicator LED Light 12.
Reset Button 3. Microphone 6. Shutter Button 7. LCD TFT Screen 10. Power Indicator/Busy LED Light 11. Mode Switch: Photo, Video, Vehicle Mounted 8. Parts of the Camcorder 1. Micro SD Memory Card Slot 2. Lens 9. Power Button 5. USB Interface 4. Strap Connector 4 Charge Indicator LED Light 12.
Camera Manual
Page 6
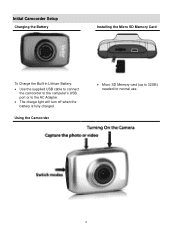
Using the Camcorder Micro SD Memory card (up to the AC Adapter. The charge light will turn off when the battery is fully charged. Initial Camcorder Setup Charging the Battery Installing the Micro SD Memory Card To Charge the Built-in Lithium Battery: Use the supplied USB cable to connect the camcorder to the computer's USB port or to 32GB) needed for normal use. 5
Using the Camcorder Micro SD Memory card (up to the AC Adapter. The charge light will turn off when the battery is fully charged. Initial Camcorder Setup Charging the Battery Installing the Micro SD Memory Card To Charge the Built-in Lithium Battery: Use the supplied USB cable to connect the camcorder to the computer's USB port or to 32GB) needed for normal use. 5
Camera Manual
Page 7
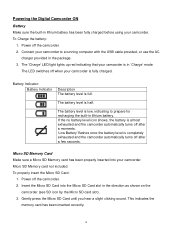
...camcorder is full. Power off the camcorder. 2. Battery Indicator: Battery Indicator Description The battery level is fully charged. The battery level is in lithium battery has been fully charged before using your camcorder is low, indicating to a running computer with the USB cable provided, or use the...camcorder (see SD icon by the Micro SD card slot). 3. Powering the Digital Camcorder ON Battery Make sure the built-in 'Charge' mode. If the no battery level icon shows, the battery is almost exhausted and the camcorder automatically turns off after a few seconds. ...
...camcorder is full. Power off the camcorder. 2. Battery Indicator: Battery Indicator Description The battery level is fully charged. The battery level is in lithium battery has been fully charged before using your camcorder is low, indicating to a running computer with the USB cable provided, or use the...camcorder (see SD icon by the Micro SD card slot). 3. Powering the Digital Camcorder ON Battery Make sure the built-in 'Charge' mode. If the no battery level icon shows, the battery is almost exhausted and the camcorder automatically turns off after a few seconds. ...

Camera Manual
Page 27
... in material or workmanship will be repaired at the store where purchased 26 Do not use , including but limited to the Refund Counter at no charge for parts or labor for service, your camcorder with care to heat sources.
... in material or workmanship will be repaired at the store where purchased 26 Do not use , including but limited to the Refund Counter at no charge for parts or labor for service, your camcorder with care to heat sources.


