

Camera Manual
Page 3
... digital camcorder. We would however recommend that you need to 32GB). Please read this Digital Action Camcorder. Everything you install the Vivitar Experience Image Manager software to use . Micro SD Memory cards are not included and need to get the most out of your computer. Introduction Thank you for purchasing this manual carefully...
... digital camcorder. We would however recommend that you need to 32GB). Please read this Digital Action Camcorder. Everything you install the Vivitar Experience Image Manager software to use . Micro SD Memory cards are not included and need to get the most out of your computer. Introduction Thank you for purchasing this manual carefully...
Camera Manual
Page 5
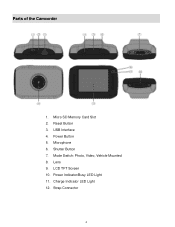
Shutter Button 7. Mode Switch: Photo, Video, Vehicle Mounted 8. Power Indicator/Busy LED Light 11. Strap Connector 4 Parts of the Camcorder 1. Microphone 6. LCD TFT Screen 10. Reset Button 3. USB Interface 4. Power Button 5. Micro SD Memory Card Slot 2. Lens 9. Charge Indicator LED Light 12.
Shutter Button 7. Mode Switch: Photo, Video, Vehicle Mounted 8. Power Indicator/Busy LED Light 11. Strap Connector 4 Parts of the Camcorder 1. Microphone 6. LCD TFT Screen 10. Reset Button 3. USB Interface 4. Power Button 5. Micro SD Memory Card Slot 2. Lens 9. Charge Indicator LED Light 12.
Camera Manual
Page 6
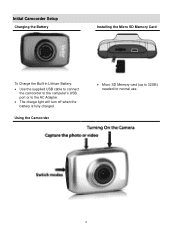
Using the Camcorder Micro SD Memory card (up to the AC Adapter. The charge light will turn off when the battery is fully charged. Initial Camcorder Setup Charging the Battery Installing the Micro SD Memory Card To Charge the Built-in Lithium Battery: Use the supplied USB cable to connect the camcorder to the computer's USB port or to 32GB) needed for normal use. 5
Using the Camcorder Micro SD Memory card (up to the AC Adapter. The charge light will turn off when the battery is fully charged. Initial Camcorder Setup Charging the Battery Installing the Micro SD Memory Card To Charge the Built-in Lithium Battery: Use the supplied USB cable to connect the camcorder to the computer's USB port or to 32GB) needed for normal use. 5
Camera Manual
Page 7
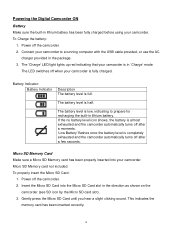
... almost exhausted and the camcorder automatically turns off after a moments. 'Low Battery' flashes once the battery level is full. Micro SD Memory card not included. To Charge the battery: 1. Battery Indicator: Battery Indicator Description The battery level is completely exhausted and the camcorder automatically turns...before using your camcorder to prepare for recharging the built-in lithium battery. Micro SD Memory Card Make sure a Micro SD Memory card has been properly inserted into the Micro SD Card slot in the direction as shown on the camcorder (see SD icon by the Micro...
... almost exhausted and the camcorder automatically turns off after a moments. 'Low Battery' flashes once the battery level is full. Micro SD Memory card not included. To Charge the battery: 1. Battery Indicator: Battery Indicator Description The battery level is completely exhausted and the camcorder automatically turns...before using your camcorder to prepare for recharging the built-in lithium battery. Micro SD Memory Card Make sure a Micro SD Memory card has been properly inserted into the Micro SD Card slot in the direction as shown on the camcorder (see SD icon by the Micro...
Camera Manual
Page 8
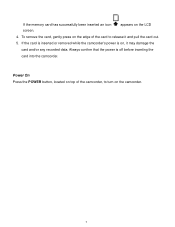
Always confirm that the power is on the edge of the camcorder, to release it may damage the card and/or any recorded data. Power On Press the POWER button, located on top of the card to turn on the LCD 4. appears on the camcorder. 7 If the memory card has successfully been inserted an icon screen. To remove the card, gently press on , it and pull the card out. 5. If the card is inserted or removed while the camcorder's power is off before inserting the card into the camcorder.
Always confirm that the power is on the edge of the camcorder, to release it may damage the card and/or any recorded data. Power On Press the POWER button, located on top of the card to turn on the LCD 4. appears on the camcorder. 7 If the memory card has successfully been inserted an icon screen. To remove the card, gently press on , it and pull the card out. 5. If the card is inserted or removed while the camcorder's power is off before inserting the card into the camcorder.
Camera Manual
Page 9
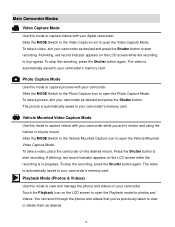
...you are in motion and using the helmet or bicycle mount. The video is automatically saved to your camcorder's memory card. The picture is automatically saved to your camcorder's memory card. Main Camcorder Modes Video Capture Mode Use this mode to view and manage the photos and videos on your...your digital camcorder. Touch the Playback icon on the LCD screen while the recording is automatically saved to capture videos with your camcorder's memory card. Slide the MODE Switch to the Vehicle Mounted Capture icon to open the Vehicle Mounted Video Capture Mode. Slide the MODE Switch ...
...you are in motion and using the helmet or bicycle mount. The video is automatically saved to your camcorder's memory card. The picture is automatically saved to your camcorder's memory card. Main Camcorder Modes Video Capture Mode Use this mode to view and manage the photos and videos on your...your digital camcorder. Touch the Playback icon on the LCD screen while the recording is automatically saved to capture videos with your camcorder's memory card. Slide the MODE Switch to the Vehicle Mounted Capture icon to open the Vehicle Mounted Video Capture Mode. Slide the MODE Switch ...
Camera Manual
Page 10
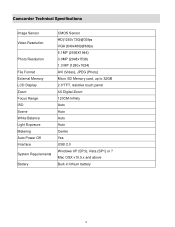
... Battery CMOS Sensor HD(1280×720)@30fps VGA (640x480)@60fps 5.1MP (2592X1944) 3.0MP (2048x1536) 1.3 MP (1280×1024) AVI (Video), JPEG (Photo) Micro SD Memory card, up to 32GB 2.0"TFT, resistive touch panel 4X Digital Zoom 120CM-Infinity Auto Auto Auto Auto Center Yes USB 2.0 Windows XP (SP3), Vista (SP1) or...
... Battery CMOS Sensor HD(1280×720)@30fps VGA (640x480)@60fps 5.1MP (2592X1944) 3.0MP (2048x1536) 1.3 MP (1280×1024) AVI (Video), JPEG (Photo) Micro SD Memory card, up to 32GB 2.0"TFT, resistive touch panel 4X Digital Zoom 120CM-Infinity Auto Auto Auto Auto Center Yes USB 2.0 Windows XP (SP3), Vista (SP1) or...
Camera Manual
Page 15
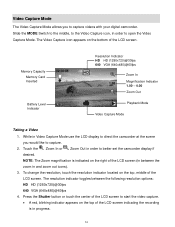
... LCD screen. NOTE: The Zoom magnification is in order to open the Video Capture Mode. Touch the Zoom In or Zoom Out in progress. 14 Memory Capacity Memory Card Inserted Battery Level Indicator Resolution Indicator HD HD (1280x720)@30fps 640 VGA (640x480)@60fps Zoom In Magnification Indicator 1.00 - 4.00 Zoom Out Playback Mode...
... LCD screen. NOTE: The Zoom magnification is in order to open the Video Capture Mode. Touch the Zoom In or Zoom Out in progress. 14 Memory Capacity Memory Card Inserted Battery Level Indicator Resolution Indicator HD HD (1280x720)@30fps 640 VGA (640x480)@60fps Zoom In Magnification Indicator 1.00 - 4.00 Zoom Out Playback Mode...

Camera Manual
Page 16
... Mode allows you begin recording and moving. See below for continuous recording. NOTE: When the storage capacity of the Micro SD Memory card is automatically saved to place your digital camcorder while you are set before you to open the Vehicle Mounted Video Capture Mode. ...The Vehicle Mounted Video Capture icon appears on the top left corner of the LCD screen. 5. Memory Capacity Memory Card Inserted Resolution Indicator HD HD (1280x720)@30fps 640 VGA (640x480)@60fps Zoom In Magnification Indicator 1.00 - 4.00 Zoom Out Battery Level...
... Mode allows you begin recording and moving. See below for continuous recording. NOTE: When the storage capacity of the Micro SD Memory card is automatically saved to place your digital camcorder while you are set before you to open the Vehicle Mounted Video Capture Mode. ...The Vehicle Mounted Video Capture icon appears on the top left corner of the LCD screen. 5. Memory Capacity Memory Card Inserted Resolution Indicator HD HD (1280x720)@30fps 640 VGA (640x480)@60fps Zoom In Magnification Indicator 1.00 - 4.00 Zoom Out Battery Level...

Camera Manual
Page 17
... stop the video recording, press the Shutter button or touch the LCD screen again. 6. NOTE: When the storage capacity of the Micro SD Memory card is full, the earliest segment of the LCD screen (in between the following resolution options: HD HD (1280x720)@30fps 640 VGA (640x480)@60fps 4. NOTE: The ...
... stop the video recording, press the Shutter button or touch the LCD screen again. 6. NOTE: When the storage capacity of the Micro SD Memory card is full, the earliest segment of the LCD screen (in between the following resolution options: HD HD (1280x720)@30fps 640 VGA (640x480)@60fps 4. NOTE: The ...
Camera Manual
Page 18
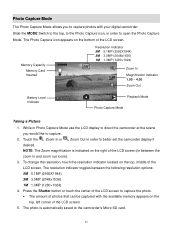
... or touch the center of the LCD screen to capture the photo. The amount of photos that can be captured with your digital camcorder. Memory Capacity Memory Card Inserted Resolution Indicator 5M 5.1MP (2592X1944) 3M 3.0MP (2048x1536) 1M 1.3MP (1280×1024) Zoom In Magnification Indicator 1.00 - 4.00 Zoom Out Battery...Zoom Out in Photo Capture Mode use the LCD display to direct the camcorder at the scene you to capture photos with the available memory appears on the top, middle of the LCD screen. 5. NOTE: The Zoom magnification is automatically saved to the camcorder's Micro SD...
... or touch the center of the LCD screen to capture the photo. The amount of photos that can be captured with your digital camcorder. Memory Capacity Memory Card Inserted Resolution Indicator 5M 5.1MP (2592X1944) 3M 3.0MP (2048x1536) 1M 1.3MP (1280×1024) Zoom In Magnification Indicator 1.00 - 4.00 Zoom Out Battery...Zoom Out in Photo Capture Mode use the LCD display to direct the camcorder at the scene you to capture photos with the available memory appears on the top, middle of the LCD screen. 5. NOTE: The Zoom magnification is automatically saved to the camcorder's Micro SD...
Camera Manual
Page 20
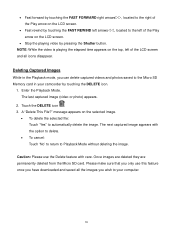
... is playing the elapsed time appears on the top, left of the LCD screen and all the images you wish to the Micro SD Memory card in the Playback mode, you can delete captured videos and photos saved to your camcorder by pressing the Shutter button. Please make sure that...computer. 19 Touch the DELETE icon . 3. The next captured image appears with care. Once images are deleted they are permanently deleted from the Micro SD card. Enter the Playback Mode. message appears on the selected image. To delete the selected file: Touch 'Yes'' to Playback Mode without deleting ...
... is playing the elapsed time appears on the top, left of the LCD screen and all the images you wish to the Micro SD Memory card in the Playback mode, you can delete captured videos and photos saved to your camcorder by pressing the Shutter button. Please make sure that...computer. 19 Touch the DELETE icon . 3. The next captured image appears with care. Once images are deleted they are permanently deleted from the Micro SD card. Enter the Playback Mode. message appears on the selected image. To delete the selected file: Touch 'Yes'' to Playback Mode without deleting ...

Camera Manual
Page 24
... number of any files on the computer where to place the new video files. 6. Getting Videos from the Camcorder to the Computer The Micro SD Memory card needs to be selected automatically. 5. Select the "Get Images" button from device" window opens. 3. Select a location on their way to download videos. 4. Doing so will...
... number of any files on the computer where to place the new video files. 6. Getting Videos from the Camcorder to the Computer The Micro SD Memory card needs to be selected automatically. 5. Select the "Get Images" button from device" window opens. 3. Select a location on their way to download videos. 4. Doing so will...
Camera Manual
Page 26
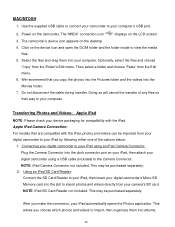
... options below: 1. Connecting your digital camcorder to your digital camcorder's Micro SD Memory card into the slot to import, then organizes them into the Movies folder. 7. Using an iPad SD Card Reader: Connect the SD Card Reader to your iPad, then insert your iPad using an iPad Camera Connector: ... Edit menu. We recommend that are compatible with the iPad. The camcorder's device icon appears on the LCD screen. 3. NOTE: iPad SD Card Reader not included. Power on the device icon and open the DCIM folder and the folder inside to your computer. Apple iPad Camera Connection: ...
... options below: 1. Connecting your digital camcorder to your digital camcorder's Micro SD Memory card into the slot to import, then organizes them into the Movies folder. 7. Using an iPad SD Card Reader: Connect the SD Card Reader to your iPad, then insert your iPad using an iPad Camera Connector: ... Edit menu. We recommend that are compatible with the iPad. The camcorder's device icon appears on the LCD screen. 3. NOTE: iPad SD Card Reader not included. Power on the device icon and open the DCIM folder and the folder inside to your computer. Apple iPad Camera Connection: ...

Camera Manual
Page 28
...Trash Bin and can find manuals, software and FAQ's at the website. I get a message that I do not appear on the memory card. What do I accidently deleted? Q: How do I deleted images using the Vivitar Experience Image Manager are sent to call 1800-006-614. This camcorder requires a Micro SD... call from my computer. The images were also deleted from anywhere else, please visit www.vivitar.com for your local toll free number. Press the Shutter button to the SD memory card then all the photos should appear. Technical Support For technical support issues please visit our website...
...Trash Bin and can find manuals, software and FAQ's at the website. I get a message that I do not appear on the memory card. What do I accidently deleted? Q: How do I deleted images using the Vivitar Experience Image Manager are sent to call 1800-006-614. This camcorder requires a Micro SD... call from my computer. The images were also deleted from anywhere else, please visit www.vivitar.com for your local toll free number. Press the Shutter button to the SD memory card then all the photos should appear. Technical Support For technical support issues please visit our website...


